My Final Project
What does it do?
Since the beginning of the year 2023, I am working in the field of quantum sensor technology. The goal of our Quantum Technology FabLab working group https://www.qufablab.de/de/ and our cooperation partners is to construct inexpensive quantum sensors, which can be used for education, research and as industrial sensors. These sensors can be used to measure very fine magnetic fields, for example. For the measurement, a green laser is directed onto a very small diamond with NV centres. In a NV centre, one of the carbon atoms in the diamond crystal lattice is exchanged for a nitrogen atom and a carbon atom adjacent to the nitrogen atom is missing. This causes the diamond to glow red, when irradiated with green light. The intensity of the glow depends, among other things, on surrounding magnetic fields. The stronger the magnetic fields near the diamond, the weaker the glow. To build such a quantum sensor, it is necessary to align a suitable diamond very precisely in the beam path of the laser. For this purpose, I constructed a very accurate motorized xy-table using a reliant mechanism. This table can also be used to measure magnetic fields in 2D using the quantum sensor or to build a scanning laser microscope and much more. I decided to build the xy-table by using a reliant mechanism, since it combines the x and y motion in one layer.
Who’s done what beforehand?
The idea of this kind of quantum sensors is already published:
Jan Stegemann et al 2023 Eur. J. Phys. 44 035402
https://iopscience.iop.org/article/10.1088/1361-6404/acbe7c
The cube-system with which the quantum sensors are build was designed by Lana Hagenauer - a former FabAcademy student:
http://fabacademy.org/2020/labs/bottrop/students/lena-hagenauer/index.html
What did you design?
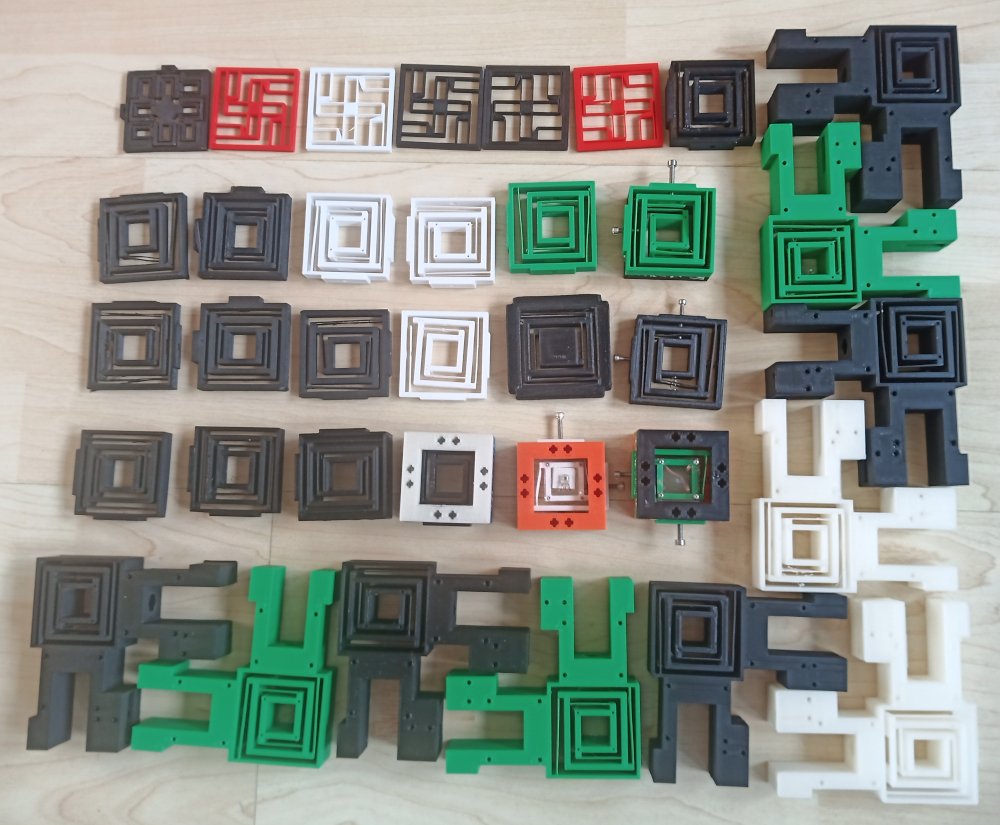
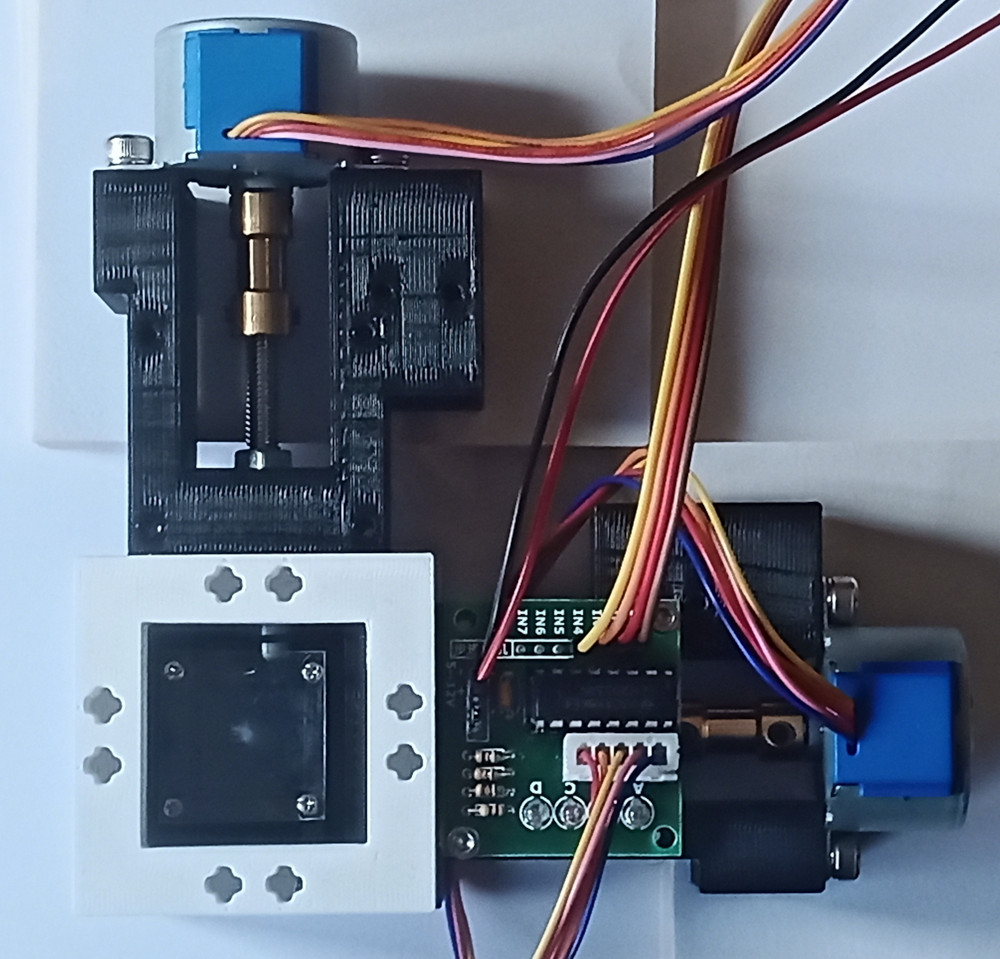
To design a reliant mechanism I tried out serveral geometries (see image below) and finaly desigened my own one. The reliant part ot the mechanism is only one 3D path (0.38 mm) thick, so this seems to be the smallest geometry for a reliant mechanism, which can be printed with a FDM 3D printer. The reliant mechanism is 48x48 mm large and has a compatible lare radius of movement of 5x5 mm. I use this mechanism twice in my setup. Once to move the diamond in the focus of the laser, and once to move the photodiode in the focus of the second lens. The first motorized reliant mechanism is powered by two 28byj-48 stepper motors. The shafs are coupled to headless M5 screws. These are threaded in hexagonal long nuts. The long nuts reach in hexagonal holes in the reliant mechanism. This prevents the long nut from turning, so it is forced to move forwards or backwards, when the stepper motor is turning.
Here you can see most of my 3d prints of the reliant mechanism in my journey to optimise it:
And here you can see the final reliant mechanism. One stepper motor driver is attached, the other not to show the mechanism of the linear guidance. Later I attached the drivers to the back side of the reliant mechanmis.
In the square-shaped middel of the reliant mechanism a transparent pcb foil with NV-diamands is located. The dimonds are glued to the foil using superglue. The foil is attached to the reliant mechanism with tiny glasses and watch screws. The reliant mechanism moves the diamonds in x- and y- direction in a serpentine-like movement. Acutally the stepper motor for the x-axis makes 10 steps, than the motor for the y-axis makes one step and the motor for the x-axis makes 10 steps back. This process is done till the reliant mechanism moved to 100 different positions. At every position the fluorescent intensity of the diamonds will be measured. By this procedure a adjustment of the diamand to the laser can be found. Later I will try to programm another algorithms, with which a good adjustment can be found faster. The 28byj-48 stepper motors have a high translation of 4096 steps per revolution, which is good for accurateness, but the process to move to 100 positions needs about 8 minutes. Presumably the best way to find the highest fluorescence is to control the stepper motors by hand using rotary encoder.
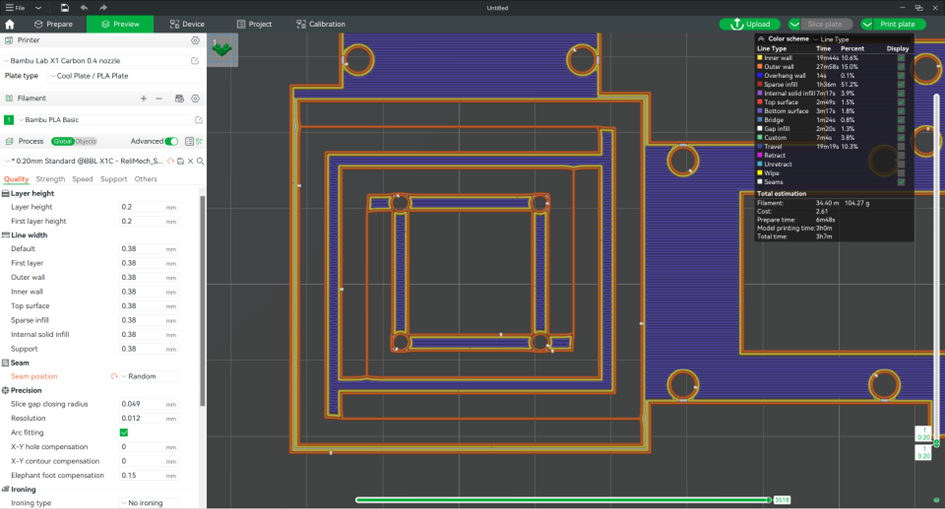
I optimised the reliant mechanism to print it on a bambu 3d printer. For other pinters you probalby need to adjust the geometry. It is important, that the flexible parts of the mechanism are securly attached to the rest of the mechanism. This is the case, when the printer does not start the extrusion at one of the ends of the flexible parts of the reliant mechanis, but earlier. In the following image you can see, that the white points (start and end points of the extrusion) are not located at the ends of the flexible parts:
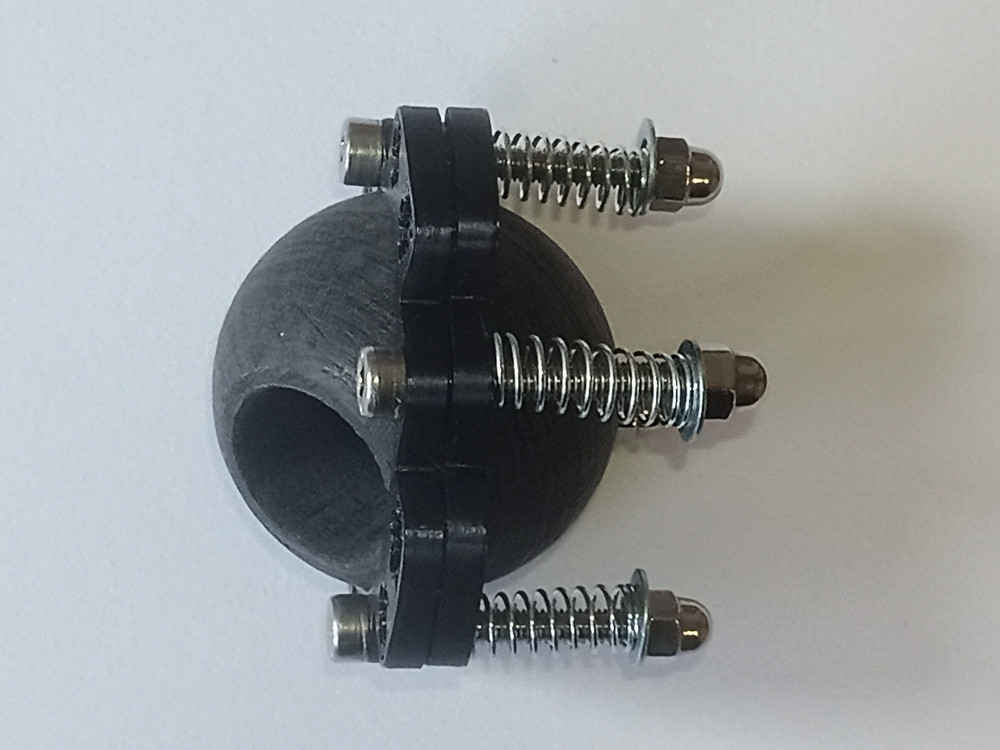
Further, I designed a planitary holder for a green laser to adjust the laser beam to the middle of the reliant mechanism. The two holder, which hold the ball in the middle in place, are fixed with 4 screws and springs, which allow to rotate the laser in the holder.
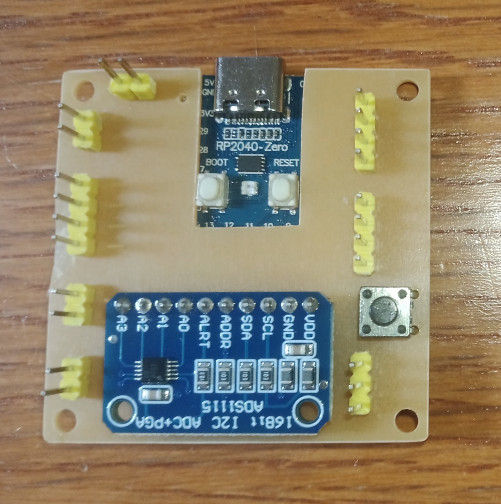
I desigened the pcb for my final project using EasyEDA. I used a RP2040-Zero microcontroller, because I needed several pins and wanted to fit the pcbs to the size of the cubes with 48x48 mm. This was not the best choise, because many Arduino libraries are not compatible to this microcontroller. So I had to try out several libraries to get things to work.
Then I milled the pcb with our LPKF-mill. The following image shows the main pcb with the surface mounted RP2040-Zero.
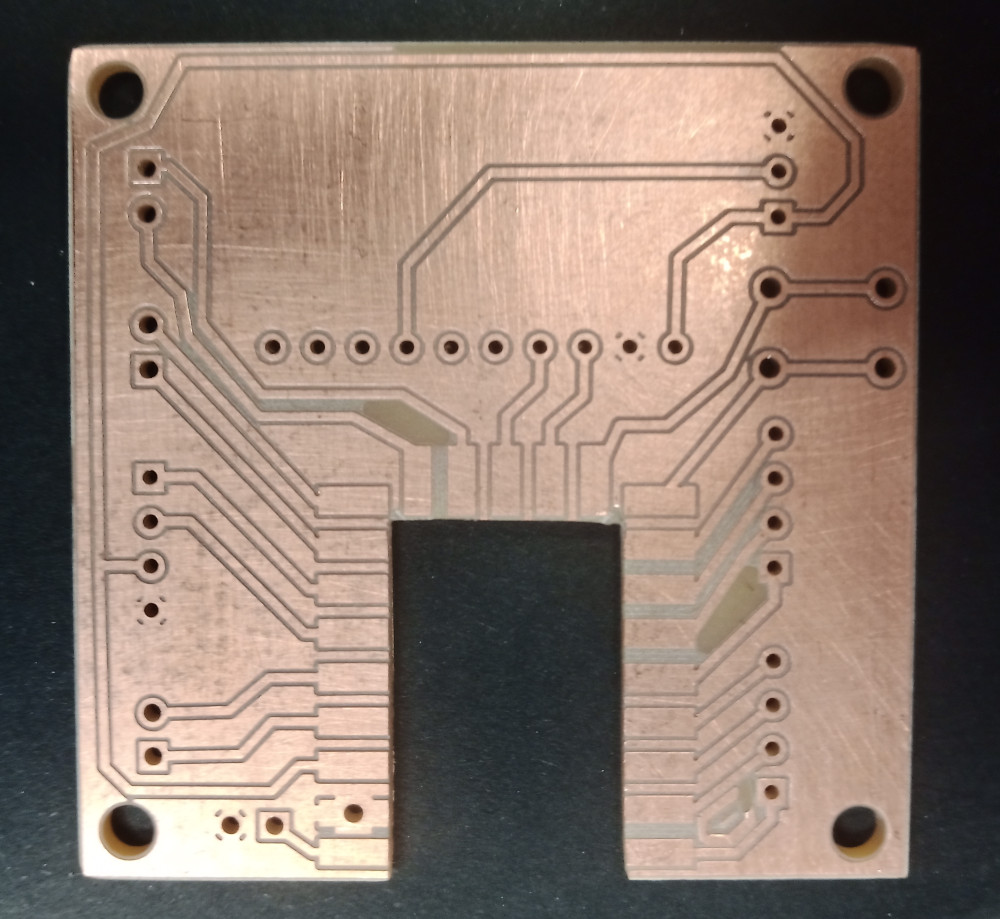
Here you see the pcb mounted from top:
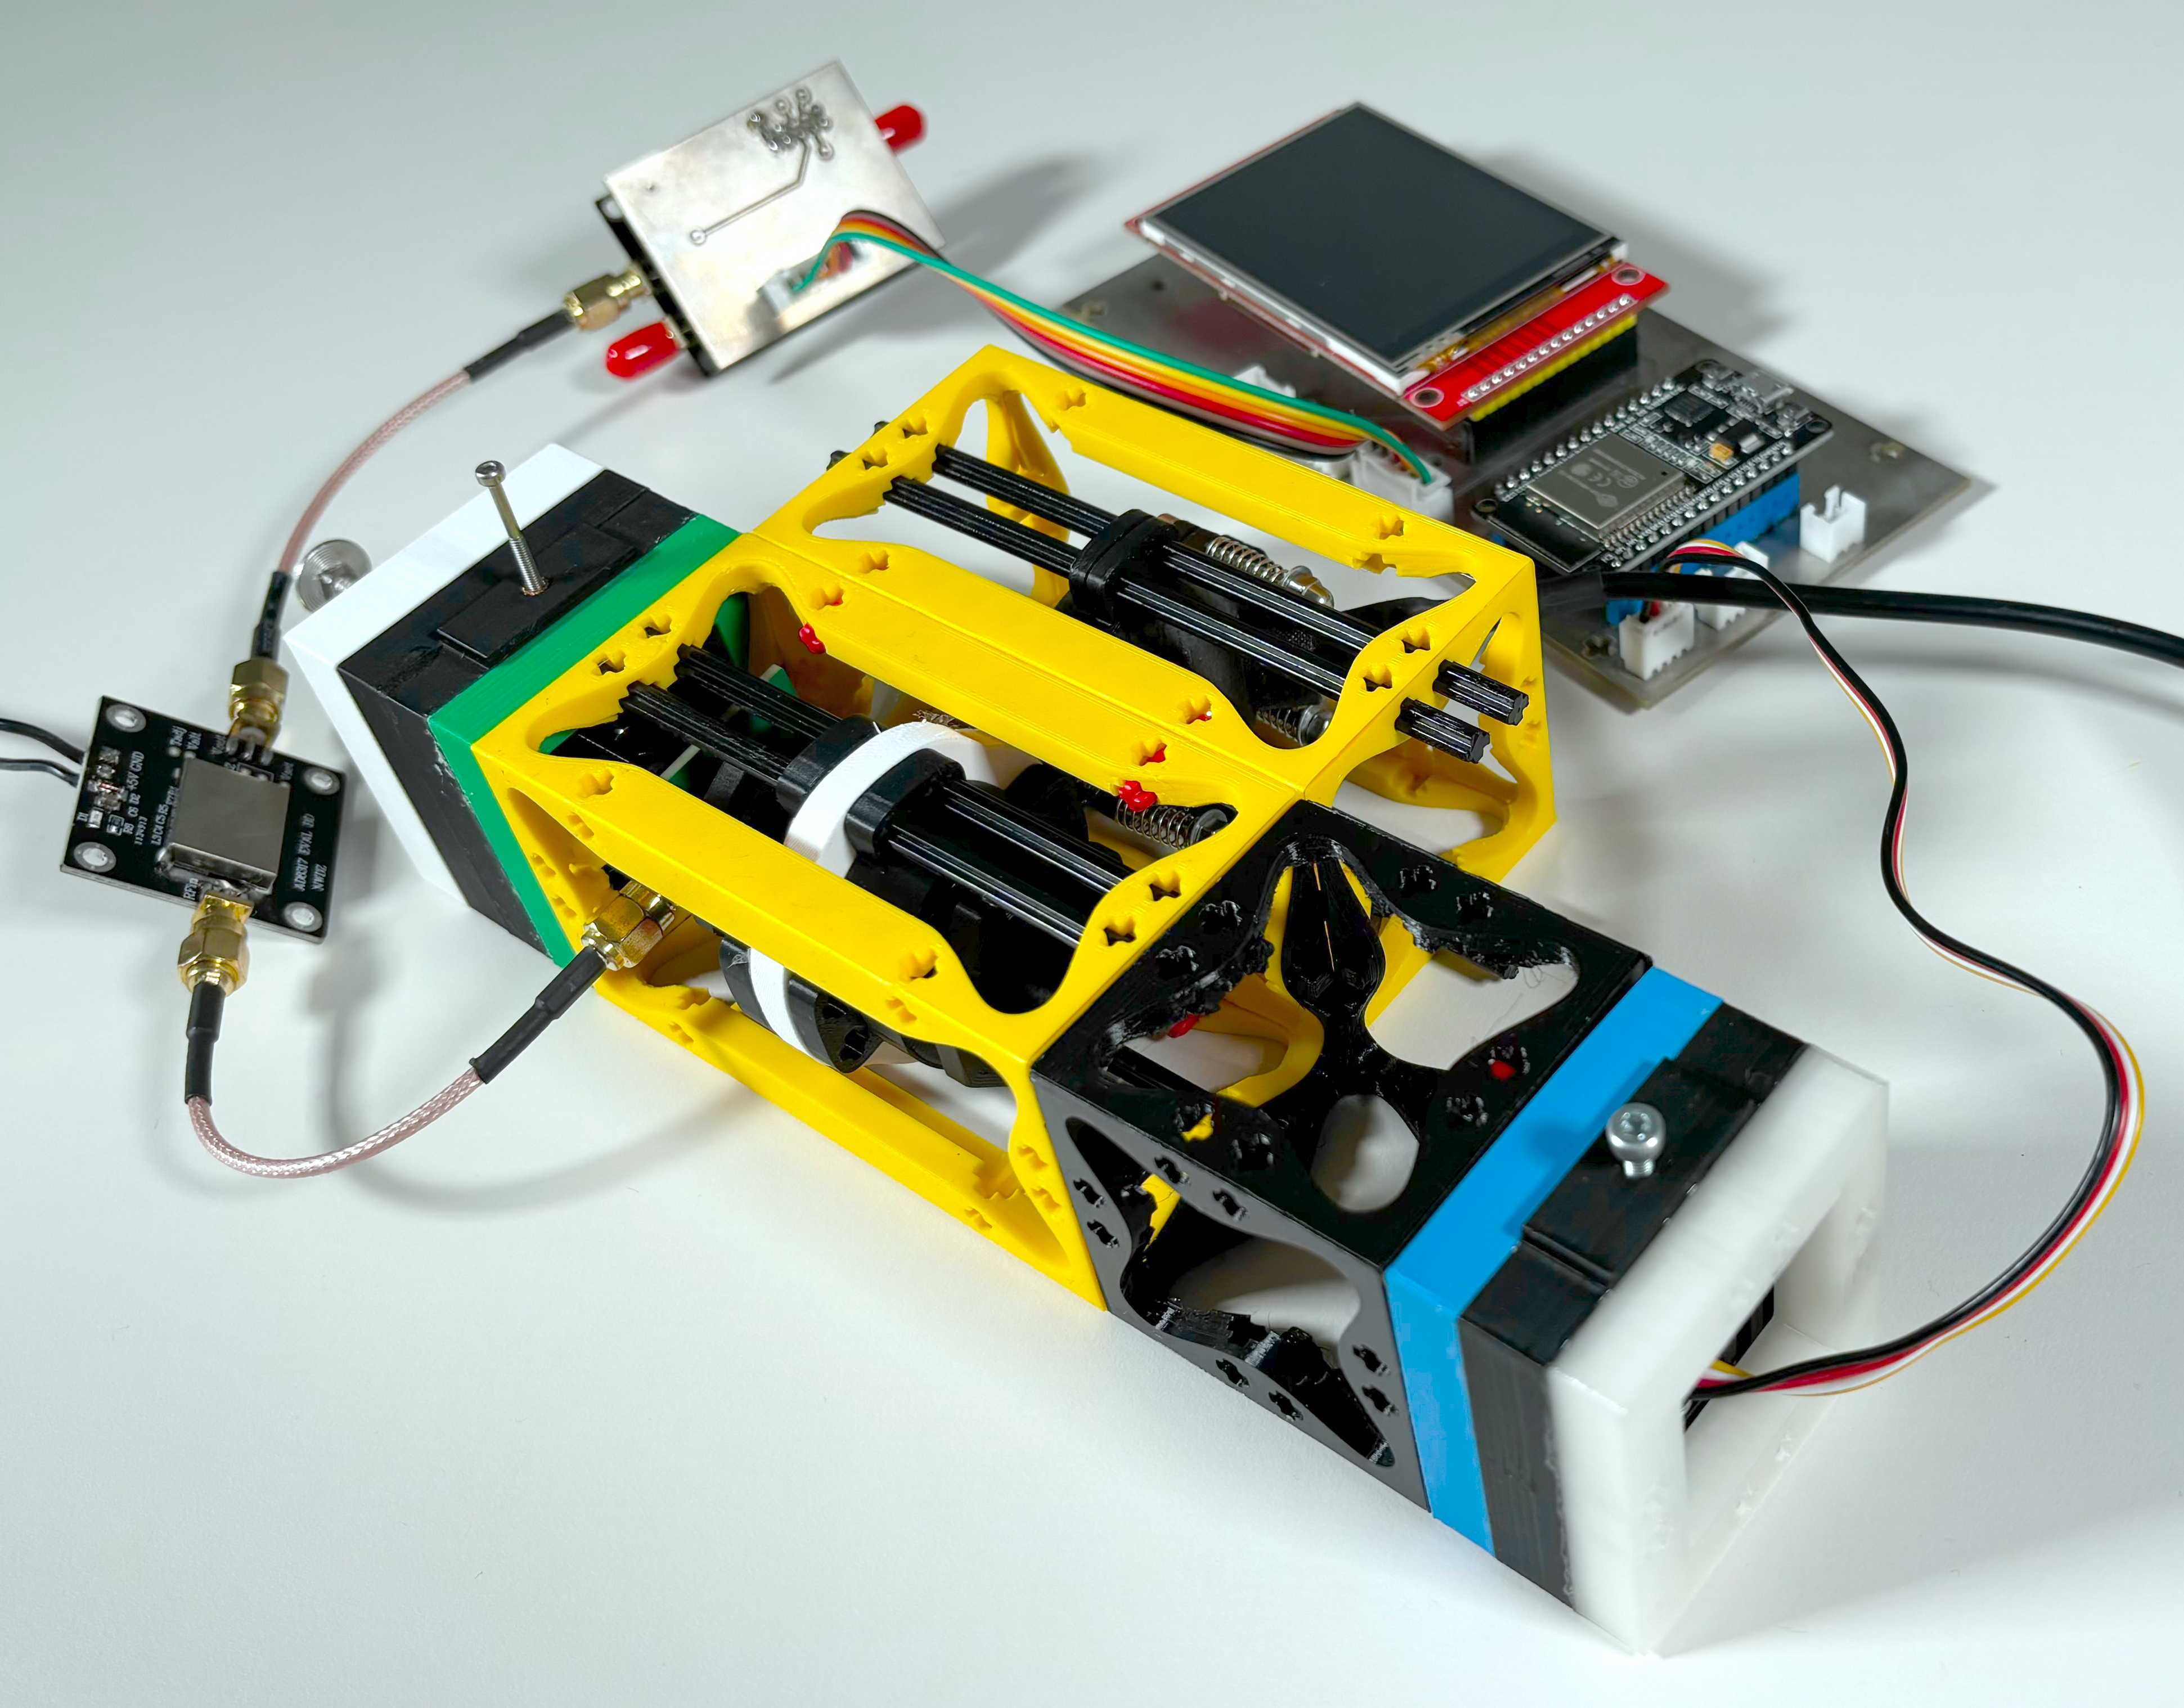
ODMR sensor with microwave excitation
By irradiating the diamond with microwaves, the sensitivity of the quantum sensor can be significantly increased. Information on the basic functionality of the magnetic quantum sensor can be found on the following website: https://qufablab.de/ (in German). Below you can see the ODMR setup with the possibility of irradiating the diamond with microwaves:
In the following video you see the assembly of the ODMR-sensor with microwave excitation:
Video recorded and edited by Theresa Knispel.
Downloads
The following files you can use under the Creative Commons-Licence: CC BY-ND 4.0
Please cite: © Dr. Michael Bennemann
G-code motorized Reliant mechanism
G-code hand driven Reliant Mechanism
endarkenment 48x48 mm with holes
96x48x48 mm cube © Lena Hangenauer & Dr. Michael Bennemann
red filter mount © Lena Hangenauer
Arduino Code (photosensor and display) for XiaoEsp32S3
PCB files for the microstripline and the OPT101 photosensor
All 3D geometries were designed by myself except for the magnet mount and the red filter mount, which had been designed earlier (see copyrights above). Also a 48x48x48 mm large version of the cube has been designed earlier in the Morph3Dbot project - the final FabAcademy project of Lena Hagenauer.
What materials and components were used, where did they come from and how much did they cost?
Materials
| Qty | Description | Price | Link |
|---|---|---|---|
| 1 | diamonds with NV-centres (MDNV150umHi30mg) | $382 plus shipping, handling fee and duty | https://www.adamasnano.com/fluorescent-agents/ |
| 4 | linear drive (not used) | 9.16 € | https://de.aliexpress.com/item/4000406385009.html?spm=a2g0o.order_list.order_list_main.83.47fb5c5fwgcCt6&gatewayAdapt=glo2deu |
| 2 | xy-table (not used) | 2.35 € | https://de.aliexpress.com/item/32972295033.html?spm=a2g0o.order_list.order_list_main.142.47fb5c5fwgcCt6&gatewayAdapt=glo2deu |
| 1 | USB-C Port | 0.29 € | https://de.aliexpress.com/item/1005005747511572.html?spm=a2g0o.order_list.order_list_main.12.4b465c5fjtiCqZ&gatewayAdapt=glo2deu |
| 2 | limit switch | 1.15 € each | https://de.aliexpress.com/item/1005003536527857.html?spm=a2g0o.order_list.order_list_main.49.4b465c5fjtiCqZ&gatewayAdapt=glo2deu |
| 1 | photosensor | 2.30€ | https://de.aliexpress.com/item/1005004743918321.html?spm=a2g0o.order_list.order_list_main.55.4b465c5fjtiCqZ&gatewayAdapt=glo2deu |
| 2 | springs (0.4mm, 6mm, 20mm) | 2.35€ | https://de.aliexpress.com/item/1005003389383775.html?spm=a2g0o.order_detail.order_detail_item.19.4a8e6368wjTpws&gatewayAdapt=glo2deu |
| 1 | RP2040-Zero | 2.41€ | https://de.aliexpress.com/item/1005004389234434.html?spm=a2g0o.order_list.order_list_main.75.4b465c5fjtiCqZ&gatewayAdapt=glo2deu |
| 1 | step down converter (3V) | 2.35€ | https://de.aliexpress.com/item/32810850343.html?spm=a2g0o.order_list.order_list_main.92.4b465c5fjtiCqZ&gatewayAdapt=glo2deu |
| 4 | lego rod (U20-1x32 10PCS) | 3.34€ | https://de.aliexpress.com/item/1005003224783056.html?spm=a2g0o.order_list.order_list_main.96.4b465c5fjtiCqZ&gatewayAdapt=glo2deu |
| 2 | coupler (5mm-5mm) | 0.26 € each | https://de.aliexpress.com/item/1005003808341565.html?spm=a2g0o.order_list.order_list_main.250.4b465c5fjtiCqZ&gatewayAdapt=glo2deu |
| 1 | display | 15.99 € for 3 | https://www.amazon.de/gp/product/B074N9VLZX/ref=ppx_yo_dt_b_search_asin_title?ie=UTF8&th=1 |
| 2 | long nut (20X M5x30) | 6.29 € | https://www.amazon.de/dp/B081M2GFHV?psc=1&ref=ppx_yo2ov_dt_b_product_details |
| 2 | headless screw (M5x40 - (10 Stück)) | 3.65 € | https://www.amazon.de/dp/B077XRMBRR?ref=ppx_yo2ov_dt_b_product_details&th=1 |
| 1 | glue | 19.99 for 3 | https://www.amazon.de/Alleskleber-MaxRepair-transp-UHU-ExtremKleber/dp/B01481O9KS/ref=sr_1_6?crid=2PJPNPD17SOD9&keywords=uhu+max+repair+extreme&qid=1699734506&sprefix=uhu+max%2Caps%2C89&sr=8-6 |
| 1 | laser (532 nm, 1 mW) | 37.20 € | http://www.roithner-laser.com/laser_modules_dot_532.html |
| 2 | stepper motor | 1.72 € | https://de.aliexpress.com/item/32714267741.html?spm=a2g0o.order_list.order_list_main.464.4b465c5fjtiCqZ&gatewayAdapt=glo2deu |
| 1 | red filter | 6.99 € | https://www.amazon.de/DECARETA-Farbfolien-Farbfilter-Transparente-Fotografie/dp/B0C5J4NR2N/ref=dp_prsubs_sccl_1/261-7272380-4118516?pd_rd_w=jCf6W&content-id=amzn1.sym.760655e3-a281-472e-9463-2bddd33448c0&pf_rd_p=760655e3-a281-472e-9463-2bddd33448c0&pf_rd_r=SYP9KZ21XA2SEC54FSNT&pd_rd_wg=8iwKn&pd_rd_r=4804762a-0d80-4a20-827c-58e1e7913f0e&pd_rd_i=B0C5J4NR2N&psc=1 |
| 1 | melt-in thread (length 12mm, 25pcs M4 (OD 7mm) | 4.03 € | https://de.aliexpress.com/item/4000585933306.html?spm=a2g0o.order_list.order_list_main.587.31335c5fTMRGOq&gatewayAdapt=glo2deu |
| 1 | lenses for VR glasses (25 mm) | 4.57 € | https://www.amazon.de/FASOLI-Linsenf%C3%B6rmige-bikonvexe-Acryllinse-virtuelle/dp/B0C4YBV5LB/ref=sr_1_6?__mk_de_DE=%C3%85M%C3%85%C5%BD%C3%95%C3%91&crid=244SRRIOSBBA3&keywords=linsen+f%C3%BCr+vr+brille+25mm&qid=1699782818&sprefix=linsen+f%C3%BCr+vr+brille+25mm%2Caps%2C73&sr=8-6 |
| 8 | glasses and watch screws | 5.07 € | https://de.aliexpress.com/item/1005004744859993.html?spm=a2g0o.productlist.main.3.241647eezmuCbl&algo_pvid=5f1e3e54-811e-4154-8b9c-f6b43f4b94a8&algo_exp_id=5f1e3e54-811e-4154-8b9c-f6b43f4b94a8-1&pdp_npi=4%40dis%21EUR%2110.35%215.07%21%21%2110.79%21%21%402103893b16997982535002854e4abc%2112000030317297163%21sea%21DE%212600609762%21&curPageLogUid=407OJVKXV6uV |
| Components for the ODMR-sensor with microwave generator: | |||
| 1 | ADF4351 HF-signal source | 30.99 € | https://www.amazon.de/gp/product/B07RQSVVCJ/ref=ppx_yo_dt_b_asin_title_o00_s00?ie=UTF8&psc=1 |
| 1 | Akozon Logarithmic Detector AD8317 1M-10GHz 60dB | 15.43 € | https://www.amazon.de/gp/product/B07HG7STHT/ref=ppx_yo_dt_b_asin_title_o03_s00?ie=UTF8&psc=1 |
| 1 | SMA to BNC adapter (connection to oscilloscope) | 8.99 € | https://www.amazon.de/gp/product/B07RQSPZNK/ref=ppx_yo_dt_b_asin_title_o04_s00?ie=UTF8&psc=1 |
| 1 | alternative link: SMA to BNC adapter (connection to oscilloscope) | 7.98 € | https://www.amazon.de/gp/product/B08K37QVWC/ref=ppx_yo_dt_b_asin_image_o02_s00?ie=UTF8&th=1 |
| 1 | wire with SMA connector to SMA connetor | 1.57 € | https://de.aliexpress.com/item/4000245307369.html?spm=a2g0o.order_list.order_list_main.63.5fe65c5f6aqJcz&gatewayAdapt=glo2deu |
| 1 | 2,8 Zoll 3,3 V 300mA TFT LCD Schild Touch Display Modul | 9.91 € | https://de.aliexpress.com/item/32905829057.html?spm=a2g0o.order_list.order_list_main.133.5fe65c5f6aqJcz&gatewayAdapt=glo2deu |
| 1 | Xiao Esp32 S3 | 7.49 € | https://www.seeedstudio.com/XIAO-ESP32S3-p-5627.html |
| 1 | Esp32 TYPE-C 38PIN | 7.73 € | https://de.aliexpress.com/item/1005005291387204.html?spm=a2g0o.order_list.order_list_main.58.155f5c5fOU4TA6&gatewayAdapt=glo2deu |
| 1 | € | ||
| 1 | € |
What parts and systems were made?
- two reliant mechanisms - one motorized, one hand driven
- 14 different 3D prints
- two pcbs
- electronics
What processes were used?
- 3D printing
- pcb milling
- soldering
- 2D and 3D design
What questions were answered?
- How to build a motorized reliant mechanism with high accurateness and a high ratio of movement.
- How to joint this to the Morph3Dbot-system.
- How to control the movement of the stepper motors, the display, the sensor...
- How to make a good wire management.
What worked? What didn’t?
The algorithm to move the motors to analyse the intensity of the fluorescent of the diamand is quite slow. I will attach remote controlls or rotary enconder to controll the stepper motor manually to align the diamand into the laserbeam.
How was it evaluated?
My boss, Prof. Michael Schäfer, likes the motorized reliant mechanism.
Also the fundamental set up works. In the course of my employment I will further improve the setup - see next question.
What are the implications?
In the quantum project I work in we want to produce hundrets of similar quantum sensor kits to educate pupils, students and the industry. In the course of this project, we will certainly continue to adapt and optimise the setup.
If you have any questions to my final project feel free to contact me: michael(dot)bennemann[at]hrw-fablab{dot}de