1. What does it do?
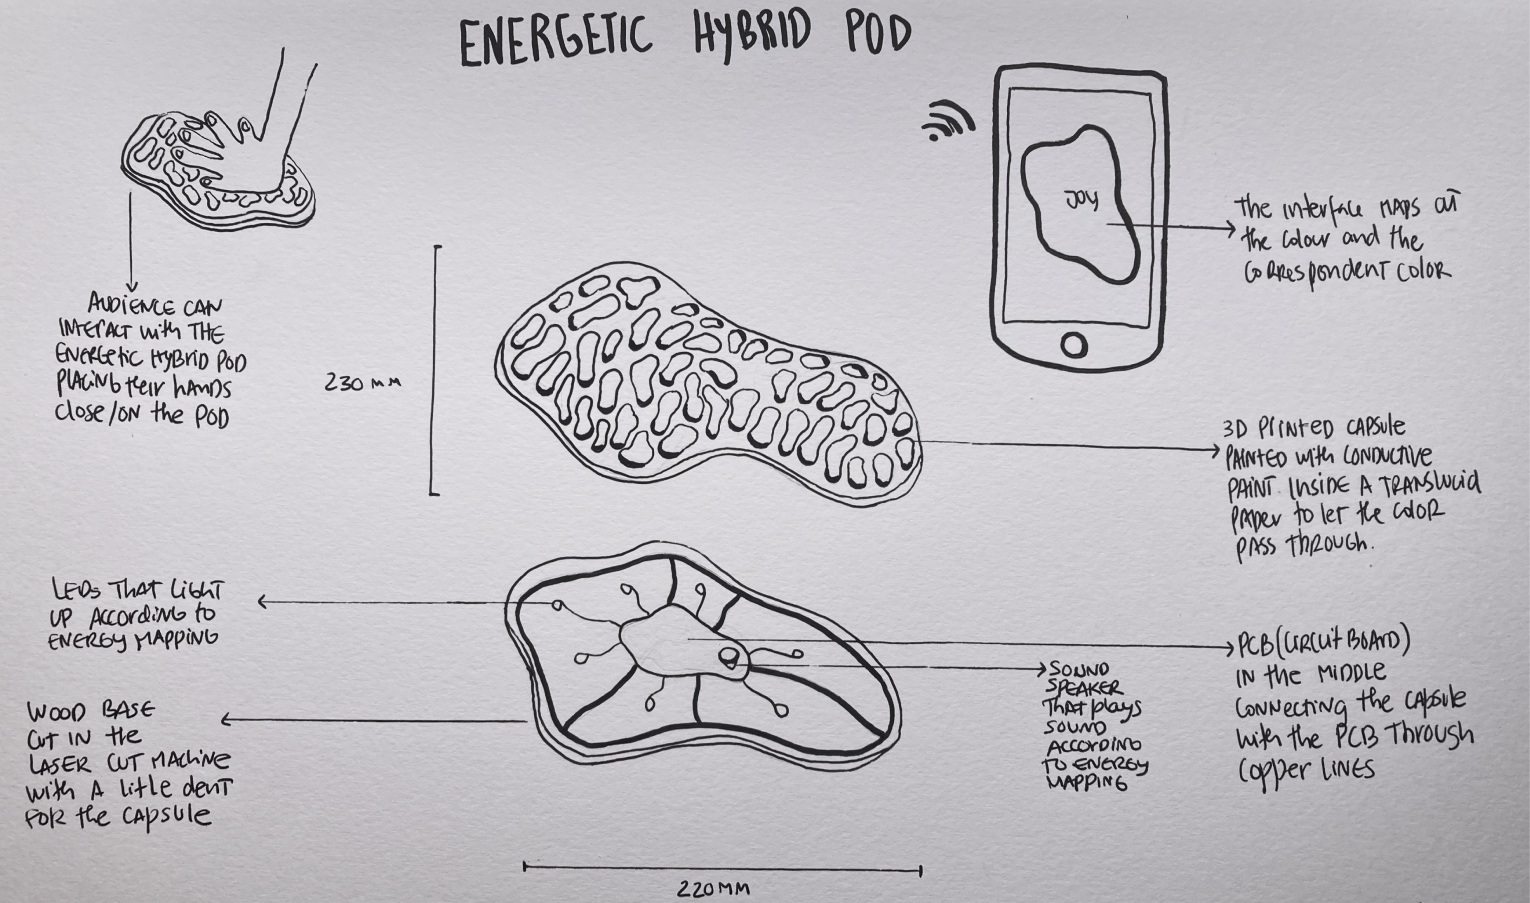
The energetic (because it deals with human energetic charge) hybrid (because it mixes light, sound, and emotions) pod (something that is detachable, and self-contained) is an object with the purpose of being used in an experimental art installation. It is meant for individuals to interact with and explore their senses and creativity.
It aims to explore the senses of touch (input), sight (visual output), and hearing (sound output). Ultimately the installation is a creative object that people can interact with by creating colorful sound compositions through their own body electrical charge.
2. Who's done what beforehand?
Outside the FabAcademy I saw some projects that really inspired me... The Noisy Jelly and also the experiments of Andrew Huang.
From the FabAcademy students I saw the final project from a student from WAAG Amsterdam - Nadieh (2021) that was a puzzle that would show light when the pieces of the puzzle were positioned correctly, this is different from my project but has a really nice interaction between the interface and the color as an output, I really like the feeling of it.
3. What will you design?
I will design the object capsule in 3D in Blender and then 3D print it in the Ender 3 Pro, the base in 2D in Inkscape and then laser cut it in the Trotec Speedy 400, the electronic circuit in Kicad, and then mill it in the Roland SRM 20 and solder it. I will also code the input (touch sensor) and output (neopixels strip and sound speaker) logic in Arduino IDE. In a the second phase, I will program in Processing the visualization of the color/emotion.
4. What materials and components will be used?
|
2D and 3D Electronics |
5. Where will they come from?
It seems I can source all of them from the lab.
6. How much will they cost?
|
2D and 3D Electronics Total: Aprox. €50,00 (€48,74 + small expenses like soldering wire) |
7. What parts and systems will be made?
For the object, I will be 3D modeling and 3D printing the capsule. Also will be designing in 2D the base of the object and laser cutting it in wood 4mm. I will also design the circuit in Kicad and mill it in the Roland SRM 20. I will solder all the components. The conductive ink, the electronic components, and the neopixel strip will be bought.
8. What processes will be used?
I will be using additive manufacturing (3D printing), subtractive manufacturing (PCB milling, and laser cutting). I will also be soldering the components into the PCB and designing the electric circuit.
9. What questions need to be answered?
How to calculate the price of the 3D-printed piece? (Solved)
Does the conductive ink behind the PLA captures the signals from touch? (YES! Tested)
Should I map a fixed range of values or map them dynamically? (Decision: mapped them)
Will I use the neopixel strip together or separate them? (Decision: together)
Will 5v be enough for the neopixels and soundspeaker? (Decision: didn't move with the sound for now)
Will I use silicone to difuse the light or another material? (Decision: I used another material - Polylite PETG)
10. How will it be evaluated?
I measure the success of this project by working as intended: an individual touches the object or puts their hand near it and the object reads the signals through the touch sensor and maps them to a color and sound that is displayed inside the object so that the individual can see what they are controlling. The purpose of this installation is to allow individuals to explore it and be creative with it, so I also want to measure its success by observing individuals interacting with it and measuring how long they interact with it - the longer the more successful, it means they are engaged.