1. Project management
Fab Academy Student Agreement
Here you can see my Fab Academy Student Agreement.
What is Git?

The first thing we have learned this week is to understand and start working with Git (Git-distributed even if your workflow isnt).
Git is a Version Control System (VCS), it allows us to have the history of the version of our files.
The major difference between Git and any other VCS is the way Git thinks about its data. Conceptually, most other systems store information as a list of file-based changes. These other systems think of the information they store as a set of files and the changes made to each file over time.
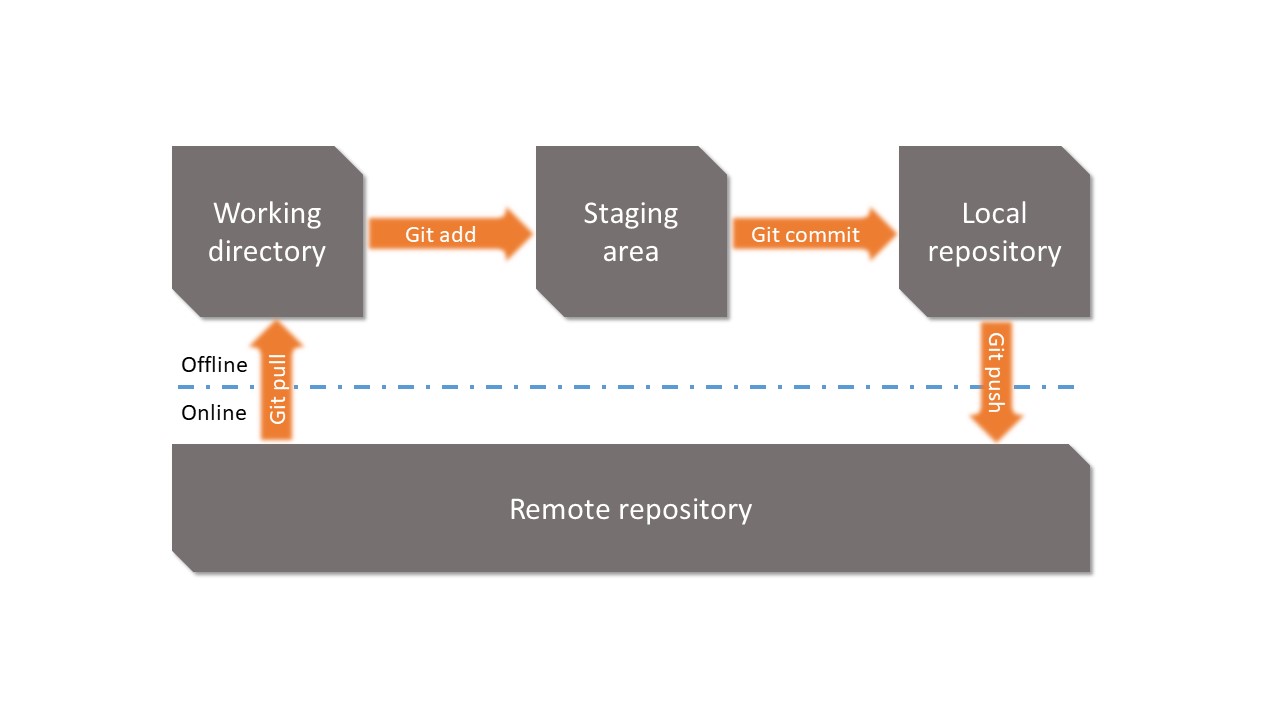
How git works?
The structure of how Git works is shown in the following figure:
How to create a Git repository and adding files?
The following steps were taken to configure Git on my computer:
- The first thing is to install Git
- To create a repository on my computer I started by setting up my account using the commands "user.name" and "user.email".
- I generated an SSH key to allow Git to connect to my computer.
- I copied and pasted the key into my Git profile.
- Clone the GitLab repository to my computer.
- You can now work locally.
  	$ git config --global user.name "anapilar.valerga"
	$ git config --global user.email "anapilar.valerga@uca.es"
ssh-keygen -t rsa -C "anapilar.valerga@uca.es"
pbcopy < ~/.ssh/id_rsa.pub
My start with git
I decided to work with the HMTL we were given and change the style little by little, despite seeing much more colourful and detailed examples (GitLab Pages examples).
This means that to change any formatting style, I look up the instructions on the HTML website (W3 HTML chools).
I looked up the things I didn't know how to do such as resizing images, having 2 columns, including separator lines, etc.
Therefore, the following steps were followed to work:
- The first thing to do is to place myself in the directory where I am working and make the changes
- Significant changes were made to the files you want.
- I used the "git status" command to check the changes.
- I used "git add" to update the changes.
- I used "git commit -m" to commit changes
- I used "git push" to push to production or online.
$ git cd (directory of the folder where I am working)
$ git status
		$ git add . (changes to all documents)
		$ git add "filename" (changes only to that document)
$ git commit -m "changes made"
$ git push
My documentation and how I learned
I wrote the content of my documentation in HTML format using a text editor in Visual Studio Code. Always keep in mind the organization of the content and the logical structure to make it easy to read and understand. It is also possible to incorporate CSS styles to improve the visual design of the documentation. In my case, I followed the default format included as a student in Git, since I preferred to understand each step I do even if the documentation is visually less attractive than using a template.
With this, I have learned to insert simple texts, justify them or put them in the area of the document that interests me, incorporate tables, images, videos and audio to complement the content and improve the user experience. It is important to optimize and compress multimedia files so that the web page loads quickly. Also keep in mind the Git upload limit of 10 MB.
It is also important to validate the HTML code before publishing the documentation to avoid errors and not to be continuously re-uploading files (in this first week I did a lot of "gitpush").
Conclusions
This is the first time I work with a VCS like Git. I had no idea what branches or commits were and I'm still in the process of learning. I've never used HTML either, so I'm learning the basics of the basic structure.
However, I think this course has helped me to get a clear understanding of the basics and I have been able to create my GIT repository and develop my website in HTML and CSS in a few days.
Final project idea
This week I have been thinking about defining my final project idea and started to getting used to the documentation process.
In this first week, I still don't have a clear idea of what product I want to make. I have doubts about my ability to manufacture or program it. So, I come up with ideas that I see as too complex, or on the contrary, too simple. However, I am going to explain below some of the ideas that have occurred to me.
Toys
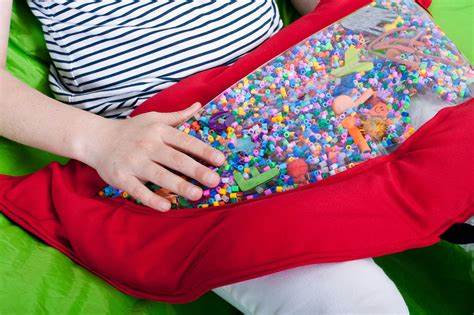
I am interested in making a toy that could be intended for a specific user, such as a child with autism spectrum disorder (ASD). People with ASD develop certain special abilities such as hypersensitivity or high melodic memory. Music therapy is proving to bring both cognitive and emotional benefits to the child. both cognitive and emotional benefits for children with ASD. So one of my ideas is to develop some kind of product that you could interact with and that would emit different kinds of sound.
ASD toysPets
Another major interest of mine is my dog, Moah. He has a lot of food anxiety and the animal toys on the market aimed at reducing food anxiety tend to bore him. Therefore, another idea I could develop is some kind of instrument that would command my pet to have to follow some kind of pattern or instruction, and in return he would receive a small reward.
Fashion
Finally, another of my interests is fashion. As I mentioned in the "about me" section, my research is related to additive manufacturing. Therefore, I would love to combine additive manufacturing with fashion and even show it off at one of my conferences. Some eye-catching accessory that can change colours, for example.
With these ideas and some others, I will be researching to work on my project and will be updating the website in the coming weeks.
My Final Project sketch
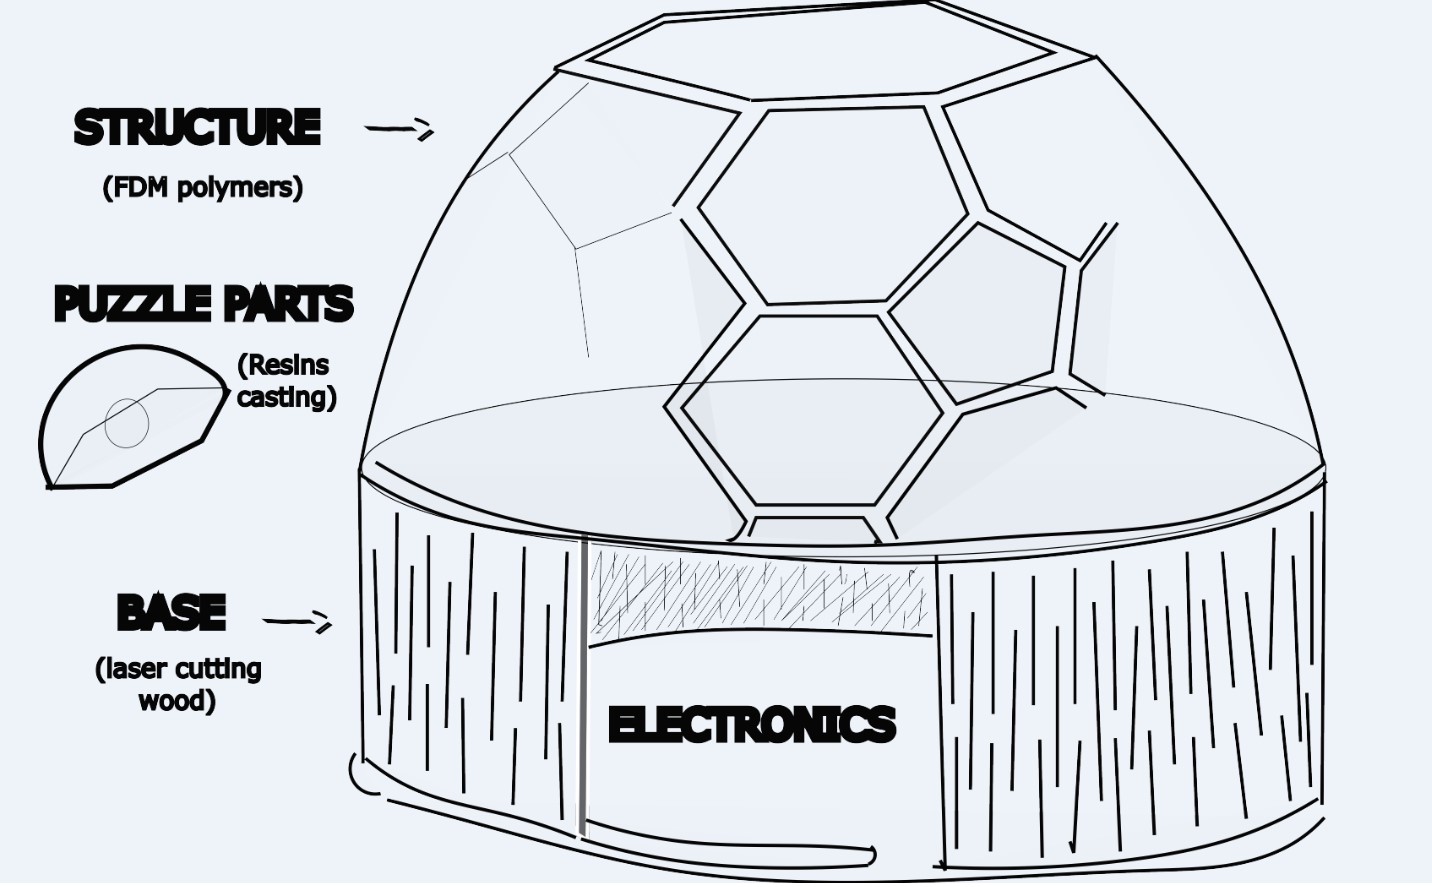
The object shall consist of the following parts:
- 1. Base. In turn formed by two flat round plates between which a door must slide. It wants to be made in laser cut wood and have a pattern that allows the wood to bend and slide around the rounded contour.
- 2. Structure. I want a self-supporting structure inspired by a parametric dome with polyhedron-shaped holes to house the pieces of the puzzle. I intend to manufacture it with polymer fused deposition modeling.
- 3. Puzzle parts. They will have the shape and dimensions to be housed in the structures. When a piece is placed, it must activate light, sound and/or vibration. I want to make them with molding and casting to make them interchangeable as well as translucent with embedded electronics and ornaments.
- 4. Electronics.