Objective
Redraw an echo hello-world board
Add (at least) a button and LED (with current-limiting resistor)
Check the design rules, make it, and test that it can communicate
Introduction
Electronics design itself means that we have a lot of time debugging, routing and setting up connections. Here we were provided with a reference board and were asked to design and mill our own from scratch
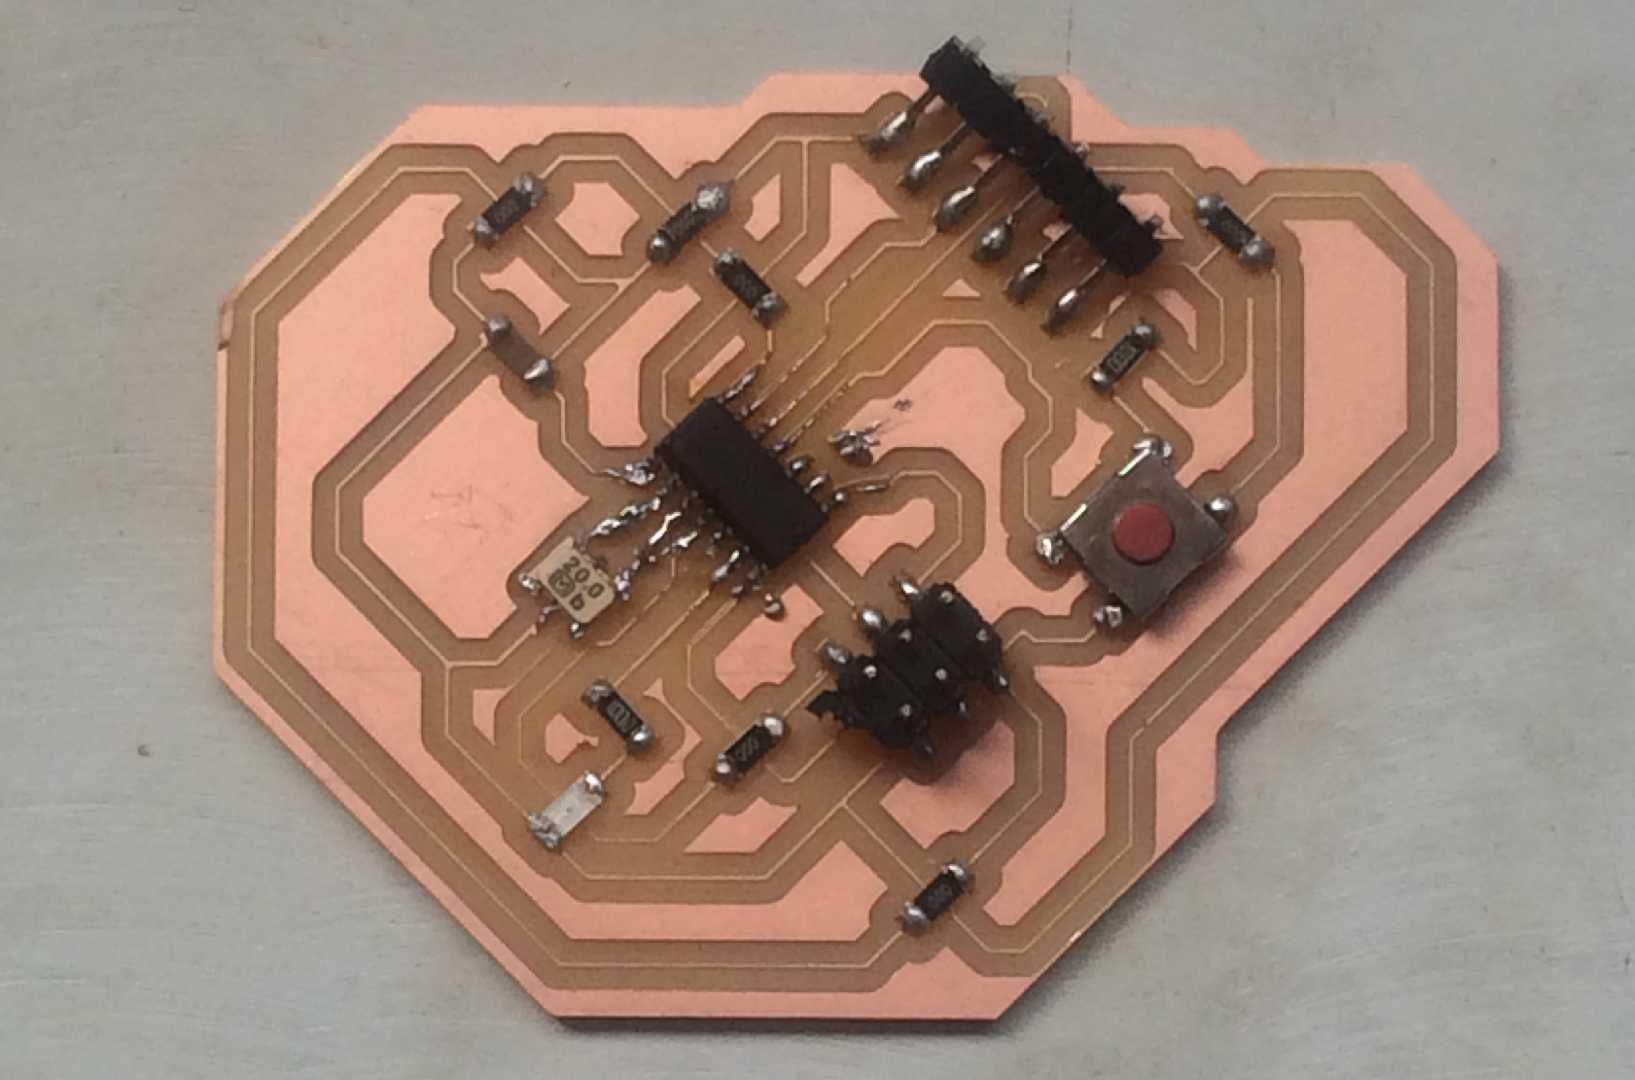
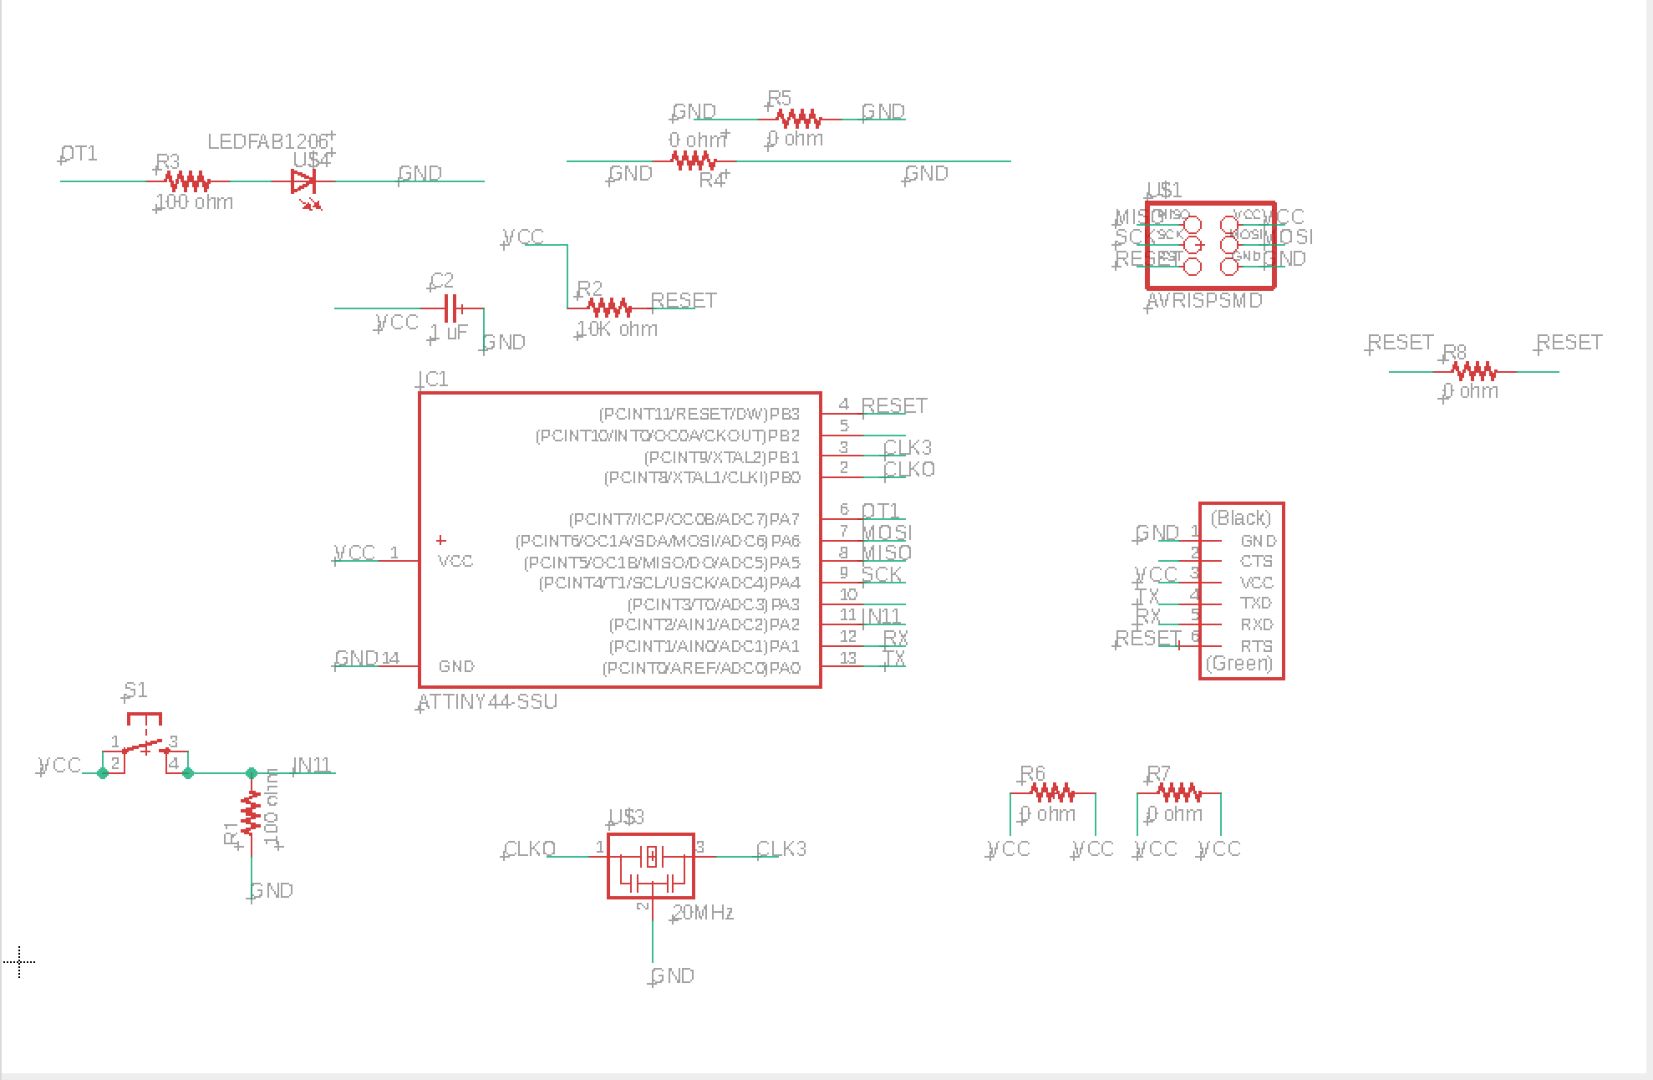
Hello World Board Design
We were asked to design an helow world board as are first pcb design assignment it was interesting to learn how PCBs are designed in an industry using some of the EDA tools that we have.
The softwares used in fabacademy are quiet hobbyist type but they introduce use to some professional once also. I used Autodesk Eagle to design my board.
To be honest I don't like the search feature of eagle it seem broken on my mac. I have the time I would switch to KiCad instead. Its open-source and a better alternative.
The design files look like this foe some reason.
I was using an Attiny 44 because of the stock availability in our lab. We had a couple of them lying aroung in the inventory. I know they are old but due to supply shortage we couldn't get our hands dirty on the newer chips.
Problems that I encountered
This week we also had a lot of problems especially with the end mills. Mine broke in the process of milling the board half way. In total I was able to mill only 6 PCBs with the 1/64 end mill.
I even encountered a bit of image sizing issue while exporting with Eagle on my Mackbook air with the M1 chip.
Do check "My experience section for the rest."
Tip
Just use another software other than eagle for designing your PCB or use another PC for exporting the necessary images for the time being.
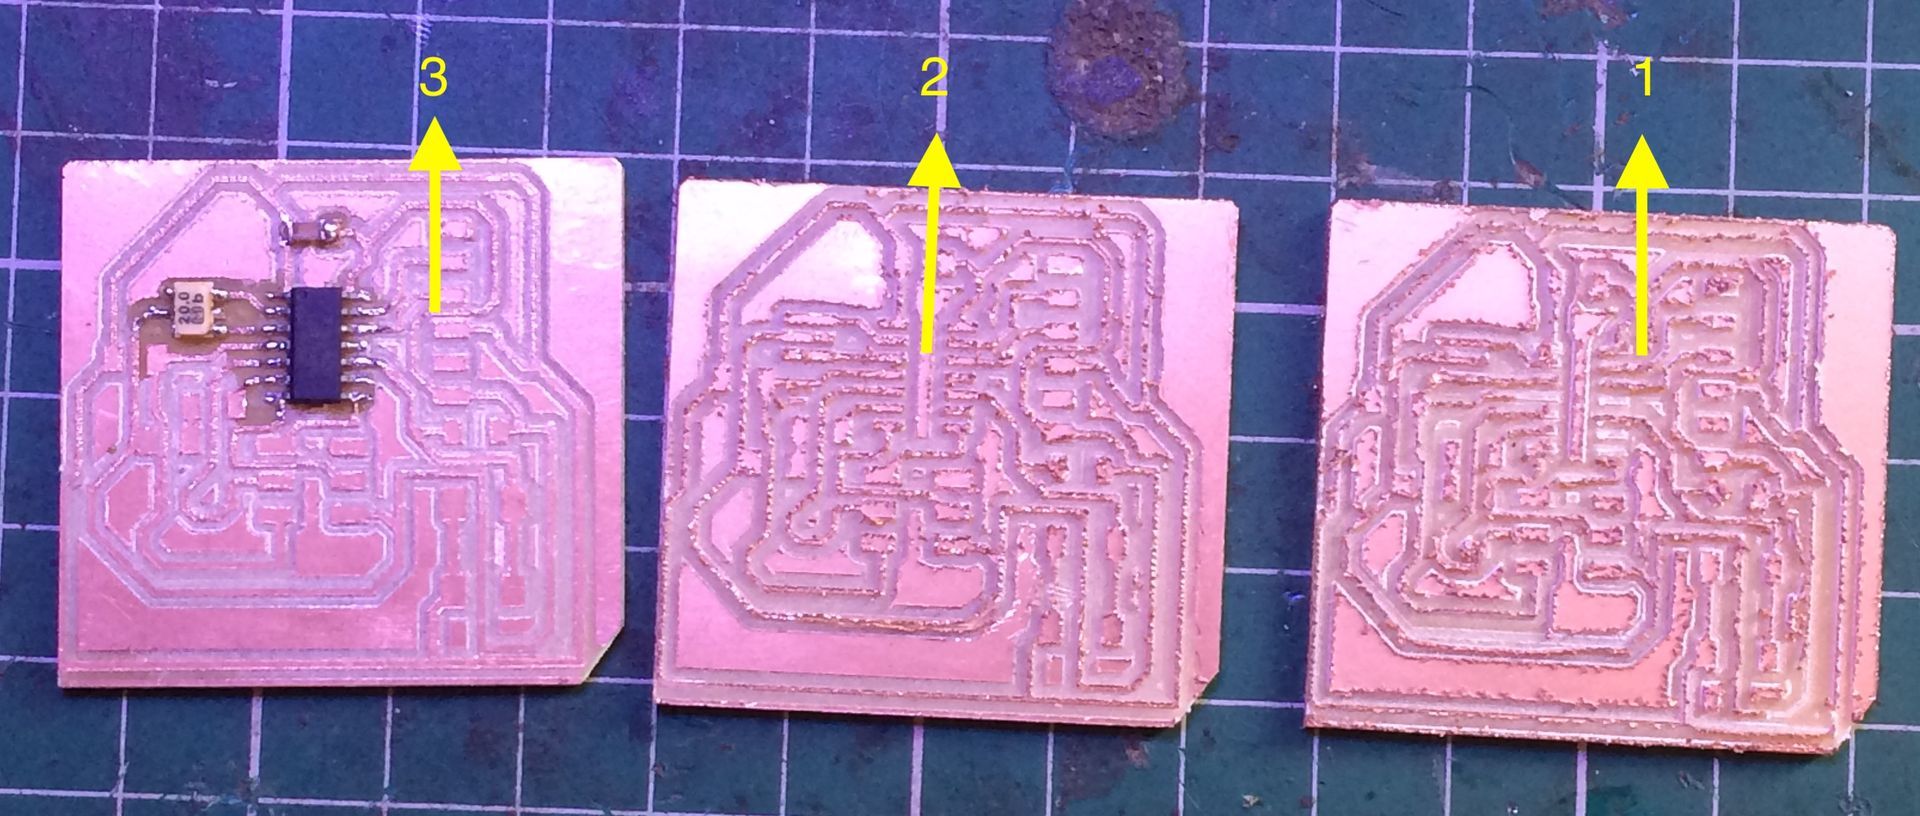
Since I had alot of troubleshooting this week I was not able to program a hello world board but I was able to survive the panic moments during this week when the end mills broke. I used a broken 1/64 end mill to mill the PCB the results were quiet fascinating.
I'm adding the a shot of all the 3 PCBs below.
1. Milling using V-bits
2. Milling using Broken 1/64 end mill
3. Milling using broken but sharpened end mill.
Softwares that I Used
Eagle
VPanel
ModsProject
Arduino IDE
Note:- The milling part of this project will be covered in a separate week if you would like to check that out then click here.
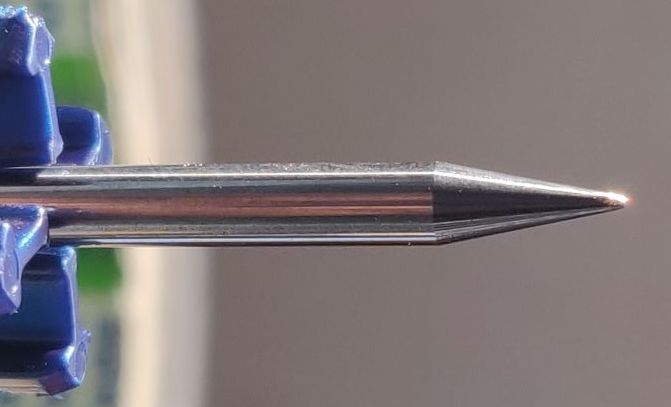
Workaround for a broken end mill
I used a V-bit and a broken end mill to mill my pcb by playing with different settings on modsproject.
Below Is the image of the broken end mill with a sharpened tip.
My Experiences
My experience in this week was quiet troublesome I couldn't get through with the programming part.
Routing was a tough process and designing a board was even tougher.
Milling and usage of bits is a different issue on itself.
Debugging and finding the reason for the error was time consuming.
Every step in this week assignment was on the basis of trial and error as a calculated guess would land you up in trouble.
I was able find out different work a rounds for different problems hence finding a solution at best but as Niel insists always about demand and supply side of time. It was harder this week to maintain a schedule, the final project plans were also pushed as I wasn't able to perform a triage.
But everthing went through except for the assignments results.
I even had to use a jumper to solve some of the issues.
Then I found out that the board isn't working and is always giving me rc-1 error after which is started designing another hello world board and this time I had made the right choice.
Weekly assignment
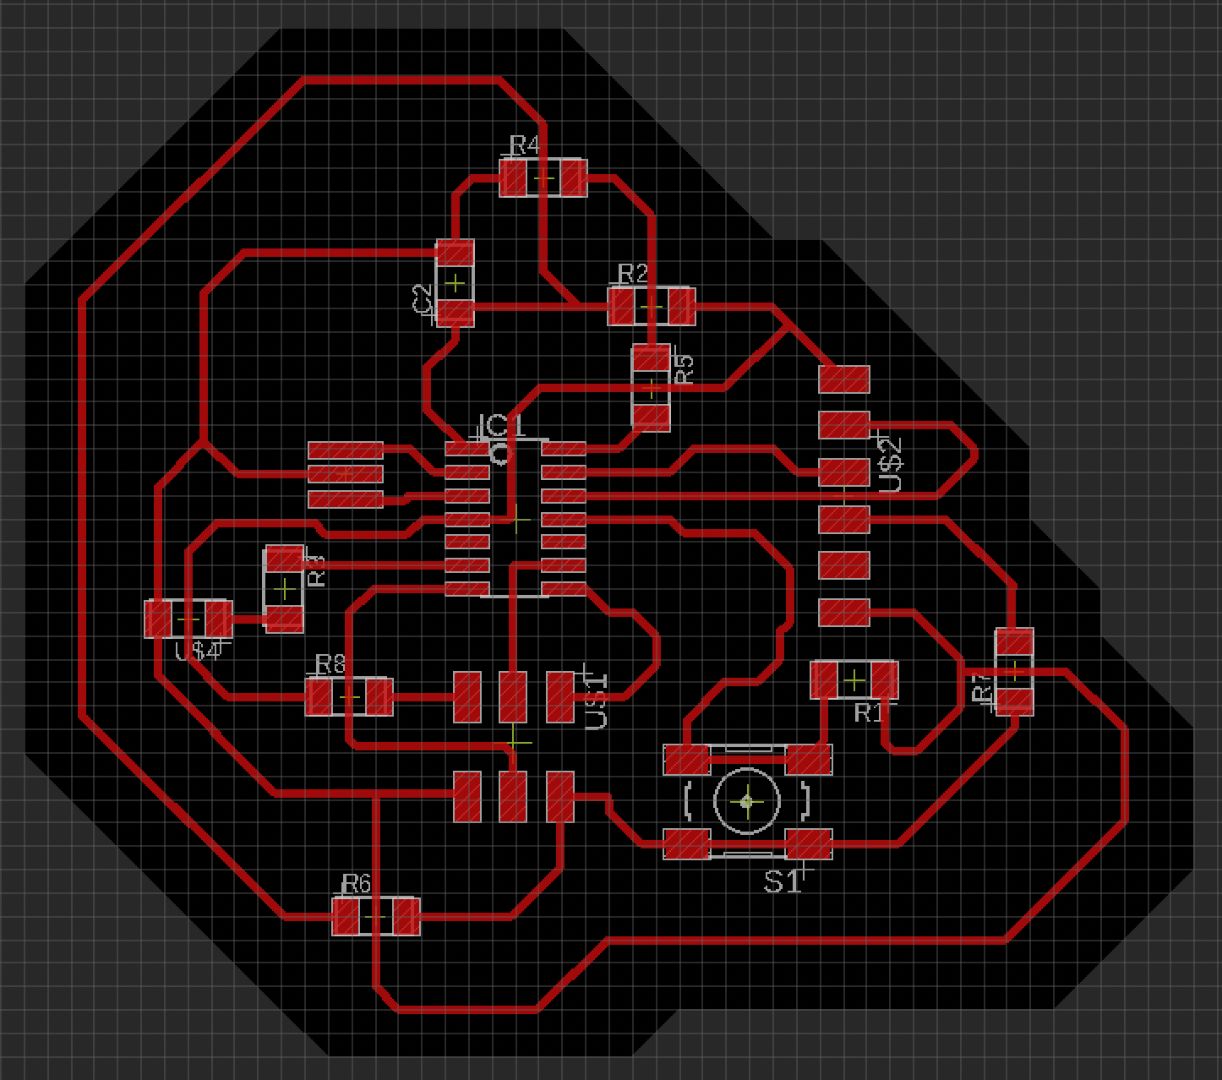
Schematic and routing
Steps to create a Schematics
- First Open Eagle
- Go to Files → Click “New”
- The Click “Project” to Create a new project.
- After creating a new project then Click “New“ again and then Click “Schematic”. The Schematic window will appear on the screen.
- On the Schematic window head on to the search bar and then type “add” to add new components.>
- A component window will appear this window has all the libraries for us to get started with the software.
- Click on the necessary eg: For Resistor Click search for “rlc” and the click the drop-down and choose the necessary component and press “OK”.>
- The component is shown on the screen.
- Do a left click to place the component on the required position.
- After placing the components do the connections according to the reference circuit.
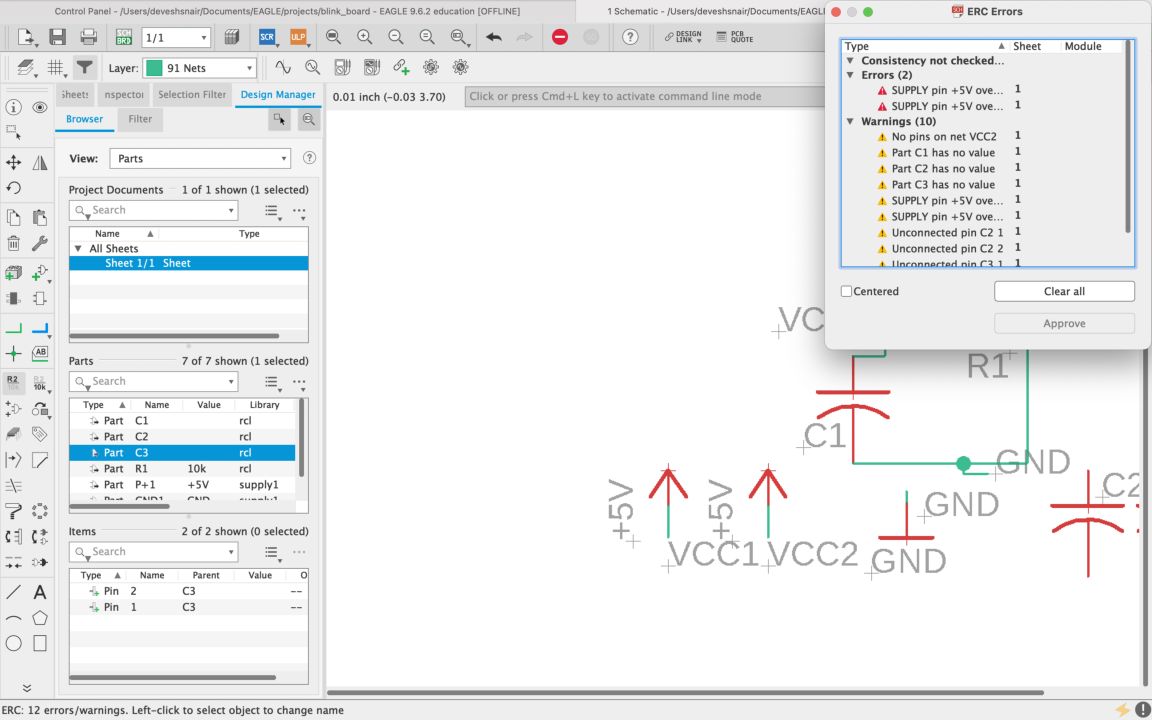
- And then Click “Tool” → “ERC”
- This will check the rules and inform you about any open connections.
- After all the errors are cleared or approved in “ERC” then click on “Board Schema Button”
- The PCB Layout board will appear.
- Then choose the required layers that you want to see since it’s a single layer PCB.
- I would only use the top, the dimension layer, and the values layer and would hide all others including Unrouted.
- After this use the “Airwire” tool to make the connection and do the routing properly.
- You are almost there. Your PCB is taking is shape according to your design.
- Next go to the layers tab and choose Dimensions Tab to switch here draw a border around your PCB. Then delete the default dimensions border.
- Your PCB is ready to export.
- First ensure to hide all the layers except Dimensions layer.
- Then Goto File → Export → Image
- An export window will pop up on the screen
- Here we have to provide a name for the file and keep dip settings to 1000 and check the monochrome checkbox after which click “Export”.
- Export in the necessary format like PNG etc.
- Repeat the couple of steps with hiding “Dimensions layer” and Unhiding the “Top layer” and exporting the image.
- You will obtain two images one is the pcb tracings and the other is for a cut-out.
- Hence we have created a PCB in Eagle.

Bill Of Material
A BOM is a list of components that are used in our design it is mainly used to analyze the cost of fabricating the entire (or partially it depends) design.
A BOM can allow us to optimize the design and do an efficient build here I will only be listing the parts from Eagle.
| Part | Value | Device | Package | Description |
|---|---|---|---|---|
| C2 | 1 uF | CAP-UNPOLARIZEDFAB | C1206FAB | |
| IC1 | ATTINY44-SSU | SOIC14 | ATTINY44-SSU | |
| R1 | 100 ohm | RES-US1206FAB | R1206FAB | Resistor (US Symbol) |
| R2 | 10K ohm | RES-US1206FAB | R1206FAB | Resistor (US Symbol) |
| R3 | 100 ohm | RES-US1206FAB | R1206FAB | Resistor (US Symbol) |
| R4 | 0 ohm | RES-US1206FAB | R1206FAB | Resistor (US Symbol) |
| R5 | 0 ohm | RES-US1206FAB | R1206FAB | Resistor (US Symbol) |
| R6 | 0 ohm | RES-US1206FAB | R1206FAB | Resistor (US Symbol) |
| R7 | 0 ohm | RES-US1206FAB | R1206FAB | Resistor (US Symbol) |
| R8 | 0 ohm | RES-US1206FAB | R1206FAB | Resistor (US Symbol) |
| S1 | 6MM_SWITCH | 6MM_SWITCH | 6MM_SWITCH OMRON SWITCH | |
| U$1 | AVRISPSMD | 2X03SMD | AVRISPSMD | |
| U$2 | FTDI-SMD-HEADER | 1X06SMD | FTDI-SMD-HEADER | |
| U$3 | 20MHz | RESONATOR | EFOBM | |
| U$4 | LEDFAB1206 | LED1206FAB | LED |
Group Assignment
For this weeks group assignment we were given a brief introduction of different testing equipment that were in the lab.
There different testing equipments like a DSO, A variable power supply,multimeter etc.
We used components like LED, resistor to measure parameters like current,voltage and voltage drop.
We even tested a "Hello World" board with a variable power supply and checked the output waveform through a DSO.
For more information I'm linking the group assignment page here.
Choosing the right components
If you take a closer look I have added a button and an LED with the reference design so how did I choose the the components.
First I checked the the datasheet of the LED that we have in our lab.
Then I found out that the forward voltage for red led is 2V and current is 30mA.
We know that Voltage = I*R where:- I - Current, R - Resistence. Since our input is from a USB port its capped to 5V therefore when an led is connected there will be a voltage drop.
Hence Voltage at Led will be = Input voltage - Forward voltage.
5V-2V=3V. Now to find the resistence using ohms law we get 100 ohms.
This is how I decided that value of the components that I used.
Original design files
I'm leaving my original design files download link is here.
I'm also leaving a to the Bill Of Materials (BOM) over here
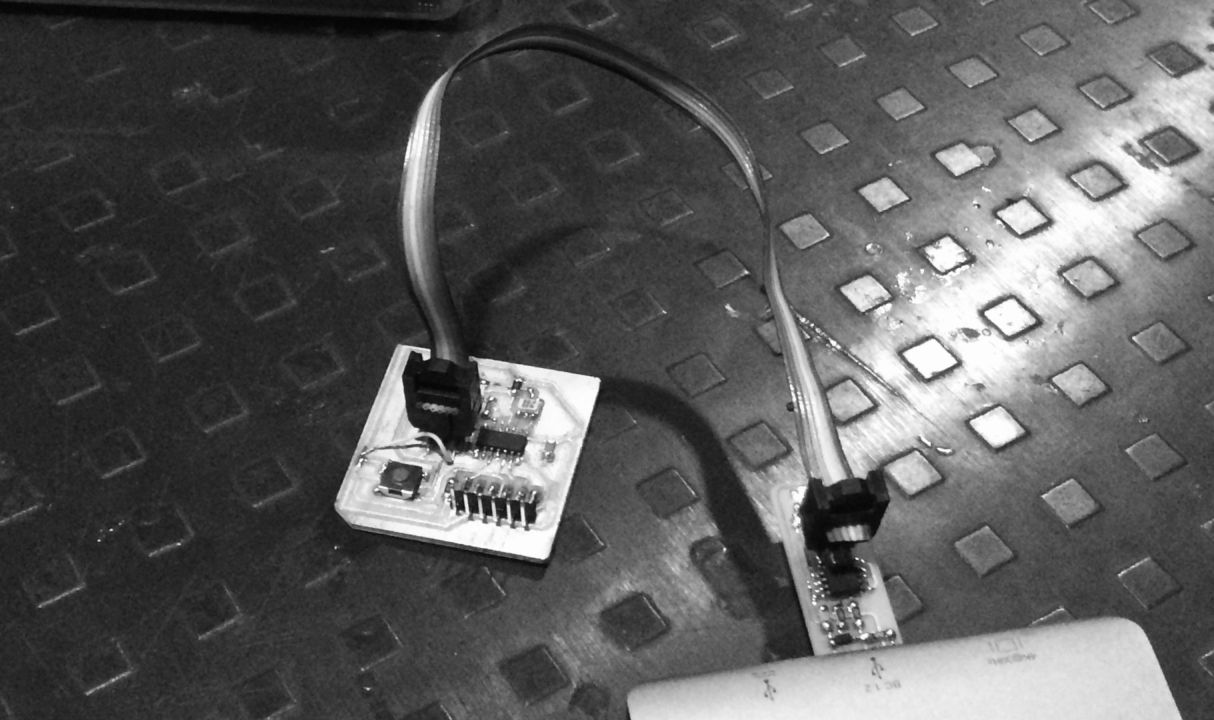
Programming
Programming the board was easier than soldering the connections on the board.
I used Arduino IDE the ISP programmer that I created during the electronincs production week. I used a ribbon cable to connect the pins of the ISP and the "Hello World Board".
First Open Arduino IDE
Then Connect the ISP using a male to female USB cable to the PC
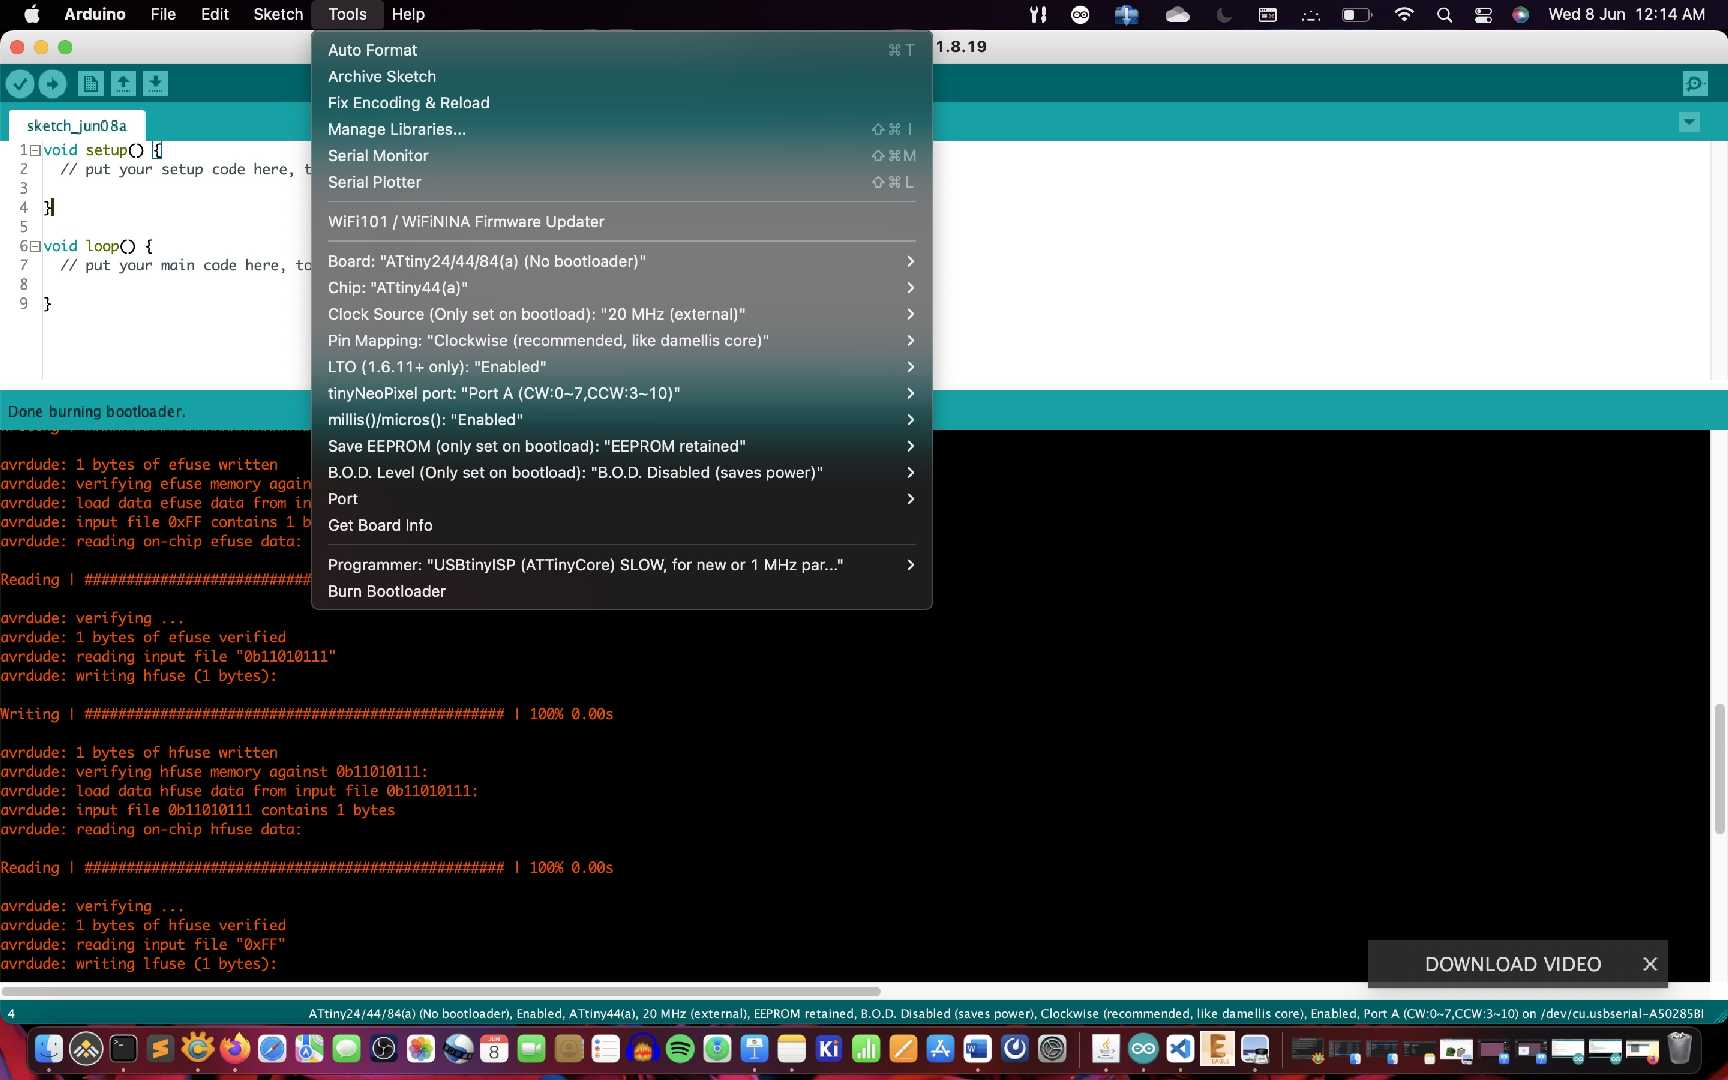
Then goto Tools check the ports and select the microcontroller that you have in my ase it is attiny 44 (with no booloader)
Check the clock speed
Then if everything is check and is fine click the burn bootloader button at bottom of the drop down.
This should start AVRDUDE and burn the bootloader on to the IC
The image below shows all the parameters that has to changed in the tools menu for programing and burning bootloader.
After Soldering the "Hello World Board" We have to burn the bootloader to the chip i.e Attiny44
But We have to do this process with patience if a wrong step is taken then it is possible that we could brick the IC.
There was an external oscillator given in the refrence design my assumption for this component to be there is for faster switching and greater accuracy in the longer run.
After all the hardships we finaly can see something that is shown in this video.

Fabspace by Devesh S Nair is licensed under a Creative Commons Attribution-NonCommercial 4.0 International License.