LASER CUTTING MACHINE CO2 X500III
GCC OVERVIEW:
Under the slogan "Innovation with a human touch" GCC was founded in 1989, is a global manufacturing company that produces a wide range of quality products, including cutting plotters, laser engravers, laser markers, laser cutters, inkjet printers, UV curing ink and digital finishing equipment for various applications such as signage and advertising, personalization and identification, gifts and promotions, apparel and electronics Headquartered in Taiwan through a worldwide network of authorized distributors and branches in the United States, Europe and China, GCC is committed to persistently pursuing the goal of providing the best possible performance in technologies, services and solutions to meet customer needs.
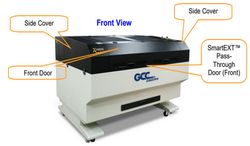
The machine we used in the lab was the GCC LaserPro X500III X-series designed for professional use. Equipped with various user-friendly features, the GCC LaserPro X500III offers high work performance in durability and practicality. The X500III model combines cutting and engraving capabilities, offering users a highly versatile system.
FEATURES: 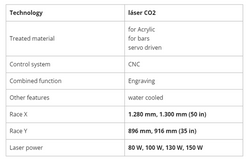
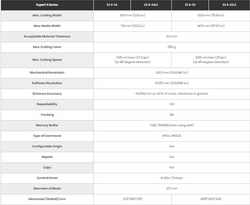
Technical specifications: 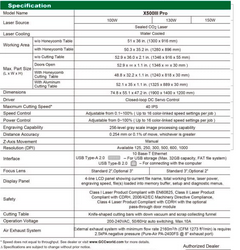

We can visit: https://www.procad.cl/view_prod/668/5/LaserPro%20X500III to better see the description of the equipment.
The parameters that we can adjust depend on the type of work that we want to carry out (engraving or cutting), in addition to the material that we are going to use.
We can download the controller driver from the internet to use it as if it were a paper printer to which we are already accustomed, obviously with the special configurations for this machine, which we have to practice to have a good command of this equipment.
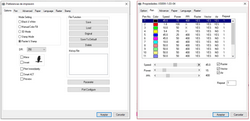
Once the installation of the driver and our model or application that we want to engrave and/or cut have been completed, we have to configure the sections that will be engraved and the parts or sections that will be cut. For this, we go to the print section and select the name of the laser machine, we give preferences to configure and we see the following window.
In this window we select the type of engraving, the points and other properties which we have to practice to see the best results for the required application, in addition to the fact that the configuration is very intuitive.
The section that we use the most and we must practice is the second tab "PEN" in which through the selection of colors we can indicate how much power and speed will be used when engraving or cutting the material used, as we already mentioned this configuration It is intuitive and takes a lot of practice to master.
Next, we will show a list of the main parameters for the Laser Pro X500 III machine according to the work we have developed.
We can find the product brochure, the driver and the user manual at the following address: https://www.gccworld.com/download.php?act=view&id=40.
Practice 01:
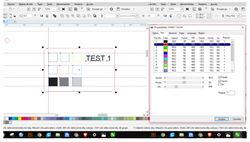
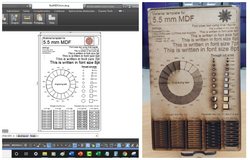
We develop a table to be able to determine the power and speed that we require in a certain material. First we design our table in AutoCAD and then we send it to the required software in the FabLab of the Continental University, which in this case is Corel Draw, for the cuts of the material we normally select the red color and for a reasonable engraving we select the blue color.
Now we configure the colors of the "PEN" table with different powers and speeds to know the power and speed necessary to cut the material according to its thickness, in our case it is 3mm MDF.
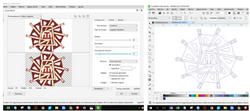
In the same way we work the logo of our institute from our image, we vectorize it and prepare it to be able to engrave it and cut the edge, as well as integrating it into our following works .
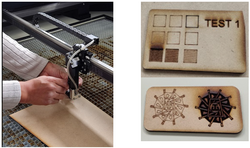
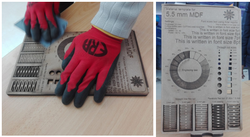
We prepare our material and develop the cutting and engraving of our test 01 and the logo of the institution.
For the 5.5 mm MDF we develop a template to determine its cutting and recording characteristics developed in AutoCad and save it in dxf format to work with the laser machine.
We have to take into account to make it post-processed so that it has a better finish, for this, with a fine sandpaper, our product is passed.
Practice 02:
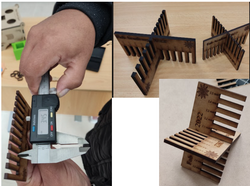
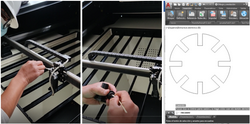
We develop a comb in autoCAD and save it in .dxf format to be able to determine the thickness of the cut that the laser beam occupies for both 3mm and 5.5mm MDF.
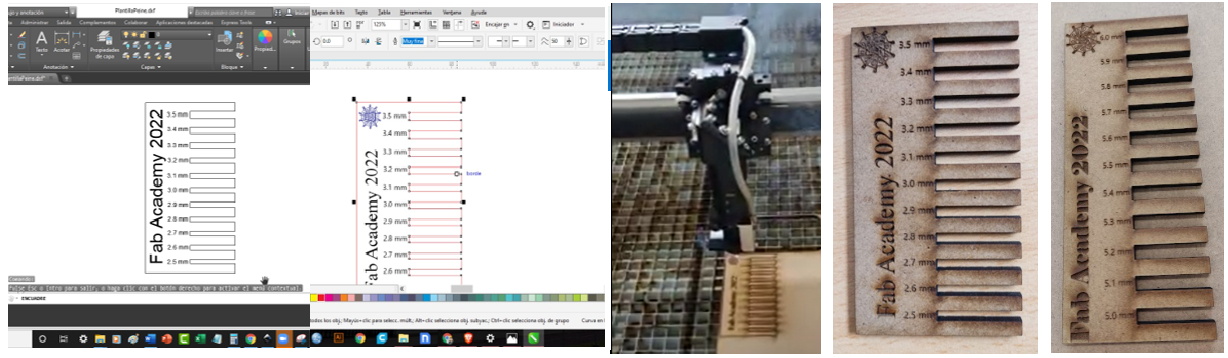
We took measurements with the vernier and discovered that the measurement that the laser beam occupies is 0.15 mm, in all the measurements that we made it had that difference with the measurement that it should be, in the image an opening of 3.3 mm is being measured, but as seen in the image is 3.45 mm.
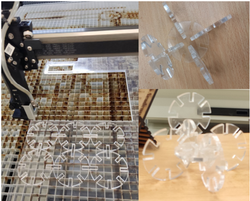
Practice 03:
Before starting with the parametric cut in acrylic, we do a cleaning maintenance to the lenses of the machine to remove the carbon that is impregnated and we have a laser light with good power. We design the model and cut it on the laser machine.
We cut the model and gave it different shapes.
GROUP WORK TEAM: Timoteo Calderón Letona and Jorge Chevarría Mar.
PERSONAL WORK:
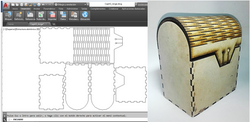
Practice 04:
Develop the model in .dxf format from AutoCAD of a 3mm MDF box to be assembled without pure pressure glue.
Practice 05:
To finish, we cut the logo that will represent our final project in vinyl; We work with the GCC EXPERT II LX cutter, which is very easy to use since it has a very small and intuitive panel for its control to make the cuts.
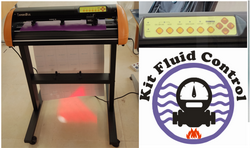
In order to use the cutter, we must know some specifications of the machine and the description of its panel to be able to use it.
Specifications:
 We will review the control panel for the basic use of this machine.
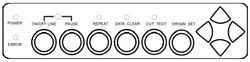
POWER LIGHT: Indicates that the plotter is connected.
FAULT LIGHT: Indicates an error during plotter operation.
ON/OFF LINE. Switches to cut mode (light on online) and settings mode (light off offline).
PAUSE. Temporarily stops the cutting process.
REPEAT. Repeat the last job done.
DATA CLEAR. Clears the data from the memory buffer.
CUT TEST. Perform a test cut.
ORIGIN SET. Resets the origin point to a new position.
4 CURSORS. They move the material or the knife holder and are used to select options in the menus
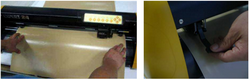
We prepare the parts before cutting them, we have to leave only the edges to be cut and we must select the parts one by one according to the color of vinyl to be used, in our case I will use three colors, one blue, one red and one black.

In general, before sending to cut, we must adjust the vinyl orthogonally to the machine, adjust it with its prisoners, locate the head of the blade holder and verify that it is connected to the power and also to the computer through the USB cable.
If you want more information, you can find it at: https://www.brildor.com/media/upload/descargas/Manual_plotter_serie_expert_24.pdf.
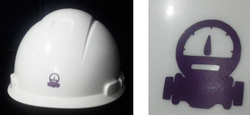
We start with the valve that sticks in my helmet as seen in the figure.
created with
HTML Builder .