 What you see when opening Fusion 360
This week we ended up looking into a lot of different types of microcontrollers. Microcontrollers are basically small computers that are designed to govern a specific operation inside of a system. The microcontroller is said to be embedded within that system in order to operate the single function that it is designed to do. And there the title of this week is name-dropped.
The list of different boards we looked at is as follows
 What you see when opening Fusion 360
the board that I researched myself was the Feather M0 LoRa that we had in our Lab. I found that the:
The pinout diagram is as followed below:
 What you see when opening Fusion 360
We have all of this data comparing each of these microcontrollers, but we do not have any physical representation to see what they actually mean. Below we have a picture comparing the clock speed of the Teensy 4.0 vs. a couple of different Microcontrollers. What we see below is the clock speed in binary, and since the clock speed of the Teensy is 600MHz, we can see a drastic difference in the frequency on the oscilloscope.
 What you see when opening Fusion 360
the spreadsheet for this week can be found here.
Now I will go over a couple of the programming processes that I can use to code my boards. To start off we will be looking at the Arduino IDE to program my attiny 1616 that I have on my board design.
When first opening up the Arduino IDE, This is the basic screen that you will be met with.
 What you see when opening Fusion 360
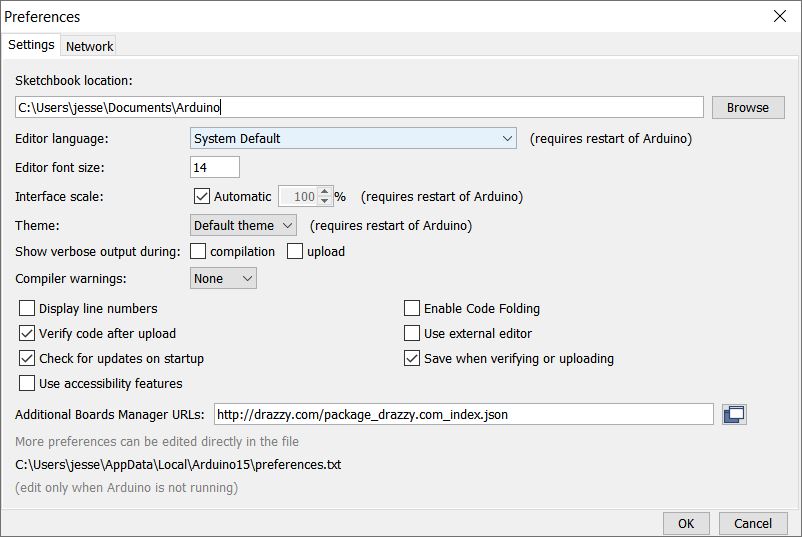
Since we are using the Arduino IDE we need to make sure that we can program our specific board. The first the we will need to do is to download a board library. To start this process we will head over to preferences. and add a URL to the section called "Additional Boards Manager URLs"
 What you see when opening Fusion 360
Once that is done, we can open up the boards manager menu and download the specific library we are looking for. In this case I search "megaTinyCore" and downloaded the library by Spence Klonde.
 What you see when opening Fusion 360
Next I can go back to tools into boards now we can go and click on megaTinyCore and select the specific boards we are looking to use. In this case I selected "ATtiny3226/3216/1626/1616/1606/826/816/806/426/416/406"
 What you see when opening Fusion 360
Now we can select the specific chip and board that we need.
 What you see when opening Fusion 360
Before running any code, we need to make sure that the programmer is set correctly, in this case I selected "pyupdi" and that we can select a port.
 What you see when opening Fusion 360
When code is successfully compiled and sent to uploaded to our chip, we will see this message.
 What you see when opening Fusion 360
Lastly, the serial monitor will be used a lot while using this IDE and this is what that looks like.
 What you see when opening Fusion 360
When first opening up Platform.io, we are welcomed with this screen. we want to click on the bee symbol to get things started. Platform.io can be found within Visual Studio.
 What you see when opening Fusion 360
This is the home screen for Platform.io, we want to go and click the new project button.
 What you see when opening Fusion 360
Unlike the arduino IDE, platform.io will allow you to search from a plethera of different boards. Once one is selected it will download everything that you wil need for you. Also, unlike when we had to manually change boards and programmers in arduion, platform.io will do that for us.
 What you see when opening Fusion 360
To start programming we will need to go to under src to main.cpp, this is where our void setup and void loop will be loacated. We can go ahead and type out all of our code here.
 What you see when opening Fusion 360
Just like arduino we can open up a serial monitor for our port and view what is on serial.
This first video is a quick shot of when I got some simple blinking code to work on my on my board. Below is nothing too fancy but is something quick to show how we can dim and light up LED's
Originally I forgot to add the correct video that corresponded with the code, but below should be the correct example.
Arduino file used, week8.ino