Learning Outcomes:-
1.Create your own integrated design.
2. Demonstrate 2D and 3D modelling capabilities applied to your own designs.
3. Select and apply appropriate additive and subtractive techniques
4. Demonstrate competence in design, fabrication and programming of your own fabbed microcontroller PCB, including an input & output device
Smart Shegadi(Stove)
Edible Oil Tempreture Controller
The Detail Discriptions of my final project is as below.
Here's why you should never reheat cooking oil.
1. Cooking oil must not be reheated
Oil is a major part of the Indian cooking style, and most households use it in their food. While the many health implications surrounding the application of oil is a story for another day, another pressing issue that concerns us is reheating, and not just reheating food. Cooking oil has undergone a lot of scrutiny when it comes to reheating, and the conclusion that most studies have come to is that it must not be reheated, and here’s why.
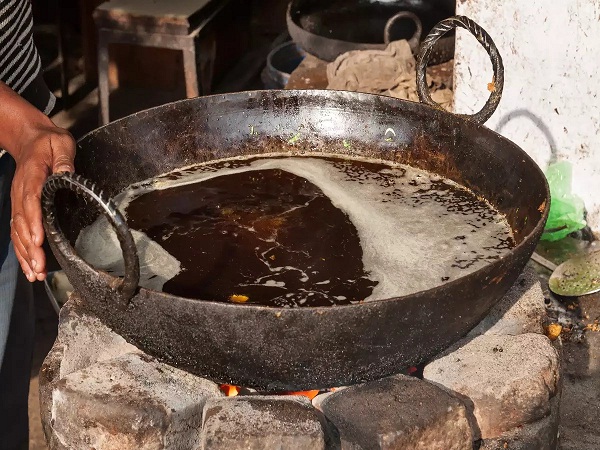
2. Releases harmful toxins.
Reheating certain vegetable oils like sunflower or corn oil has been shown to release a higher concentration of Aldehydes, toxic chemicals that have been linked with many conditions like cancer, heart disease, Alzheimer’s, dementia and Parkinson’s. Another toxin called 4-hydroxy-trans-2-nominal (HNE) is released upon reheating vegetable oil, which disturbs the functioning of DNA, RNA and proteins.
3. Increases trans fats.
Cooking oils contain trans fatty acids, which increase upon being reheated. Trans fats are worse than saturated fats as they not only increase the levels of bad cholesterol, but they also decrease the levels of good cholesterol. It is associated with an increased risk of Parkinson’s disease, cardiovascular disease, stroke, cancer, and various liver disorders.
4. Generates free radicals
Free radicals are harmful molecules that attach themselves to healthy cells and impair their functioning. Reheating oil generates these free radicals, which could cause complications as serious as cancer, and atherosclerosis, a condition where plaque is filled in the arteries causing blockage and an increase in bad cholesterol.
5.Causes harmful reactions
Reactions like oxidation, hydrolysis, and polymerisation occur upon reheating oil, which forms volatile compounds and toxic monomeric and polymeric products. These compounds and products are responsible for giving the oil a bad flavour and for many negative effects on our health. To know more details about this I have reffered THIS LINK
There has been a suggestion that cooking with vegetable oils at high temperatures releases aldehydes which have been linked to cancer and other diseases. The amount of aldehydes formed depends on the oil used, cooking method and oil temperature. When selecting an oil for cooking at high temperatures, such as frying, it is better to opt for one with a higher smoke point. This is the temperature at which the oil begins to break down, give off smoke and produce potentially harmful compounds. Typically refined oils have higher smoke points than unrefined oils (e.g. extra virgin or cold pressed), making refined oils, such as refined rapeseed oil, more suitable for cooking at high temperatures. Reheating of oils is also not recommended as it can result in lowering the smoke point of the oil each time.
Below Chart Shows the Smoke Point of Different Cooking Oil

So, By considering the above factor as one of the best solutions if we control the temperature of edible oil at define range during frying process by controlling the flame of LPG Stove. we can maintain the quality and the impact of reheating of edible oil on helth during the this process.
Abstract
Deep frying is the universal, prevalent and one of the most important processes involve in the food processing industry even in the home kitchen. Psychologically thinking of the reason behind is only the economic reason as the oils are expensive and after the first use, there is a lot of oil remaining on the pot, that makes people use it again and again without any concern of the health effect of this oil. Although for a country like India where 60% of the edible oil imported from the other source of the country which bears a lot of economic expenses. Every year elevation in the price of edible oil which causes people to use the same oil in repeated frying for food. In this review, the paper focuses on the jeopardize effect on health and the statistical and economic analysis on the edible oil in India.so for avoiding this overheting of edible oil implementing the technique of temperature control with the help of servo motor and temperature sensor, for controlling the flame of LPG stove to specific requirement.
Aim of my Project.
Automatic Controlling of LPG Flame During Frying Process.
Following are the Objective of my project.
1) To reduce the ill effect of reheated edible oil on human Body.
2) To Maintain the Quality of Edible Oil.
3) To reduce the economic loss.
4) To Reduce the loss of Heat.
Expected Outcomes:
1 ) it will save the cost of LPG.
2) it will reduce the ill effect reheated edible oil on human helth.
3)Maintaining the temperature of edible oil during frying process as per define limits.
4) Maintaining the Quality of edible oil.
5) Save the loss of heat energy.
Need of my Final Project
Below Sketch shows the Imapct of Reheated Edible oil on human Helth.

As we discuss above
Oil is a major part of the Indian cooking style, and most households use it in their food.
The need of this is by doing so we can restrict the excessive heating of edible oil.
As hotels process of cooking is quite continuous and because of which the overheating of edible oil took place.
This over heating of edible oil is not good for human health and that should be prevented.
Reheating certain vegetable oils like sunflower or corn oil has been shown to release a higher concentration of Aldehydes, toxic chemicals that have been linked with many conditions like cancer, heart disease
Cooking oils contain trans fatty acids, which increase upon being reheated.
Trans fats are worse than saturated fats as they not only increase the levels of bad cholesterol, but they also decrease the levels of good cholesterol. It is associated with an increased risk of cardiovascular disease, stroke, cancer, and various liver disorders.
So my Idea of prevention is that by using the heat sensor or (fire sensor) we can measure the limit or threshold of heat above which the heating is hazardous.
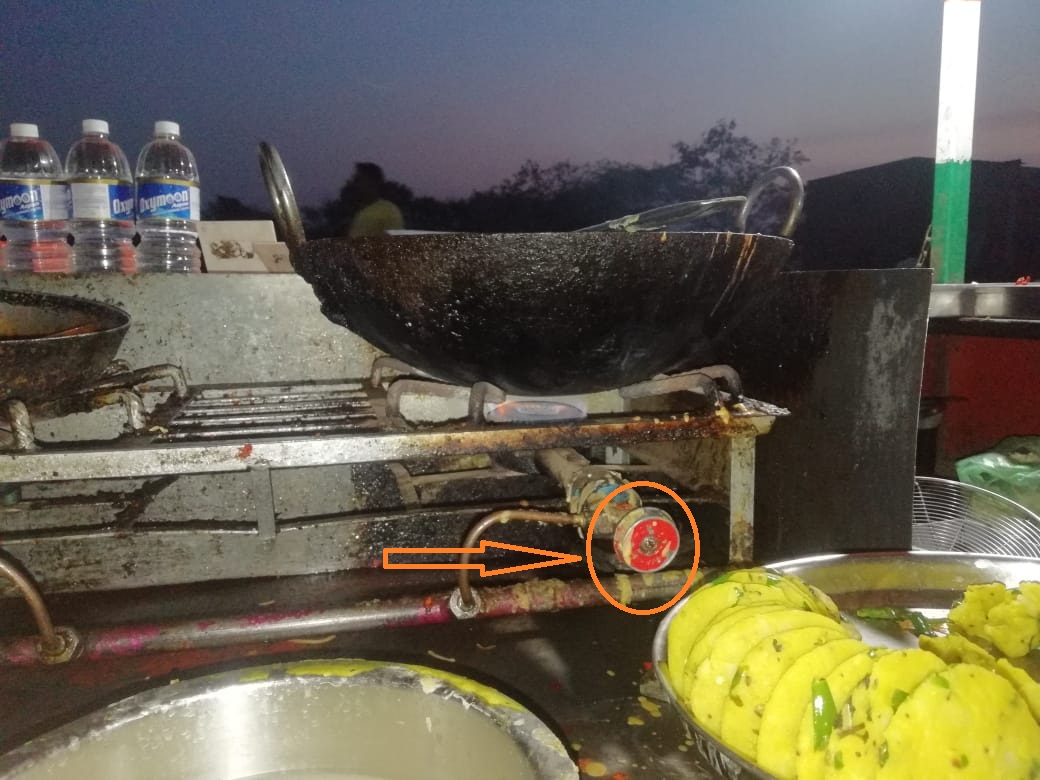
1) Electronics Circuit Design
2) Input Device Interface With Controller
3) Output Device Interface With Controller and display as per Input Data
4) 3D Designing and Printing
5) Embeded Programming
Q.1 What does it do?/How it's works.
It's about controlling the flame of gas in hotels kitchen burner.
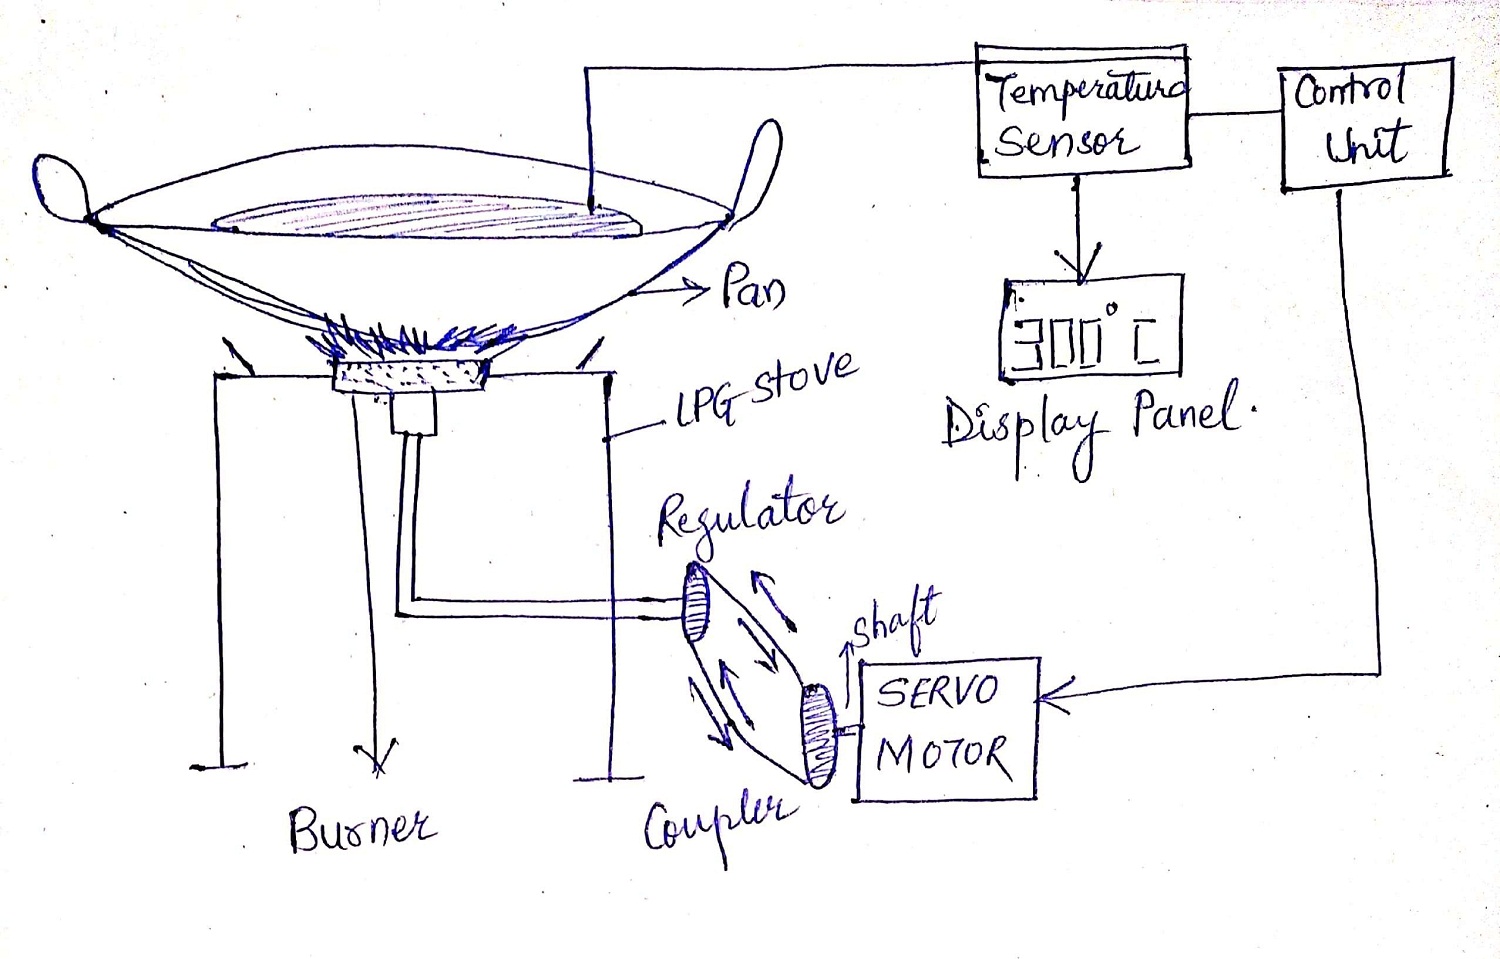
A Tempreture sensor will sense the tempreture of oil and then it gives the information to control Unit may be i.e micro-controller Board. it has the programming to optimize the tempreture level as per the need. The control unit send the command to survo motor (The shaft of survo motor is connected to knob of the regulator with the help of Gear arrangement which rotate the knob of the regulator as per requirement).
This is how the tempreture of edible oil will be maintain.
Q.2.Who's done what beforehand?
For working on this topic I have gone through some literature survey which is available on various sites. So as far as my final project topic concerned I found most of the cases related to this topic Industry Base PID controlled which is used for the controlling the flame of LPG while frying Process.
I have found the various concept of temperature controlled technique as follow.
As I wanted to make an Edible oil temperature First I need to Understand Why we need to controlled the temperature of Oil During Frying process for that First I have reffered this Research paper LINK
Why do we need temperature controllers?
Temperature controllers are needed in any situation requiring a given temperature be kept stable. This can be in a situation where an object is required to be heated, cooled or both and to remain at the target temperature (setpoint), regardless of the changing environment around it. There are two fundamental types of temperature control; open loop and closed loop control. Open loop is the most basic form and applies continuous heating/cooling with no regard for the actual temperature output. It is analogous to the internal heating system in a car. On a cold day, you may need to turn the heat on to full to warm the car to 75°. However, during warmer weather, the same setting would leave the inside of the car much warmer than the desired 75°.
Common Controller Applications:-
Temperature controllers are used in a wide variety of industries to manage manufacturing processes or operations. Some common uses for temperature controllers in industry include plastic extrusion and injection molding machines, thermo-forming machines, packaging machines, food processing, food storage, and blood banks. The following is a brief overview of some common temperature control applications in industry For more detail have reffered this hand Book Link Here.
Then I have reffered some you tube links of DIY PID Controller.
Again I have gone through some case studied related to this topic
https://www.computoolable.nl/Met4.pdf https://hackaday.com/2018/04/14/pid-control-with-arduino/
What did you design?
For final project first I have designed the stucture means how my final assembly looks so I have designed this assembly part in solid works software.
first I have tried to drawn the sektch of assembly with LPG stove, burner,where should be place the tempraure sensor , and how to aligne servo/stepper motor so that it can be properly regulate the valve of lpg stove.
So In this case I took the help from our Fab-lab instructor.

Then I have drwan the CAD modelling of above system in solid work software for this I had to made the various parts and assembled it.
Designed parts as follow.
 |  |
|---|---|
 |  |
 |  |
The Final Assembly Looks Like.

Then I have designed the Microcontroller Board In Eagle Software both schematic and Board of Atmega328 in Input devices week.
The input device board is designed using Eagle software. For the given project,Atmega328p Microcontroller board which is I have used in the already completed in Input devices Week.Assignment-10
The schematic and Board diagram for input device board is shown below:
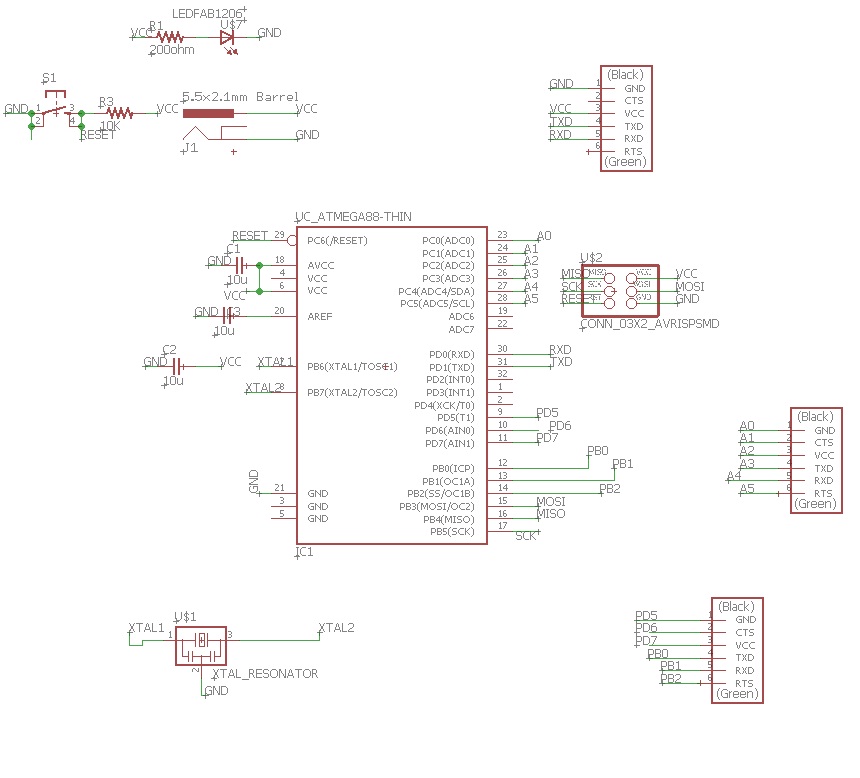
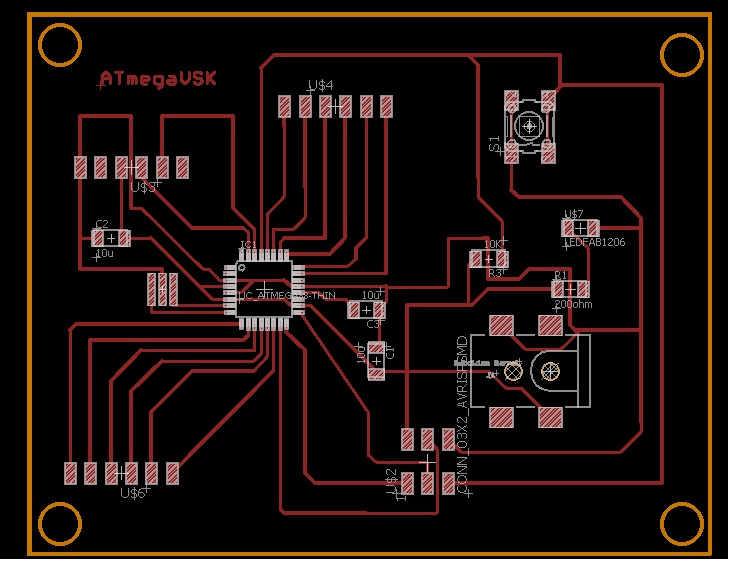
After that save this file in .png format at given to the mods.project software for completing the milling process the over of process of mods operation is given in the electronics production week for trace as well as for cutting the PCB.Assignment-04
The below Image shows the Board is ready with designing, milling and stuffing.
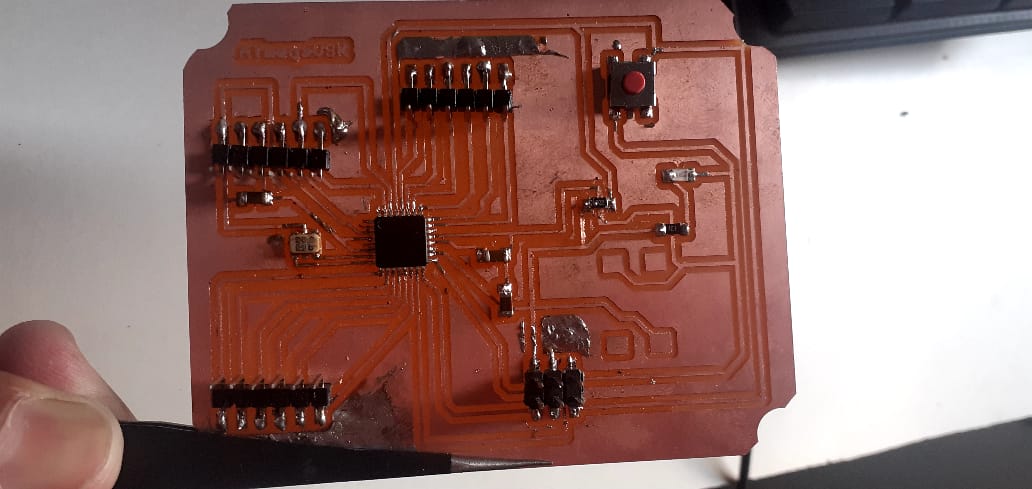
2D and 3D Designing of project part in CAD Designing Software.
Designing of required project parts Like Servo Motor Hoder ,designing of Coupling, Desinging of Gear to rotate the knob and some part designing as per project requirement. So I have design the parts Using 2D and 3D desiging software like inkscape, freecad and tinkercad.
1. Designing of Servomotor holder in freecad software. so by considering the dimentions of given servo motor I have designed this in freecad software.

2. Designing of coupler and Gear required.

I have desinged the Gear parts as per requirement and make them hole as per givan dimentions of LPG knob and motor diameter.

Casing designed for the final structure.

Casing for the LCD designing in Freecad software

First I have designed the casing for LCD in freeCad software becasue I wanted to deisgned the casing box for Microcontroller board using Acrylic material and cut it by using lesercutter but I had to attched the box near to LPG stove so I decided to use readymade PUC box avalable in our Fablab Inventory. So I had change the designed and made only 3D printed casing which can cover the front side of LCD desined in Rahino-6 Software.


What materials and components were used?
For my final project the components and the material are required as follow.
The soldering components are as follow.
1. Atmega328p ic 1 nos.
2. Push Button. 1 nos.
3. Capacitor 0.1 uF 3 nos.
4. 20 Mhz Resonator Crystal Oscillator 1 nos.
5.Resistors 10k,100ohm.
6. Connectors as per Requirement of Input and Output Devices.
The Following table shows the material required for my final Project with specifications.
| Sr. No. | Name of Components | Specification | Qty. |
|---|---|---|---|
| 1. | Servo Motor | TowerPro MG945 Digital High Speed Servo Motor – Good Quality | 1 Nos. |
| 2. | PT1000-S Waterproof 1m 30mm Stainless Steel Pole Probe Temperature Sensor,Length of the probe: 30mm. | Accuracy ±(0.3°C+0.5%|t|),Max range 550°C. | 1 Nos. |
| 3. | Atmega328P Microcontroller Board | - | 1 Nos. |
| 4. | 4.7 kohm series Resistance | Variable Potentio meter. | 1 Nos. |
| 5. | LCD Display with I2C module | 1 Nos. | |
| 6. | Stuffing Electronics Component Like resistor, Capacitor, Power LED, 20Mhz Crystal Oscillator. | -- | As per requirement |
| 9. | Cummertial LPG Stove with circular Knob. | -- | -- |
| 10. | DC Power Adaptor. | 5 Volts | 2.nos |
| 11. | Iron material for making the aseembly for sensor and servo motor as per requirement | As per Size and Dimenssion of LPG stove. | -- |
| 12. | Miscellaneous Accessories Like Heat Resistance material( Fiber glass material, | -- | As per requirements |
5. Where did they come from? and How much did they cost?
| Sr. No. | Name of Components | Supplier | Cost (Approx.) |
|---|---|---|---|
| 1. | Servo Motor | FABLAB Inventory | 700/- |
| 2. | PT1000 Temperature Sensor; | Amazon/Flipkart | 200/- |
| 3. | 5 Volts DC power Adaptor( 2 nos.) | Amazon/flipkart | 240/- |
| 4. | LCD with I2C Module | FABLAB Inventory | 300/- |
| 5. | 4.7 kohm series Resistance (Potentio meter) | FABLAB Inventory | 150/- |
| 6. | Iron Material for Stucture and final Assembly. | Vigyan Ashram Inventory | 1200 |
| 7. | ATMEGA328P IC | Vigyan Ashram Inventory | 300 |
| 8. | Wires and other Miscellaneous material like Heat resistance for protect the temperature sensors. | Fab Lab Inventory | 1000 |
The total aproximaterly cost is Rs. 4090/-
The parts and systems were made and the processes I have used as Follow. and taken some trials on it.
Before making the complete assembly first we have tried to run the stepper motor to control the knob of lpg.

Here I have faced the problems about the stepper motor and knob of lpg ,How can be coupled it toghether so that it gives the perfect controlled for that I had to do number of processes that explain in details below.
To run the final project smothely and got the results as per define objective I had to do more practice while making the parts. So the what are the practices I have followed is discribed in detail as below.
For final project assembly I have made the stucture to assembled the servo motor and to mount the temperature sensor attched with LPG stove specifically
The above stucture I have made using iron material. for this I have tried number of designed and practices as mention below. then make the final stucture.
When took some trial I have taken some shots included below.
 |  |
 |  |

|  |

| 
|
Here I have used heat resistance material for the temperature sensor for the protection from the lpg fame is shown below

For making the stucture I had to to welding griding for some parts of metals


This is the servo Motor holder cut by using plasma cutting machine.


But Here After testing its Observed that the coupler I am using is not able to precisely control the knob of lpg so I have changed it and made a gear Arrangement. also need to used the specific holder for servo motor.
For making the assembly to place the temperature sensor and to mont the servo motor for connecting to lpg knob have followed the various practices as shown in above imgaes
This is the final stucture. that I have made.I have tried to run the motor using metal sheet using plasma cutter and also the leser cutter used to cut the acrylic material and tested for the both.


This is how I have setup my system.

The next part is to made the microcontroller board which have desiged in eagle and milled it by using SRM 20 machine.both sheild circuit and ATMEGA328P Board.Here I haved faced the problems with my previous board so I have mill the new board make it ready by soldering and stuffing all the component.

Then I have made the servo motor holder and gear arrangement for coupling the servo motor and LPG knob. for this purposed I have used the subtractive process i.e. leser cutting to cut the servo motor holder and Gear arrangement
Then as I am using servo motor and LCD module it required separate 5 volts DC supply. for that I have designed and mill one extra sheild board for separate power supply and connection
Here, I have done the wiring and connections for microcontroller board.


I have also tried to designed part of gear using 3D printing i.e additive process with diferent cobinations, Size and the ratio of gear so that the motor can smoothely rotate the knob of LPG as per my requirement

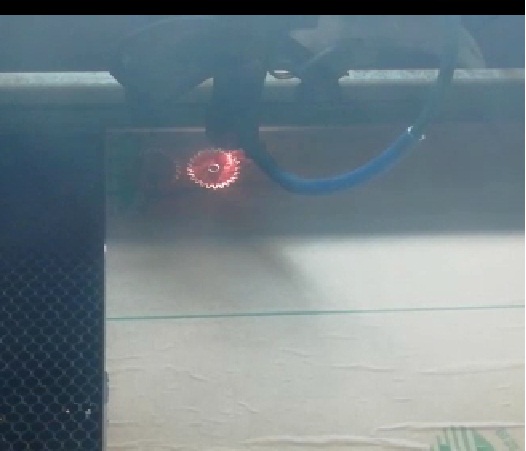

This is the servo motor holder cut by using leser cutter with gear

Then I have made the casing for LCD box using 3D printer as follow.

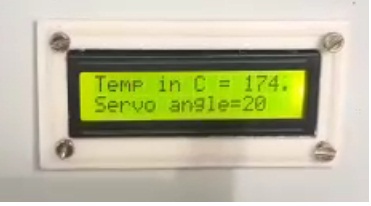
In this way I have used the above above Fabrications techniques for makng an assembly for my final project like leser cutting, 3D printing, Plasma cutting, Milling of electronics board using SRM-20 machine.
Next parts is I have taken some trials on all designed parts with controlling the LPG Knob.
At starting I need to calibrate the temperature sensor which is PT1000. Calibration of PT1000 Temperature sensor is as follow.
Firstly by making an voltage divider circuit by connecting Pt1000 sensor is in series with the 4.7kohm resistance the details about the connections and voltage divider rule is given in the Input devices week Assignment No. 10
For finding out the calibrations factor I have connect the sensor to microcntroller board as per circuit diagram given in the input devices week page and run the simple code from Arduino IDE i.e. analogread from an example menu.

After uploading this code in microcontroller board I have got the reading in term of analog values read by the sensors. Then I have used the thermameter to compaire the analog value with actual temperature. The circuit is as follow.


Then I have note down the reading after some interval of actual temperature and analog values read by serial monitor.

Then by ploting the graph I have calculted the calibrations factor and y intercept which is usefull to measure the actual temperature from PT1000 temperature sensor.

In this way I have calibrated the temperature sensor and this value I have use in final code.
Trials,testing and trobleshooting.
After done this going to make some trials on final project. So first trial I have taken on the stepper motor for controlling the knob of LPG.
The video shows the trying to rotate the knob of lpg with the help of stepper motor.
Here, it is observed that the knob of the regulator is very sensitive and it only required 30 to 40 degree rotations for getting the maximum flame and the initial torque required at home position of LPG knob is high so, I thought that we can use the servo motor thats why the next trials I have performed on the servo motor,it has high torque and maximum rotations is only 180 degree. So it is better to use servo motor instead of stepper. Because I was faced the number of issue with stepper motor like current requiremet, initial torque etc.....
So As I mentions above I decided to use servo motor available in our Fablab Inventory
Initially I have tried differnet types of coupling for the servo motor 3D printed, metal coupling and performed some trials on it but it require proper alingment and strong coupling
Initially setup the system like below with metal coupler.
Some times it Observed the flame comes automatically high and low due to not proper coupling and alignment.

The Video shows the controlling the LPG flame with the help of servo motor.
This is How LPG valve can controlled by Gear Arrangement.
The below video shows the flame controlled using metal coupling
Here After performing some trials with metal coupler to control the LPG flame the coupling is not align properly becasue sometimes its will not able to rotate the lpg knob only motor get rotate I didn't Understand this issue but it might be due not proper alignment or the skew availble for coupling not perfectly tighten so some time the operration not be perform as per given code, some times its obeseved that Lpg Flame goes very high due to sensitive rotation of knob.
Then I decided to use the Gear arrangment and tried on it. Here By making the acrylic servo holder for proper alignment and gear arrangement as follow.
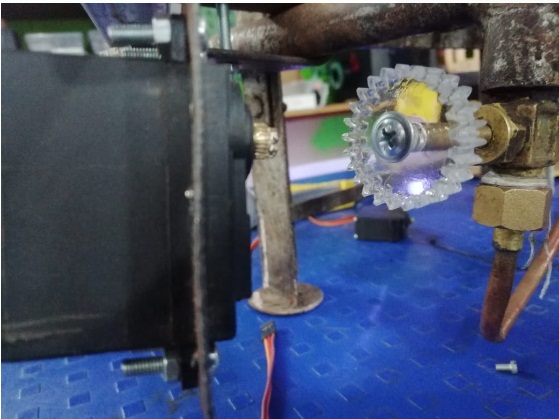
In this way I have performed the number of trials with various size and the ratio and also the by varying the number of teeth of gear final I have got the success with the Gear arrangement of ratio 1:1 having the 24 number of teeth with the Gear connected to LPG Knob is in size that gear connected to servo motor becuase the Lpg Knob when rotate it required some space in front of knob .
The Internal parts of servo motor

While trial testing on servo motor I faced one dificulty about this motor, after some trials when I fixed servo motor shaft with gear and attched it using the skewing it tightly then servo motor not working properly.

In this case I have checked the internal parts it proper or not so its detects that the due pot position distrub servo motor is not working, so I have fixed the Pot propely with the help of Mohit from our Fablab.

I noticed that Due to lenght of Skew is long it distrub the position on Pot.

Now Fixed the all issue, Resolved almost all difficulties I had to focus on final product and finishing my final project.and need to worked on the final coding.
This is I have done the final wiring and finishing to the system

This All trials I have performed when the water in the pan, so the boiling point of water is only upto 100 degree celcius, For my objective is to make the controller for edible oil ,so I have also performed some trials on edible while frying some food. and its working properly as per my requirement of temperature and the flame conttrolled as per given angle by the servo motor.
I have also tried to designed part of gear using 3D printing i.e additive process with diferent cobinations, Size and the ratio of gear so that the motor can smoothely rotate the knob of LPG as per my requirement.
Then, I had to write my final code and demonistrate the final project , so I started writing the code I want to write my code as per as per my need I need to maintain the temperature of edible oil in between 190 degree celcius to 200 degree celcius.because this is the good frying temperature as per literature so I had to controlled the flame of lpg stove during frying process as above mentions parameter.
Programming with arduino IDE.
I have written the code in such a way that initially I have set one limit of temperature initial Set value and set the motor angle at zero position. Then while connecting servo motor to lpg knob, when the motor is at 0 degree position the lpg knob is at home positions or minimum possition, so initially it will display the initial temperature on LCD display also display the servo position.then at low temperature the knob of lpg rotate in 20 degree so it will increase the temperature of oil in the pan. when the value of temperature is reached at given limit the flame will reduce by 10 deree and when the temperature is reached at maximum limit the lpg knob is at zero/home position means at minimum flame.
Final Programming.

#include "Wire.h"
#include "LiquidCrystal_I2C.h"
#include "Servo.h"
LiquidCrystal_I2C lcd(0x3F, 16, 2);
int tempf;
int setTemp = 175;
Servo myservo;
int pos = 0; // variable to store the servo position
int j = 0;
void setup() {
// initialize serial communication at 9600 bits per second:
lcd.init();
lcd.clear();
lcd.backlight();
Serial.begin(9600);
myservo.attach(9); // attaches the servo on pin 9 to the servo object
myservo.write(0);
delay(60000);
}
void loop() {
// read the input on analog pin 0:
int sensorValue = analogRead(A0);
// print out the value you read:
//Serial.println(sensorValue);
float temp_c = (sensorValue * 1.78365) - 335.045;
// Serial.print("temperature:");
while (j < 1000) {
int sensorValue = analogRead(A0);
float temp_cur = (sensorValue * 1.78365) - 333.045;
temp_c += temp_cur;
j++;
}
if (j >= 1000) {
j = 0;
temp_c /= 1000;
}
Serial.println(temp_c);
lcd.clear();
lcd.setCursor(0, 0);
lcd.print("Temp in C = ");
lcd.print(temp_c);
lcd.setCursor(0, 1);
lcd.print("Servo angle=");
lcd.print(pos);
if (temp_c < setTemp) {
pos = 20;
myservo.write(pos);
}
else {
if ( temp_c <= 190) {
pos = 10;
myservo.write(pos);
}
else {
pos = 0;
myservo.write(pos);
}
}
}
After programming This How I have setup for the Final Demonstrations.


Final Project Presentation.

Final presentation Video.
This Video shows I have tried to fry the "PAKODE" (this is an indian favourate dish) and mostely frying dish So At vigyan ahsham tried to demonstrate my final project by frying this dish, For this according to survey I have reffered temperature required for good frying process for is in between 190 degree to 200 degree celcius, So I have made the code in arduino IDE AS PER Demand and finally its works properly as per given code and instructions. The Video shows the final demonstration of my project.
After finishing my Presentations Dr. Neil Suggested me to the value of temperature displayed on the LCD screen is not clearly visible ,So its becasue when I made this Video the orinal size of video in 139MB for Uploading this video we need maximum 10MB so I compressed this video upto 9.45MB then upload so the quality of video is down SO, i attched the you tube link of origal Video as shown balow.
Finally we all have tasted the helthy frying food fried in "Smart Shegadi"

"Helthly Food Helthy Life"
On 11th of june there was scheduled my presetations ans I have presentated my work succesfully.Click Here to see my final presentation.

The image indicate presenting my work.
After finishing my presentation Dr. Neil Suggested to show the video like, as per value of temperature it controlling the LPG flame because in above video temperature value not displaying properly due to video quality issue then I have shot the video it showing the proper working with the value of temperature reading i controlling the LPG flame as shows below
In this video when oil is at low temparature the flame is increases by rotating the knob of LPG stove by 20 degree rotation with the help of servo motor and temperature value reached to set value flame is reduced by controlling the knob of LPG stove by 10 degree. and if temeperature is goes to high value the knob will be at minimum possition so that it maintain the required value of temperature during frying process.
This is All about the Final Project.
In the global evaluation I received some suggestions ragarding final project designed parts and electronics Circuit Integrations, So I have worked on that.
1. As a final project it’s fantastic, but you need to improve the integration off all the parts (design)
As I mentioned while designing the structure assembly I had to try on number of structure because of proper alingment of motor and Knob of LPG Rregulator so that it is able to control smoothely
So I have designed final structure assembly and improve the designed as follow.
This is How I have designed the all parts in solid works software.
Here, I have download the desined file of stepper motor and assembled it to my Assembl.


I have made the video of All desined parts of final assembly shown below
2. Some wires are hanging around, and could be protected from the heat, and also guided somehow through the metallic structure.
For protection of wire from the heat and lpg flame I have used some heat resistance material like fiberglass sleeve for connecting wire of temperature sensor.

Some where I have used the Heat resistance insulation alumina ceramic beads for protecting the wire from heat also puted one image of wire with this mentioned beads in while explaining the stucture and assembling the parts.

This is how overall assembly that I have integrated and protected from lpg flame.

3. Also will be super nice for further iterations, if you can create a more detailed schematic of how all the electronics components are connected between them.
Then, This is I have tried to draw the overall schematic in the form of block diagram so that it can be understand the details how electronics circuit is to be connected and all inputs and output devices are connected.

Discriptions:- For final project I have designed the ATmega328p microcontroller Board in input devices project and initially I wanted to used stepper motor , so in output devices week i have designed the A4988 driver Sheild Circuit, but after taking number of iteration with stepper motor, I have decided to used servo motor instead of stepper reason which I have already mentioned.
So In this circuit I have used the PT1000 temperature sensor by connecting 4.7Kohm Resistance in series with it and as per voltage divider rule I am going to measure the value of temperature.In this case A0( Anlog pin 0) is used for the analog signal ouput, 5volts VCC and GND taken from Microcontroller board itself.
Then I am using 16*2 I2C LCD display module its need I2C communication Pin its available at A4(SDA),A5(SCL) on Atmega328p board so it is given to shield designed board and VCC and GND taken from external supply connected to shield board.
Then, the servo motor need only one Digital signal pin , here I am using D9(Digital Pin number 9),and servo motor need 5 volts DC supply, taken from external power suplly connected to shield board.
This is how overall electronics Circuit is to be connected together.
Conclusion.
From results it is observed that the LPG flame is controlling as per given code and setup I have build it is very useful. It also maintaining the temperature of edible oil while frying process as per set limit. and the servo motor can precisely controlling the knob of LPG from temperature reading.This project is also helpful to save the cost of LPG during frying process.
The results shows that when the temperature of edible oil is less than set limit the flame of LPG will increase by 20 degree with the help of servo motor. Then if the oil temperature will increase reached to 180 degree celcius the flame of lpg is reduce by 10 degree and if temperature of edible oil is gretter than 190 Degree celcius the flame is comes down at minimum so that Its achived the temperature of edible oil during frying of food.
References:-
I have linked Acknowledged work done by the other
1) Design of A Smart Electric Cooking Stove by
Caiphas Svosvea, Loice Gudukeyaa, Link1
2) SMART LPG STOVE Link2
[1] Lina Anderson, M. L., 2006. Design of top of the range Ceramic Cooktop. s.l.:s.n.
[2] Mainali, B., 2012. Analysing Cooking fuels and Stove Choices. s.l.:Linnaeus University.
[3] Shumba, T., 2016. Electricity tarrif hike will come at a huge cost. Harare: Herald.
[4] Thermcraft, 2016. electrical Resistance Heating Elements an overview. s.l.:s.n.
[5] Michael David, V. K., 2013. A Microcontroller Based Electric Cooker/Oven with Temperature and Time Control for Developed Countries.
s.l.:Journal of Engineerin Research.
[6] Studential-Ltd, 2018. Methods of Cooking. s.l.:s.n.
[7] Erinosho T O., 2015. Pressure, Temperature and Dwell Time Effects on Fatigue Life. s.l.:s.n.
Useful Links:-
1.https://www.intechopen.com/books/lipid-peroxidation/repeatedly-heated-vegetable-oils-and-lipid-peroxidation
2.https://www.longdom.org/open-access/the-effect-of-repeatedly-cooking-oils-on-health-and-wealth-of-a-country-a-short-communication-44234.html.
3.https://www.thespruceeats.com/cooking-oil-heat-2356059#:~:text=The%20ideal%20oil%20temperature%20for,you're%20good%20to%20go.
4.https://en.wikipedia.org/wiki/Deep_frying.
5.https://onlinelibrary.wiley.com/doi/full/10.1111/j.1750-3841.2007.00352.x#:~:text=A%20large%20amount%20of%20moisture,(Stevenson%20and%20others%201984).
6.https://www.cooksillustrated.com/how_tos/6520-deep-frying-101-treating-your-oil-right
7.https://www.greatbritishchefs.com/how-to-cook/deep-fry-without-deep-fat-fryer.
8.https://reader.elsevier.com/reader/sd/pii/S1359431112002669?token=44BD299F7A0279B737E0E7ADA3C990C5708448DC59797600E7DDE5507658F45AF1A4316E5A9F20F144E9EA26827266C8&originRegion=eu-west-1&originCreation=20210515105627.
Download my original file here

