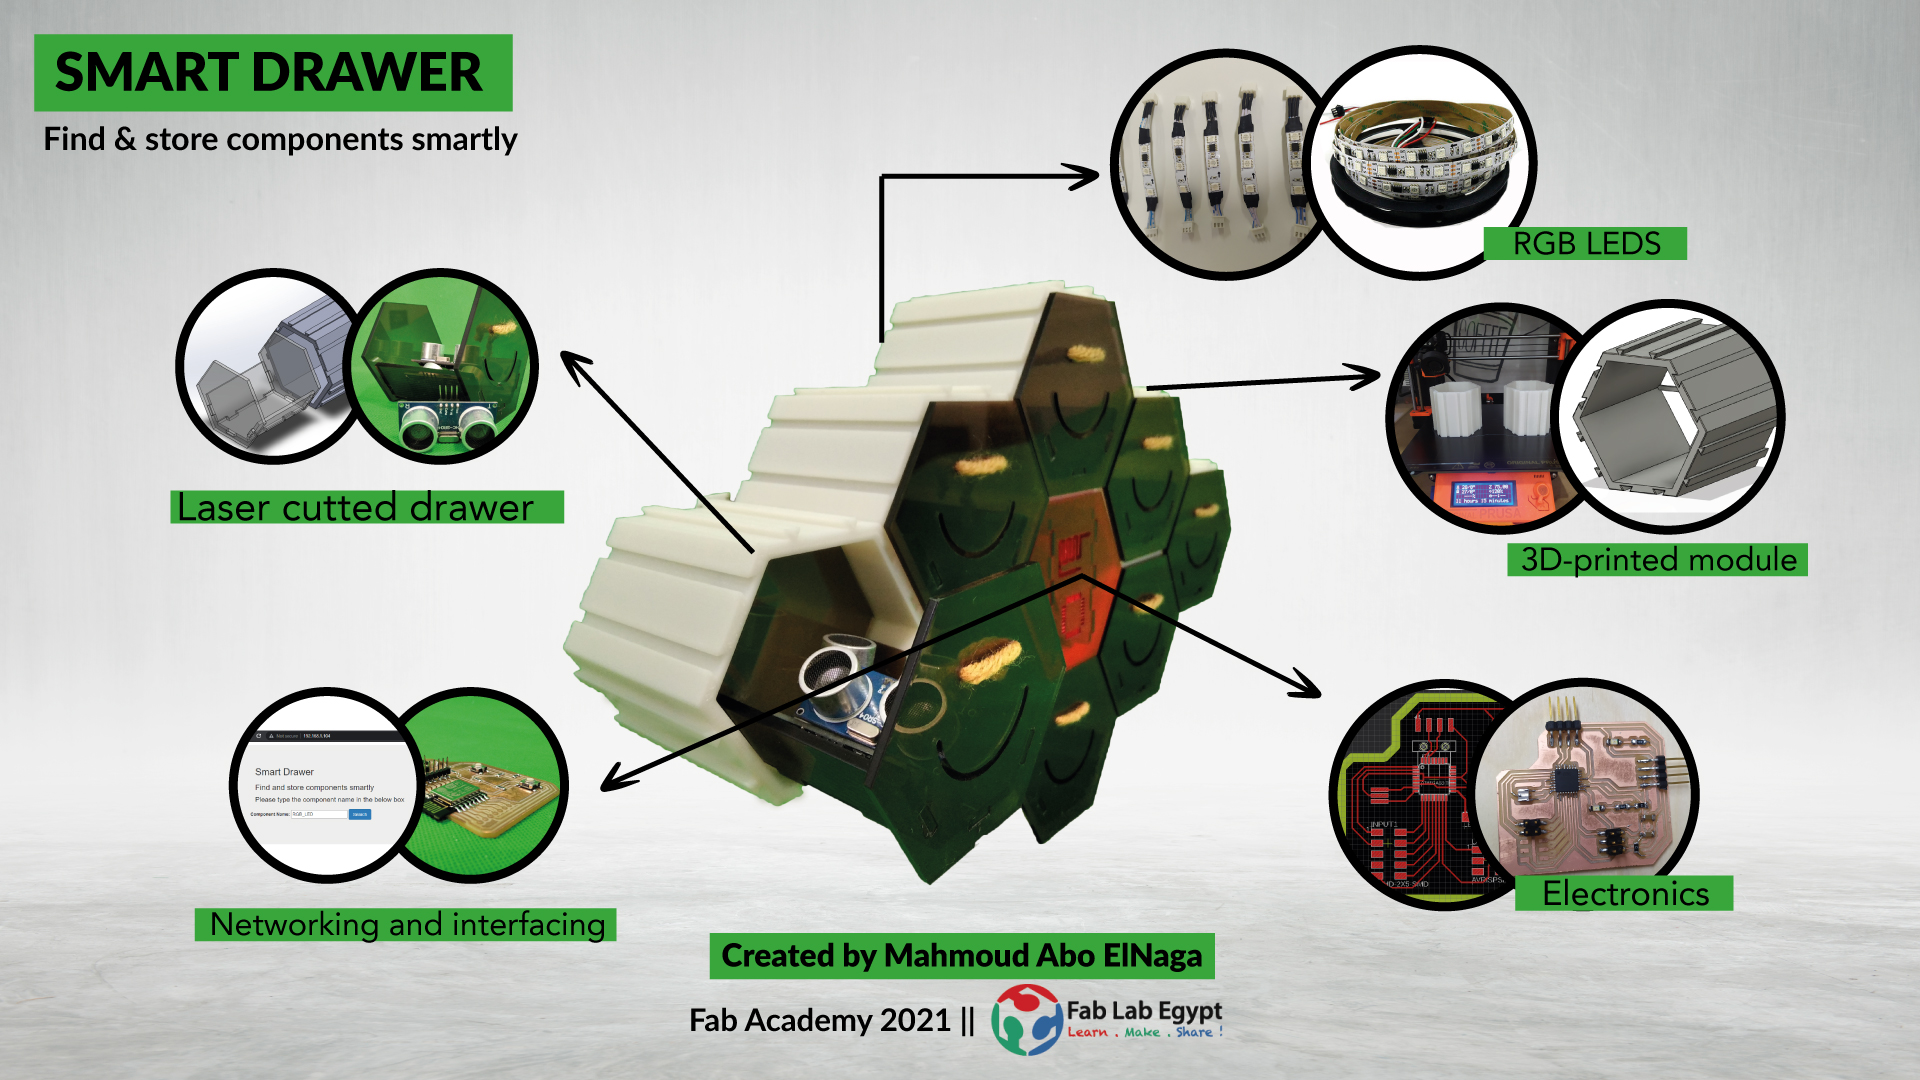
Smart Drawer
Project Slide:
Project Video:
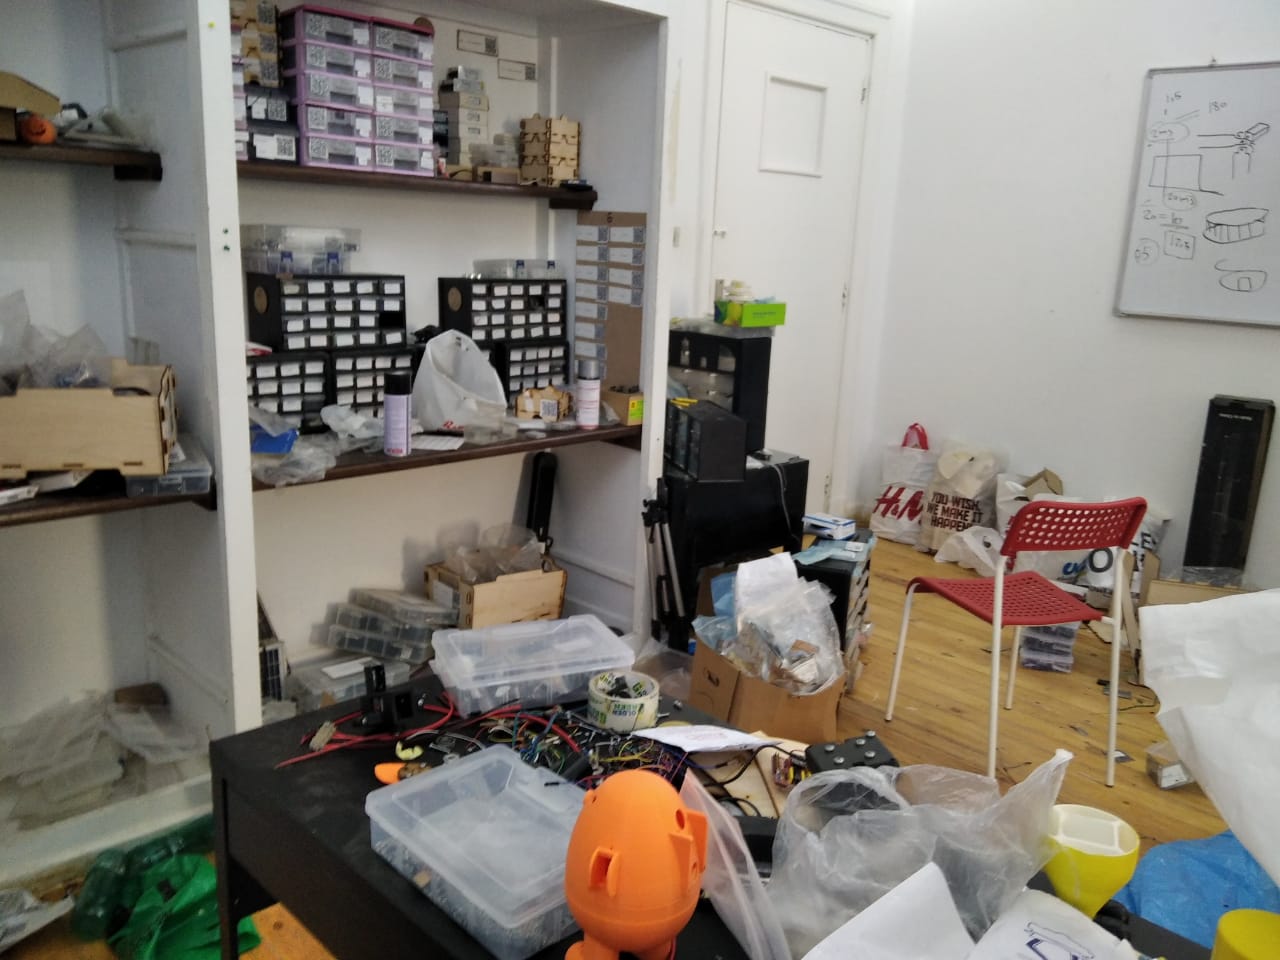
Problem & Inspiration:
Inventory tracking is one of the main issues at most fab labs and makerspaces. At San3aTech (Fab Lab Egypt), it takes a lot of time and effort to re-arrange and organize components after each workshop or educational program. So, I am passionate about solving this problem and decreasing time and effort consumed every week, by designing and making a smart system (Smart Drawer) for maintaining components in an easy way and tracking inventory.
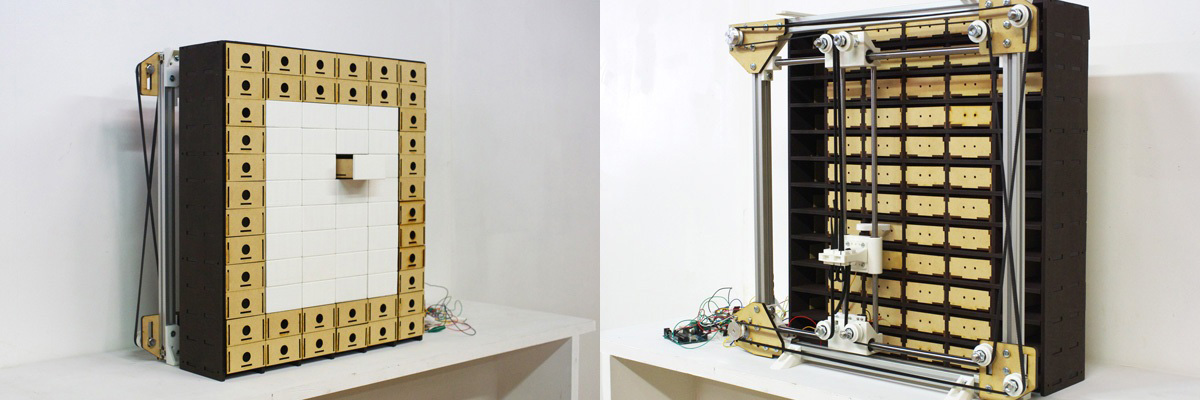
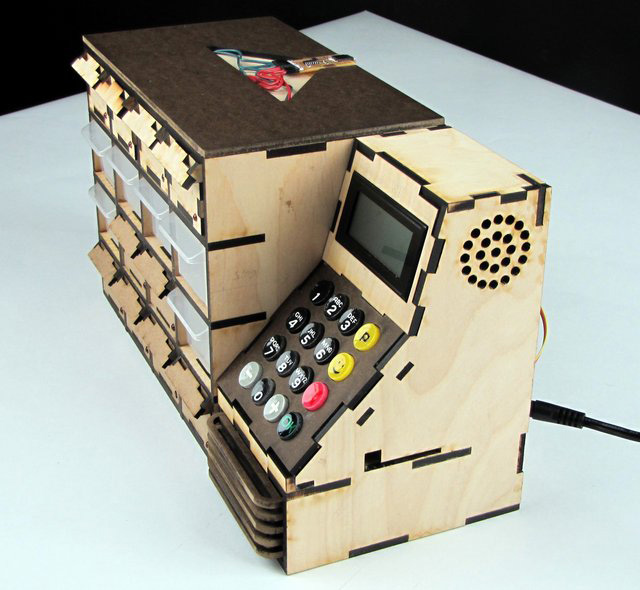
First, I searched Fab Academy Archive if a student made this before as a project/assignment and fortunately I found 3 potential projects as follows:
- Inventory Bot, made by Kohei Morimoto from FABLAB Kitakagaya Japan in 2017. The mechanism is based on core XY sytem which is attached on back of the cabinet. A shaft with servo motor is attached on the head which pushes out the desired drawer, when a person need any component he/she has to give two inputs to machine a name of component and no. of quantity after that if the component is available the core XY system moves toward that box and push it out. The arduino is used to control the core XY system which gets instruction from PC and act according to it.
- Wally, made by Kenzo Prada Abiko from AS220 FabAcademy in 2015. This project also designed to maintain the inventory for the specific projects. To interface with machine LCD is placed alongside buttons which are also fabricated, a person needs to input a number of project and the boxes which have component of those project lights up to mention them. After taking desired component a person need to enter the number of component he/she tooks. And inventory updated with respect to it.
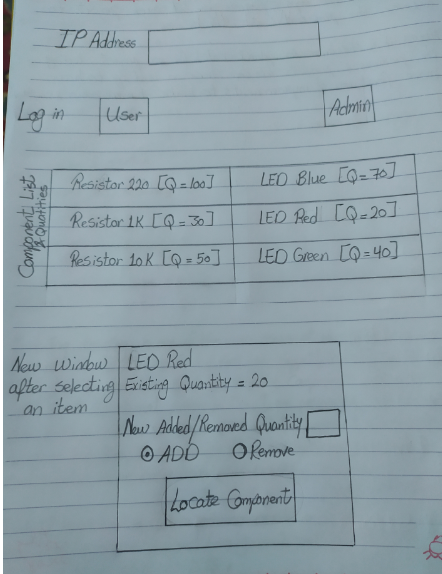
- Smart Inventory System, made by Noor Ahmed from Khairpur FabAcademy in 2018. The user inputs the IP address in the browser, a list of items and their quantities will appear, user should select an item to add or remove and its quantity and then press locate, an RGB led will be blinking indicating the the box where the component located.
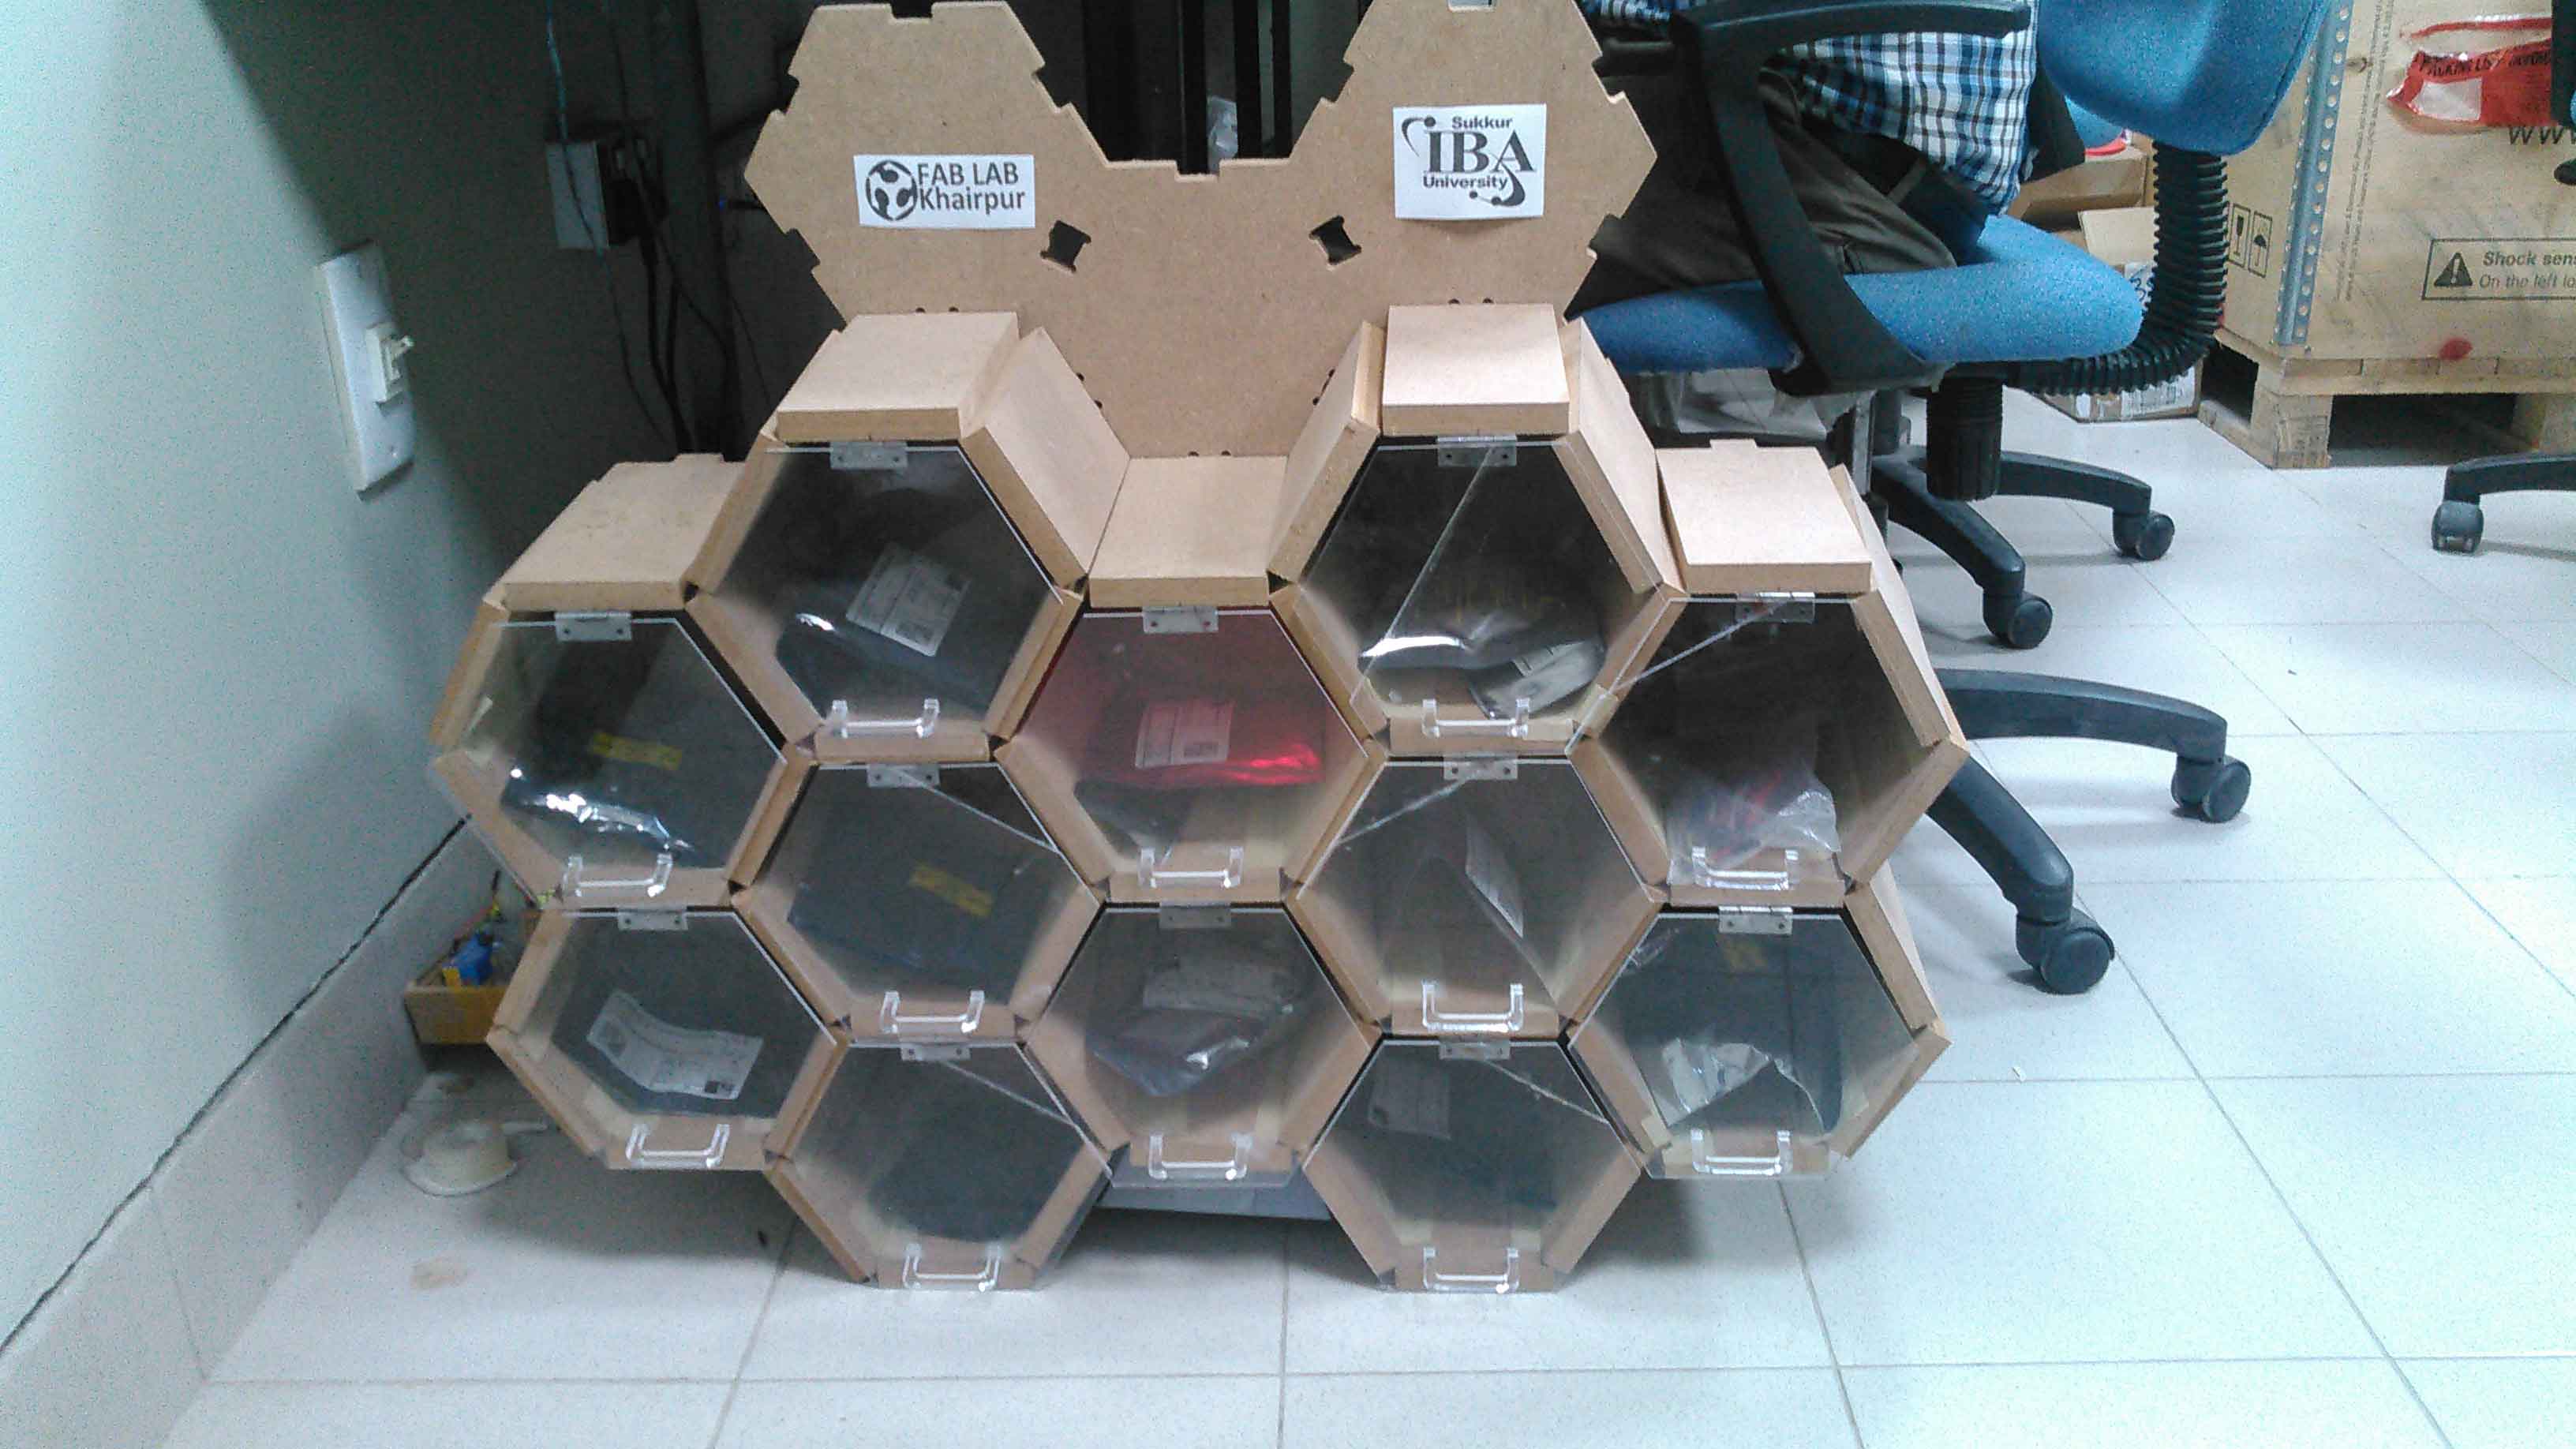
I checked all the steps and progess done at each project in order to discover the pros and cons of each one. I really loved the Smart Inventory System made by Noor Ahmed and it would be my initial start with further developments and features.
NOW! it is the time to plan and sketch for my project, taking into considearion the above 3 projects and try to have more features and improvements to make it more smart and user friendly.
My New Features:
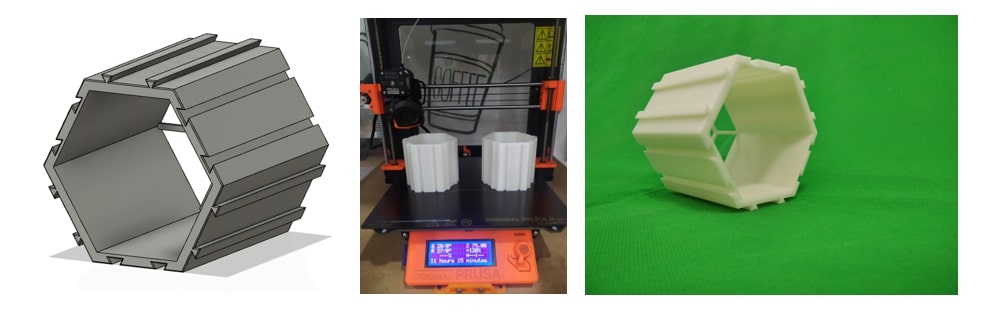
- 3D printed modules/structure to be modular and parametric, light weight and ease of assembly and disassembly.
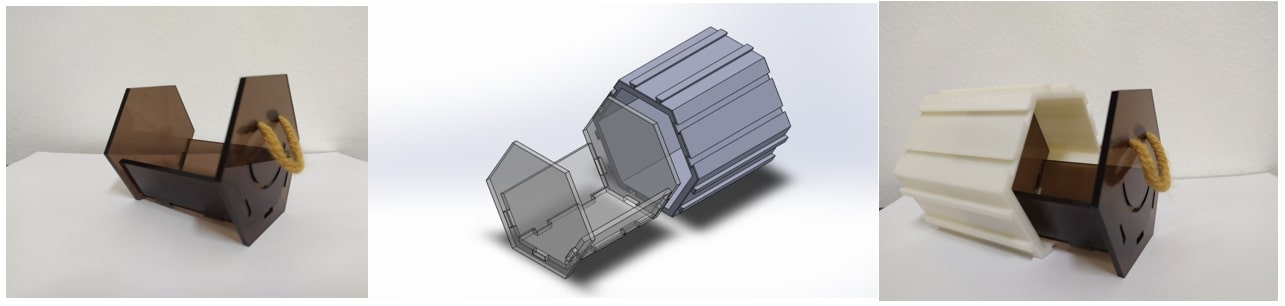
- A drawer for each module, drawers may be with different sizes and shapes to maintain various components.
- An Addressable RGB led strip for each module, it has 3 RGB leds for better flashing/blinking and connected with other modules.
- A control box in the middle of the structure to receive the signals and control the RGB Leds.
- A back cover for the structue to help fix it on walls.
- A single connector/adaptor for powering up the system
- A search box for typing the component name and then a window includes the quantities and type of target operation.
Core Modules:
- Construction Parts: I will be using Fusion 360 to design a Cabinet of 9 drawers, I will do parametric design to be able to scale up/down the cabinet in short time, firstly I will laser cut the parts using Cardboard or wook to make sure dimensions are okay, then I will use the CNC Router to fabricate the final one.
- Input Device: A user will input the fixed IP address in the browser of his/her laptop or mobile.
- Output Device: An RGB led in each drawer, it blinks when selected to add or remove components.
- Microcontroller: I will be using Atmega 328P with an ESP8266 to read the user data and blicks the desired RGB.
- Power Management (Source): A 5V adapter.
How does it work? (Process Workflow)
The following is the steps you have to do in order to find or store components:
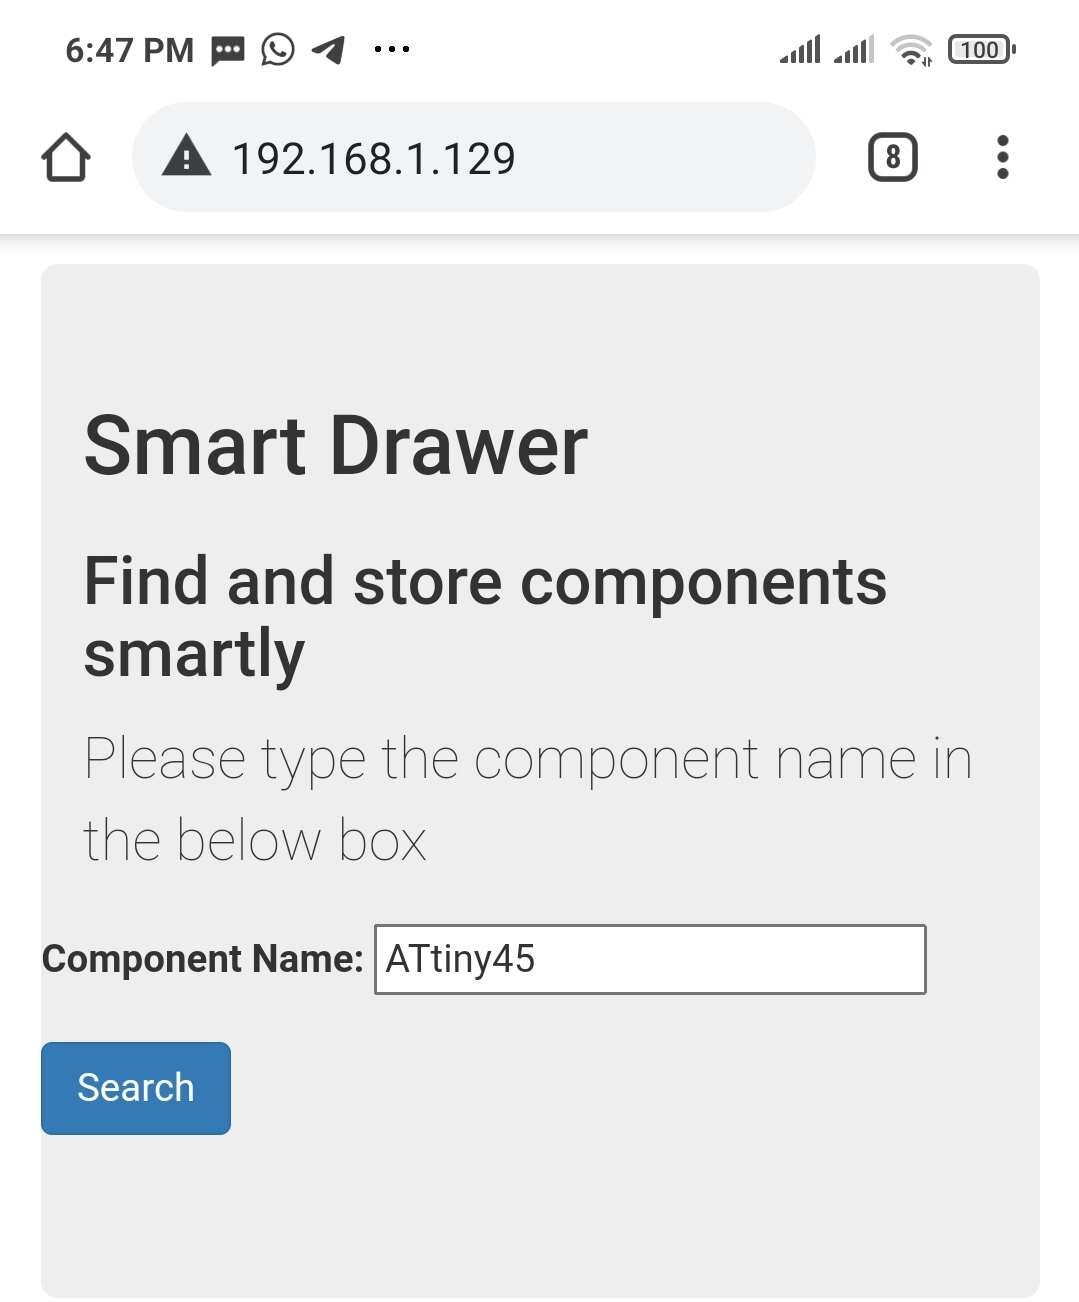
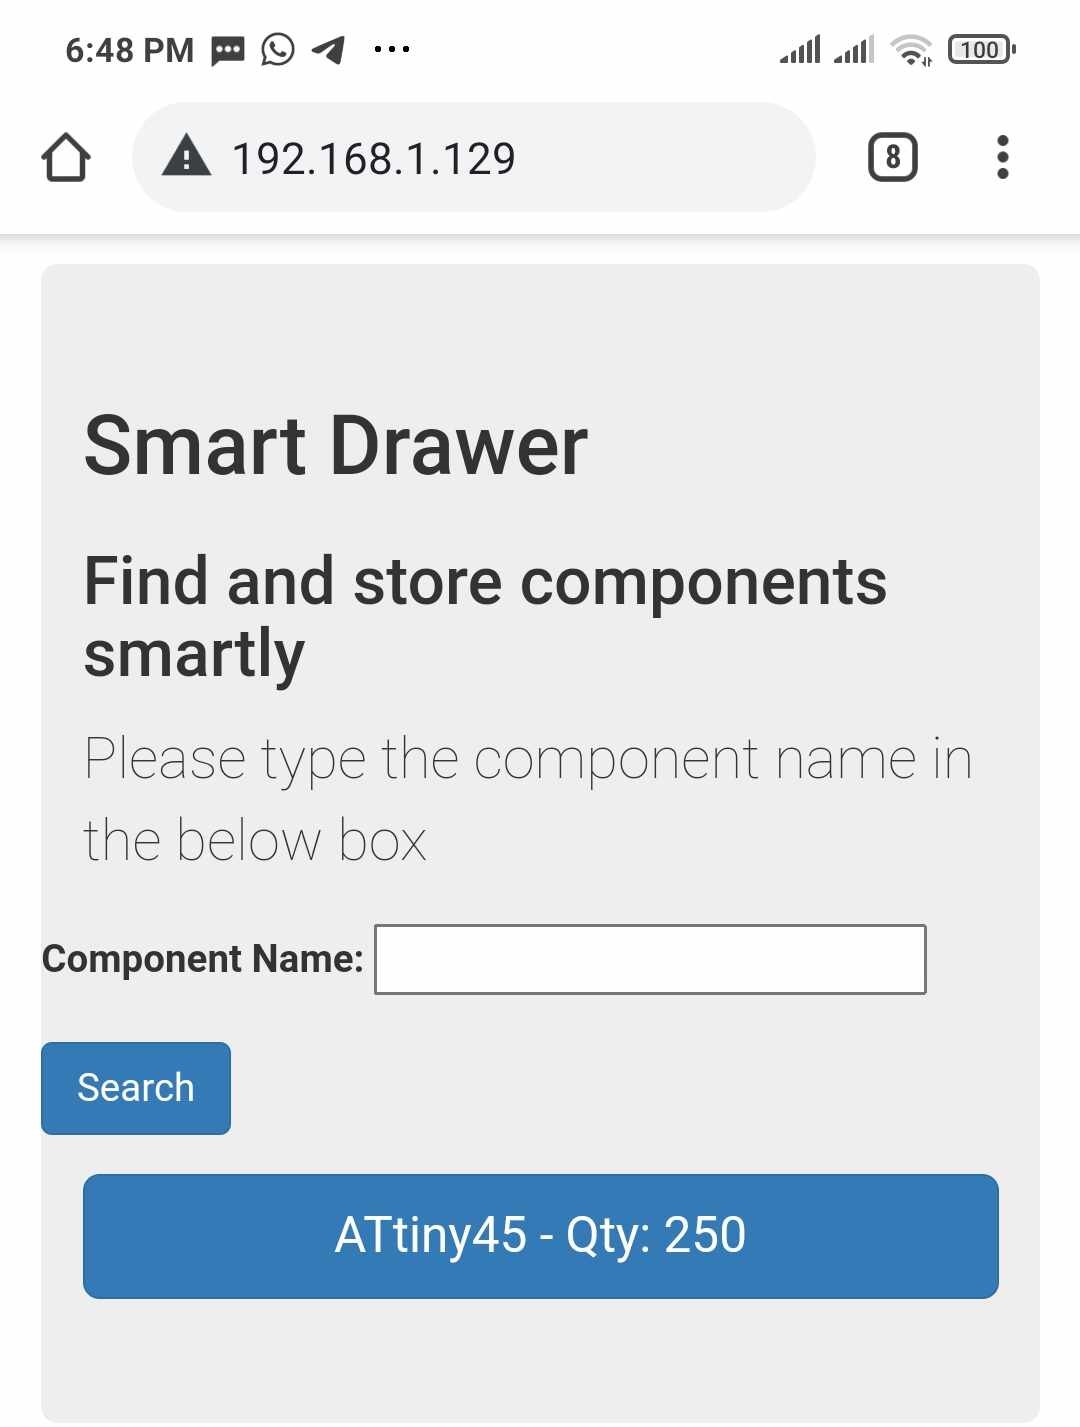
- Write down the IP address into your browser.
- A window will appear to type the component name and then press search.
- A button with the component name will appear below, press on it.
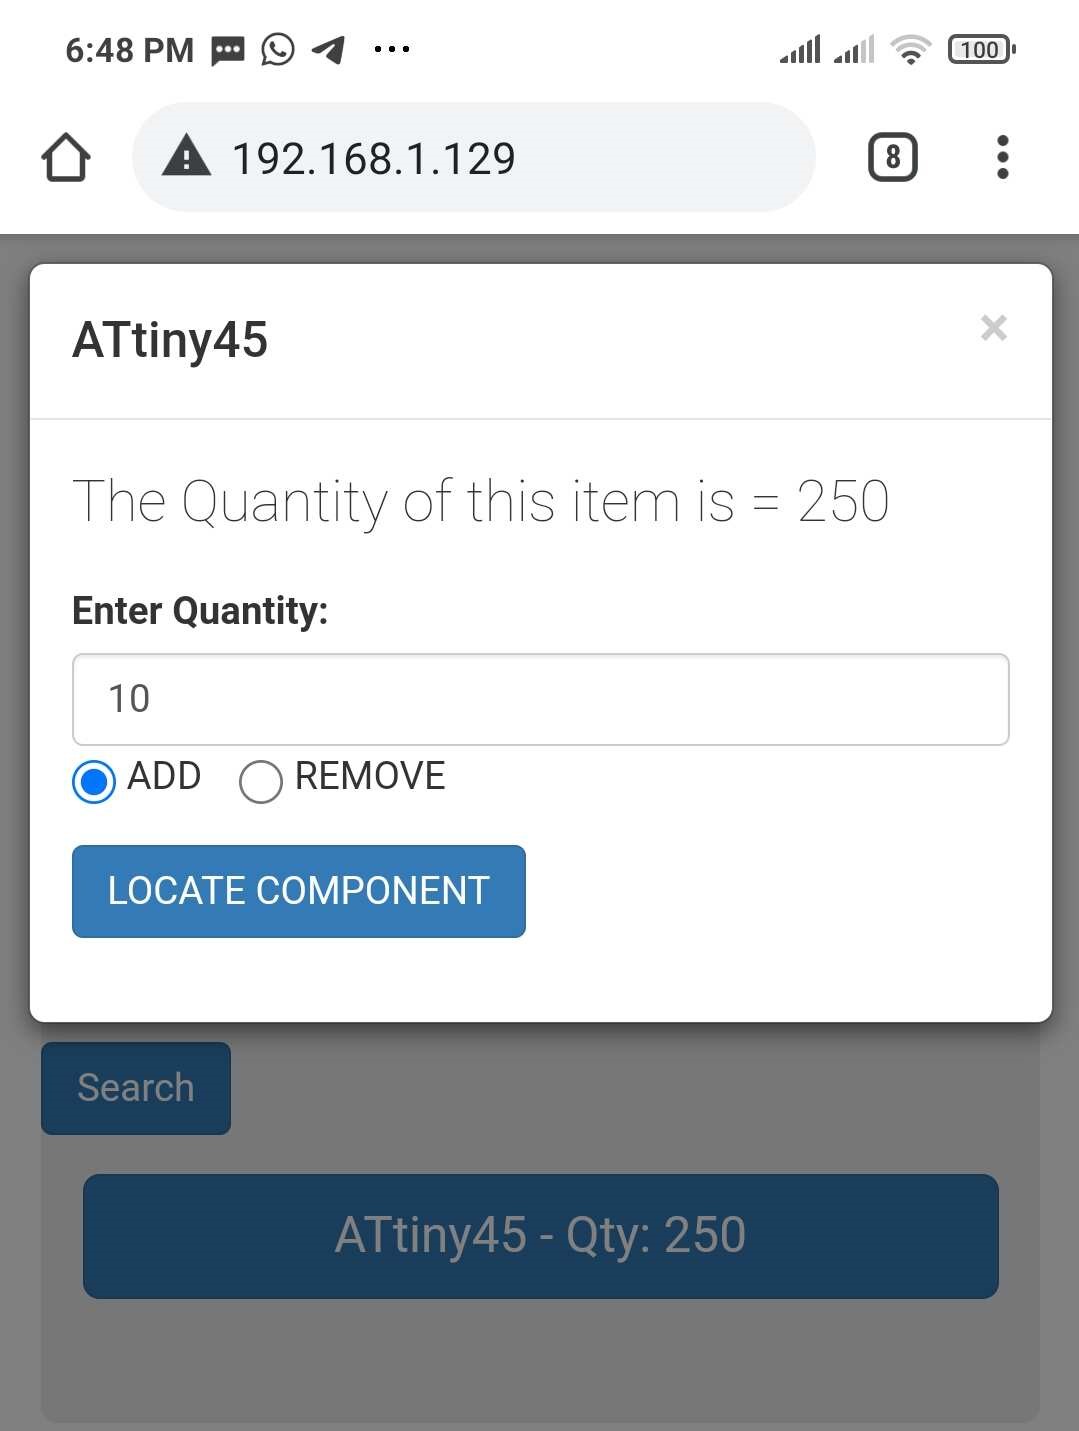
- A new window will appear to tell you the existing quantity of the requested component and also to write doen the qunatity you want to add or remove.
- Press the locate component button and the target component box will blink and the new quantity will be stored.
Design & Fabrication (Mechanical and Electronics)
Mechanical Structure
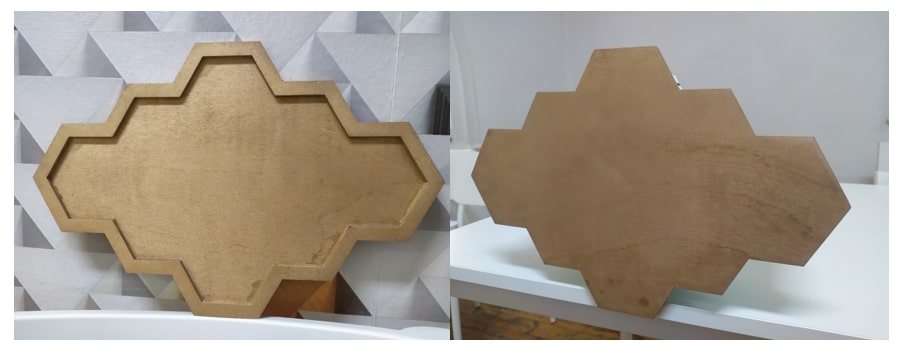
- I designed a modular frame on Fusion 360, each module has slots for ease of assembly.
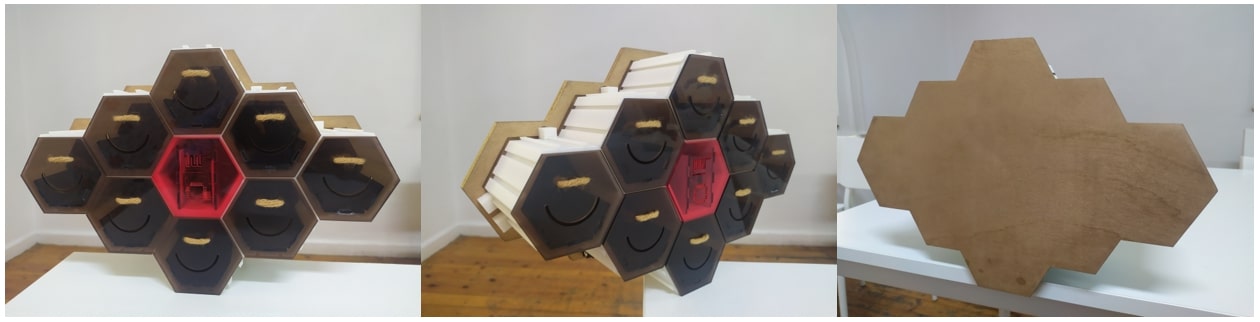
- Then I designed a simple drawer as 2d parts, cutted it on the laser cutter using clear brown acrylic of 3 mm and assembled them.
- I cutted a short rope to open and close the drawer.
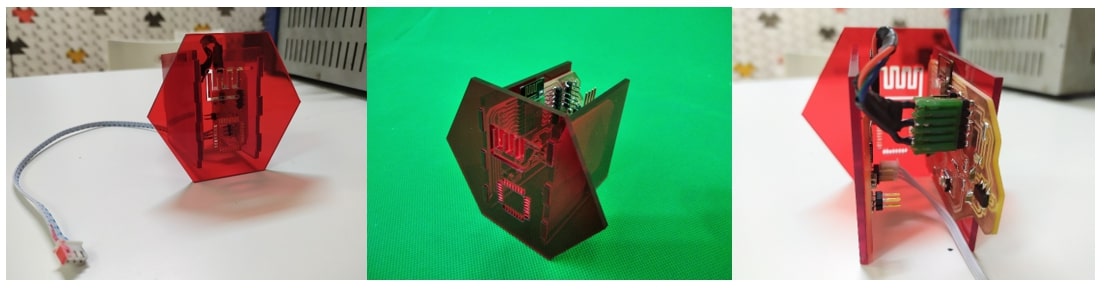
- In the middle of the structure, I designed and fabricated a control box to maintain the circuit boards.
- I made a wooden cover for the back of the structure to maintain the wiring and cable and help with fixation on a wall.
Electroncis
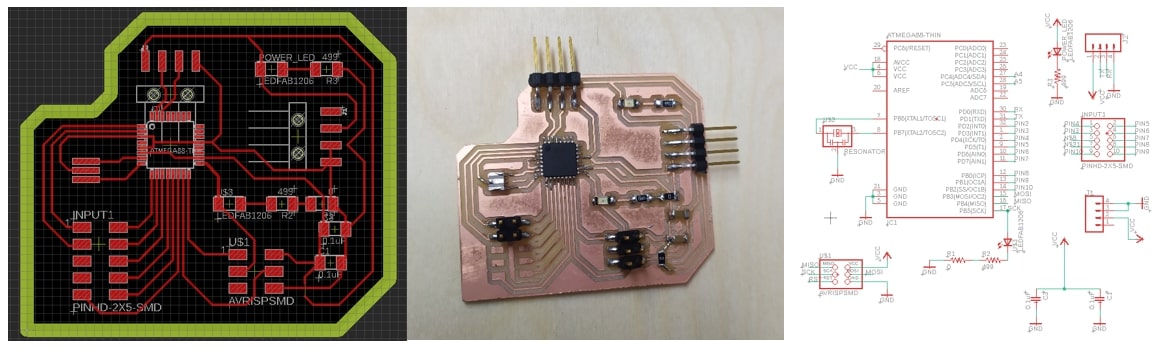
Main Board
- This board will control the RGB LEDs.
- Here I used Eagle to design the schematic and layout, I used the ATMega 328p as the microcontroller.
- I exported the GERBER files and used Gerbv and GIMP to edit the files and export the final .png files.
- Finally, I milled it on our MonoFab SRM-20, did the assembly and soldering.
- I connected the board with the USBasp and burnt the boatloader.
- It is important to add the Minicore package into Arduino, by copying and pasting the following link "https://mcudude.github.io/MiniCore/package_MCUdude_MiniCore_index.json" into the File > Preferencs > Aditional Board Manager URLs
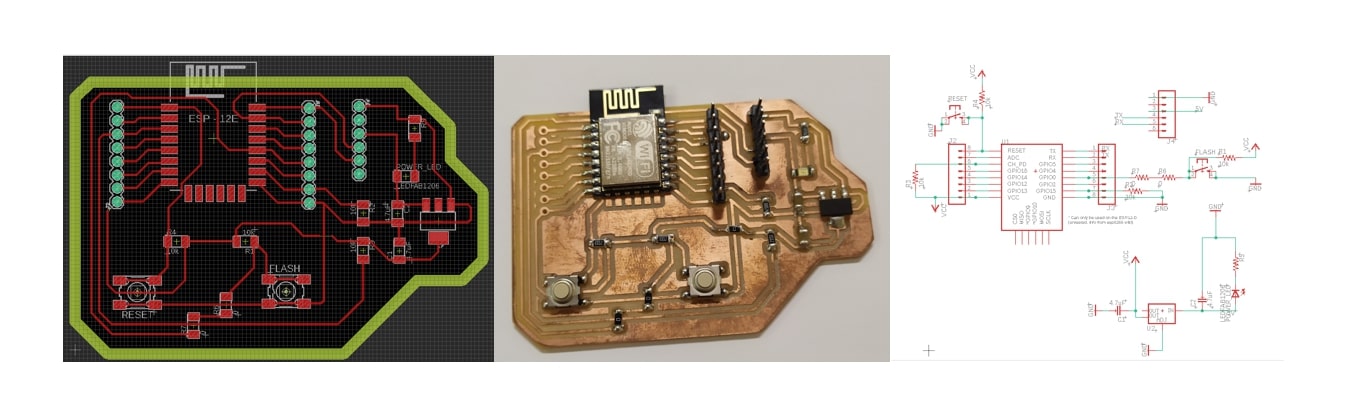
WIFI Board
- I used also Eagle to design the schematic and layout.
- It is important to fix the antenna outside the board so there is noe copper underneath.
- I made 2 push buttons, one for flashing and one for resetting.
- Exported the GERBER files and used Gerbv and GIMP to generate the .png images.
- Fab Module is a good tool to generate the .Gcode and run the MonoFab SRM-20.
- I exported 2 .png files, one for milling the traces, one for drilling the holes and the third one for cutting the outline.
- Soldered the ESP8266 and the other components on the board and connected it with an FTDI cable to the pc.
- I searched many tutorials about making a webserver on the internet using the ESP8266 and found Web Server with ESP8266
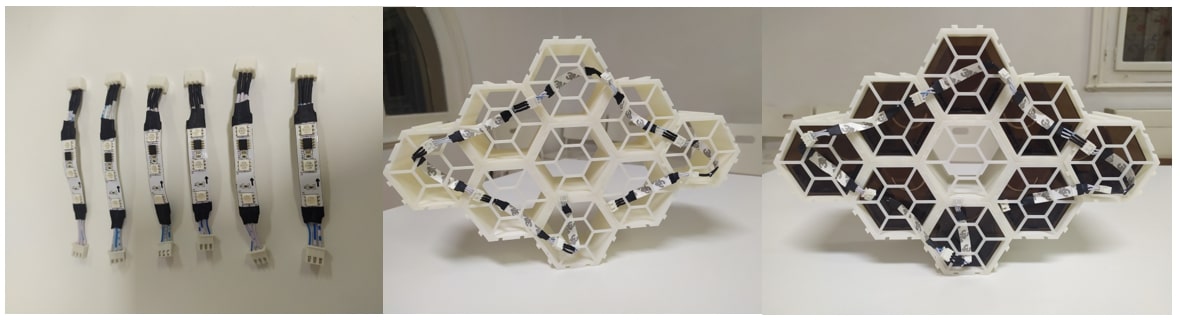
RGB LED Strip
- I bought a 1 meter RGB LED Strip (WS2811 Addressable RGB LED Strip 60leds/m DC12V) from Makers Electronics
- I cut the strip into pieces, a piece with 3 LEDs and made male and female connectors to facilitate the wiring and modularity.
- Then I fixed the RGB leds at the back of the structure using zip ties.
Wiring & Cable Management:
- I fixed the 2 boards in a different drawer and put it in the middle of the structure in red acrylic box.
- Made the connection between the ATMega 328p, esp8266 and the RGB Led strip.
- I made a 2 power sources, one is a 5v for operating the boards and the other is a 12v for operating the RGB Leds.
- I prefered to use cables rather than single jumpers to make stable wiring.
- I made sure all parts and components are well connected and wired.
- Made fixation to maintain the structure with the back cover.
- Fixed the power inputs at the bottom of the system.
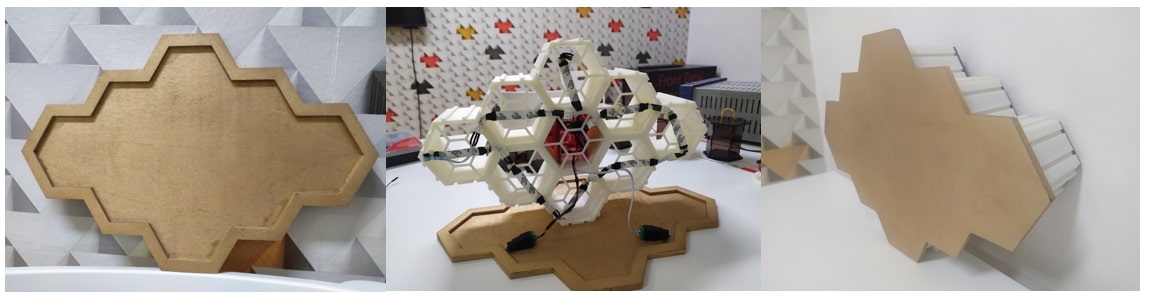
Final Assembly:
Programming
// Including Libraries
#include "FastLED.h"
#define NUM_LEDS 20
CRGB leds[NUM_LEDS];
#define PIN 6


// variable for which BOX LEDs to blink
byte ledToBlink = 0;


void setup()
{
  Serial.begin(115200);
  FastLED.addLeds(leds, NUM_LEDS).setCorrection( TypicalLEDStrip );
}
//Initialization PART.
// Starts the Serial Port, Controller waits for a NUMBER on the Serial Port to turn on the relevant LEDs of the selected BOX.


// RGB LED SUPPORT FUNCTIONS - from blog link: https://www.tweaking4all.com/hardware/arduino/adruino-led-strip-effects/
void showStrip() {
 #ifdef ADAFRUIT_NEOPIXEL_H
   // NeoPixel
   strip.show();
 #endif
 #ifndef ADAFRUIT_NEOPIXEL_H
   // FastLED
   FastLED.show();
 #endif
}


// RGB LED SUPPORT FUNCTIONS - for a single PIXEL - from blog link: https://www.tweaking4all.com/hardware/arduino/adruino-led-strip-effects/
void setPixel(int Pixel, byte red, byte green, byte blue) {
 #ifdef ADAFRUIT_NEOPIXEL_H
    // NeoPixel
   strip.setPixelColor(Pixel, strip.Color(red, green, blue));
 #endif
 #ifndef ADAFRUIT_NEOPIXEL_H
   // FastLED
   leds[Pixel].r = red;
   leds[Pixel].g = green;
   leds[Pixel].b = blue;
 #endif
}


// RGB LED SUPPORT FUNCTIONS - for all LEDs - from blog link: https://www.tweaking4all.com/hardware/arduino/adruino-led-strip-effects/
void setAll(byte red, byte green, byte blue) {
  for(int i = 0; i < NUM_LEDS; i++ ) {
    setPixel(i, red, green, blue);
  }
  showStrip();
}


// LED EFFECT FUNCTION - from blog link: https://www.tweaking4all.com/hardware/arduino/adruino-led-strip-effects/
// MODIFIED to read SERIAL and ONLY show the relevant LED and the one before and after it.
// Each box has 3 LEDs, so the number received is multiplied by 3 and then the LED before it and after it is illuminated and rest are all set as color to BLACK.
void RunningLights(byte red, byte green, byte blue, int WaveDelay) {
  int Position=0;
  for(int i=0; i0){
          // ONLY TURN ON 3 LEDs and rest all set to BLACK==OFF
          //if(i==ledToBlink-3 || i==ledToBlink-2 || i==ledToBlink-1)
          if( i==ledToBlink-1 )
           setPixel(i,((sin(i+Position) * 127 + 128)/255)*red,
           ((sin(i+Position) * 127 + 128)/255)*green,
           ((sin(i+Position) * 127 + 128)/255)*blue);
          else
            leds[i] = CRGB::Black;
        }else{
            leds[i] = CRGB::Black;
        }
      }
      // CODE MODIFICATION END

      showStrip();
      delay(WaveDelay);
  }
}

// LOOP FUNCTION, keeps the led effect running at all times
// LED effect changes color.
void loop() {
  RunningLights(0xff,0,0, 50);        // red
  RunningLights(0,0xff,0, 50);        // green
  RunningLights(0,0,0xff, 50);        // blue
  RunningLights(0xff,0xff,0xff, 50);  // white
  // original checked by Noor
  // further edits by Mahmoud Abo Elnaga
}
// Including Libraries
#define DEBUG 1
#include
#include
#include
//FIXED WIFI Settings
#define ssid "Orange-D955" // WiFi SSID
#define password "IloveFLE" // WiFi password
// FIXED IP and NETWORK SETTINGS
IPAddress ip(192, 168, 1, 104);
//set static ip
IPAddress gateway(192, 168, 0, 1);
//set gateway
IPAddress subnet(255, 255, 255, 0);
//set subnet
ESP8266WebServer server ( 80 );
// INVENTORY ITEM NAMES, COUNT and QUANTITY
#define numberOfItems 12
String item[numberOfItems] = {
"ATtiny44",
"ATtiny45",
"20MHz_Oscillator",
"10k_Resistor",
"499_Resistor",
"LED_Red",
"LED_Blue",
"ATMega328p",
"1uF_Capacitor",
"Push_Buttons",
"AVR_ISP_Header",
"Male_Header_Pins"
}
;
byte itemQty[numberOfItems] = {
0,0,0,0,0,0,0,0,0,0,0,0
}; // DUMMY VARIABLE for storage
byte itemQtyS[numberOfItems] = {
10,13,5,18,6,9,3,2,12,14,16,20
}; // INITIAL COUNT when there is nothing in EEPROM, this is already saved now
// WEBPAGE CODE
// code was tested with notepad and browser(chrome)
// code written with help from bootstrap online demos and tutorials
// once code was ready, changed all double quotes to single quotes
// added variables for dynamic web page generation
String getPage(int boxNumber) {
String page = "";
page += "";
page += "";
page += "";
page += "";
page += "";
page += "Smart Drawer ";
page += "";
page += "";
page += "";
page += "";
page += "";
page += "";
page += "";
page += " ";
page += " ";
page += " ";
page += "
";
page += " ";
page += " ";
page += " ";
page += " ";
page += " ";
page += " ";
page += " Smart Drawer
";
page += " ";
page += " Find and store components smartly
";
page += " ";
page += " Please type the component name in the below box";
page += "
";
// SERACH BOX CODE - now removed.
//page += " ";
//page += "
";
//page += " ";
page += " ";
page += " ";
if(boxNumber != -1)
{
page += "";
page += "";
// Loop to generate code for MODAL/POPUP Boxes that appear when any button is clicked
// Generated DYNAMICALLY from variables in code
page += "";
page += " ";
page += " ";
page += " ";
page += "";
}
page += " ";
page += " ";
page += " ";
page += "";
page += "";
page += "";
return page;
}
// function which manages how the page is shown to user and what operation is perfomed for inventory control.
void handleRoot() {
int itemNumber = 100, qtyChange = 0, sign = 1;
String search_value = "";
boolean search_v = false;
int search_index = -1;
if (server.args() > 0 ) {
if(DEBUG)
Serial.println("Server Arguments: ");
for ( int i = 0; i < server.args(); i++ ) {
if(DEBUG){
Serial.print(server.argName(i));
Serial.print(": ");
Serial.println(server.arg(i));
}
if (server.argName(i) == "search")
{
search_value = server.arg(i);
search_v = true;
}
if (server.argName(i) == "qtyChange")
qtyChange = server.arg(i).toInt();
if (server.argName(i) == "itemNumber")
itemNumber = server.arg(i).toInt();
if (server.argName(i) == "add")
sign = 1;
if (server.argName(i) == "remove")
sign = -1;
// if server argument is a valid add/remove number
// the item quantity is changed, saved in variable, showed to user and saved in EEPROM
if(itemNumber < numberOfItems) {
if(itemQty[itemNumber]+(qtyChange*sign)>=0){
itemQty[itemNumber] = itemQty[itemNumber]+(qtyChange*sign);
EEPROM.write(itemNumber, itemQty[itemNumber]);
EEPROM.commit();
}
Serial.println(itemNumber);
Serial.println(",");
}
}
}
if(search_v)
{
for (int z=0; z< numberOfItems; z++)
{
if(search_value == item[z])
{
search_index = z;
break;
}
}
server.send ( 200, "text/html", getPage(search_index));
}
else
server.send ( 200, "text/html", getPage(-1) );
}
int address = 0;
byte value;
void setup() {
// INITIALIZATION CODE, Serial, EEPROM, Server
delay(1000);
EEPROM.begin(512);
Serial.begin(115200);
delay(1000);
Serial.println(-1);
delay(1000);
Serial.println(-1);
// WRITE ALL DEFAULT VALUES TO EEPROM
// Serial.println("itemQtyS[z]");
// for(int z=0; z< numberOfItems; z++){
// address = z;
// EEPROM.write(address, itemQtyS[z]);
// Serial.println(itemQtyS[z]);
// address = address + 1;
// if (address == 512)
// {
// address = 0;
// EEPROM.commit();
// }
// }
// READ ITEM QUANTITY from EEPROM
if(DEBUG)
Serial.println("itemQtyREAD[z]");
for (int z=0; z< numberOfItems; z++) {
address = z;
itemQty[z] = EEPROM.read(address);
if(DEBUG)
Serial.println(itemQty[z]);
address = address + 1;
if (address == 512) {
address = 0;
EEPROM.commit();
}
}
// connect to WIFI and start WEB SERVER
if(DEBUG) {
Serial.println();
Serial.println();
Serial.print("Connecting to ");
Serial.println(ssid);
}
WiFi.config(ip, gateway, subnet);
WiFi.begin(ssid, password);
while (WiFi.status() != WL_CONNECTED) {
delay(500);
if(DEBUG)
Serial.print(".");
}
if(DEBUG) {
Serial.println("");
Serial.println("WiFi connected");
}
delay(1000);
Serial.println(0);
server.begin();
if(DEBUG) {
Serial.println("Server started");
Serial.print("Type this address in URL to connect: ");
Serial.print("http://");
Serial.println(ip);
Serial.println("/");
}
// link to the function that manage launch page
server.on ( "/", handleRoot );
server.begin();
delay(1000);
Serial.println(1);
if(DEBUG)
Serial.println ( "HTTP server started" );
delay(1000);
Serial.println(2);
delay(1000);
Serial.println(-1);
delay(1000);
Serial.println(-1);
// TURN OFF ALL LEDS
// at start LEDs of boxes 1, 2 and 3 are turned on to indicate system status
// each step makes the other box LEDs turn on
// box 2 is wifi connected status
// box 3 is server start status
}
void loop() {
server.handleClient();
delay(500);
}
// LOOP code, keeps running forever.
// Original checked by Noor
// edited by Mahmoud Abo Elnaga
Interfacing:
-
The user will type the IP address in the browser of his/her laptop or mobile, it will open to ask for the component name.
-
Make sure to type the correct name of the required component and press search.
-
A button will appear with the component name and its current quantity, press on it to open a new window.
-
A new window will appear to type the quantity you want to add or remove and then press locate component.
-
The target box will be blinking and the new quantity will be stored in the EEPROM.
Testing & Results:
-
I put components in the drawers and starting with the ip address on my phone and did the above mentioned workflow and it worked properly for several times.
-
Here is a video for the testing.
Downloads:
Downloads(Design files+Source codes).rar
Aknowledgment:
-
Thanks to my local instructor Mohamed Kamel who provided all his knowledge and experience to help me succeed and enhance my skills and experience.
-
I would like to thank Ahmed Saeed and Lamiaa for making the fab academy journey easier and more organized, setting a weekly schedule and reviews.
-
Special thanks to Noor Ahmed from Fab Lab Khairpur, I learned a lot from his work on the assignments and final project. He had made a great documentation for each week. His final project "Smart Inventory" encouraged me to do a project to solve the inventory issue. I really appreciate his support and assistance through emails and whatsapp.
-
Big thanks to Omar El-Safty, San3a tech's general manager, for giving me the opportunity, support and encourage.
-
My colleagues Noha Hani and Abdelrahman Salah who made the fab academy journey easier by joking :D, they helped me alot and did a great work in their projects and assignments.
-
Special thanks to my technical team at Fab Lab Egypt, they supported me alot and helped me do the best. I really appreciate their support and assistance, specially: Omar Elsinbisy, Shams, Amani Ayman and Omar Saif. I really love you guys.
-
Big thanks to Tarneem Yahia, San3a Tech's Graphic Designer, who helped me create a wonderful poster for my final project.