
- Introduction
From the very beginning of my fab academy course I had two ideas for my final project and couldn't orientate which one I like more and want to do. One of them is designing and making a tail bag for bicycles, which has lights on it and can automatically light on when it’s dark.
During my research I found out that even in Europe, UK, US and Japan, where there are proper bicycle trails and people mostly aware of the safety rules, numbers of accidents and fatality rates for cyclists are increasing. Here is the information about accidents and fatality rates for cyclists- Fatality facts USA
- Europe road safety and statistics for cyclists
- CYCLING ACCIDENT STATISTICS 2019 - UK VS EUROPE
- Number of road traffic accidents involving bicycles in Japan from 2010 to 2019
Due to the COVID19 pandemic situation we had an emergency state in the country and the public transport was not working. Therefore, more and more people started cycling and that brought me to the point that I decided to make a lighting tail bag for bicycles, which can be easily attached to any kind of bicycle, is lightweight and easy to carry. According to this source having lights on your bike is vitally important to night riding – to see where you’re going, of course, but more importantly, to be seen by others.
So, I made a tail bag for the bicycles with red and white LED lights. Red one is going on when the brakes are pressed and white one is going on as soon as it’s dark.
As input devices I have used LDR as a light sensor and a small limit switch attached to the brake handle bar and LEDs as output device.
- What will it do?
While I was looking for a prototype to the bag I want to design, I have found many different types of tail bags like this ones in
The first one is comparatively big and needs a special base to connect it to the bike. I have decided to design and make one similar to the bag from Walnut. I will work in three stages:
- Making a tail bag, which has lights on it and detects the light in the environment. If it’s dark, lights are going on automatically.
- Adding to this an accelerometer and red lights, so when the cyclists stops, the red lights will go on.
- I will add a solar panel block to the battery, so this will not require charging or changing batteries.
- Who's done what beforehand?
When I was looking for similar projects done in the Fab Academy previously, I found these two, which seem interesting and I can take information from.
- Smart bike seat made by Pierre Bertrand
- Brake lights made by Inês Carmo
-
Board deasign, assembling and programming
The concept of the bag is to have a white light which is always on, when it’s dark and a set of red lights, which is on when the brakes are pressed.
So I will have an LDR and a button as input devices and LED sets as output devices.
As the bag needs to be portable, I’m going to use a 9V or 12V battery as a power source. This can not be directly connected to the microcontroller due to the voltage differences, that’s why I consider having a 5V voltage regulator between the battery and the microcontroller. A voltage regulator generates a fixed output voltage of a preset magnitude that remains constant regardless of changes to its input voltage or load conditions. You can find more information about the voltage regulators in following articles:- Powering Your Electronics Projects – Voltage Regulators and Converters
- Different Types of Voltage Regulators with Working Principle
- Voltage Regulators
On the output I have many LEDs , which are going to consume quite a big current, which the microcontroller can’t handle, so I’m going to add transistors to the circuit. Transistors in this case work as switches. A tiny electric current flowing through one part of a transistor can make a much bigger current flow through another part of it. In other words, the small current switches on the larger one. So when the small current comes to the transistor from the microcontroller, a larger current will be generated and go to the LEDs. More detailed information about the transistors and their work principles I found in the following articles and videos:
- Transistors: How do they work (video)
- How does a transistor work (video)
- Transistor Circuits
- Using a transistor as a switch
- Output devices by Mrehan Elshehawy
After reading all of this and having an idea about what I want to have, I did a simple prototyping by connecting 5* 2.2V LEDs in parallel, attached it to the 5V power of Arduino and connected to the BC817 transistor, which I’m going to use in my circuit. I've attached an 100ohm resistor to the LEDs in series.

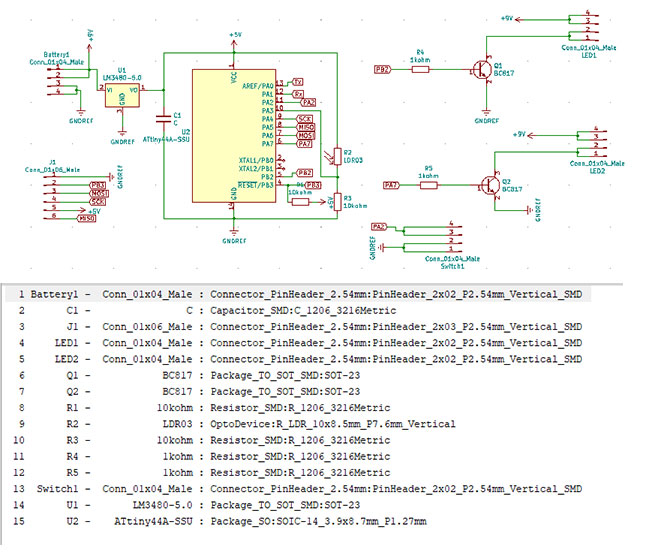
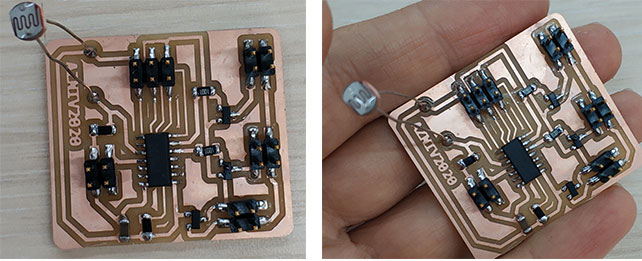
When I was sure that everything works properly, I started designing the board in KiCAD. Here is the list of components, which I’m going to use:- ATtiny44 microcontroller
- 5V voltage regulator
- 2* 10kOhm resistors ( 1 for microcontroller and 1 for LDR)
- 1uF capacitor
- LDR
- 2* BC817 transistors
- 2* 1kOhm resistors to attach to the transistors
- A connector header to connect the switch from the brakes
- A connector header to connect the battery
- Two connector headers for LEDs
- 2*3 connector header to connect the programmer
I added all of the components from the KiCad library and started to connect them.
Then I designed the PCB, exported it as svg and cut the board as it’s described in Electronics production and electronics design weeks. I checked all of the connections by the digital multimeter, seems everything is fine.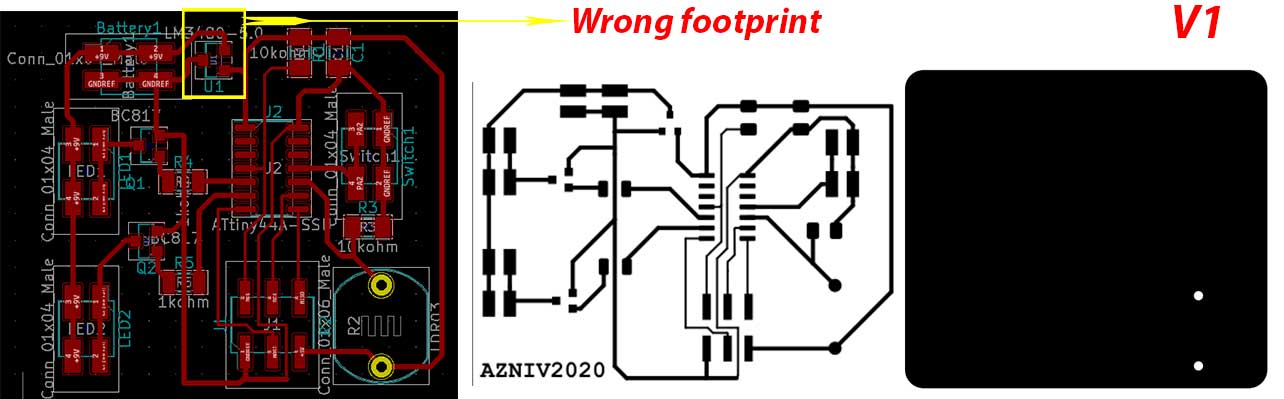
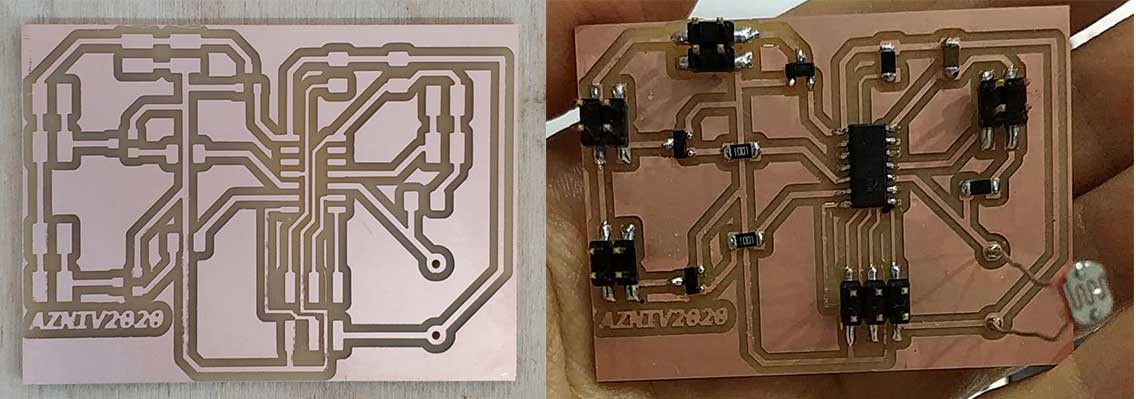
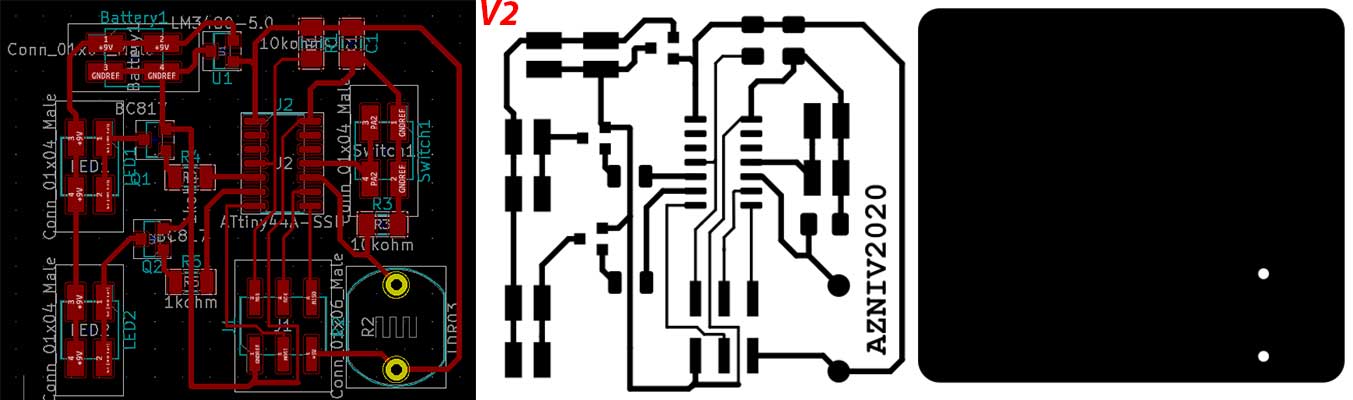
Programming was successful but the board didn’t work. Then I started to check the connections again, all was fine. Afterwards I have checked the footprints and found out that I have a wrong footprint and connections for the voltage regulator. So I have changed the footprint and connections to the proper ones. This time I moved the components closer to each other and my board got smaller.
After assembling the board, I did the programming and this time it worked, hooray.
-
Bag design
As a prototype for my bag I have chosen this one from Walnut.

I designed and made the bag in two steps: the sides were made from 10mm plywood and the cover is made from leather. I chose the leather, because it is water resistant, easy to cut and combine.Cutting and engraving the sides
For the bag sides I have decided to have round plywood with the engraving on them. I decided to have an armenian ornament which I found here.
To cut the plywood I used the CNC machine. I have just drawn two 12mm diameter circles and cut it using a 1/8inch end mill. Here are the settings for the cutting and the final result.
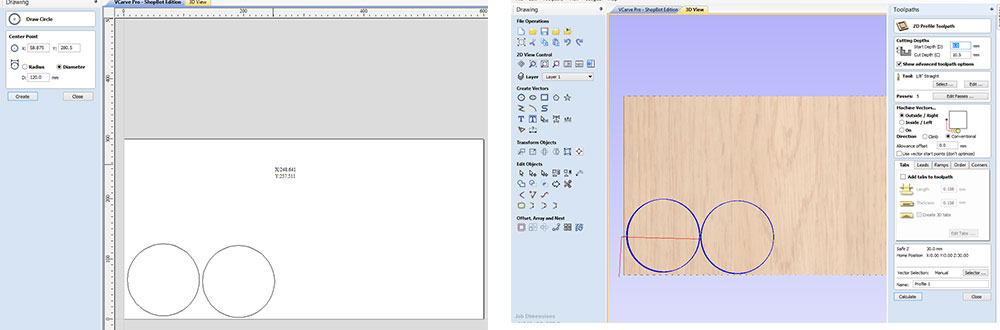

After some finishing I did the engraving by the laser machine. To be sure that engraving will be in the proper place, I made a 12cm draft circle on a wood piece by laser and put my material on it.

Here are the parameters applied:

And the final result.

Designing and cutting the leather
As I want to have a parametric design, I decided to do it in the Fusion360, even though it’s only a 2D design. Here is the sketch and the parameters which I have used. I am going to have lights on the cover part of the bag, so I included it into the design as well.
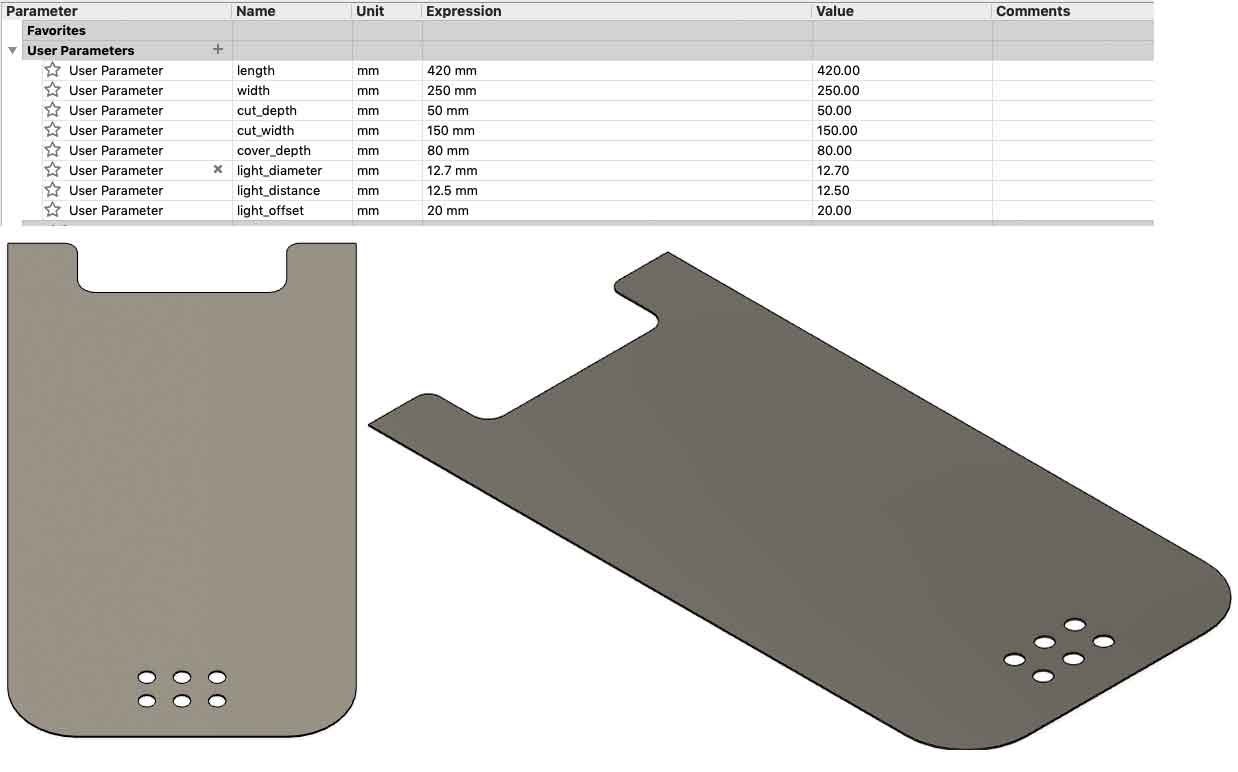
Before cutting the leather, I cut a cardboard with the same file, to do the prototyping and be sure that the sizes are good. I made some not deep line cuts on the cardboard to make it flexible.
My first design was not proper enough, I had to change the size of the holes for the lights and increase the size of the cover.
After changing the design I cut one more cardboard and this time it was fine, so the file is ready.

Now it’s time to choose the proper parameters to cut the leather. I took a small piece of it and cut a circle and a line first of all with the parameters given by the manufacturer. The cut was not good, I decreased the speed and this time the cut was fine.

So I did the lasercut with the proper parameters and have the leather ready.

Engraving logo on the leather
I decided to name the bag LOOYS (Լույս), which means “light” in Armenian. As there is a double O in the word, an idea came to my mind to make that OO-s out of the bike wheels. I found a clip-art image of the bike here and included it in the word “LOOYS”. Here is the result.

Then I did several trials of engraving on leather to find the proper parameters.

When I liked the result, I did the engraving on the bag leather.

3D printed box for electronics
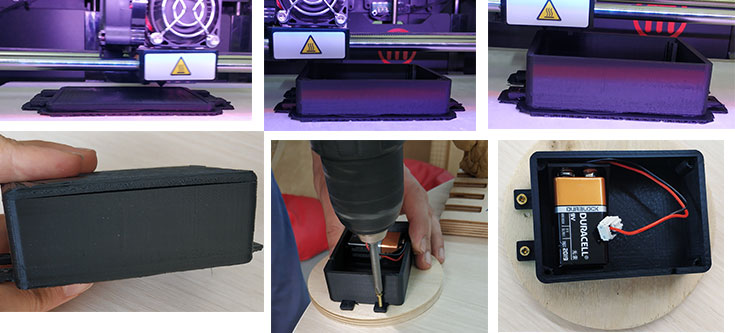
I want the electronics part to be as secure as possible, because it will be in the bag on the bicycle. So I have decided to design and 3D print a box to fit all the electronics in it. I need to fit a battery and the PCB as well as have some space for wires and connector headers. br After doing all the measurements, I did the design in Fusion360.
I have attached the box to one of the sides.

Assembling
Assembling was one of the hardest parts, as it was difficult to nail leather and the wood. Thanks to Ashot, I did it .

I have attached LDR on the side abd the limit switch to the brake handle.

To attach LEDs I have used PVC glue and tape.

After doing wiring and making sure that everything is working, I covered the wires with the special tissue, which can be attached to the leather or any fabric by just ironing.

Also, I cut a belt by laser, for connecting the bag to the bike seat.

here s the result

-
Bill of Materials (BOM)
Leather 1500AMD Nails and the lock 2000AMD Plywood 300*150*10mm ≈ 150AMD Filament for 3D printing 73g*24=1752AMD FR1 PCB board ≈200AMD ATtiny44 microcontroller 570AMD LED sets 2*350 = 700AMD Limit switch 300AMD Switch 300AMD 9V Battery 800AMD 5V voltage regulator 150AMD 2* 10kOhm and 2* 1kOhm resistors 4*45=180AMD 1uF capacitor 30AMD LDR 400AMD 2* BC817 transistors 2*50=100AMD 4 of 2*2 + 2*3 connector headers 5*50 = 250AMD Wires ≈ 300AMD Total ≈ 9682AMD ≈ $20 -
Conclusion
The process of planning, scheduling and doing the final assignment was one of the best experiences of my Fab Academy circle. I have learnt to use all of my new skills, combine them in a single project and have a good product in the end. I made myself to start with the simpler prototype and work on the development and this process will be ongoing.
I’m planning to develop this project and do a startup in Fab Lab Dilijan. -
Files
KiCAD design files, Svg files and G codes for the board
Programming file
Design file of the leather
Files for the sides
Ornament file on the sides
Box for the electronics, design and svg files
Belt