Jose Alegria - Fab Academy
![]()
![]()
![]()
![]()
Final
Project
Slide:
Video: Open directly
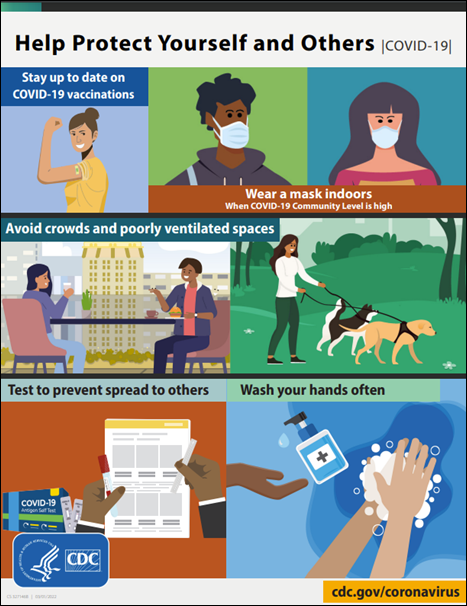
As the economy reactivated after the lockdown
enforced by worldwide authorities during the COVID-19 Pandemics, we started
learning about the different prevention measures that should be taken to avoid
contagion in public indoor areas.
For
example, the United States CDC has a page citing the following actions:
-
Get Vaccinated
-
Wear a mask
-
Stay 6 feet away from others
-
Avoid poorly ventilated spaces
-
Test to prevent spread.
-
Wash your hands often
-
Cover coughs an sneezes
-
Clean and disinfect
-
Monitor your health daily
-
Follow recommendations for
quarantine.
-
Follow recommendations for isolation.
-
Take precautions when you travel.
You can see a
description of each recommended step at: 2019-ncov Prevention
One
of the most common recommendations was to improve ventilation within the public
premises, this goal is easily achievable in Mexico City buildings because most
of them do not have a central heating, ventilation, and air conditioning
system.
So,
the most effective action taken to reduce possible viral transmission was to
simply open the windows when a group of people gathered inside a building, but
nothing is as easy as it sounds, because in Mexico City we have a very steep
rainy season, averaging above 28 rainy days in July and August.
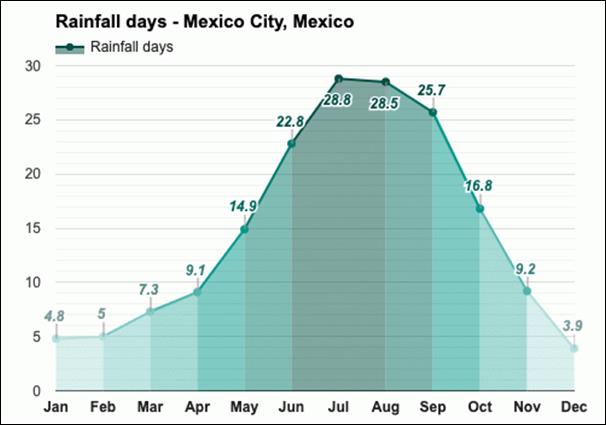
https://www.weather-atlas.com/en/mexico/mexico-city-weather-july#rainfall_days
Despite
a 93% chance of having a rainy day in July, most of the days are warm and the
rainfall will only be present after 5 pm and rain will stop before 9 pm (this
is an average and you should not trust your life to rain stopping early in the
night).
This
creates a logistic problem or an area of opportunity (whether you like being
optimistic or not), for most of the day windows will be open everywhere in our
buildings, but out of a sudden, there would be people rushing through the
entire university closing windows to avoid all the furniture getting soaked.
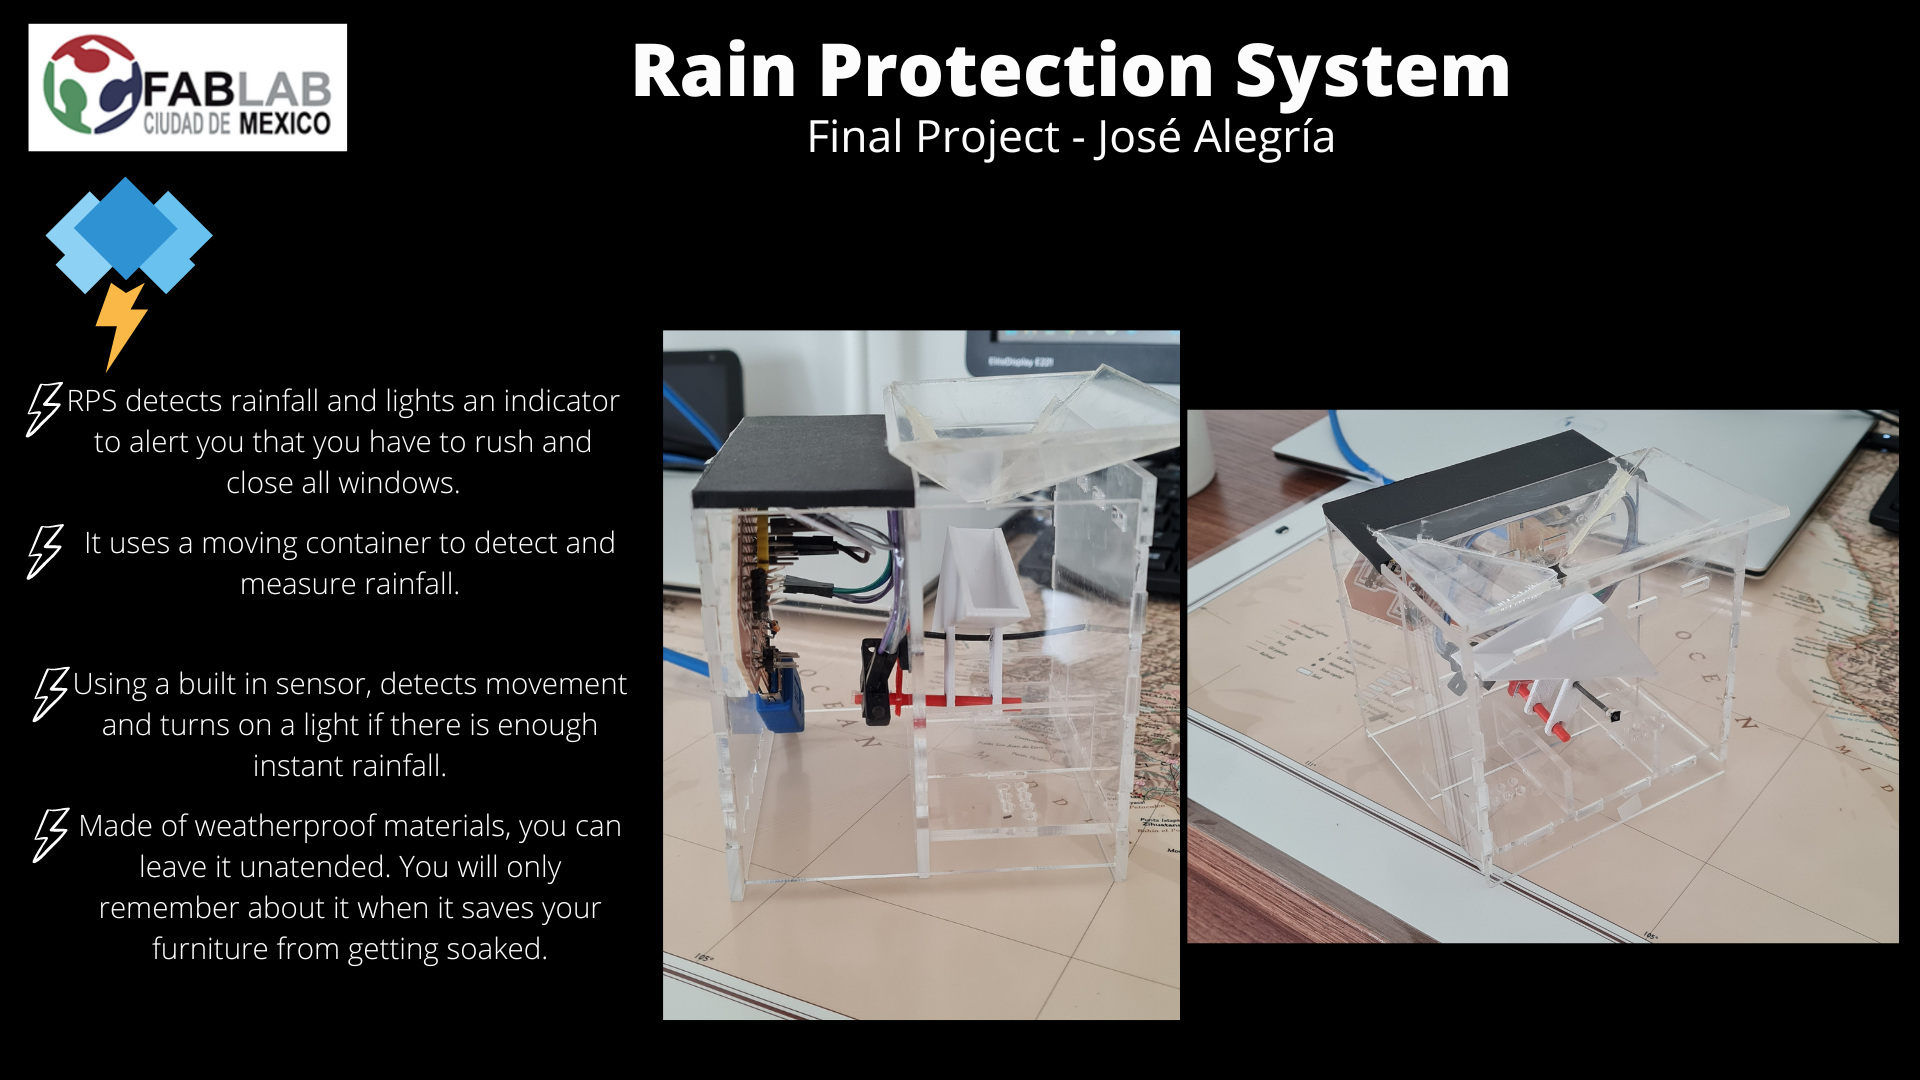
So,
I devised a way to automatically close the windows when it starts raining: Rain
Protection System (RPS).
A system comprised by two main parts
that work together:
-
Pluviometer:
o
Devised to measure rain intensity and
be able to decide if the instant rainfall is enough to send a signal to the
second part. The pluviometer relies on an electronic rain sensor because it is
intended to be able to differentiate between a light rain and a rain with
enough intensity to deploy the closing windows instructions.
-
Window closing:
o
Mechanism with the capability to open
or close a window, whether automatically or at will through a button.
Within Fabacademy:
-
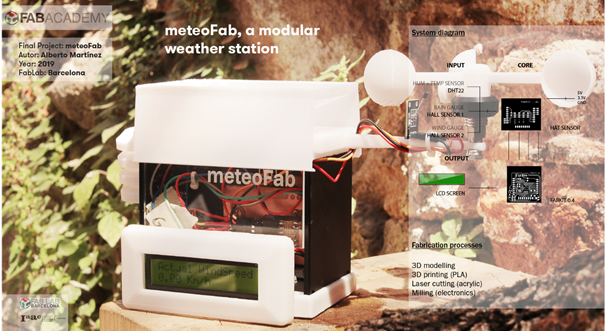
MeteoFab: Alberto López (Fablab Barcelona)
2019
Super local
weather station comprising wind gauge, rain gauge, thermometer, and humidity
sensor. Works by collecting data and displaying information through an LCD
screen.
-
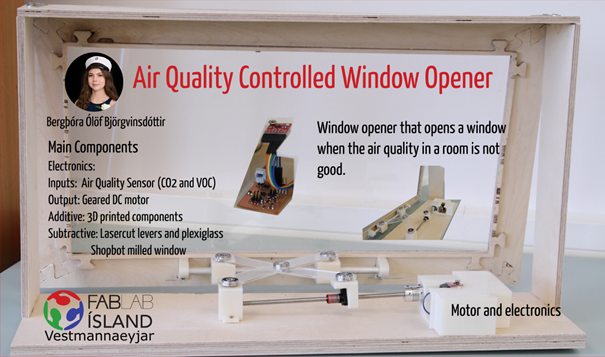
Window Opener: Bergþóra Ólöf
Björgvinsdóttir (Fablab Vestmannaeyjar)
2018
Device
with air quality sensors that, when reaching preset parameters, would open a
window.
Outside Fabacademy:
There are several commercial options, using different types of actuators
with prices ranging from 400 USD to 1 000 USD per window, these are part of
whole home automatization systems. They are not available in every country (i. e. in Mexico), though.
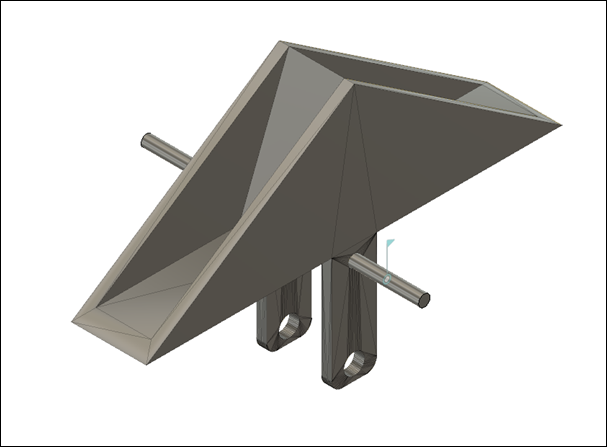
Pluviometer Moving Parts
-
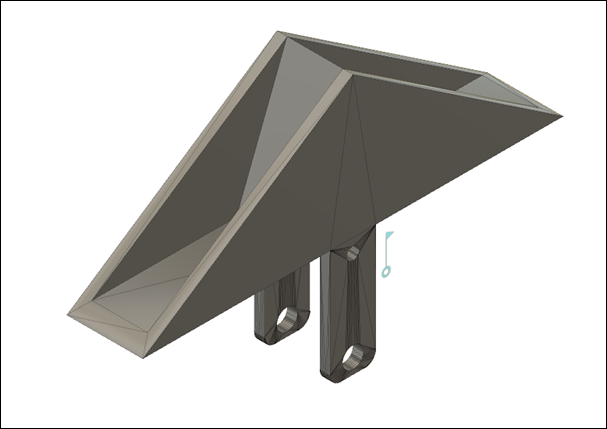
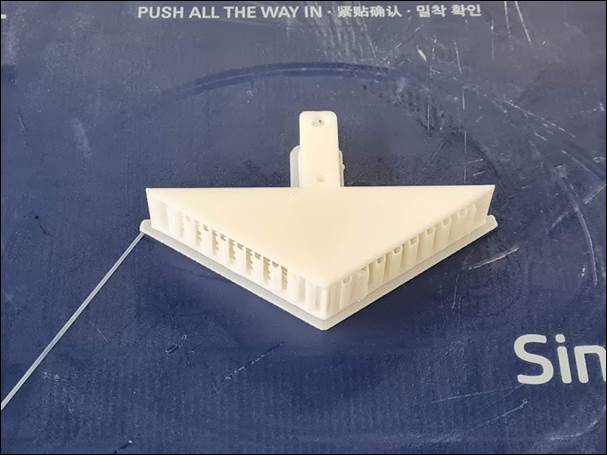
Pluviometer bucket:
o
Process: 3D Printing
o
Material: ABS
o
Description: The moving parts of the
pluviometer were designed to be 3D printed; these were separated into 3
different pieces that work together. A bucket that works by collecting water in
one of its two sides and when there is enough water to make a movement it
simply lets it run and starts collecting water in the other side. A Pin that
crosses the middle wall to ensure the movement is detected outside the area
which will be receiving water and, therefore, will have excessive humidity for
the electronics to work safely. Both, the bucket, and the crossing pin, were
made of ABS through 3D printing in a WOX 3D Printer. I chose ABS over PLA so
that the material would be able to endure being outside into direct sunlight.
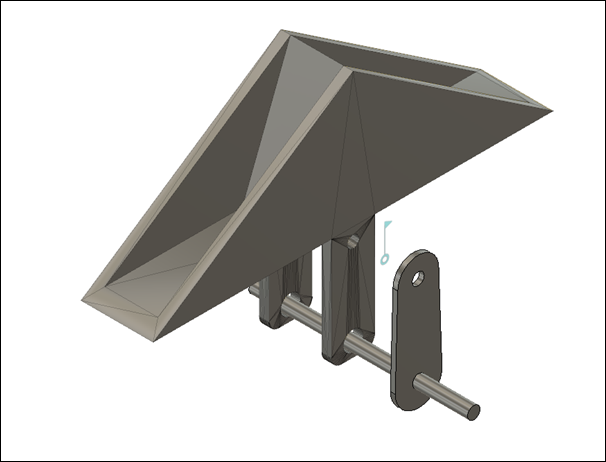
-
Main support pin:
o
Process: 3D Printing
o
Material: Resin
o
Description: The central pin is only
there to allow the rest of the system to have free rotational movement, I tried
to use ABS as with the other parts, but the 3D Printer resolution would not let
me have the smoothness needed for the water be able to move the bucket, so I
changed the material and printed it with an Stratasys Objet
Resin Printer. This, while pricier, allowed the system to work correctly.
-
Second pin:
o
Process: 3D Printing
o
Material: ABS
o
Description: The second pin is
designed to allow the movement transmission into the dry case of the
pluviometer. Consists of a pin that crosses the middle wall and a second part
that allows it to be held by the main pin and promotes the water to fall below
the electronics boards being attached to the dry case.
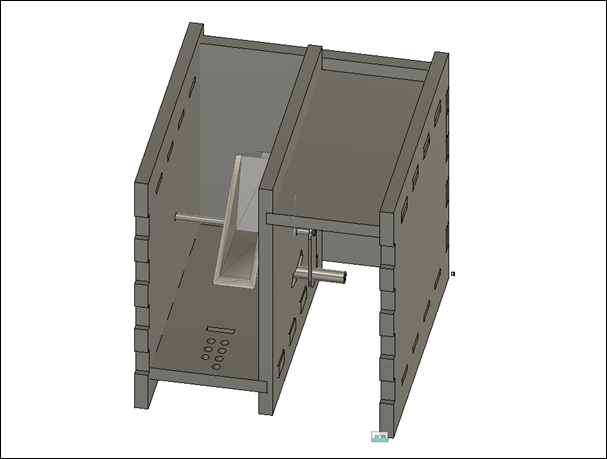
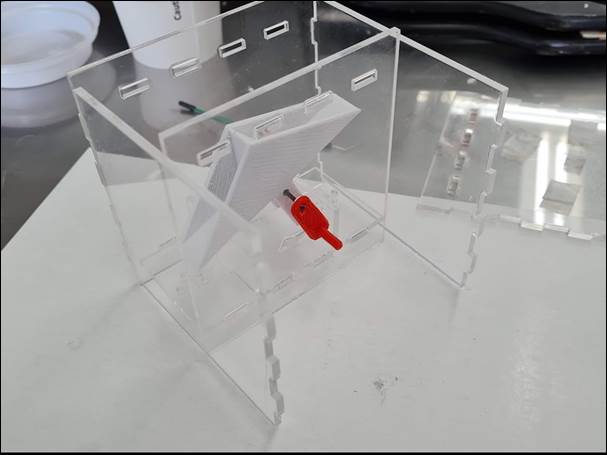
Pluviometer Case
-
Case:
o
Process: Laser cutting
o
Material: 3 mm Transparent Acrylic
o
Description: The pluviometer case was
made as a press fit box of transparent 3 mm acrylic; the design had several
stages to allow all the different components to be set without the need for
extra supports. It consisted of two separated compartments: The first one, an
open-ended area, is intended to contain the pluviometer bucket (the one I 3-D
printed) and receive the rain water, so it has to be able to let the water flow
through a series of holes drilled into the bottom piece, in theory water will
only be entering the case through the bucket, but I have to be prepared in case
the water flows outside the bucket, so everything into this compartment should
be made with any waterproof material. This leads us to the second compartment,
an enclosed area where the electronics are and that should not get any water
into it (we must remember that the entire ensemble, by design, must be outside
into the rain). This was easy except for one part: There should be a connection
between the dry and wet compartments of the pluviometer. I solved it by adding
a second pin (the first one is only intended to support the bucket in its place
and allow it to rotate in only one axis), the function of this second pin is to
translate the movement between both compartments, it is designed so that if any
water should cross on it, the water would fall before getting close to the
electronics boards (they will be over this height).
Motor and moving mechanism (Future Development)
-
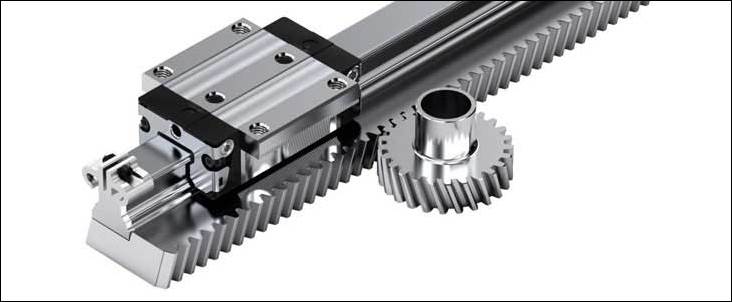
Rack and Pinion:
o
Process: Laser cutting
o
Material: 5 mm Transparent Acrylic
o
Description: The rack-and-pinion
system was chosen over other options made to transform the rotating movement
generated by a motor into a linear movement needed to move a window (at least,
this kind of window), because it is simple to use and takes a good advantage of
the amount of torque produced by the step motor. The main requirement that I
had while choosing the material was that it may be attached to the outside side
of the window and must be waterproof (although it is not going to be the case
in every window configuration I had to be prepared if that was the situation).
So, I chose to use 5 mm acrylic and let it accomplish another requirement, it
is going to be visible so, it must look nice with any material the window could
be made of. The rack-and-pinion design was chosen as a straight gear, over a
helical gear, to ensure all the torque is applied into the pinion. The
pluviometer case was made as a press fit box of transparent 3 mm acrylic; the
design had several stages.
-
Step Motor:
o
Process: None
o
Material:
o
Description: I used a step motor to move
the window because it allowed me to define a certain movement range, counting
from one of the sides, and avoid having to add a switch in each side of the
window, reducing the need of wiring through large distances.
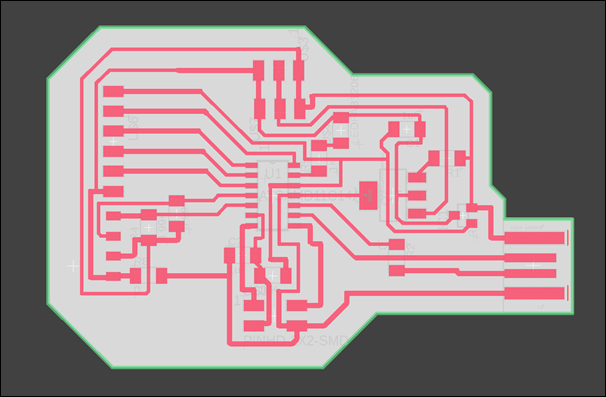
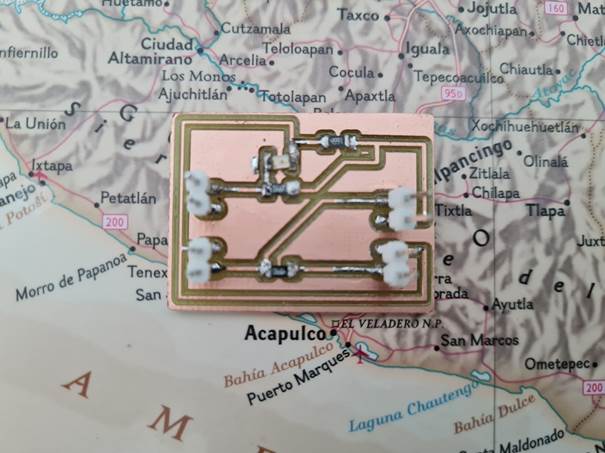
Electronics
-
Main board:
o
Process: One sided Milling
o
Material: Single sided copper PCB
Circuit Board
o
Description: The electronics work by
having one main board (i. e. where the microprocessor
sits) and two auxiliary boards just made to allow the sensor and the motor to
be plugged into. This configuration allowed me to make a smaller main board
that will be prepared for future additions because it only has to have one
extra port if I want to add another sensor or anything else to the system. The
boards functions will be explained in the electronics design section. The
milling process was chaotic at first but as we tested different methods to send
our board designs to the Modella MDX-20 Machine we have in our fablab, things
started to work out easier. I used the characterization for the machine I
explained in my Electronics Productions assignment.
-
Secondary board (Motor PCB) (Future
Development)
o
Process: Perforated PCB Milling
o
Material: Single sided copper PCB
Circuit Board
o
Description: The PCB for the motor
was designed as a perforated board to allow for a stronger board because we
were testing many different configurations and the pins were starting to fail
because of the excessive manipulation.
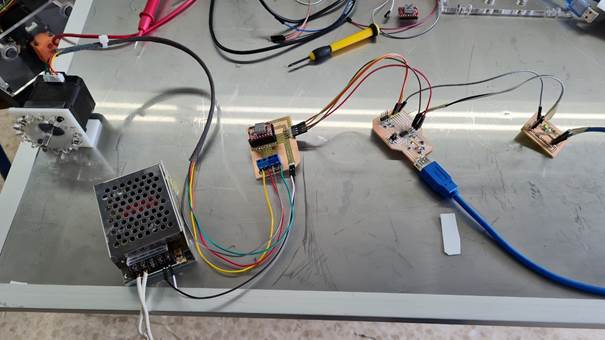
The system
works by detecting the motion of the bucket within the pluviometer, processing
it as a signal, and once stating that rain is falling, sending a signal to the
motor to start a closing window procedure.
Individual
component operation is as follows:
Pluviometer moving parts
-
Description: The rain falls into the
pluviometer bucket, thus adding an extra weight that when filling the recipient
is enough to rotate the bucket letting the water flow downstream into the
pluviometer case and discarding the water, this movement changes the position
of the bucket and sets the second recipient into the water dripping line,
filling it with water until the weight produces a second rotation movement that
discards again the water and sets the first recipient in the water receiving
position. Each movement is transported to the dry case with the help of the
second pin, moving the pin inside and outside the sensor range and letting the
sensor to be able to detect each change of the bucket position.
Pluviometer case
-
Description: It has a cover that
leads water to fall into a specific area, ensuring the water collected into a
measurable area falls directly into the bucket, this could let us to calculate
the rain intensity for in a standardized unit (i.e. mm/h or in/h). After the
water has been discarded the configuration of the holes drilled in the bottom
of the case will allow the water to leave the case and avoid water accumulation
inside the system.
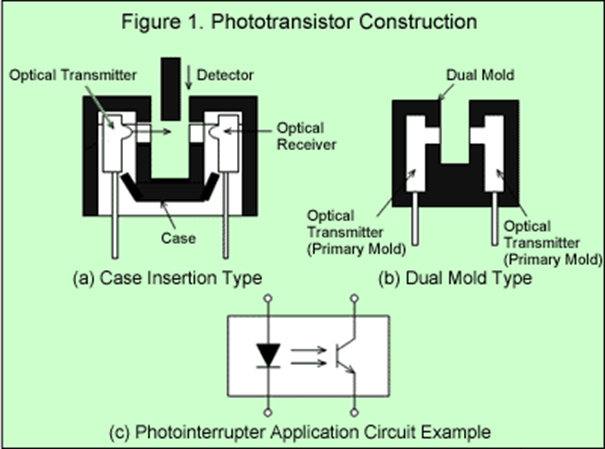
Electronics
-
Description: The electronics were
designed to operate with two different processes. The first one is the rain
detection, which is provided by a photointerrupter.
This device works by detecting the movement of the second pin by sensing if it
is closing its circuit. When the bucket position changes, it sends (or not) a
signal to the main board which then determines if that movement is being
frequently enough to consider (by user set parameters) that it is raining with
enough intensity to deploy the other processes. The first process is to light a
LED to allow me to know that the movements are being frequently enough.
Simultaneously, it sends a signal to the motor to start operating, and that
movement will close the window. The board is divided into three different
parts:
o
Main board:
§
Processor: SAMD11c14
§
Power input: 5V, GND
§
Input: None
§
Output: Red LED
§
Signal Inputs: Photointerrupter
board signal.
§
Signal Output: Motor board signal.
§
Notes: This is a modified board based
on Adrian Torres SAMDINO Board: https://fabacademy.org/2020/labs/leon/students/adrian-torres/samdino.html
o
2nd board (Photointerrupter board):
§
Processor: none
§
Power input: 5V, GND
§
Input: Photointerrupter
§
Output: Green LED (shows if
interrupter is closed or open)
§
Signal Inputs: None
§
Signal Output: Photointerrupter
board signal (to the main board)
o
3rd board (Motor board)
(Future Development):
§
Processor: Motor Driver model: Pololu a4988
§
Power input: 5V, GND (from main board);
24V, GND (From External Power Source)
§
Input: None
§
Output: None
§
Signal Inputs: Motor board signal
(from the main board)
§
Signal Output: Motor board signal (to
the motor)
Motor and moving mechanism (Future Development)
-
Description: Once the motor receives
a signal, the motor starts working to move the window to its closed position.
The distance is determined by the number of steps done by the motor. The speed
of the motor and direction of the rotation will be preset by the user.
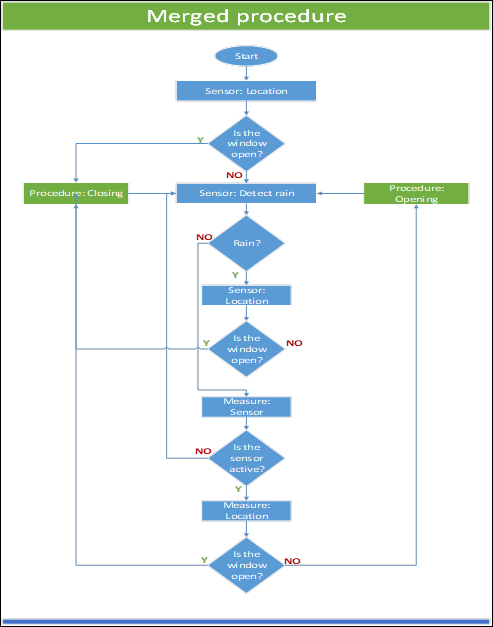
Process to be programmed:
-
Check for the position of the bucket
through the photointerrupter.
-
Count the time between the changes.
-
Determine if it is raining by
counting 10 minutes between the movements.
-
If the movement is repeated in the
set time, send the signal to LED.
Settings:
-
Initial state: No rain.
-
Rain started: When there are two
movements within a 15 second interval.
-
Rain ended: When the time between
movements is over a minute.
-
Rain: Anytime between rain started
and rain ended.
-
When rain is happening: Turn on the
Red LED and send 1 time the signal to the motor.
-
When rain stops: Turn off the RED LED
and send 1 time the signal of reverse movement to the motor.
Code:
const int ledPin1 = 2;
const int buttonPin = 4;
int pos = 0;
int lluvia
= 0;
int pos_guardada = 0;
int cambio
= 0;
int tiempo_lluvia = 10000;
int tiempo_altolluvia = 20000;
int t1 = 0;
int t2 = 0;
void setup() {
pinMode(ledPin1,
OUTPUT);
pinMode(buttonPin, INPUT);
}
void loop() {
pos = digitalRead(buttonPin);
if (pos != pos_guardada)
{
pos_guardada
= pos;
cambio++;
Serial.print("Número
de cambios: ");
Serial.println(cambio);
t1 = millis();
}
if (millis()-t1>tiempo_lluvia) {
cambio = 0;
}
if
(cambio>2) {
lluvia = 1;
t2 = millis();
}
else {
lluvia = 0;
}
if
(lluvia==1) { digitalWrite(ledPin1, HIGH);
}
else { digitalWrite(ledPin1,
LOW);
}
delay(1000);
}
Main Board
|
Part |
Device |
Description |
Value |
Qty |
Price |
USD |
|
1 |
Capacitor |
|
1uF |
2 |
0.77 |
1.54 |
|
2 |
Regulador |
IC REG LINEAR
5V 500MA TO252-3 |
5V |
1 |
0.60 |
0.60 |
|
3 |
PINHD-1X04_2.54-SMD-90° |
PIN HEADER |
|
1 |
0.17 |
0.17 |
|
4 |
Regulador |
IC REG LINEAR
3.3V 1A TO252-3 |
3.3V |
1 |
2.03 |
2.03 |
|
5 |
Resistor |
Resistor |
0 |
3 |
0.26 |
0.78 |
|
6 |
Resistor |
Resistor |
4.99K |
2 |
0.26 |
0.52 |
|
7 |
Resistor |
Resistor |
1K |
1 |
0.26 |
0.26 |
|
8 |
Resistor |
Resistor |
10K |
1 |
0.26 |
0.26 |
|
9 |
Microprocessor |
ATSAMD11C14A |
|
1 |
1.78 |
1.78 |
|
10 |
LED |
LED |
|
1 |
0.05 |
0.05 |
|
11 |
Placa 10x6 |
Copper Clad
PCB Laminate Circuit Board, Single Side, 4 x 2.7 inch |
|
1 |
0.69 |
0.69 |
|
Total |
|
|
|
|
|
8.68 |
Secondary Board (Motor)
|
Part |
Device |
Description |
Value |
Qty |
Price |
USD |
|
1 |
Stepper Motor Driver |
Pololu A4988 |
|
1 |
4.45 |
4.45 |
|
2 |
Pin Header |
PIN HEADER |
5V |
1 |
0.60 |
0.60 |
|
3 |
Placa 10x6 |
Copper Clad
PCB Laminate Circuit Board, Single Side, 4 x 2.7 inch |
|
1 |
0.69 |
0.69 |
|
Total |
|
|
|
|
|
5.74 |
Secondary Board (Sensor)
|
Part |
Device |
Description |
Value |
Qty |
Price |
USD |
|
1 |
Optointerruptor |
ITR8102 |
|
1 |
0.75 |
0.75 |
|
2 |
Resistor |
Resistor |
499 |
2 |
0.26 |
0.52 |
|
3 |
Resistor |
Resistor |
4.99K |
1 |
0.26 |
0.26 |
|
4 |
Placa 10x6 |
Copper Clad
PCB Laminate Circuit Board, Single Side, 4 x 2.7 inch |
|
1 |
0.69 |
0.69 |
|
Total |
|
|
|
|
|
2.22 |
Pluviometer Case
|
Part |
Device |
Description |
Value |
Qty |
Price |
USD |
|
1 |
Acrylic Case |
Acrylic Sheet
81.3x111.8 cm 3 mm |
|
0.12 |
30.91 |
3.71 |
|
2 |
Bucket |
ABS 3D Printer
Filament |
|
14.2 |
0.05 |
0.74 |
|
3 |
Main Pin |
ABS 3D Printer
Filament |
|
1.1 |
0.05 |
0.06 |
|
4 |
Secondary Pin |
ABS 3D Printer
Filament |
|
1.4 |
0.05 |
0.07 |
|
Total |
|
|
|
|
|
4.58 |
Motor base and window actuator (Future Development)
|
Part |
Device |
Description |
Value |
Qty |
Price |
USD |
|
1 |
Motor |
NEMA 23 Step Motor |
|
1 |
24.22 |
24.22 |
|
2 |
Motor Base |
ABS 3D Printer
Filament |
|
11.3 |
0.05 |
0.59 |
|
3 |
Acrylic Rack and Pinion |
Acrylic Sheet
81.3x111.8 cm 3 mm |
|
0.1 |
30.91 |
3.09 |
|
Total |
|
|
|
|
|
27.91 |
Pluviometer:
-
Laser cutting for a press fit case was
difficult, at first the case was weak and moving it from one place to another
was a real problem. After a few modifications and revisions of the laser
cutting characterization and the kerf measures, it fitted correctly and that
problem disappeared.
-
3D printing the pins that support the
bucket had challenges. The printer resolution was too big, and the pins were
not working as intended because they were not perfectly round. The main pin,
which would allow free movement of the bucket was changed to a resin 3D printer
and the problem was solved.
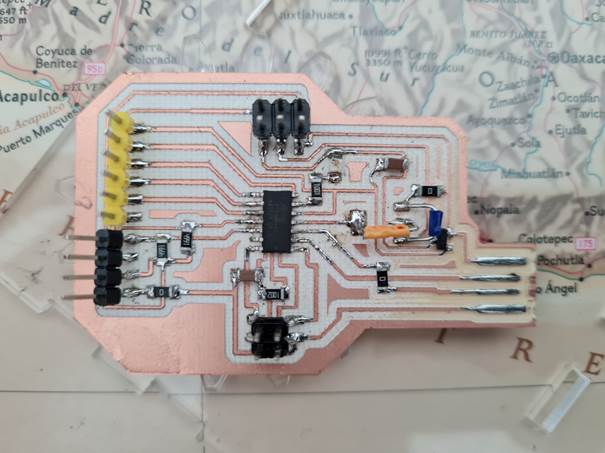
-
When milling the electronics boards,
I had a few issues with the design, mostly because the pads were separating
from the board when I manipulated the header pins (which by the way were the
most difficult part when welding). I solved it by changing the design, trying
to make the lines as straight as possible and avoiding 45 degrees connections
with the pads.
Window actuator:
-
For a future development, I decided
to add an automatic window closing system, there is already a lot of
information about this in my page. I started working into it, but I am
currently having issues with calculating the torque needed to move an actual
window and finding a step motor that would do the job. I will be working in
this development through the next months to ensure that the system works as
intended before presenting it as a formal addition to my project.
Laser Cutting Design:
-
Laser cutting case (Autocad)
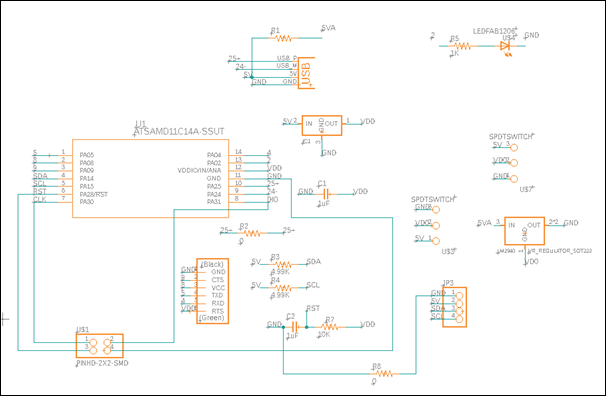
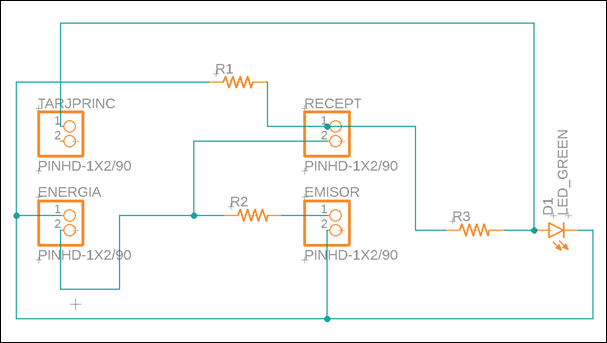
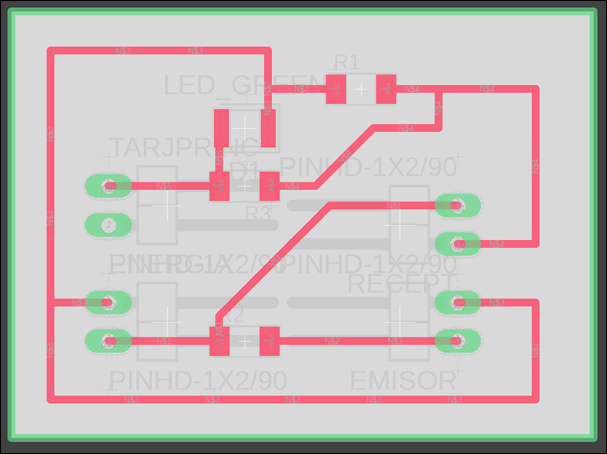
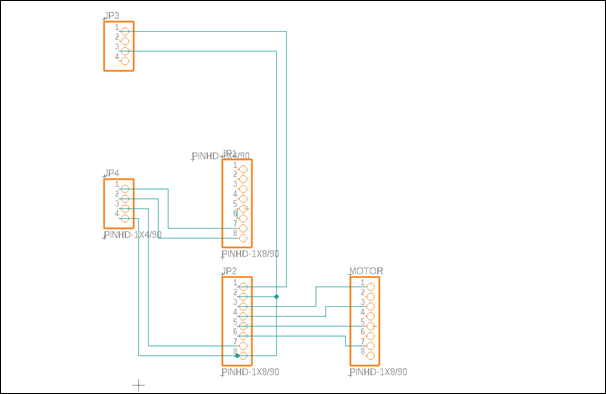
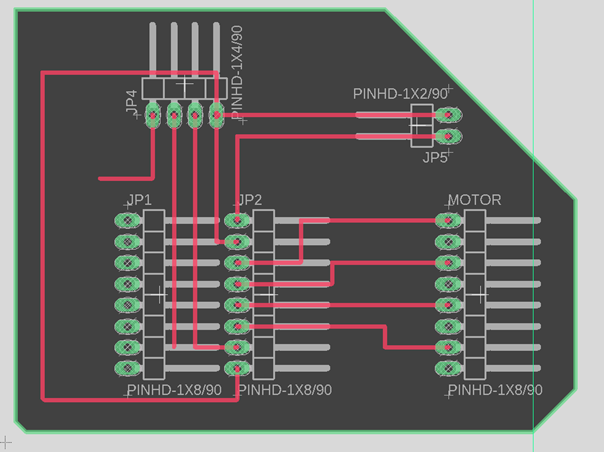
Electronics Design:
-
Main board schematics (Eagle)
-
Secondary board schematics
(Eagle)
Programming code:
3D Printing files:
Fusion 360 Design (All files can be downloaded
individually above)
-
Pluviometer (Fusion 360 design)