Jose Alegria - Fab Academy
![]()
![]()
![]()
![]()
Embedded
programming
Assignment
wHAT iS THE ASSIGNMENT ABOUT?
-
Read the datasheet for your
microcontroller.
-
Use your programmer to program your
board to do something.
GROUP ASSIGNMENT:
Compare
the performance and development workflows for other architectures
What did I learn:
-
You must know what each of your
microcontroller pins is able to do and what it is intended for (you are not
going to use each of them and there are some that have two or more uses).
-
Once you programmed your board to be
used with Arduino, the programming will be easier and
you should not have any problems.
1st Step. Reading
the datasheet
We are using
the Atmel SAM D11 C14 Microcontroller for programming our boards,
you can find the Datasheet in the following link:
For
this assignment we should read and get the most important information out of
the datasheet. For example, we must learn what do the pins do:

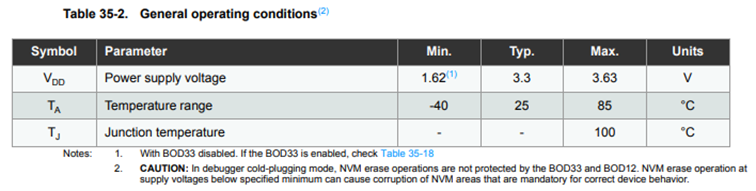
We can also
take this table to understand what it needs to work properly, and understand
which mistakes could take us to damage the microprocessor:
2nd Step.
Programming the board
To
program the board I will be using the Arduino IDE for
Windows. The process to program it to be able to receive instructions from
Arduino was explained in the 07 -
Electronics Design assignment.
3rd step.
Programming processes
To send the program to my board I
just needed to check a few parameters:
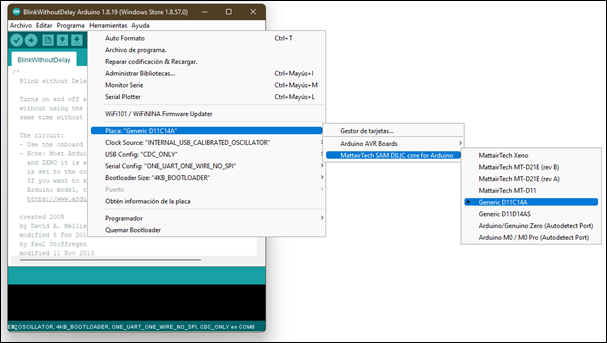
-
Select the board by selecting the
following menus: Tools, Boards, MatterTech, Generic D11C14A
-
Select the appropriate port by
searching where your board is connected.
4th step. Code
For this assignment I designed a board that could turn on two different
LEDs by pressing each button. For that, I modified a code from Adrián Torres
(Leon, 2019) to allow it to work with the pins and configuration I created
during the Electronics Design assignment.
const int ledPin1 = 2;//first light
const int buttonPin1 = 4;// first button
pin
int buttonState1 = 0;//initial state of the
button
const int ledPin2 = 8;//second light
const int buttonPin2 = 5;// second button
pin
int buttonState2 = 0;//initial state of the
button
void setup() {
//declaration of inputs and outputs
pinMode(ledPin1, OUTPUT);
pinMode(buttonPin1, INPUT);
pinMode(ledPin2, OUTPUT);
pinMode(buttonPin2, INPUT);
}
void loop() {
buttonState1 = digitalRead(buttonPin1);// we read the state of the button
buttonState2 = digitalRead(buttonPin2);
if (buttonState1 == HIGH) { //if we press the button
digitalWrite(ledPin1, HIGH);
}
else { //if we don't press the button
digitalWrite(ledPin1, LOW);
}
if (buttonState2 == LOW) {
//if we press the button
digitalWrite(ledPin2, HIGH);
}
else { //if we don't press the button
digitalWrite(ledPin2, LOW);
}
delay(1000);
}
Here is a
video of the board working with this code:
Conclussions
This assignment importance was to learn
what are the important things to follow in order to
program a board.
Original
Files
1. Code
file
Nueval
Checklist
-
Linked to the group assignment page.
-
Documented what you have learned from
reading a microcontroller datasheet.
-
Programmed your board.
-
Described the programming processes
you used.
-
Included your source code
-
Included a short hero video of your
board.
2022