13. Applications and implications
As with many thing in life my initial idea swifted when doing the academy. My initial plan was to make a fablab nodes lamp showing the activity in the different fablabs across the world. While still liking this idea i change my final assignment. The change of though came when there was a change in the global lecture moving from bluejeans to zoom. This made me realize that my design could be outdated before i even started the final assignment. There are also available appi for tracking online status but it could happen again that there will be a change of software. Another thing that me me swift was that the lamp would be only interesting during the fab academy. I would like to make a design which has interesting aspects all year through.
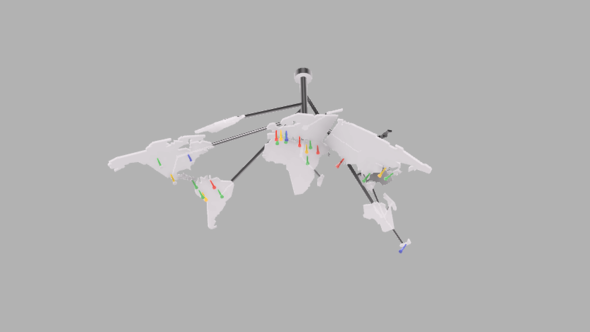 previous design
The introvert Lamp: The light that does not want to be in the spotlights
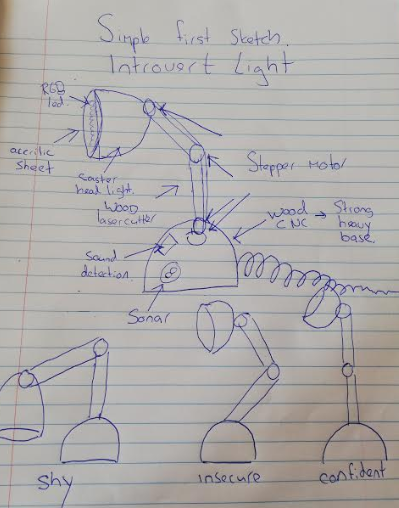 first sketch of the principle
The idea is to make a shy light that reacts on it surrounding. When it get to much attention it will move its away in a shy matter. The lamp use a sound sensor and sonar to determine its reaction. The light has rgb light installed that can change lights accordantly. With the of stepper motors the design can move. Become confident or shy. When spoken to the headlight will look up.
This design will cover many aspect of the fabacademy. Would like to incorporate all the different machines used during the course and have multiple input and output for the design.My wish is to use the skill learned to make a functional estetic design which also can have educational purposes.
This lamp is interactive and controlled by senses. This lamp will have a carakter which could make it a companion for kids. It can help kids learn coding to create there own karakter. My goal is to make a light design which mechanical structure enables you to play with the code and create your own karakter which his own movements and changing lights.
This lamp could cover all the aspects i learn in the fab academy. 2d en 3d design, Cnc cutting, Molding and casting, 3d printed parts, input and output and mechanical design.
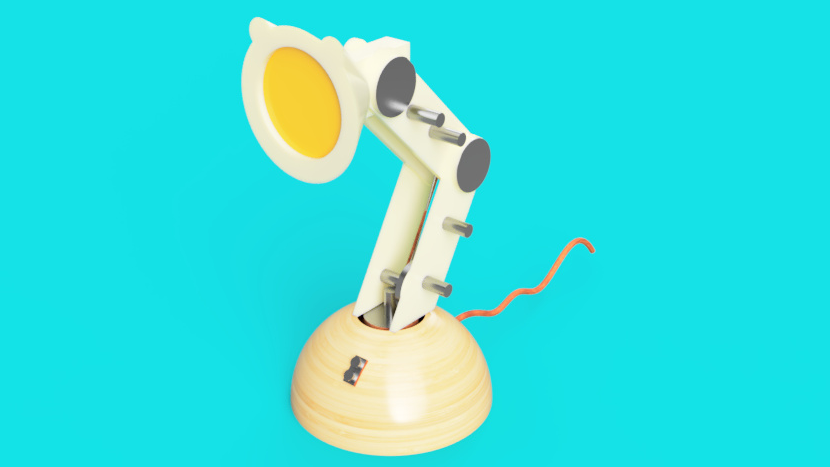 A impression of the design
BOM Bill of material
- acrifix-192-acrylaat-lijm-tube-100-gram: (Dokter Plexiglas) €15.95
- Acrylic frost 5.8 mm 50 cm by 50 cm: (Dokter Plexigas) €40.-
- Multiplex wood 136 cm by 38 cm: (Houthandel Schmidt Amsterdam) €24
- 3 TowerPro MG958 Servo A €12.95 (Hobby electronica) €38.85
- 2 HC SR04 SONAR A €2.95 (Radio rotor Amsterdam) €5.90
- 1 5v 3A Adapter VOLTCRAFT (Conrad) €7.75
- WS2812b neopixel (ledkoning) €22.90
cost: €155.35
- Filament yellow pla Waag fablab inventory €14.-
- Atmega 328 P au Waag fablab inventory €1.63
- avrismpd Waag fablab inventory €0.87
- Ftdi header Waag fablab inventory €0.53
- Capicitor 1 uF Waag fablab inventory €0.26
- 4 X capicitor 100 uF Waag fablab inventory €1.04
- micro usb connector Waag fablab inventory €0.62
- Male connectors Waag fablab inventory €0.89
- 20 Mhz resonator Waag fablab inventory €0.75
- Led RED Waag fablab inventory €0.14
- resistor 10 K Waag fablab inventory €0.025
- Resistor 1 K Waag fablab inventory €0.03
- Resistor 330 OHM Waag fablab inventory €0.02
- Resistor 0 OHM Waag fablab inventory €0.02
- 6 mm switch button Waag fablab inventory €0.65
Cost fablab €21.75
Total Cost: €177.10
The prices of the fablab inventory i looked on the site of farnell There could be a difference in actual pricing of the components. But it gives me a understanding of prices for electronics.
Spiral development
With the lamp i try to work with multiple sensor for input (sound/distance) and multiple output (lights and movement) My first priority will be movement depending on the distance. This way i can create a functional light. The sound part will be additional, so the changing led colors.
The electronic parts will be the biggest challenge so i want to focus on getting the mechanics right with a simple structure. When the concept is proven i want to focus on the looks of the design.
For the electronic parts i want to make several boards and test them. With i2c i want to connect them together in a later stage. I would like to equip the light with a micro controller so the movement can be improved in a later stadium. You can customize the behavior of the light yourself.
The design
Before i know what stepper motors i will use i can’t start designing my final assignment. The stepper motors are the core of the design and everything has to be build around it. The amount of torque required to move the light design will have a impact on the rest of the materials. Thats why i first will put my focus on creating a good steady mechanism and afterwards focus on the design it self. For now i put the focus on making a simple chassis where in a later stage you can press new designs on it.
 The parts of the design
-
What will it do? A light design that reacts on it surrounding using multiple sensors and output devices. The design is programmed to be shy and introvert. The idea is that you can adjust the code to make a more extrovert light. Or crazy. Or happy. Whatever movement you want to give to it.
-
Who’s done what beforehand? This will be a new project. The mechanism i use in my design is often used in robotic arms with four rotational points. I found a nice instructable which use 4 axis as well in the design. This one use servo motors.
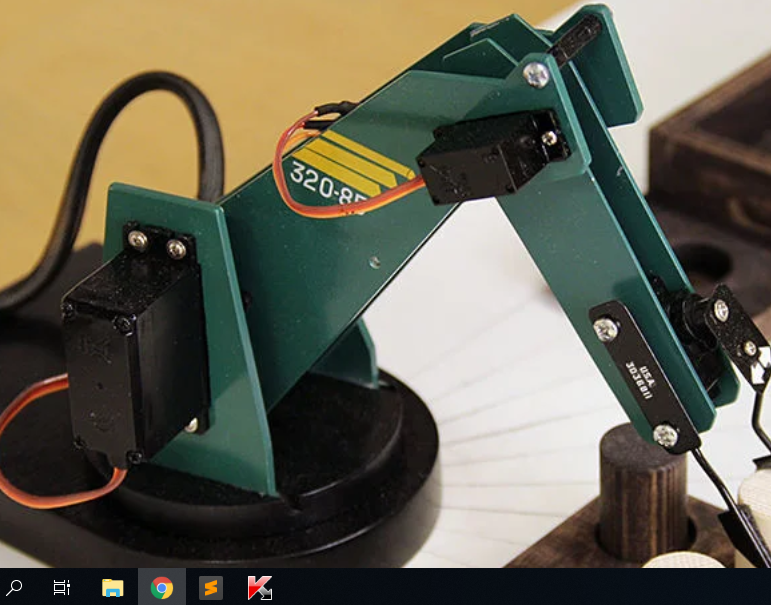 nice DIY robotic arm
-
What will you design? Everything except the electronics.
-
What materials and components will be used?
- Wood (connecting parts and base)
- silicone (mold)
- epoxy (light cover)
- Accrilic (cover led)
- pla filament (connecting parts)
- 4 x Stepper motor
- Led strips
- 2 x Sonar
- Sound sensor
-
Microcontroller
-
Where will come from?
-
How much will they cost?
Still in research. At the moment i am looking for the right stepper motors. When i know which motors i am going to use i can build the design around it.
- What parts and systems will be made?
All external parts will be designed and made. The electronics i used from the fablab inventory
- What processes will be used?
Molding and casting for the head of the light, 3d printing, lasercutting, cnc machining, pcb milling
- What questions need to be answered?
How to make a safe light. How to make movement predictable. What is the best mechanical design for optimal movement How make it simple reproducible How much voltage is needed What stepper motor could be used. How slow can a stepper motor go.
- How will it be evaluated?
That my spiral development goal is archived. A lamp that moves and rotate depending on the distance to the object. Sound and changing led colors are additional.
- Your project should incorporate 2D and 3D design,
The design will be establish using all the different machines available. 2d and 3d design will be incorporate in the lamp. The frame of the light will be 2d manufactured while the design that goes around will be 3d made.
- additive and subtractive fabrication processes,
With the different machines used i will incorporate both processes.
- electronics design and production,
Using the Roland MDX 20 i will produce the circuits for my input and output for the design.
- microcontroller interfacing and programming,
At first i will program the device in a simple way. The idea is that in a later stage you can alter the movement and reaction of the lamp design.
-
system integration and packaging
-
Where possible, you should make rather than buy
Apart from the electronic components and wiring the device will be made.
-
the parts of your project
-
Projects can be separate or joint, but need to show individual mastery of the skills, and be independently operable
This will be a individual final assignment to show the skill learned during fabacademy.
Costs
My first priority is to figure out the amount of torque needed for my stepper motor. then i have a better view in how much the design will cost to make. At this moment i want to focus first on a type of stepper motor and fix my design accordantly to the weight.
List of materials
Electronics * Transformer * Mosfet * H-bridge * 4 strong torque stepper motors * strip neopixel * stepper with gears * Mosfet * shield * Torque
Materials * Acrylic frost polar white 3 mm * Solid wood for base (will find a nice piece on the street) * triplex wood 4 mm for the chassis * Pla filament (connecting different parts)
First experience using a stepper motor
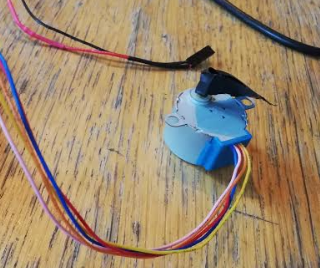
I like the concept of using stepper motors for my design. My biggest concern is if it can handle the weight of the design. Since the light moves there is allot of changing weight the stepper has to deal with. Further i have also get acquainted using the stepper. I decided to buy a few simple stepper motors to practice with. This way i learn how the stepper works in electronics and coding. I bought the 28byj-48 - 5 volt stepper. Datasheet
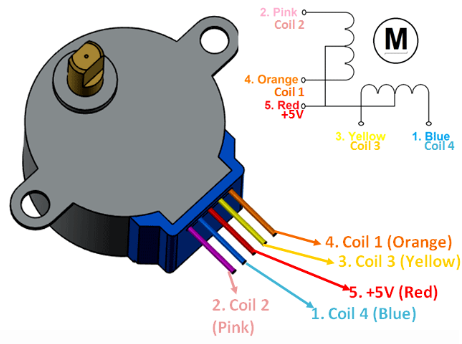 overview of the stepper
What i liked about this stepper that is has gears. This way the device stays put also when there is no electricity. I followed a tutorial using this stepper and the arduino. I followed the instructions to see if i was able to get it working.
/*
 * cheapStepper_simple.ino
 * ///////////////////////////////////////////
 * using CheapStepper Arduino library v.0.2.0
 * created by Tyler Henry, 7/2016
 * ///////////////////////////////////////////
 *
 * this sketch illustrates basic step() functionality of the library:
 * the stepper performs a full rotation, pauses 1 second,
 * then does a full rotation in the other direction, and so on
 *
 * //////////////////////////////////////////////////////
 */

// first, include the library :)

           #include <CheapStepper.h>


CheapStepper stepper;
// here we declare our stepper using default pins:
// arduino pin <--> pins on ULN2003 board:
// 8 <--> IN1
// 9 <--> IN2
// 10 <--> IN3
// 11 <--> IN4

 // let's create a boolean variable to save the direction of our rotation

boolean moveClockwise = true;
A boolean data type is used for only two possible values. 0 or 1 or true or false. This case it is used to make the stepper turn clockwise.
void setup() {


  // let's just set up a serial connection and test print to the console

  Serial.begin(9600);
  Serial.println("Ready to start moving!");
}

void loop() {

  // let's move a full rotation (4096 mini-steps)
  // we'll go step-by-step using the step() function

  for (int s=0; s<4096; s++){
    // this will loop 4096 times
    // 4096 steps = full rotation using default values
    /* Note:
     * you could alternatively use 4076 steps...
     * if you think your 28BYJ-48 stepper's internal gear ratio is 63.68395:1 (measured) rather than 64:1 (advertised)
     * for more info, see: http://forum.arduino.cc/index.php?topic=71964.15)
     */
I learned from the datasheet and the code that this particular stepper has 4096 steps for a full rotation. The defeult is 0 and moves up till 4096 before moving the other way. In m,y final assigment i don’t want to use a full rotation. In this code you can sett the spin less by changing this number.
    // let's move one "step" (of the 4096 per full rotation)

    stepper.step(moveClockwise);
    /* the direction is based on moveClockwise boolean:
     * true for clockwise, false for counter-clockwise
     * -- you could also say stepper.stepCW(); or stepper.stepCCW();
     */

    // now let's get the current step position of motor

    int nStep = stepper.getStep();

    // and if it's divisible by 64...

    if (nStep%64==0){

      // let's print the position to the console

      Serial.print("current step position: "); Serial.print(nStep);
      Serial.println();

    }
  }

  // now we've moved 4096 steps

  // let's wait one second

  delay(1000);

  // and switch directions before starting loop() again

  moveClockwise = !moveClockwise;
}
This line of code makes the steppes moves clock ward for one full circle and then a full circle counterclockwise. Most of this code comes from a library. I intent to make my own line of code for my design for more control in speed and rotation.
Seeing it spin is rewarding but not sufficient I wanted to test the stepper on the torque. I realize the stepper i bought would not be strong enough but can i add weight to it so it still function? in the datasheet it mention that the Friction torque is 600-1200 gf.cm. This does not say much to me so i wanted to put the stepper to the test. I made a simple design with the laser cutter to keep the stepper in place while rotating. I designed in fusion a small cap so i could mount something steady on the stepper.
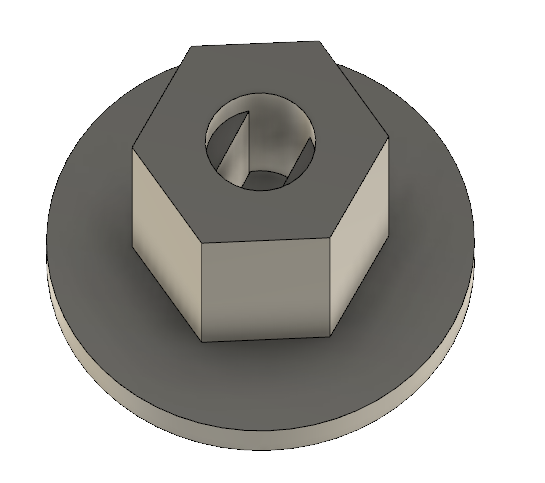 3d design to mount lasercutted pieces on the stepper motor
I designed the arms in a way you could mount the next stepper on the end of the arm. It did not came so far. I did spin without the weight of the stepper. As soon i placed the next stepper i was not able to do a full rotation.
spinning from Rutger Oomkes on Vimeo.
The rotation works but it does not give me to much faith. I do have to search for bigger stepper motors but they will be more heave which have to be lifted by on stepper. I might go for several different types of stepper. The bottom one needs to be more steardy and heavy then then ones on top. Still some research to do.
Research
[Deciding size stepper(]https://www.motioncontrolonline.org/content-detail.cfm/Motion-Control-Technical-Features/How-to-Size-a-Motor/content_id/2236)
Stepper versus servo Servo higher speed then stepper. Stepper more torque.
Type of stepper i bought important differences
https://www.lightexpert.nl/led-breedstraler-100w-10000-lumen-4000k.html
haudrelic robotarm stepper tutorial
What i learned and what went wrong.
As i explained in the beginning my idea shifted during the fabacademy.Last week this idea came to mind and i thought it would be feasible. It does turn out more complicated. There are several important aspects i have to figure out before making the design. Have to break my brains the coming weeks to find the best solution and find cheap stepper motors which will do the job good enough. So far i have been practicing with just one stepper motor. This will become four reacting on a input. Not there yet. Btw.. I still like the idea.
GNU General Public License version 3