Machine Design
Group assignment:
- actuate and automate your machine
- document the group project and your individual contribution
Automation of our machine
As stated in week11, for the two machines week, we want to make a Syringe pump end-effector for the 4xiDraw.
The objective of this week is to automate the full process of spherification, controlling all degrees of freedom of our machine: * X and Y axis position, speed and acceleration control of the needle * Z position control of the needle * syringe movement control (injection)
The questions that arise are:
- When do we activate the injection, at what speed ?
- How do we synchronize the syringe movement and the injection ?
- Should we modify the GRBL Code?
- Should we get the speed of the flow of the syringe and calculate the syringe speed in real time?
The different points we want to investigate are:
- Activate the syringe pump on the Z movement as simple as possible: Z Up / Pump Off - Z Down / Pump On
- Finding a strategy to define an adapted G-code from a drawing
- HardCoded
- Inkscape plugin
- Mods
- Regulate the injection process in function of the needle displacement
4xiDraw Automation
The configuration of the Arduino UNO and the ARD-CNC shield used to control the X and Y movement is basically the same as last year Fabacademy project.
Control of limit switches has been added.
Syringe pump control
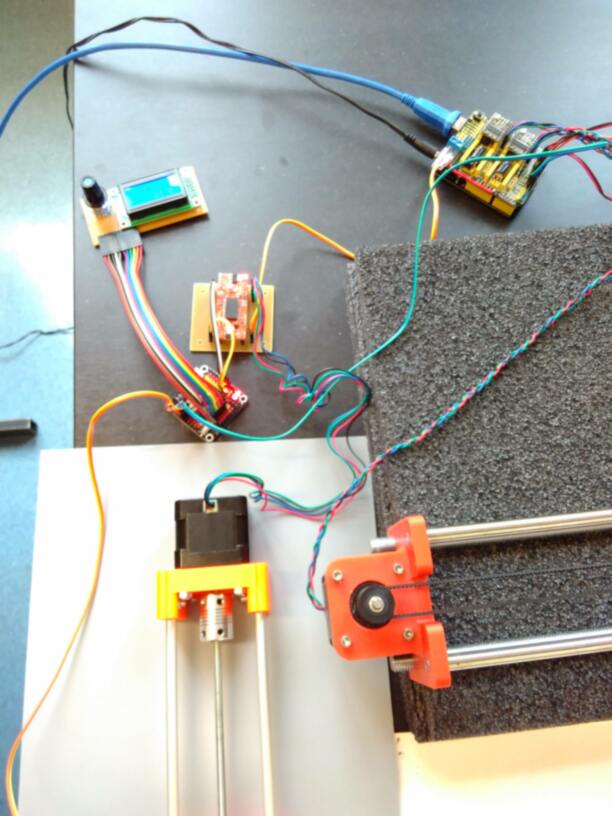
The main adaptation is the addition of a syringe pump, and in order to have it functional in a short time deadline, we decided to control the injection pump through a separate microcontroller from the CNC shield that will move the injection pump when the needle is in the correct Z-position for plotting.
Therefore, Axel decided to connect the microcontroller to the CoolEn (coolant enable) output of the CNC shield. So it will enable/disable the extruder as it would do for a coolant control.
The original G-code of any drawing is then adapted in this way:
- When drawing, send M3 S0 to move down the Z-axis, then M8 to start injection.
- When jogging, send M9 to stop injection, then M3 S100 to move up the Z-axis.
This has been done with some modifications of the Path to G-code module in mods
Control of limit switches has also been added.
Hardware:
-
The ARD-CNC shield mounted on a Arduino UNO is used to control the X and Y displacement of the 4xiDraw motors.
-
The core of the pump control is a compact Arduino clone with following connections:
-
CoolEn (coolant enable) output of the ARD-CNC shield on pin 2 (INT0) with a pull-down resistor.
-
Limit switch for the syringe pump wired as normally-closed on pin 3 (INT1).
-
User interface board, in order to allow manual tuning of the injection speed, and visual control on a LCD.
-
EasyDriver v4.4 module to control the NEMA 17 stepper motor (with MS1 and MS2 unconnected, so the microstepping is set to 1/8).
This setup is illustrated below:

Software
-
The actual Arduino code on the Arduino clone can be found on Axel’s page
-
The mods program is loaded with a 2D png/svg, removing unnecessary commands, adding the coolant, replacing Z by M3S, using M8 to activate the syringe pump and M9 to disactivate it.
Adaptation for the syringe pump can be found here. -
software Cre-mov is used to send the G-code to the Arduino UNO controlling the ARD-CNC shield.
Result
Here is our video demonstrating the functioning of our machine:
We used silicone oil and ethanol as documented during the mechanical design week. The tests were not totally satisfying on the physics side, but allowed to demonstrate the machine. Hopefully, we believe that with a little bit of fine-tuning and with adequate fluids, we could obtain good results for specification. More, as noted in the machine design week, it could also be used for eatable spherification, or to make robots as the octobot:
Future developments: Regulation of the injection
In a first instance, the injection control has been done manually. In a second instance, we would use the external Arduino/Micropython board to calculate the speed of the needle in real time and control the injection speed accordingly.
Choice of the microcontroller
We need a microcontroller fast enough to compute the real time movements of the needle, which implies measurements and mathematical operations, and to control the injection pump accordingly.
A first glance, we would need a microcontroller running faster than the Arduino UNO running the CNC shield and driving the 4xis end effector movements.
Alex has a MicroPython pyboard lite v1.0 on hands.... This board is based on a STM32F411RE microcontroller, with a Cortex M4F CPU running at a maximum frequency of 96MHz, which sounds nice for the job we want to do…