Project Management "Build your own website"
For this assignment we were asked to build our own website using whatever technology available, and then upload it to our our git lab that we got access from Fab Academy.
The Local Workshop
After Neil Gershenfeld online session, we had local session in the following day, where we were introduced to different parameters to build our website. The workshop was conducted by a local computer scientist who is working with the company that operates QBIC Fab Lab.
In the worksop we covered the following topics:
- 1. Introduction to HTML and CSS
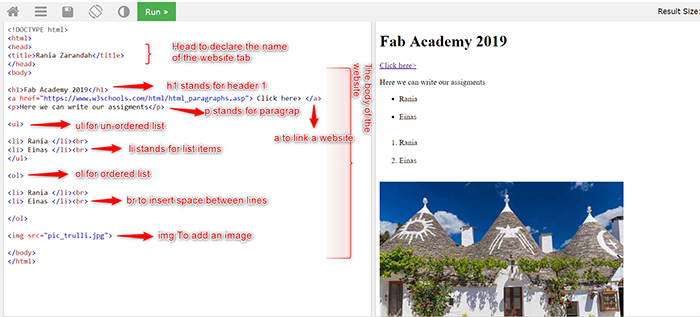
- 2. Small example of how HTML work using w3schools platform
- 3. Where we can get free HTML templates and one example was Bootstrap platform
- 4. Introduction to Brackets software to edit the HTML templates
- 5. Introduction to Git Bash to link git lab to your computer
- 6. Introduction to Gimp to resize our pictures

Choosing Website Templates
After the local workshop we had with QBIC Fab Lab, our rule started, now we had to go on and start building our websites. During the workshop we were introduced to Bootstrap, which is a website where you can find a free HTML templates, these templates can be edited and customized using software called Brackets.
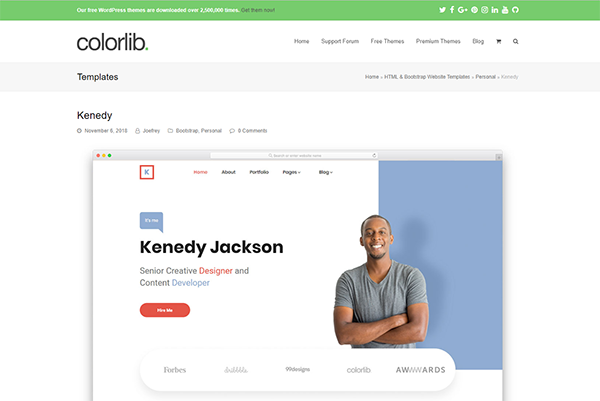
Our local advisor suggested to choose a template that has 70% of what we require to have in our websites. Therefore Bootsrap was not a good choice for me, I could not find any tempates that has even 50% of what I require. Then I found another website with free HTML templates called Colorlib. From Colorlib I used the following tempaltes:

The template I choosed is actually a CV/ Blog tempalte. It has different tabs I can use for; Home page, About me, Project, Assignments, and Contact me. It was quite easy to customise it, and it gave me the chance to build my website the way I was imaging it.
Customize the Website Template
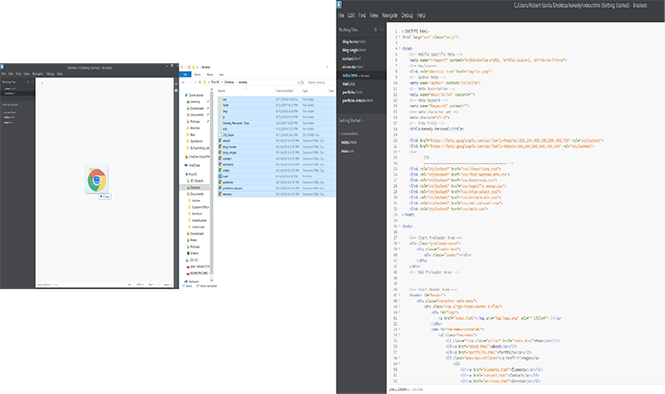
For customizing the website template I used Brackets software. Brackets is a free and an open source software, used as a source code editor that has primary foucs on web development. One of the main advantages of using Brackets is that it has live HTML, CSS, and JavaScript editing functionality.Meaning that while you are editing your HTML, and CSS, you see a live view of the changes you did.
After downloading the template from Colorlib, I extracted the folder and move all the content inside it to Brackets using grab and drop:

In my website I have 5 mian tabs
- 1. Home
- 2. About
- 3. Assignments
- 4. Project
- 5. Contact me
In the "home" page you will find a shortcut of everything you can find in the website (e.g. assignments, and project). "About" tab has my own Bio, and small description about QBIC Fab Lab. "Assignments", is where all my assignments are going to be listed, "Project" has small description of what I want to do as project during Fab Academy. And Finally, "Contact me" has all my contact information so anyone one can use it to reach out to me.
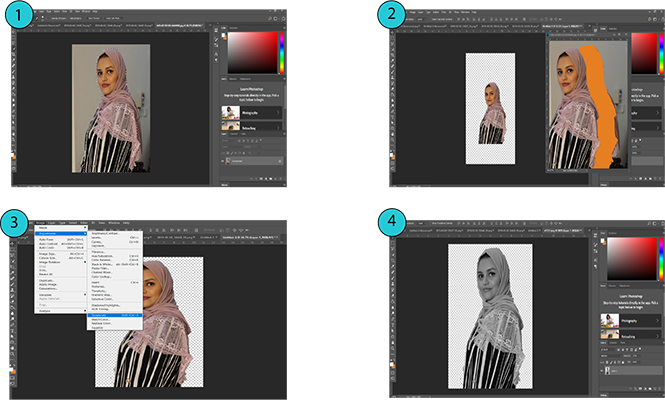
For the pictures I added in my website, I used different softwares such as; illustrator, photoshp, and Gimp. There were some pictures I wanted to edit so I worked in photoshop at the beginning then I moved to illustrator to add some artwork. I am not an expert in both softwares, however, I wanted to use them to edit some pictures of myself and add it in the website :) and a picture of what we are doing in general in QBIC Fab Lab. On the other hand, I used Gimp to re-size the pictures I am using in the website. Although, I could have do it in photoshop or illustartor, but Gimp was quit faster when I needed to resize the picture quickly.

Linking my Environment to GitLab
To link my environment to GitLab I should have GitBash since I am using Windows operational system. So first things first, after downloading GitBash and using GitLab's account that Fab Academy created for us we can link our local enviroment to GitLab.
It is very important to first configure my Git username and email address, since all Git commit will use the information I provided to identify that I am the original aurthor.
So first in GitBash window I wrote the following command with the username Fab Academy provided for me.

Then to verify that it is the correct username I use the following command.

After that I will write my email with the following command to set it to GitBash

These steps are only needed to be done once, since I am using the "--global" option, because what it does exactly is that it tells Git to always use the information I provided for anything I do on that system.
After that I used the "Clone a repository" so I can start working locally on an existing remote repository. Cloning a repository will download a copy of the files found in GitLab to my local computer preserving the Git connection with the remote repository.
There is two options to Clone a repository either using HTTPS or SSH. In my case I used the SSH, because while dealing with SSH I only need to enter my credentials once then I can pull and push straightaway.
So moving on to start creating a local server that will be able to access my personal student directory on the remote server, I wrote the following command on GitBash to get my local server SSH key. This command creates a new SSH key, using my email address as a label.

Then I should provide exact location I want to save my SSH key on my local environment.

After saving the key in exact location GitBash will ask for passphrase to use whenever I am linking my local environment to GitLab, meaining whenever I am pushing something to GitLab or pulling something to my local environment, GitBash will ask for the passphrase I assigned.

Now after locating my SSH key, I will have to send it to GitLab to create a path between my local environment and GitLab. To do so I have to write the following command on my GitBash, then copy my SSH key and go to my GitLab - Settings - SSH key, and paste my SSH key there.


After adding my SSH key to GitLab, I created a folder in my computer "Desktop", this folder is where I am going to place the clone file from GitLab. After creating the folder I went back to git lab and copied the GIT Repository, inside my project branch.

Finally, to finish connecting my local environment to GitLab, I went back to GitBash and located the folader I created in GitBash, and then clone my GitLab to this folder.


Pushing/ Pulling the Website Content to GitLab
After finish everything now I will have to push my website to GitLab. To do so, first I need to transfer all the content related to my website to the clone I created previously of my GitLab.

Then I went back to GitBash and locate the location of the cloned files, and finally pushed the content of the website.


And by this I was able to learn HTML, and CSS, customize a free HTML templates, create a path between my local environment and the directory "GitLab", and push the content of my website to GitLab.