Torture test was being performed to actually characterize the capabilities of our machine. It was done to understand how good our machine can work and give the best results and finding out the right settings for the printing. After a group dicusiion we decided to print a design wa=hich was downloaded from thingiverse website.
Thingiverse is a thriving design community for discovering, making, and sharing 3D printable things. There are some mesmerising oprn source design files available You can download the files as well as manipulate it and also you can upload your design files for 3D printing.
We decided to print the following design for our test purpose-

The thingiverse page can be visited for downloading the files from the following link-
https://www.thingiverse.com/thing:2806295
Why?
- because the test file included
MakerBot Desktop is a free app for preparing 3D prints and managing your 3D content. Whether you print directly to your MakerBot 3D printer via USB cable, Ethernet or Wi-Fi or you export your print files to a USB drive or SD card, MakerBot Desktop is where all of your prints will begin. Yo can download the Software from this link
We did not tweak with the default setting only added some supports with 10% infill layer.
MAKER BOT REPLICATOR Z18
The Replicator Z18 is another series of a printer manufactured by Makerbot Company, it has some enhanced features like printing over Wifi u can directly give it instruction to print using the same network to which the printer is connected.
Results- In the overhang test Our Printer can print upto 50 to 60 degree without any issue and without supports..

Results-There printer was able to print the minutes bridge very efficently.

Results-
There are some oozing issues in printing of the pillars but it could be minimized by increasing the Retraction time

and
Scaling Test- It's basically testing your actual model to the xact dimensions of the design and see the difference.
Results-
In the scaling test the dimension was 64.62 mm whereas the actual dimension of the design was 65mm

Slicing Up for Printing
MakerBot Desktop
MakerBot Desktop
You can add a STL file in Tthe MakerBot desktop App and the you can play Around its setting like scale it down to reduce the printing time you can adjust whether you need some rafting or support to be printed or not, also you can define how mach dense you object can be by deciding the infill amount.
The basic Terminologies to know are -

The workspace of makerbot desktop

I imported the STl file


It showed that it wil take almost 3 Hours to print

Here we can manipulate the settings to make the design more appealable, suppose for overhangs of larger angle we need to add some support but for the current design we did not required any support or Rafts so we opted out these setting
Rest all were printed using the software's default settings.
Setting Up the Printer

The process we followed to print was to print via USB by giving it a make file.

Feeding the Spool of PLA filament Material

Inserting the USB drive that Contains The make File Select the file and Press the Knob in the centre and it will Start printing. Before printing it takes some time to heat the filament to ample temperature so that it can ooze out from the extruder.

Before printing it takes some time to heat the filament to ample temperature so that it can ooze out from the extruder.


Final Results Of Toture Test


Difference I learned Between Additive and Subtractive manufacturing
Additive Manufacturing
- Involves addition of material layer by layer to create any object
- Good for rapid prototyping
- Uses computers and special 3D printer to create any object
- Usually layering often gives a rough surface wich often needs clearing afterwards.
- Intricate and hollow objects can easily built up in layers.
- Depending on the size of object, 3D printing can be a slow process.
- Overall, 3D printing is a fairly cheap process.
Subtractive Manufacturing
- Removes material from an object.
- Uses computer and robotics to assist standard machining process like, turning drilling or milling.
- A variety of Surface finished can be machined, inluding smooth stepped, mottled etc.
- Milling undercuts and intricate shapes can be quite diffficult
- BEst suited for manufacturing voluminous items and parts
- It's a relatively fast process and comparartively more expensive process.
Individual Assignment
For the individual assignment I was supposed to make a design and print which cannot be made easily by subtractive manufacturing. After giving a much thought about the topic I decided to make a lamp shade and designed it using fusion 360.
Why?
I chose this kind of design for this assignment beacause on advantage of Additive Manufacturing has over subtractive is based on the way parts are built: layer by layer, from nothing. Since they’re built up from scratch, certain models can be created using 3D Printing that can’t be manufactured in any other way. 3D Printing is not limited by the same restrictions that come from using rigid tooling, so features such as curved holes, which would be impossible to cut with a rotating endmill or drill, can be printed without issue.

I made a line on a plane and used the spline tool to make a structure.

The I used the feature revolve to make a kind of lamp structure.

Then I made offset plane from top and Bottom side beacause I intend to give an unedrcut feature in the middle section of my lamp.

Then I projected the body and made a skecth from between to make an intersect pattern.

In extruding the 6mm line that I made I used the intersect feature instead of the cut.

Then I patterned the intersected line in a circular pattern and gave the number of intersect according to the appeal of the design for this design I used 20.

Finally I selected the other cut and gave the same number of pattern from the other side and the design was made. I exported the file as STl from fusion and send it to My makerbot desktop software to create a file for 3D printing.
The files of this design can be downloaded from this link
lamp shade.f3d
lamp shade.stl
Slicing Up for Printing


Here I imported my STL file to the MakerBot Desktop Software and generated a Print Preview for the current design, but the time It showed me for printing was too long about 17 hrs . number of Layers are also displayed along the side that is how many layers your printer is gonna print.

Also number of Layers are also displayed along the side that is how many layers your printer is gonna print.

So in order to save the material and reduce the printing time I scaled down my object the scaling otion is available on the left panel of the interface.

Also number of Layers are reduced if we scale it down

I scaled down my design from 135mm to 54.5mm.

the printing time drastically reduced to about 2 hrs and also the number of layers that were goinfg to be printed reduced.
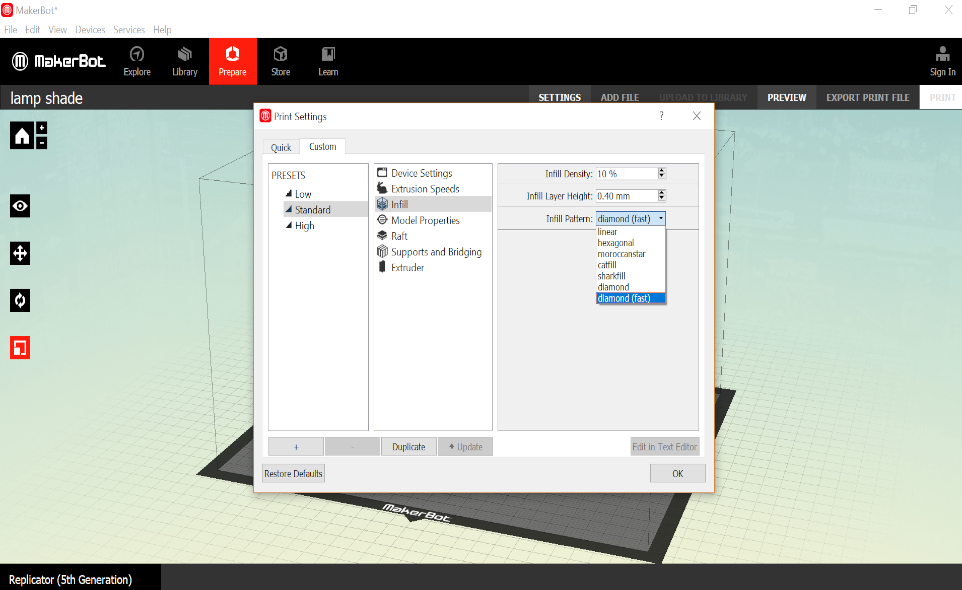
In the print setting I left most of the options default. In the infill setting there are various kinds of infill type like linear, hexagonal, diamond. I kept it to diamond as it showed me the fast option.

As my design did not needed any support so I did not gave it although there are otions to add some extra support if it's needed. I put on the Raft option beacause Rafting basically makes some extra layer on the bed before starting to actually print the file which was provided to have a better hold of the design to the bed of the printer.
Sending Files to the printer
So after exporting the make file in the usb I inserted the usb in the printer and turned the know and pressed it to select my file to print.
After pressing the print if everything is okay say your calibration is fine and bed Alignment is fine the printer starts pre heating the extruder to heat up the filament to extrude and then it starts printing.


The Final Output
The final printed desgn when it came out of the printer with the help of spatula I removed it from the bed of the printer, the print was very satisfying and appealing. I was very happy to see the design when i actually got printed.


I uploaded my design on sketch fab so that to have a 3D model look.
Experience with 3D printing
- Honestly my experience on this week with 3D printer was insanely awsome. I was amaze by the fact that just by knowing a good design knowledge which I have developed a lil bit on the previous week you can actually see you designs in a physical form.
- The agenda of the assignment was to make anything which could not be made substractively made me stress to imagine a design that would fulfill it.
- Also the process is so easy to print you just have to play with it's settings like infill to change the density of the print and supports to make a support for large overhangs.
- I was introducesd to thingiverse community which has so many cool designs which you can think of is available you can learn take inspiration and make your own designs.
- Also this type of manufacturing is less time taking and it's not tool dependant as we do in molling process for every separate action we need differnt type of tool.
- I am hoping to learn more about the small features and settings to get more fine prints and make useful designs to inculcate in my final project.
Limitations in the Field of 3D printing
In terms of materials options Additive Manufacturing is still fairly new technology, compared to its subtractive counterpart, so material options are still limited. Some types of 3D Printing, such as those that adhere or melt powdered material, are flexible in their material usage since all that’s required is a powdered form of the substance. FDM-style printers, on the other hand, are limited by the needs of the process: the material has to be extruded into a filament of consistent diameter from a raw state, which requires custom tooling.
for more info about regarding this you can check out this
page.
Using Microsoft Kinect Xbox 360

For scanning we used xbox kinect 360,
The Kinect sensor is a horizontal bar connected to a small base with a motorized pivot and is designed to be positioned lengthwise above or below the video display. The device has an "RGB camera, depth sensor and multi-array microphone running proprietary software",
which provide full-body 3D motion capture, facial recognition and voice recognition capabilities.
It has a software available named as Skanect which can be downloaded from this link
Download Skanect
The process of scanning through the skanect app is simple you just have to decide the size of the box what you have to scan it can be an object or full room depending what are or obejct you have to scan.
It has following features-
I tried to scan myself by sitting on a rotatable chair and moved around you have to make sure that recording is under 30fps and after that I just clicked on the reconstruct and voylaa all processing is done by the scanning software itself and gives a 3D model out of it.


Now in the process tab there are some features from which you can play with like cropping the object and making it colorized or watertight .


I tried to export it as OBj file but for exporying in any format you need to have a pro vesion of the software which is paid so instead of exporting into a file format I uploaded it to sketch fab initially it failed beacuse I didn't give my right API of sketch fab to uplaod by mitigating that and giving correct API my ID object was uploaded to sketch fab.

One more issue that I face during scanning was Xbox Kinext 360 gives a lot of load to your CPU and if you don't have a powerful CPU it might crash. My laptop got very hot during the reconstructing and recording time so I wold suggest to scan only if you have a good CPU and GPU in the system.
Experience with scanning
Although the scanning was not very perfect but it can be made more accurate if we use Industrial grade scanners, the Scanning process was kind of very amusing to me beacause it basically allows you to reverse engineer any thing or any part for which you don't have adesign file you can easily scan and get the design of that part it can be helpful in many ways in the process.
Uploading
The files were of great big size and exporting was not an option in the unpaid version so I uploaded the file in drop box ny zipping it in a folder but still tye size was of some GigaBytes so I'm sharing the the link where the files are.


The link for the .skn file
https://www.dropbox.com/s/hy65v2fffc81sms/skanectfile.zip?dl=0
Scanning Again with the Kinect Sensor
For exporting 3D scaaing file I again redo all the things to have the skanect file..
I followed the same procedures as above-
.jpg)
.jpg)
.jpg)
.jpg)
.jpg)
.jpg)
Again the image frames was more than 5000 so i exported it as OBj and PLY instead, It gave me the otion to export it I've not realized that while exporting earlier.
.jpg)
Scanning Using Qlone App
Qlone is a mobile app which is avialable in google play store for android devices as well as on istore for apple it allows you scan an object using the camera.
For that a mat should be printed on a non glossy page with clear four corners and we have to scan the mat first to calliberate it once depending on the size of the mat we can print it in any size depending on the object.


I tried to scan my mouse but somehow the dome was supoosed to complete you have to manually rotote your phone in partical circles to complete each strand of the dome, it was not completed so thas why the scan did not come out perfectly.
Skanect V/s Qlone
Skanect obviously I would prefer for 3D scanning because while scanning with qlone there was not any stability as ine has to rotate the frames to complete the dome but It doesn't have a dedicated hardware like XBox 360 hardware that has an array of cameras which can detect. Including depth camera. While the mobile phone aplication doesnt support that high end dedicated hardware for the same.
Although I was unable to scan the whole image using the Qlone app I will look in future to see some more apps related to scanning via smart phones.
Disadvantages
Although using kinect I was able to scan myself but there is some hackable issue also the 3D scan was not very appealing but there are some interesting scanners like I've seen on an insta page where Dentist use to scan and make replica of teeth structure.
The main limitation in 3D scanning is the hardware you are using, if you have a portable high end scanner, you can get detailed resolution scans, but if you don't then it really limits your options in the things you can scan.
For example, in our lab we have the kinect sensor . From my experience using it, I can say that the kinect is not suitable for small fine details, it is good for large long range objects like furniture and rooms. It has very poor resolution.
Scanning using 3D Scanner Android Mobile Application

Having issue in exporting the file in native format or uploading at the archive I couldn't wait to go at the Lab to get acess for the Kinect sensor Instead I found this cool app on the google playstore that scans the object and build a 3D model.
Ypu can checkout the app from this
link.
There are some basic steps after Launching the Application it uses the camera of your phone, You can either make a video in a 360 deg manner such that the object u want to scan is in the predefined box provided in the app interface.
You can either click as many pictures at different angles or make a video.
The steps to open the app are displayed below in the video which i screen recorded via my phone-
After clicking on few next the camera opne with a white box in which the object should be placed to be clicked make a video-
I scanned my Laptop that was kept on my bed, I clicked few picture at different angles to get the scan.

The video i recorded of the 3D model build up and displayed on the phone the files were saved in the 3D scanner folder of the phone.