Applications and Implications
Table of contents
- Introduction
- System overview
- Parts and processes
- Tasks to be completed and schedule
- Evaluation
- Links
Introduction
The Solar kiln will dry firewood for use in a wood burning stove. The link to my final project page will give more details about this and includes a bill of materials, costs and details about the various parts and systems of this project. The links to other Solar Kiln designs are included at the bottom of this page and show who has done this before and how. Using the radiant energy from the Sun is a common method of drying wood and solar kilns come in various designs and sizes. Apart from drying firewood they are also used to dry wood for carpentry or furniture making. See the links section for the wide range of designs and sizes for a solar kiln.
The advantages of using kiln dried wood are:
- More useful heat generated by the wood as the water in the wood is not being boiled off and heat wasted.
- Creates less tar and creosote in the chimney.
- Is easiler to light and control.
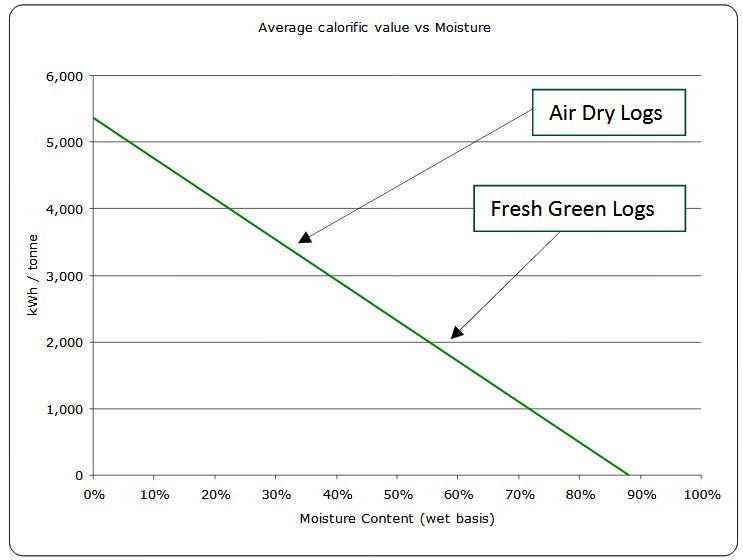
The ideal moisture content of firewood is between 15 and 20%. If over 20% then the advantages mentioned above are lost. However if the wood is too dry over combustion problems can occur like not being able to feed an adequate air supply to the stove or having an uncontrollable furnance in your living room.
Green wood typically has a moisture content of approximately 60%. Ideally the solar kiln will dry the wood to less than 20% in around 30 days.
The graph below illustrates the how the calorific value of wood increases as a function of decreasing moisture content showing the benefits of drying wood.
System overview
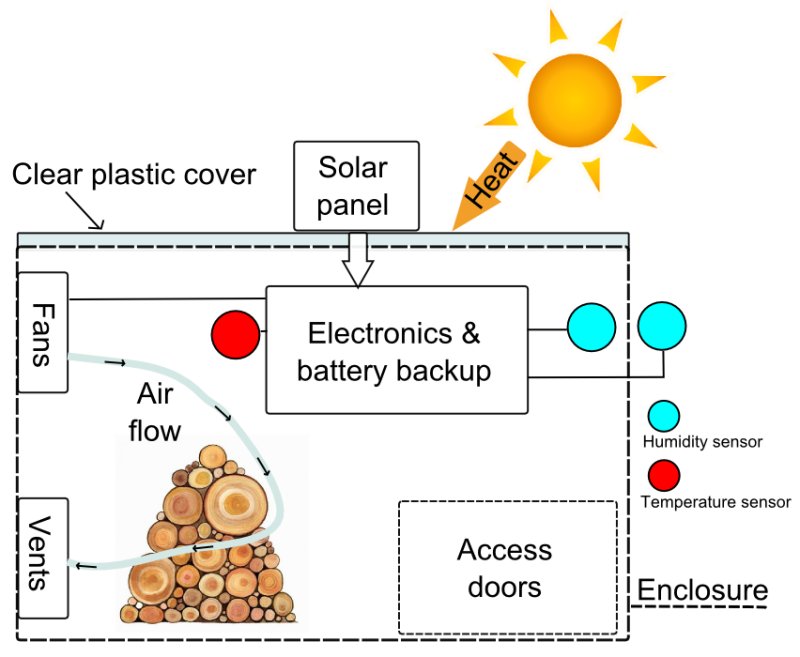
The main parts of the solar kiln are the enclosure, solar panel to provide power, a couple of fans and control electronics to measure temperature, humidity and battery backup. See the final project BOM spreadsheet for a list of the components, suppliers and costings. The whole thing is planned to cost no more than £200 and where possilbe recycled parts will be used - for example the fans could come from desktop computer power supplies or enclosures.
The diagram below gives an overview of the solar kiln as a system.
Parts and processes
The various parts are listed in the table below along with how they will be produced
| Part | Process |
|---|---|
| Enclosure | Shopbot cut 18mm OSB |
| Vents | Laser cut 3mm ply |
| Case for external humidity sensor | 3D printed ABS |
| PV solar panel | bought in |
| Access doors | Shopbot cut 18mm OSB |
| Fans | Recycled from old electronics |
| Roof - clear corrugated PVC sheet | Frame made on Shopbot |
| Control electronics | Reuse design ideas from assignments to create overall control system |
| Power supply and battery backup | New electronic design |
Tasks to be completed and schedule
- Design of Solar Kiln enclosure. In the Computer controlled machining assignment I built a prototype of the solar kiln. From that prototype I realised my design needed changed to become structurally stronger and to have added features like access doors and places to hold the solar panel and electronics. To accommodate these changes, I need to re-design the solar kiln in SolidWorks.
- The control electronics has to be designed. This will take in the learning outcomes from some of the electronic/firmware assignments such as the input/output devices assignments and the networking assignment.
- It is planned that a photo-voltaic (PV) solar panel will provide the electricity to power the solar kiln. For this to happen power supply electronics will be created which will regulate the solar panel output to a usable voltage and current and provide a mechanism for charging a battery facilitating battery backup in times of reduced sunlight.
- The vents also need to be designed along with any mounting enclosures for the various humidity and temperature sensors.
Along with the design the above things need to be built and assembled and tested. The schedule for this is shown in the following table.
| Task | Time | Dates |
|---|---|---|
| Enclosure design and build | 2 weeks | 5th to 19th June |
| Design/build control electronics | 2 weeks | 19th June to 3rd July |
| Power supply electronics design and build | 2 weeks | 3rd to 17th July |
| Miscellaneous: laser cutting vents etc. | 2 weeks | 17th to 31st July |
| Assembly and test of solar kiln | 2 weeks | 31st July to 14th August |
Evaluation
All stages of the design, build and testing of the solar kiln will be documented and recorded on the final project webpage. This will allow independent verification as to whether this project has met its requirements.
The individual elements of the solar kiln will also be tested to see if they perform as expected. To help with this a test list will be drawn up and the main sub-systems of the solar kiln appraised against this.
Links to information about solar kilns and wood burning stoves
- Oregon Wood Innovation Center.
- Popular Woodworking article
- Northern Woodland article
- List of various solar kiln designs.
- Wood as fuel - a guide to choosing and drying logs.