Discovering the Variable of CNC Machining
CNC Machining is the process used in the manufacturing sector that involves the use of computers to control machine tools. Those tools include lathes, mills, routers and grinders.
In this section, we will learn on how to operate the CNC Router Machines.
There are many technologies and brands nowadays that are considered to be under the umbrella of CNC Routers. Among those are:
- Roland which is mainly used by us to mill PCBs.
- Onsrud
- Tormach
- Hurco
- Harrison
- Zund
- MTM
- Fellesverkstedet
- Shopbot which is the biggest CNC Router we have in the lab.
Assignment
We had a Group Assignment and an Individual Assignment this week.- Group Assignment The group assginment was to test the CNC Router available in our lab, using a variety of settings, mainly speeds, feeds, and toolpaths. To achieve that, we contructed the same design using various setting and checked the difference in between.
- Individual Assignment The individual assignment was mainly to make something. In my case i produced a chair using the same design i used for laser cutting.
- Shopbot 96-60-8 is the main CNC Router available in our lab, having the largest size. It has a working volume of 2.44m x 1.52m x 0.15m.
- Blue Elephant 9060 is another smaller CNC Router we have in the lab. It has a working volume of 0.9m x 0.6m x 0.15m
- Fusion 360 was used for 3d modelling in this assignment.
- AutoCad was the main software used for 2D design. I used it to design in 2D and set the dimensions i want to use in the 3d model.
- Fab Modules can be used to produced the g-code for many different machine types incuding the Shopbot and the Blue Elephant.
- ShopBot VCarvePro is the main software used by us to produce the g-code for the Shopbot
- Mach 3 is the main software used toprepare the g-code for the Blue Elephant CNC Router. .
You can check the Group Assignment on the following link: Group Assignment
Machines Used
The main machines used in this week's assignment are the CNC Routers. The list of machines we used are the following:Software Used
The following software were used for the Design part in this week's assignment:Some CNC Machining Basics
In order to understand the basics of CNC milling and machining, an intensive research was performed to discover all the variables that affect the CNC machining process.
There are many components that must be taken into consideration when CNC machining, and those mainly are based on the material undergoing machining, the tools used, and the machine itself.
In this section we will discuss the following topics that affect the process of CNC Machining and the final product, and describe how they are connected:
- Tooling
- Speed and Feeds
- Toolpaths
Tooling
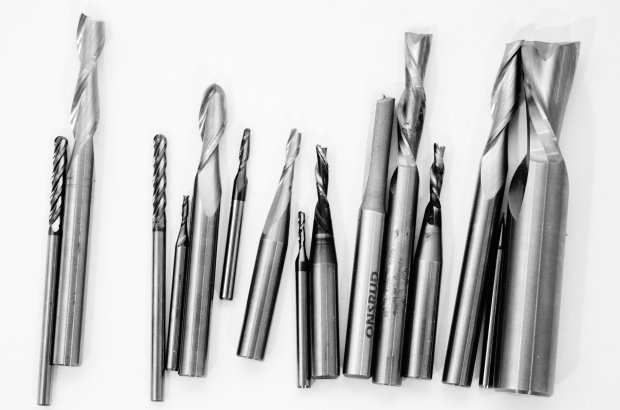
To begin with, there are different tools that are used during the Machining process, each having a specified job.
The main three different tool types available are:
- Drill Bits are designed to plunge directly into material, cutting axially, and creating cylindrical holes
- Mill Bits are designed to undergo horizontal carving and cutting laterally.
- End Mill Bits
Among those specifications are:
- Diameter
- Shank
- Length of Cut
- Overall Tool Length
- Teath
- Number of Flutes
- Tip Shape represents the shape of the tip for the used tool.
- Coatings
- Center Cutting Capability means the ability to cut both axially and laterally.
- Helix Angle
- Helix Direction
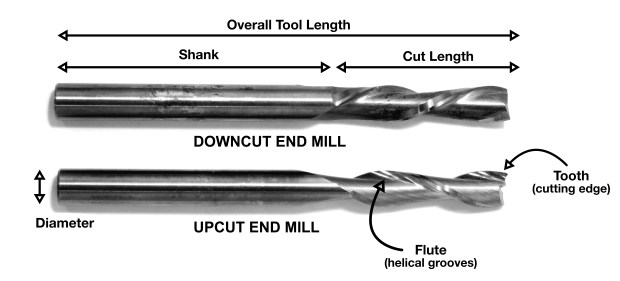
The image below illustrates the different parts of a bit showing the Diameter, Shank, Length of Cut, Overall Tool Length, Teath, and the Flute.
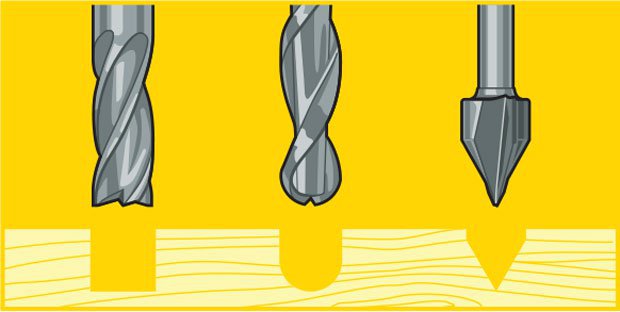
Tip Shape
Concerning the Tip Shape of the End Mill, there are many different tip shapes that are designed for particular purposes. The most common shapes available are the following:- Ballnose mills produce a rounded pass and are ideal for 3D contour work, because their rounded edge reduces jagged steps when cutting several stepped layers. Ball nose mills can also be used to cut wide paths with rounded edges by reducing the step over amount (overlapping distance between) between passes
- Fish Tail cutters are used to produce a flat surface.
- Surface Planing
- V-carving produce a “V” shaped pass and are used for engraving.
- Straight These bits are made to skim the surface and leave a smooth flat finish.
Material and Coating
Concerning the material, you should choose a bit made for the material of your choice. Many manufacturers make bits especial for your material of choice. Bits for hardwood are designed to leave a clean edge. Bits for plywood and laminates are designed so they won’t mangle the outer veneer layers. Bits for plastics are designed to avoid excessive melting. Aluminum cutting bits are designed to clear chips efficiently to avoid rewelding (heated chips getting fused to the hot cutting tool). Many bits can be used for multiple applications so you don’t need to buy 30 bits right away if you are in the prototyping stage of your project. A good all purpose bit is a 2-flute up cutting spiral bit.There are many router bit material available and here are some of them:
- HSS – High Speed Steel A tool steel far superior to carbon steel when used for drill bits and cutting tools. A HSS drill bit can drill a hole much faster than a carbon steel bit, hence its name. Quite the innovation in the 1940's! We've moved past this type of tool steel today, HSS bits are only suitable for cutting foams. (some disagreement here)
- SC – Generally just called Solid Carbide. A very tough wear resistant steel. Many forms of Carbide exist (silicon carbide, tungsten carbide, Beryllium carbide, etc.) as do forms with different grain size. Solid carbide router bits can vary from worthless to extreme high quality.
- Carbide Tipped – Carbide is expensive... larger diameter bits are available with chunks of carbide brazed (welded) to a steel body. This reduces the total amount of carbide used to make the bit and hopefully the price. Every thing above applies here. Generally, bits with .1" or more carbide thickness is considered a sharpen-able bit. Note: a sharpened bit may no longer be its full design diameter, and will need to be compensated for in the CNC software.
- OTHER – There are many other exotic router bit materials available... Diamond, Diamond like, poly crystalline, and more. These bit materials tend to be used in specialty, high volume, and niche markets.
You can find more details on CNC Router Bit Basics
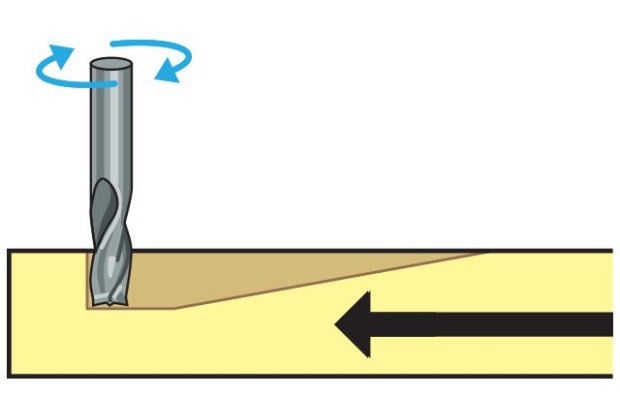
Helical Direction
A CNC router spins a cutter clockwise. The helical direction of the flutes as they wrap around the tool determine if chips are ejected towards the top or bottom of the workpiece. True to their name, upcut mills eject chips towards the top of the workpiece, producing a cleanly cut bottom surface. The downside is possible surface splintering or “tearout” on the top surface as the chips are ejected upwards.Upcutting bits mounted in a CNC pull chips (and your material) up and away from the table. They are great at clearing out chips from your cuts to avoid overheating your bits. They excel at making cuts all the way through material since they just slightly lift the material and scraps up into the end of the bit. Because of the upcutting action, these bits have a tendency to splinter the top surface of sheet goods like plywood and melamine coated particle board. You also need to be very sure that your material is securely held down to the table so the bit doesn’t lift it from the table and chuck it across the room.
Downcut tools do the opposite, producing a smooth upper surface. They are ideal for pieces that have been previously engraved or v-carved and cannot be flipped to hide tearout. In addition, as downcut mills pack the chips into the cut path, they can be used instead of tabs to hold down a workpiece and keep it from moving. Downcutting bits press chips and material back into the cut and into the table. The downshearing action of these bits do a fantastic job of preserving your material’s top surface. Since the chips are forced down into the cut, these bits should never be used to drill holes. The friction of the bit against the compressed chips is enough to melt plastics and start wood on fire.
A third option called a compression or up-down bit offers some of the benefits of both up and downcut bits. The bit is a standard downcut bit until you get to the tip. The direction of the cut is switched making the tip an upcutter. This means that you can cut through materials like plywood and you will get a clean edge on both sides. The top is shear down, the bottom is pulled up. Compression bits are never to be used to drill holes. Once the bit has been plunged beyond the direction change, the chips have no way to escape and get compressed creating an extreme amount of friction and heat. Compression bits are a little more expensive because of the complicated manufacturing of the cutting edge but they are my goto bit for nearly all of my wood cutting.
You can find more details on Guide to CNC Bits
Flutes and Chiploads
Number of Flutes Flutes are the helical grooves that wrap around the sides of the end mill. Each flute has a single tooth with a sharp cutting edge (although there can be more than one) that runs along the edge of the flute. As the tooth cuts into the wood, each flute whisks away a small section or “chip”. The fewer the flutes, the more material that is ejected with each tool rotation. The overall cutting depth should never exceed the length of the flutes on an end mill. If cutting deeper than the length of the flutes, the tops of the flutes will be blocked and chips won’t clear, building up heat and reducing tool life.Chipload Chipload is the thickness of a machined chip as cut by a specific tool type. This is simply the thickness of a chip which is formed during the machining of material. Chipload is important because the proper size chip will carry away heat, promoting long tool life. When the chip is too small, heat is transferred to the cutting tool causing premature bit failure. Too high of a chipload will cause poor edge finish, and transfer cutting load or thrust to the part, possibly causing it to move. A bit in good condition and running at recommended loads will be at room temperature when a cut is finished.
More flutes create a smoother surface finish, while fewer flutes remove material fastest, but make rougher cuts. Proper chipload is important because chips dissipate heat. Hot cutters can lead to suboptimal results, including burned wood, a poor edge finish and dull tooling.
To summarize:
- More flutes create a smoother surface finish
- Fewer flutes are best at chip clearing, keep heat from building up
- Two or four flute cutters are the most common.
- The direction, size, speed and amount of chips being ejected can also damage the surface of the work piece. We can control how the tooling effects the material through our end mill type selection (upcut, downcut or compression) and speed at which we cut.
There are many tables that help you choose the chipload of the job you want to do, which will be needed to calculate the speed of the router. The image below represents one of the chip load charts available online.
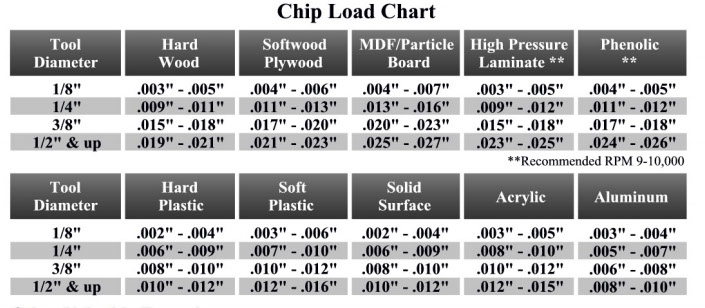
Please note that those represent a specific kind of milling bit. Specific loads for your tools can be obtained from your router bit manufacturer.
Speed and Feeds
The speed at which we move a cutter across the material is called the “feed rate”. The rate of rotation is called the “speed” and is controlled by how fast the router or spindle turns the cutting tool. Both feed rate and spindle speed will vary based on the material being cut. A general rule of thumb is that you want to move the tool through the material as fast as possible, without sacrificing surface finish. The longer the tool rotates in any one place, the more heat that builds up. Heat is your enemy and can burn your material or radically decrease the life or your cutting tool. Feed rate vs spindle speed: Spindle speed that is too fast paired with a slow feed rate can result in burning or melting. Spindle speed that is too slow paired with a faster feed rate can result in dulling of the cutting edge, deflection of the end mill and possibility of breaking the end mill. A good strategy when selecting a cutter is to attempt to balance feed rate and spindle speed by performing two passes on the work piece. The first pass, called the roughing pass, can be done by using an end mill that will eject a large number of chips at a high feed rate. The second pass, called the finishing pass, then won’t require as aggressive of a cut and can provide a smoother finish at a high speed.Chipload refers to the physical size of the chips the bit creates when making a cut. Higher feeedrates produce larger chips. Higher tool rpm produces smaller chips. If your chips are to large, you risk breaking your bit. If your chips are more like a fine powder, you are probably dulling your bit. IT’s a balancing act but start with the manufacturers recommended settings and adjust from there.
Chipload = Feedrate / [RPM x number of flutes]
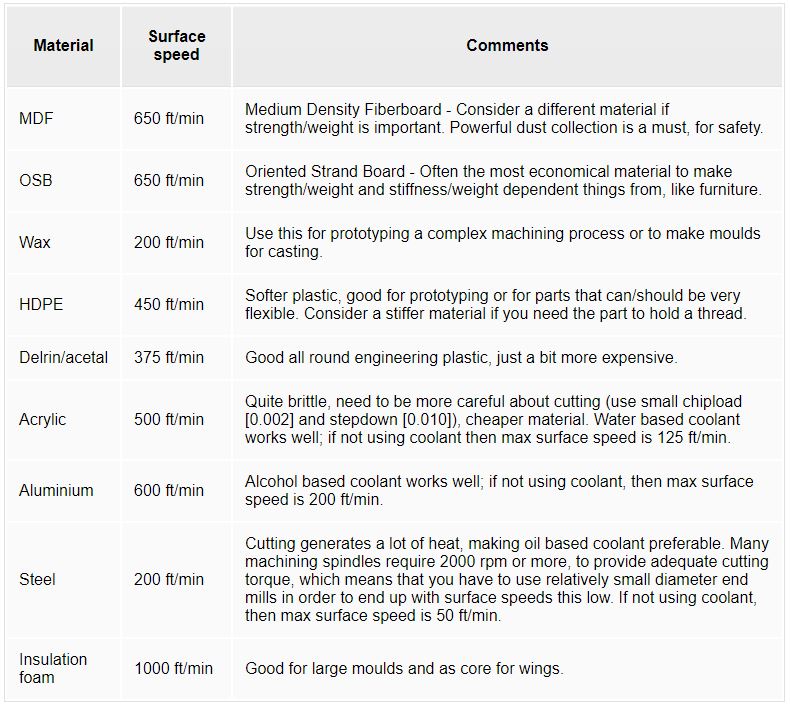
The nominal surface speeds used for various material are shown in the image below.
Here are some equations you need to know to calculate the spindle speed and the Feed Rate during any job in mind.
- Spindle Speed
- Feed Rate Feed Rate = Spindle Speed (RPM)* Number of Flutes * Chip Load (inches) = Spindle Speed * Number of flutes * Chip Load = Answer inches/min
- Plunge Rate Use a plunge rate of 50% or less of the feed rate.

Toolpaths
Many settings can change that control the toolpath of the tool. Among those settings are the following:- Ramp is used to reduce the tool breakage and stress on the material being cut. It occurs by ramping the end mill slowly into lateral cuts, where your tool moves in an XZ or YZ 3D incline into your material to reduce stress on your bit when plunging.
1- Group Assignment - Testing the CNC Machine
In this section we will test the alignment of the Shopbot we have in our fab lab, and then test the various outcomes we get when we change the speeds, feeds and toolpaths.
To achieve that, we prepared various test files that we used to perform those tests.
You can download the original files used for our tests from the following links: Test File
Getting to the actual testing, first we had to identify our material that would be cutting and the bit we are going to use.
- Material: Plywood (15mm)
- Tool: ONSRUD - 65-025, a 1/4 Inch, Solid Carbide Upcut Spiral O FLute Ctting Tool.
We decided to go with a chiprate of 0.005 which is halfway in between and adjust the spindle speed and feed rate while maintaining the chiprate based on the equation stated above Chipload = Feedrate / [RPM x number of flutes]
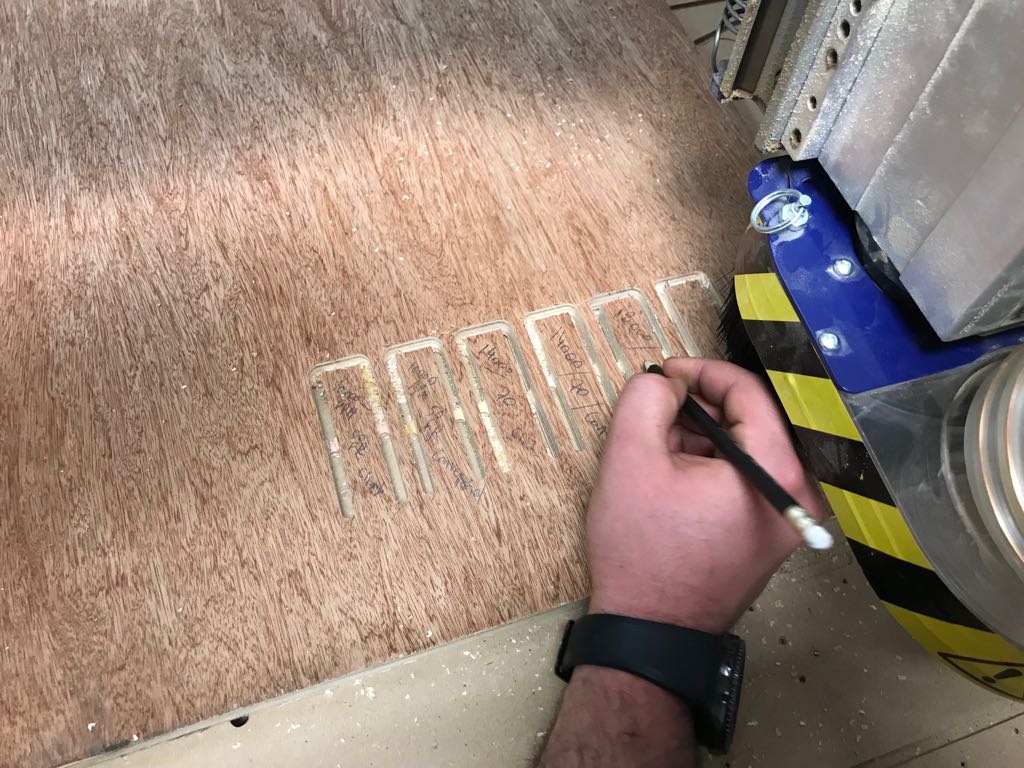
Test 1 - Various Feeds, Speeds, and Toolpaths
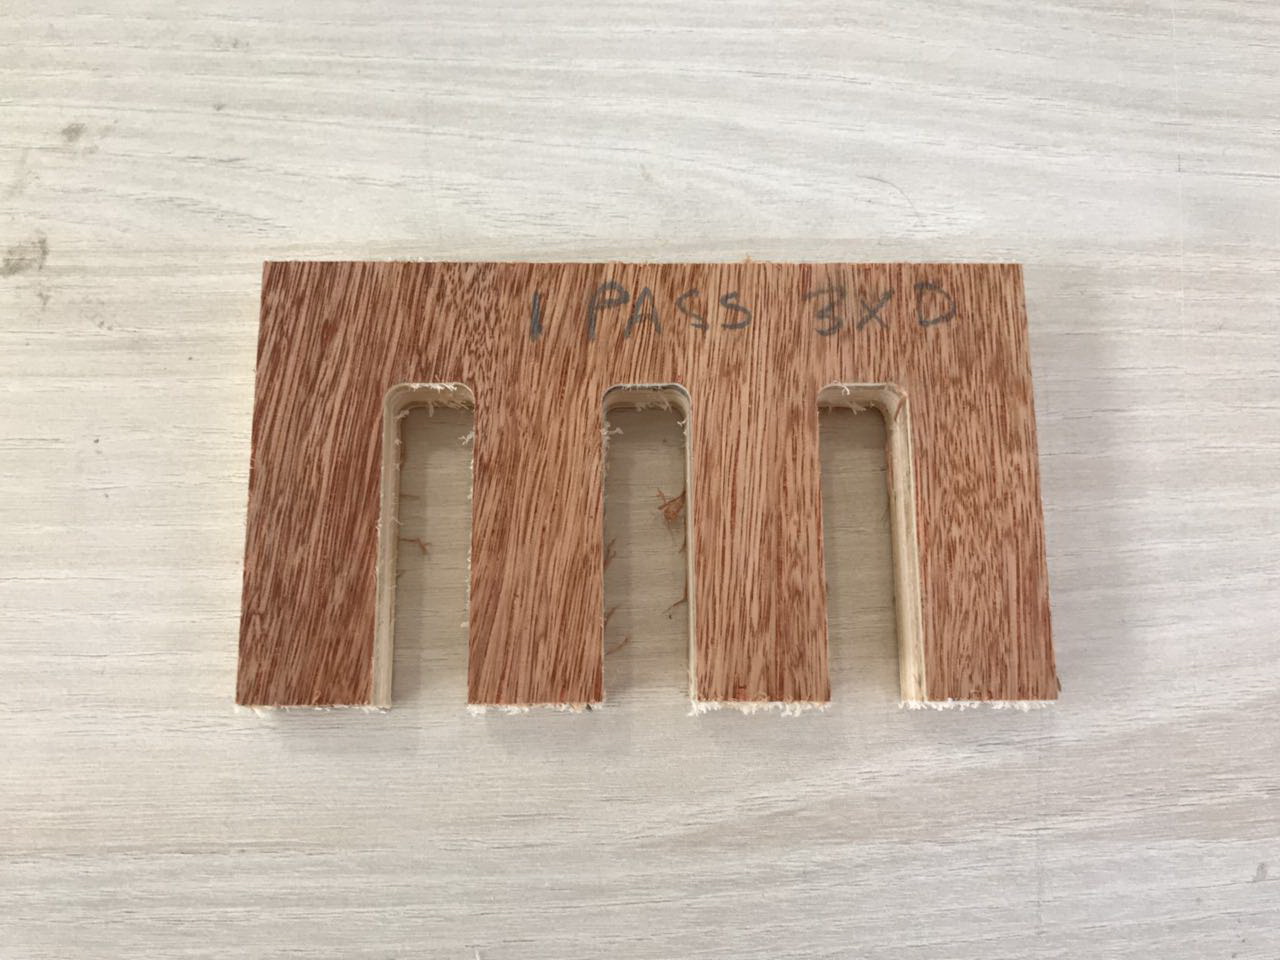
We chose to start with the first test which is variating the Feeds, Speeds, and Toolpath and check the difference between the outputs. In the first test we followed 3 Steps of 1 x D (Cutting Diameter of Tool)
So the Chiprate is a constant 0.005:
Chipload = Feedrate / [RPM x number of flutes]
- Setting 1: Chiprate = 0.005; RPM = 10,000; Feed Rate= 50
- Setting 2: Chiprate = 0.005; RPM = 14,000; Feed Rate= 70
- Setting 3: Chiprate = 0.005; RPM = 18,000; Feed Rate= 90
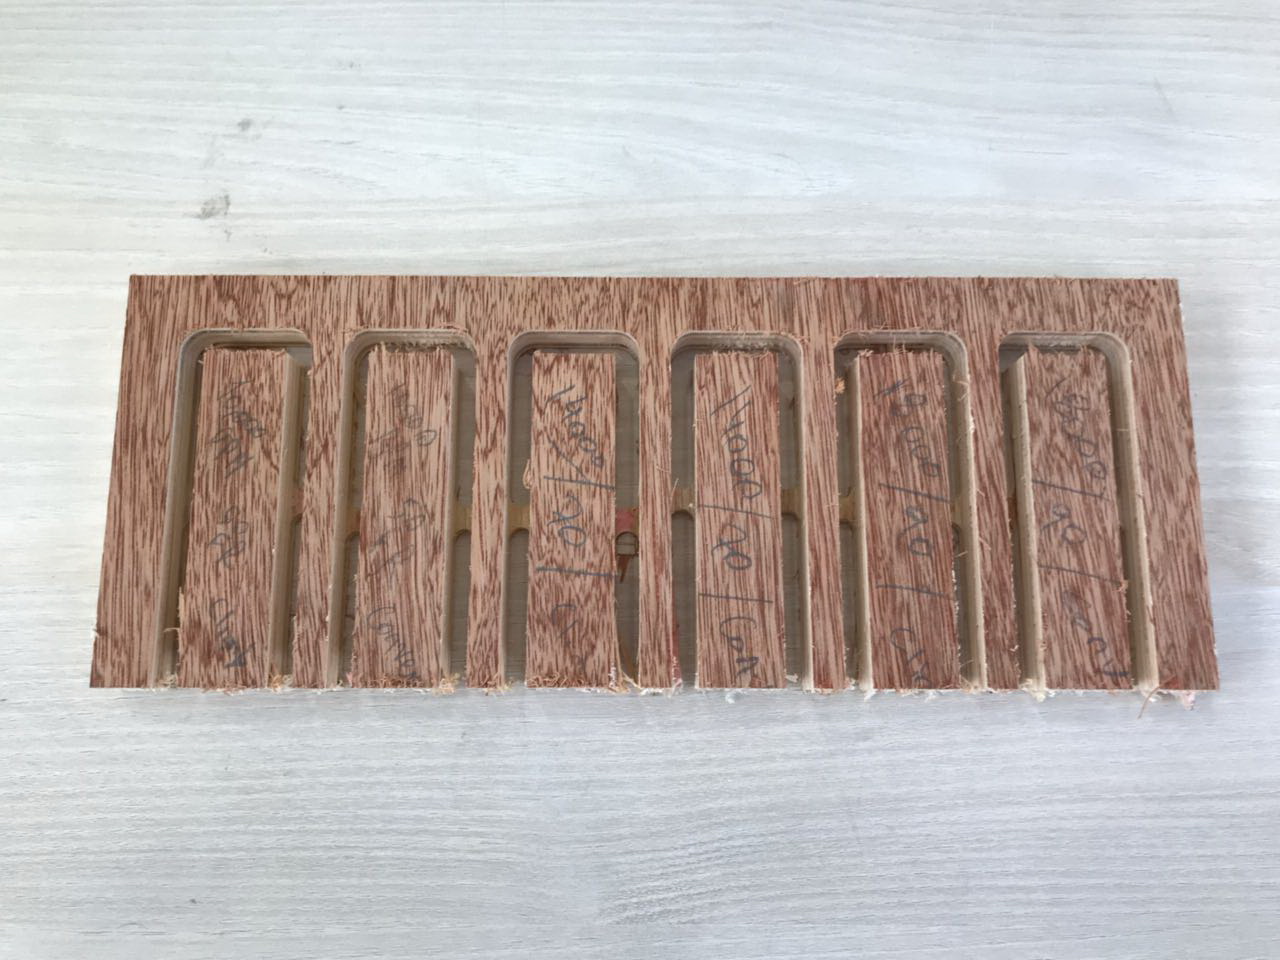
The image illustrates the raw result.
We noticed that the Setting 2 Climb had the best result in relation to our bit and the material used, so we went on with this setting to achieve our final designs with the individual assignment. It is safe to say that all results were very similar, but the second had the best results as in finishing.
Test 2 - 3 x D Test
We also did another test with one pass instead of 3. For this test we had to recalculate the chip rate. According to the supplier and professionals in the industry, the Chiprate is reduced to 50% at a depth of 3 x Cutting Diamter. So the new Chiprate used was 0.0025.
We noticed that the outcome has a rougher surface than the test done with 1xD, however it is a fast way to cut when the quality is not an issue.
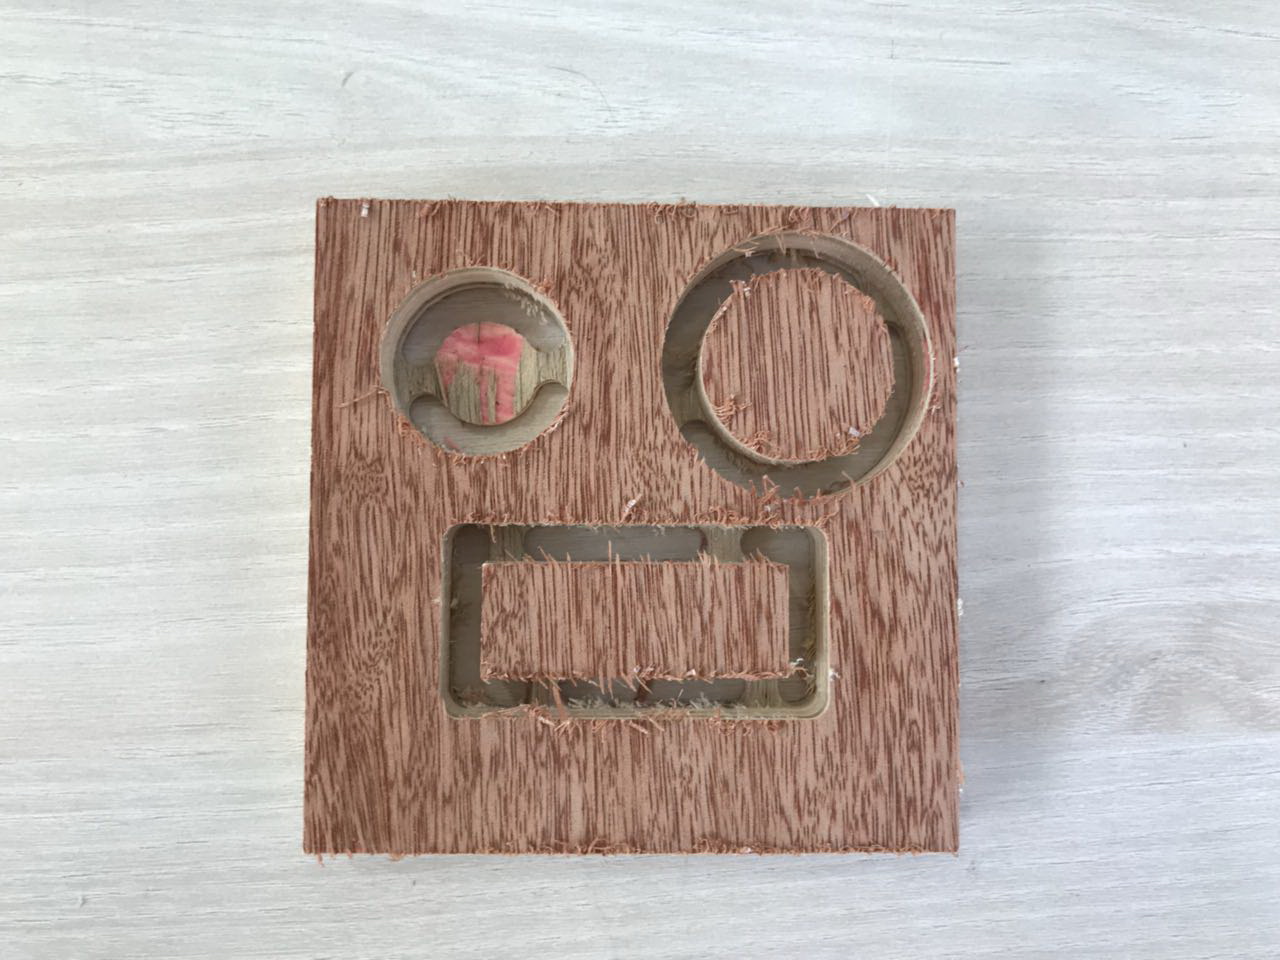
Test 3 - Squareness Test
After choosing the best settings for the PlyWood we are using along with the Tool we have, we went on to do the squareness test. For this test a test file was prepared having an external square, an internal rectangle and two circles. The external square and one of the circles were cut following the extenal path. On the other hand, the rectangle and the other circle were cut following the internal paths.
After the test was done, a comparisson was done between the original design and the outputs. Some minor differences were deduced between both. The external paths made a slightly bigger output. On the other hand, the internal path made slightly smaller outputs.
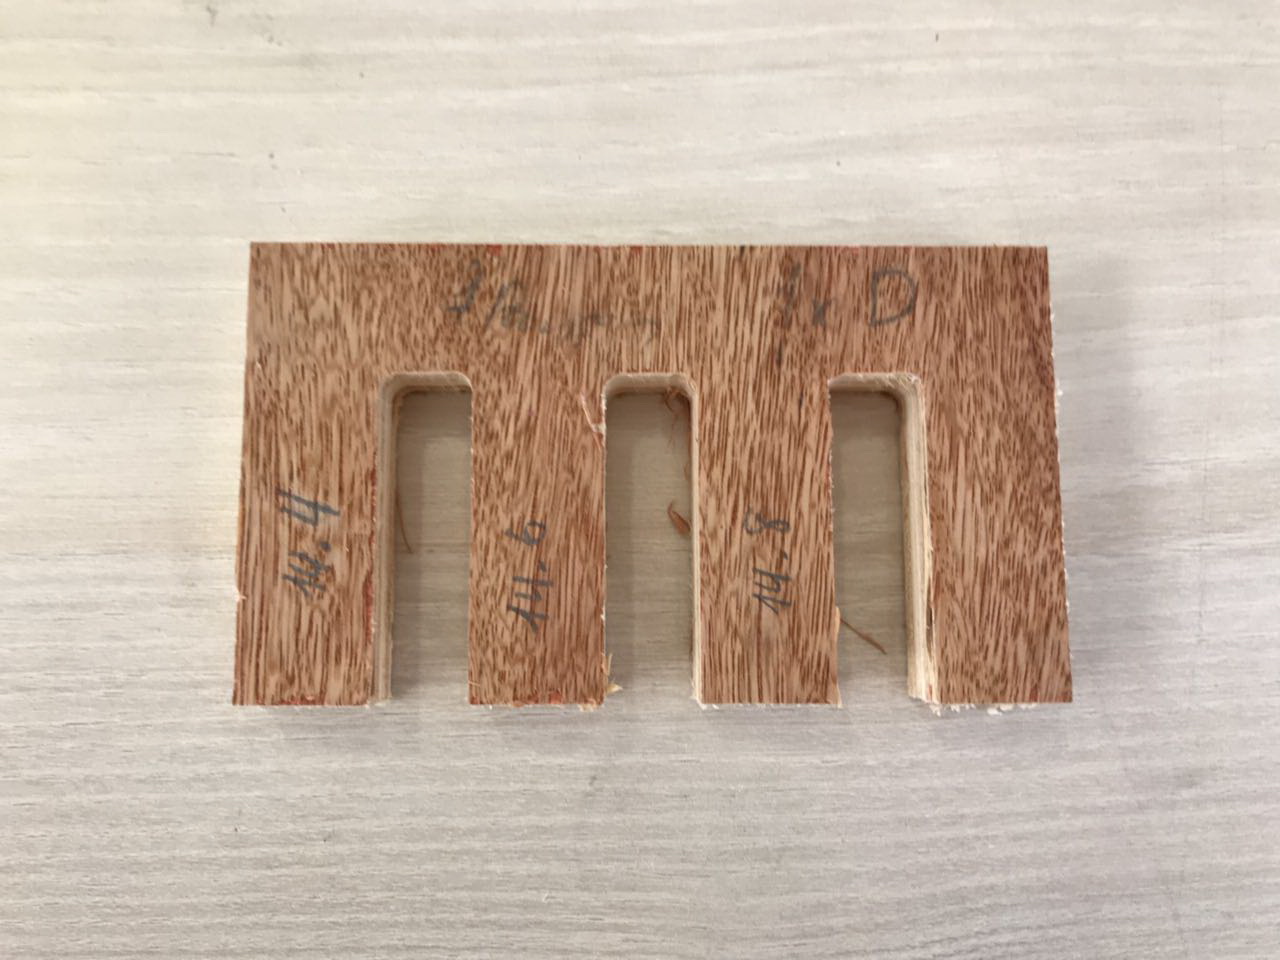
Test 4 a- Fitting Test One
After doing all the previous test, we went on to make a press-fit test, to check which is the best width we should use for the joints so we have a press-fit connection. The Board thickness is 14.6mm. So we choose three different dimensions:
- Width = 14.4 mm
- Width = 14.6 mm
- Width = 14.8 mm
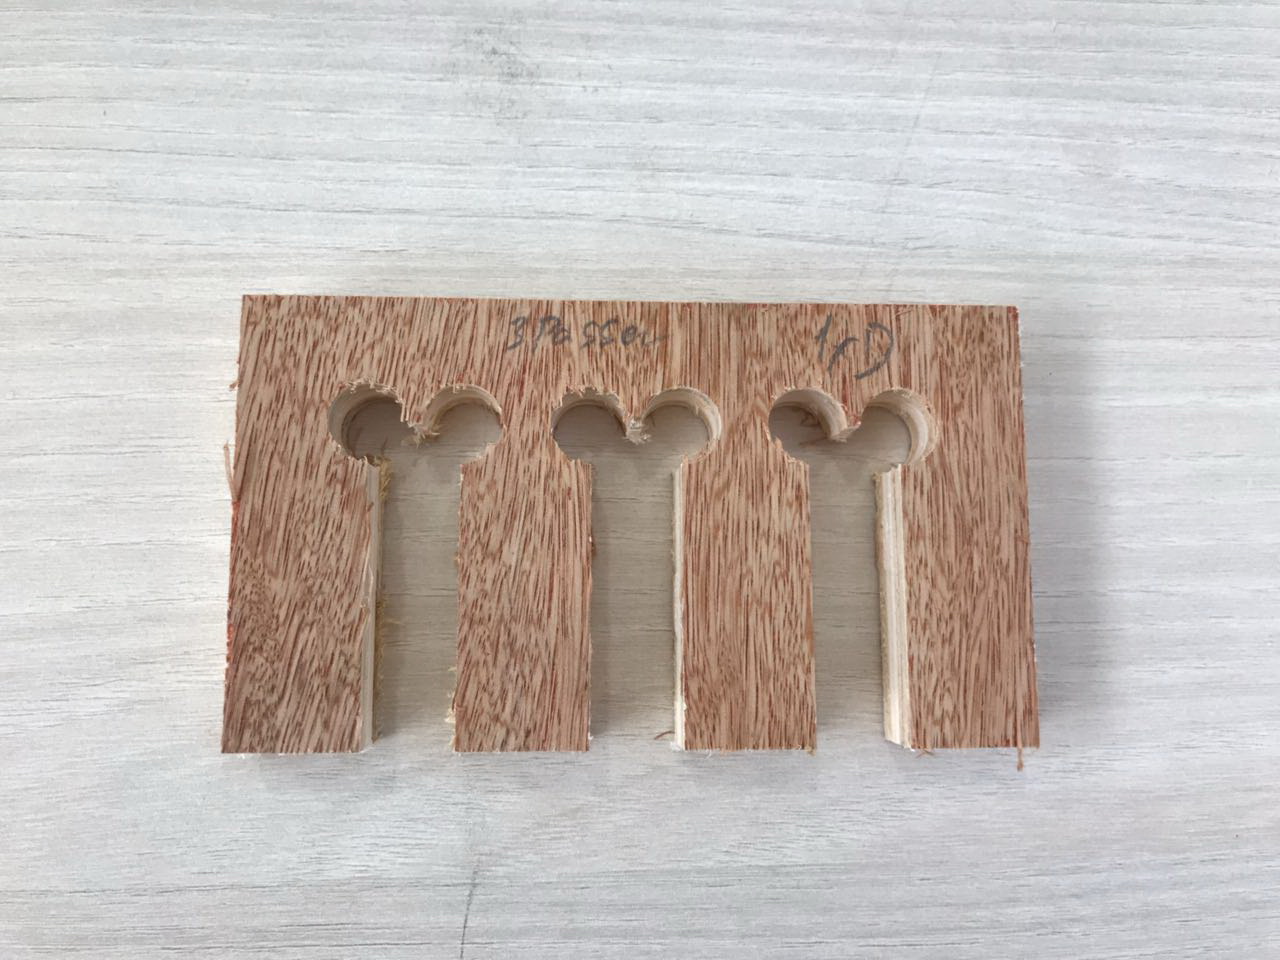
Test 4 b - Fitting Test with T-Bones
In the previus test, the fitting were not perfect as they could not go through to the end, as the drilling bit cannot achieve a 90 degrees. Saying that we used another technique known by the t-bone technique.
The same test was done but this time a circle having a dameter slightly bigger than the milling bit diameter was placed at the 90 degree corners.
The image illustrates our results. Perfect fitting was achieved with the used t-bones.
2- Individual Assignment - Build Something Big

In the individual assignment, we had to build something big. When i worked on the design in the Laser Cutting week, i designed different peices that could be assembled to make furniture peices. I wanted to do the same design on a larger scale to build furniture in real size. So i used the same design and CNC machined it into plywood.
To do so I had to prepare the design, then prepare the g-code, perform the cut and assemble it.
Step 1 - Parametric Design Using Fusion 360
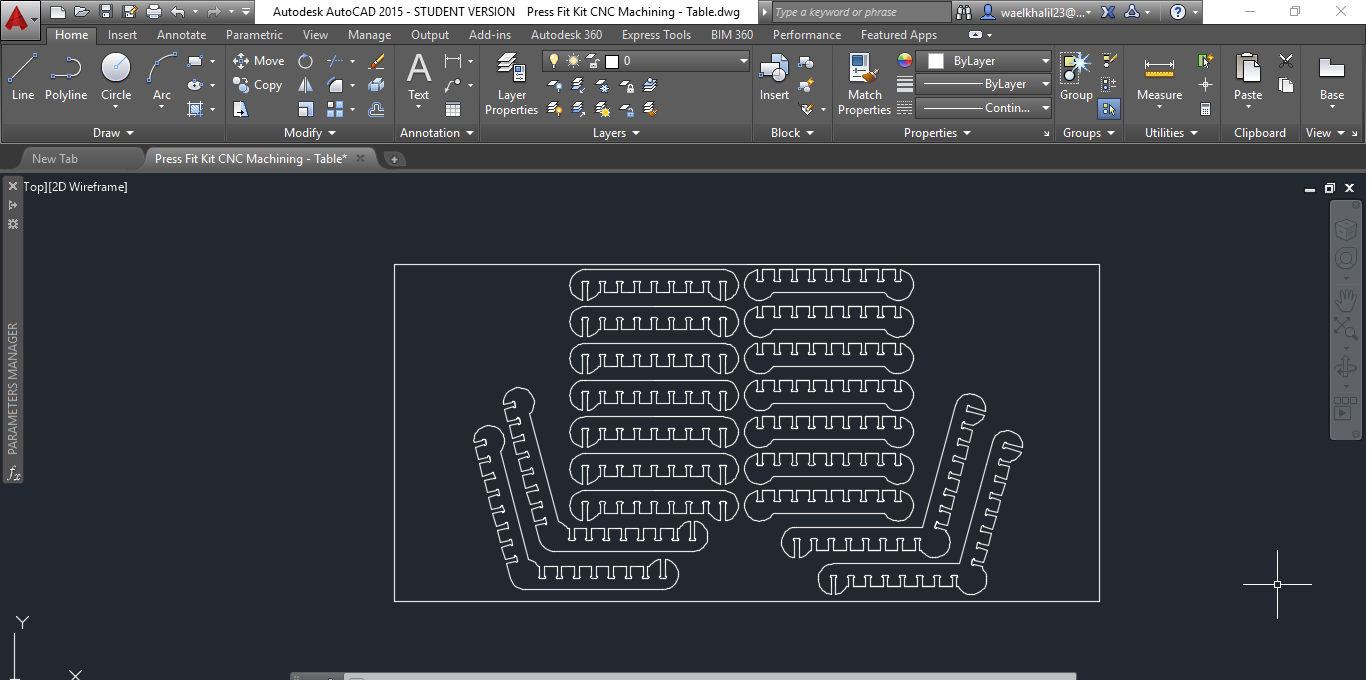
My original design was done on Autocad, where i couldn't use parametric design. This time i wanted to make the design parametric so i can change the dimensions easily when buidling the same design with different material. So the first step was to design the shape i wanted using Fusion 360.
You can see in the attached design that 4 pieces were designed parametrically and assembled on fusion to check if it works before producing it.
Step 2 - Exporting Sketch to DXF Format
After finalizing the parametric design on Fusion 360, the next step was to extract the Sketch in DXF file so we can Import it later to the VCarve Software.
The design was then fixed a bit. T-bones were added to the 90 degrees corners in the joints. Also a file was prepared that contains all the peices needed to form the table i want, fitting them all inside a rectangle that has the same design of the board we are using.
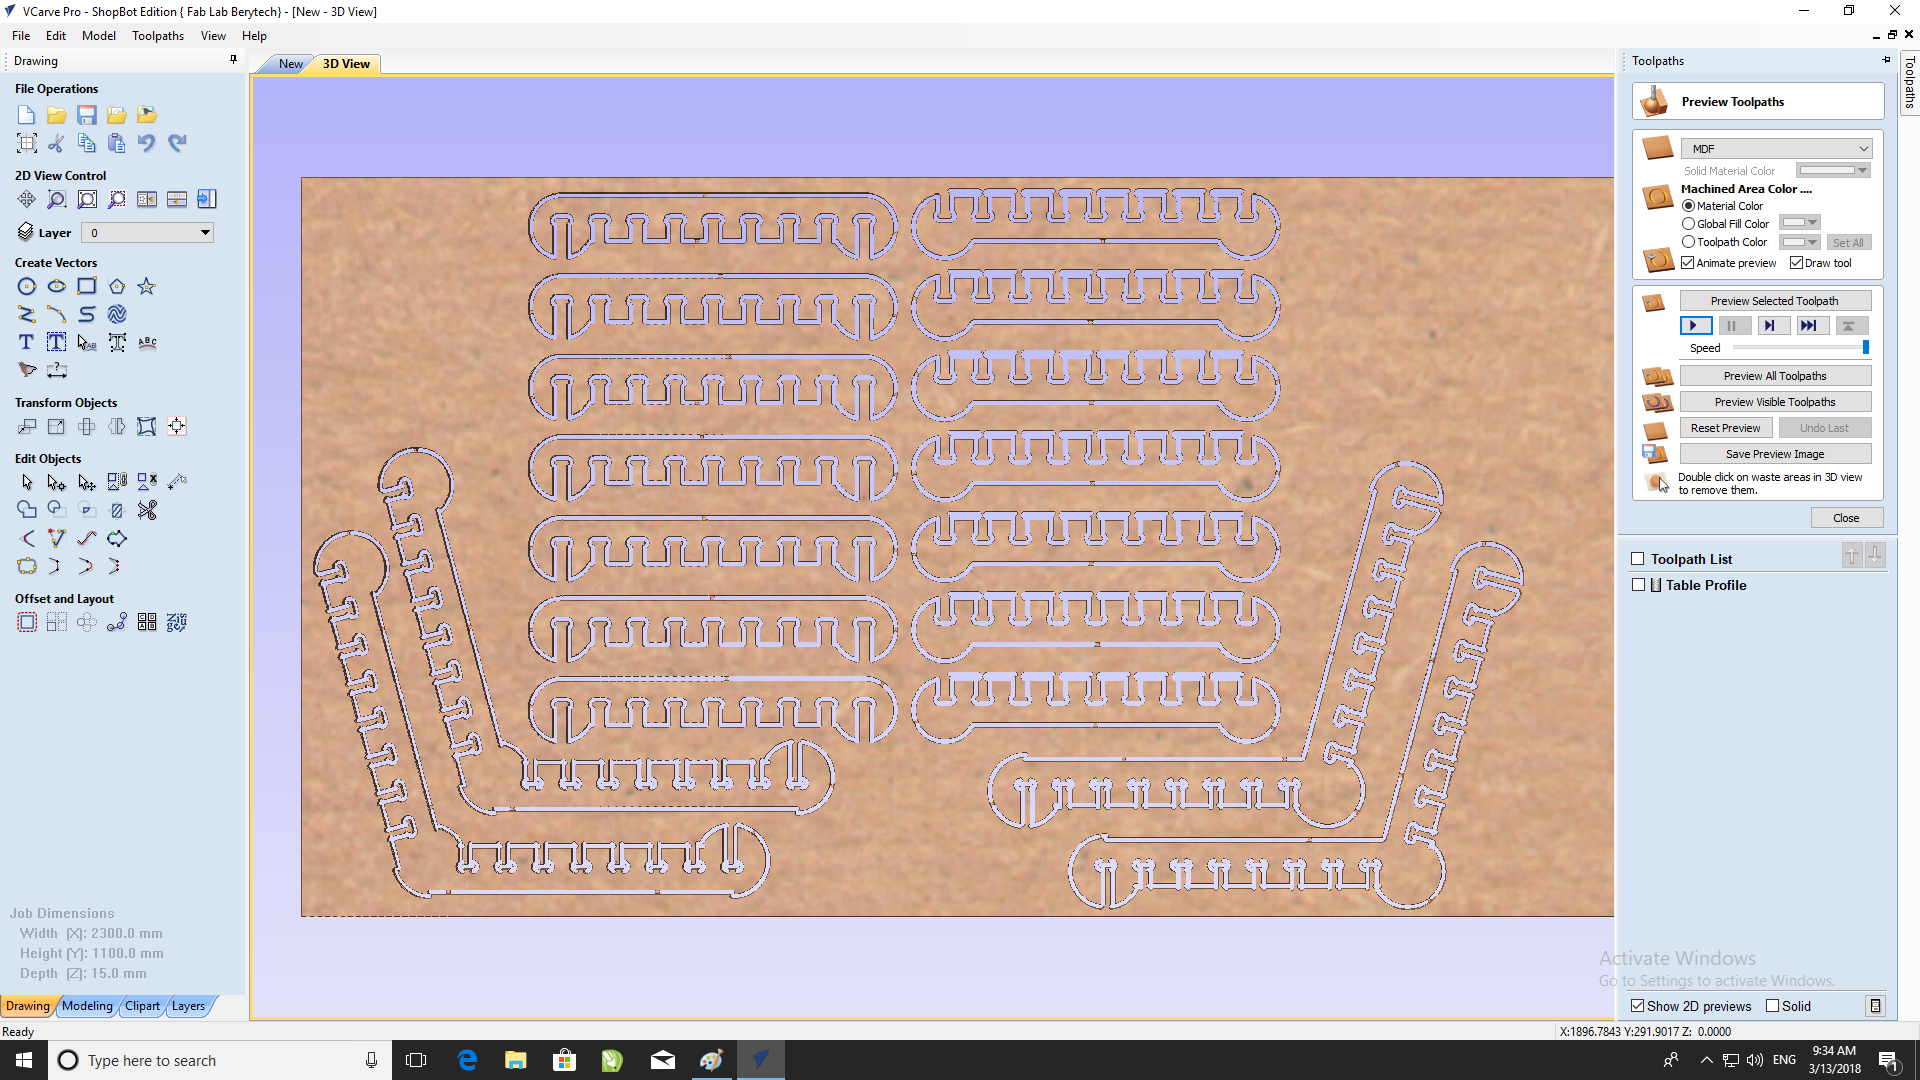
Step 3 - Preparing G-code on V-Carve
After that, the next step was to prepare the g-code based on our design.
- Open new page
- Input Board Dimensions. Take into consideration the lost area because of the screws used to fix the board
- Import the DXF file
- Fix the possition of the design
- Generate the Path for the inner cuts and then the exterior cuts To do so the following steps are followed:
- Select depth of cut. In our case it is 15.2 mm which is slightly bigger than the board width
- Select Tool, I chose the tool setting 2 (calculated above)
- Insert Tabs, you can either automatically set them (software) or just press on the cut path to add a tab
- Add Ramps. Those are used to keep the cut peices connected to the original board, to prevent loose objects from
- Save Toolpaths
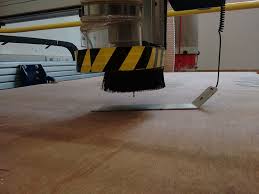
Step 4 - Preparing the CNC Machine and Zeroing
Next we need to set the zero position for the machine on the board we are using.
To do so, we need to follow those steps.
- Manually move the router to the desired X and Y position, and then zero the X and Y from the control panel
- Zero the Z-Axis using the automatic zeroing option on the SHopbot. The plate is positioned under the router on the surface of the board, and the Z-zero button is pressed. The process is fully automatic.
Step 5 - Performing the Milling Job
Next we perform the milling job. Just import the G-code to the Shopbot software and launch the job. The video illustrates the milling job.
Step 6 - Assembling the Table
The final step is to assemble all the peices.
