BLANK PAGE
Being the first time I design in 3D, this log might be useful to other people that have never tried. Fellow explorers, don't panic, we'll get there!
The self assigned task for this week, as mentioned in the project proposal, is to learn to design 3D surfaces. Flexible, textural, responsive, modular, patterned surfaces...
Well, where to get started?
- Find a easy to use program for complete beginners
- Get comfortable with its 3D environment
- Learn the basics of 3D design systems
- Explore parametric tools
- Explore sculptural tool
As well as:
- create some 2D patterns
- extrude them
SOME TARGETS
There are couple projects/tools that I found particularly interesting and I would like to get to test by the end of this week:
- Ornamental Work in Rhino
- Surface patterns in grasshopper: functionality in grasshopper that allows you to take the image of a texture, in this case the beautiful texture of a Radiolaria, and use it to texture your 2D/3D surface
- Grasshopper + Firefly + Arduino: Firely is software tool that bridges Arduino and Grasshopper, giving you the opportunity to receive input data in grasshopper and transform the 3D surface in accordance.
HOW I REALLY WENT ABOUT IT
1. WINDOWS PARTITION ON MAC
I spent good part of last week installing Windows on my Mac. This was necessary in order to test Rhino with Grasshopper. A free version of Rhino exists for Macs, but Grasshopper is a Windows only Rhino plugin.
Tips for Windows on Mac:
- backup your computer, better, make a bootable copy with Super Duper (external hard disks with independent power supply only, gone through it, save yourself 8 hours of false hopes)
- you need to use Bootcamp, which is already installed in your Mac, and helps you download drivers to properly run Windows on your Mac and create a partition.
- you need to have at lease 20 Giga of free space on your Mac (I used 54), and whatch out, doesn't matter if you clean up your computer, and you managed to free 100 Giga of space, Bootcamp needs CONTIGUOUS SPACE.
- a 8 Giga usb stick formatted in MS DOS where you will save the windows drivers dowloaded by Bootcamp
- an .iso image of Windows 7 or 8
WARNING: if you have a CD reader on your Mac, burn the Windows iso on a DVD because trying to install it from USB stick is a pain. It happened to me: when Bootcamp shuts down your Mac to install Windows, it can't find the bootable Windows file.
2. DAY ONE: MATTER MACHINE
The first program I tested has been MatterMachine, a parametric software that conveniently runs on the browsers. After few hours of completing all the most basic tutorials (I completed 1 to 15). I enjoyed the copy node function, which takes a line, curve or solid and multiplies it X times. You can then rotate, translate and scale each copy. I'm sure that for more expert users this is quite an interesting feature.

Although I liked the interface, since the tool is new there is not much online support apart from the tutorials uploaded by the company itself and since I am a complete beginner, I think bigger support community helps a lot.
3. DAY TWO: RHINO ABSOLUTE BEGINNER
I had to get started with the Rhino 5 User Guide. I painstakingly followed it. Before I even get started to describe the process, lesson nr. 1 was: GET A MOUSE! You can't do 3D design without one. Once discovered it, I understood why I was struggling so much...
This is roughly a list of the concepts I had to learn to start getting comfortable with the program:
- Navigate between viewports, change perspectives
- Draw lines, polylines, interpolated and control point curves
- Use absolute, relative and polar coordinates to draw segments
- Copy, Mirror geometry
- Explode, Join stuff
- Tools to facilitate drawing tasks: Osnaps, Planar, Tab contstraint, Project constraint, Planar constraint
- Create surfaces by: Extrude, Revolve, Bend, Loft, Sweep1, Network surfaces, Patch surface
- Modify control points on Surfaces
- Trim, Split, Offset geometry
TUTORIALS FOLLOWED SO FAR:
Overview of curves and surfaces
Control points editing
Build components on a surface in Grasshopper
4. DAY THREE: RHINO + GRASSHOPPER
The third tutorial was quite interesting in terms of starting to understand how to construct modular elements on a planar surface, and how these modules can be responsive to control points in space (in this particular example we change either the height or the width of the surface parts).
STEPS TAKEN IN THE TUTORIAL:
1. Create a surface geometry:
- create base surface in Rhino
- subdivide it in smaller areas
- explode it in parts
- find center point of each new rectangular surface
- create a second rectangular element for each part, placed centered and perpendicular to original rectangle, lofted with it to create cut pyramids
2. Create a basic attractor system that influences the geometry of the surface:
- create 2 attractor points in Rhino
- withing the 25 center points of each subdivision, find the closest and furthest to new points
- map these distances to a change factor (ex. the closest the point, the highest the lofted surface)
I find particularly helpful this series of tutorials by Nick Senske.
I started from the Data Trees, Structure tutorial.
STEPS TAKEN IN THE TUTORIAL:
1. Make polygons grid:
- make a grid of points, graft and flatten them
- make poligons on this grid
- rotate them individually
2. Make a pattern module and apply to complex surface:
- see points location and list point coordinates
- create diagonals on a squared surface and pipe them
- apply pattern to complex surface
- use dispatch to change disposition of pattern
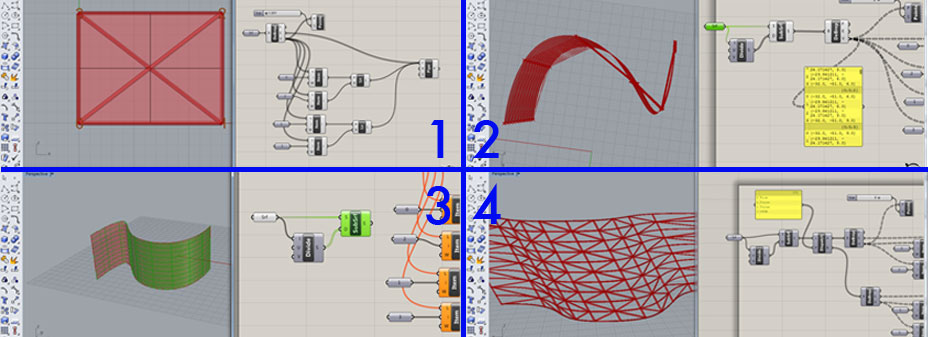
3. Loft surfaces from points:
- Add points to curves on 2 levels
- Join points vertically
- Shift the lists of points
- Loft surfaces

4. Differentiate subsurfaces and build different geometries:
- Select first and last part of list (list item)
- Cull surfaces
5. Create Series to apply effect in a certain logic
Next tutorial I followed (in 3 parts) went through interesting points too:
STEPS TAKEN IN THE TUTORIAL:
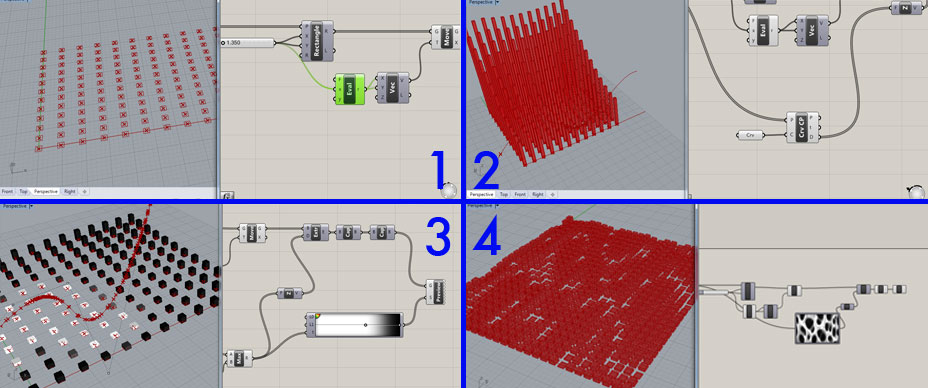
1. Create a grid of rectangular solids
2. Create a curve in Rhino and use it as attraction curve to control height of rectangles
3. Map the height to colour values
4. Use an imported image as control value for solids heigth
5. INDEPENDENT SURFACE MAKING
New day, new tutorial:
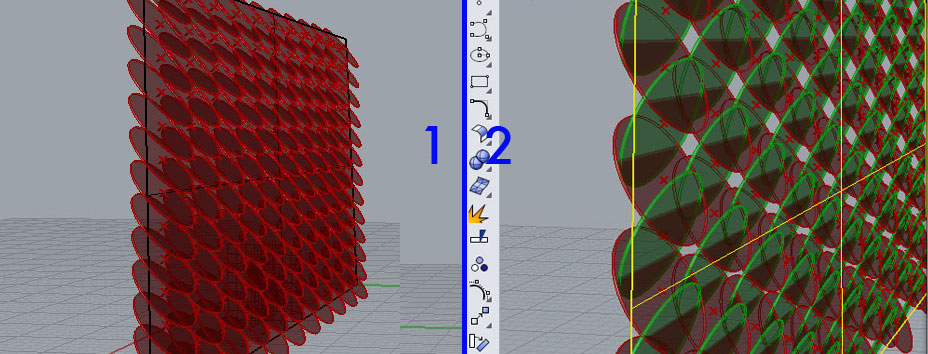
STEPS TAKEN IN THE TUTORIAL:
1. Create an object
2. Make a surface, find center point, make planes for each point
3. Apply object to subplanes using ORIENT
4. Mirror objects
5. Distribute objects in different planes subdivisions (CULL)
And now, mix-mash parts of these tutorials to create new surfaces!
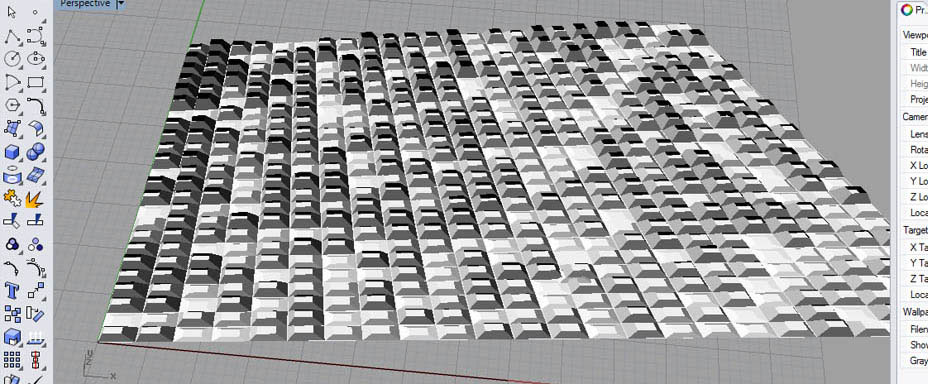
ATTEMPT 1:
Based on the Build components on a surface tutorial, control the height of the sub-surfaces through an image:
ATTEMPT 2:
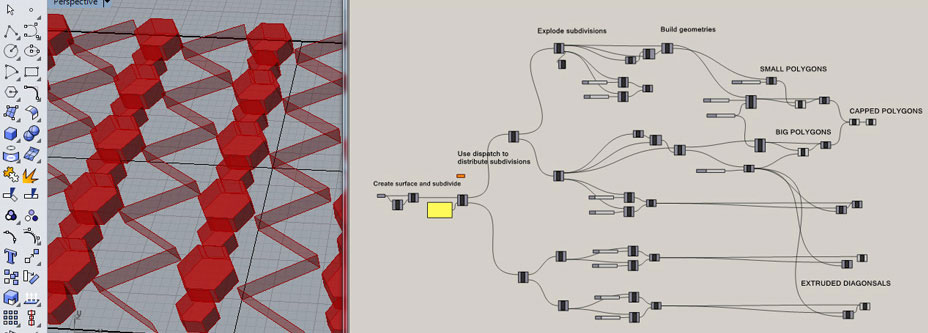
Based on the subsurfaces differentiation tutorial (Data Trees,Structure), I built different patterns in different subsurfaces using DISPATCH and BREP COMPONENTS. I built both diagonal segments and solids. I used ITEM elements to create the segments, changing the I values (0-2; 1-3) to create diagonal lines between the subsurfaces. I found the center points of the subsurfaces through AREA element, and built solids onto them.
The solids are parametric, therefore their radius and number of edges can be changed with the sliders.
ATTEMPT 3:
Based on the same tutorial, create polylines (from points made with DIVIDE function) on different axis and loft them.

Bake this new surface, use it as base surface in Rhino and apply and existing pattern (taken from same tutorial).
ATTEMPT 4:
This is the example that required more effort. Build a surface and subdivide it, and create on each subsurface a circle, lofted to the bottom square.
The problem: lofting circles with rectangular surfaces and match the data from the two geometries!!! While rectangles are drawn in the program from the leftmost bottom corner, circles, which are not defined by points, start at a different point. Trying to loft the two curves needs a SEAM function slider attached to the circle, to reset its starting point to 0, to match the starting point of the rectangle.
6. ANIMATING THE PROJECT:
I implemented various parametric features in the final model, which are shown in the video.
- The surface is divided into two subsections: one section is attracted to a point placed on top of the surface, whereas the other is attracted by a point below. The shapes are extruded accordingly.
- The surface subdivisions, radius of the circles, as well as the loft rotation between the circles and the subsurfaces can be adjusted. - I calculated the distance between the center points of each circle and the attraction points. The amplitude of the resulting lofted shapes depends on such values.
7. RECAPPING SKILLS DEVELOPED SO FAR:
1. Create point grids and surfaces:
- create grids of points, build polygons on it
- create grids of points, build solids on it
- subdivide surfaces and dispatch subdivisions to different effects
- build layers detached from surface and extrude surfaces
2. make patterns
- make modular patterns (lines or polygons) and apply to flat surfaces
- mirror patterns
3. modify surface based on other elements
- use attraction points/curves to change feature of surface elements (height, amplitude, colour)
- use image colours to create variation in surface
- colour surface based on values (this might be useful for 3d printing)
FILES DOWNLOAD LINK
Being the first time I design in 3D, this log might be useful to other people that have never tried. Fellow explorers, don't panic, we'll get there!
The self assigned task for this week, as mentioned in the project proposal, is to learn to design 3D surfaces. Flexible, textural, responsive, modular, patterned surfaces...
Well, where to get started?
- Find a easy to use program for complete beginners
- Get comfortable with its 3D environment
- Learn the basics of 3D design systems
- Explore parametric tools
- Explore sculptural tool
As well as:
- create some 2D patterns
- extrude them
SOME TARGETS
There are couple projects/tools that I found particularly interesting and I would like to get to test by the end of this week:
- Ornamental Work in Rhino
- Surface patterns in grasshopper: functionality in grasshopper that allows you to take the image of a texture, in this case the beautiful texture of a Radiolaria, and use it to texture your 2D/3D surface
- Grasshopper + Firefly + Arduino: Firely is software tool that bridges Arduino and Grasshopper, giving you the opportunity to receive input data in grasshopper and transform the 3D surface in accordance.
HOW I REALLY WENT ABOUT IT
1. WINDOWS PARTITION ON MAC
I spent good part of last week installing Windows on my Mac. This was necessary in order to test Rhino with Grasshopper. A free version of Rhino exists for Macs, but Grasshopper is a Windows only Rhino plugin.
Tips for Windows on Mac:
- backup your computer, better, make a bootable copy with Super Duper (external hard disks with independent power supply only, gone through it, save yourself 8 hours of false hopes)
- you need to use Bootcamp, which is already installed in your Mac, and helps you download drivers to properly run Windows on your Mac and create a partition.
- you need to have at lease 20 Giga of free space on your Mac (I used 54), and whatch out, doesn't matter if you clean up your computer, and you managed to free 100 Giga of space, Bootcamp needs CONTIGUOUS SPACE.
- a 8 Giga usb stick formatted in MS DOS where you will save the windows drivers dowloaded by Bootcamp
- an .iso image of Windows 7 or 8
WARNING: if you have a CD reader on your Mac, burn the Windows iso on a DVD because trying to install it from USB stick is a pain. It happened to me: when Bootcamp shuts down your Mac to install Windows, it can't find the bootable Windows file.
2. DAY ONE: MATTER MACHINE
The first program I tested has been MatterMachine, a parametric software that conveniently runs on the browsers. After few hours of completing all the most basic tutorials (I completed 1 to 15). I enjoyed the copy node function, which takes a line, curve or solid and multiplies it X times. You can then rotate, translate and scale each copy. I'm sure that for more expert users this is quite an interesting feature.

Although I liked the interface, since the tool is new there is not much online support apart from the tutorials uploaded by the company itself and since I am a complete beginner, I think bigger support community helps a lot.
3. DAY TWO: RHINO ABSOLUTE BEGINNER
I had to get started with the Rhino 5 User Guide. I painstakingly followed it. Before I even get started to describe the process, lesson nr. 1 was: GET A MOUSE! You can't do 3D design without one. Once discovered it, I understood why I was struggling so much...
This is roughly a list of the concepts I had to learn to start getting comfortable with the program:
- Navigate between viewports, change perspectives
- Draw lines, polylines, interpolated and control point curves
- Use absolute, relative and polar coordinates to draw segments
- Copy, Mirror geometry
- Explode, Join stuff
- Tools to facilitate drawing tasks: Osnaps, Planar, Tab contstraint, Project constraint, Planar constraint
- Create surfaces by: Extrude, Revolve, Bend, Loft, Sweep1, Network surfaces, Patch surface
- Modify control points on Surfaces
- Trim, Split, Offset geometry
TUTORIALS FOLLOWED SO FAR:
Overview of curves and surfaces
Control points editing
Build components on a surface in Grasshopper
4. DAY THREE: RHINO + GRASSHOPPER
The third tutorial was quite interesting in terms of starting to understand how to construct modular elements on a planar surface, and how these modules can be responsive to control points in space (in this particular example we change either the height or the width of the surface parts).
STEPS TAKEN IN THE TUTORIAL:
1. Create a surface geometry:
- create base surface in Rhino
- subdivide it in smaller areas
- explode it in parts
- find center point of each new rectangular surface
- create a second rectangular element for each part, placed centered and perpendicular to original rectangle, lofted with it to create cut pyramids
2. Create a basic attractor system that influences the geometry of the surface:
- create 2 attractor points in Rhino
- withing the 25 center points of each subdivision, find the closest and furthest to new points
- map these distances to a change factor (ex. the closest the point, the highest the lofted surface)
I find particularly helpful this series of tutorials by Nick Senske.
I started from the Data Trees, Structure tutorial.
STEPS TAKEN IN THE TUTORIAL:
1. Make polygons grid:
- make a grid of points, graft and flatten them
- make poligons on this grid
- rotate them individually
2. Make a pattern module and apply to complex surface:
- see points location and list point coordinates
- create diagonals on a squared surface and pipe them
- apply pattern to complex surface
- use dispatch to change disposition of pattern

3. Loft surfaces from points:
- Add points to curves on 2 levels
- Join points vertically
- Shift the lists of points
- Loft surfaces

4. Differentiate subsurfaces and build different geometries:
- Select first and last part of list (list item)
- Cull surfaces
5. Create Series to apply effect in a certain logic
Next tutorial I followed (in 3 parts) went through interesting points too:
STEPS TAKEN IN THE TUTORIAL:
1. Create a grid of rectangular solids
2. Create a curve in Rhino and use it as attraction curve to control height of rectangles
3. Map the height to colour values
4. Use an imported image as control value for solids heigth

5. INDEPENDENT SURFACE MAKING
New day, new tutorial:
STEPS TAKEN IN THE TUTORIAL:
1. Create an object
2. Make a surface, find center point, make planes for each point
3. Apply object to subplanes using ORIENT
4. Mirror objects
5. Distribute objects in different planes subdivisions (CULL)

And now, mix-mash parts of these tutorials to create new surfaces!
ATTEMPT 1:
Based on the Build components on a surface tutorial, control the height of the sub-surfaces through an image:

ATTEMPT 2:
Based on the subsurfaces differentiation tutorial (Data Trees,Structure), I built different patterns in different subsurfaces using DISPATCH and BREP COMPONENTS. I built both diagonal segments and solids. I used ITEM elements to create the segments, changing the I values (0-2; 1-3) to create diagonal lines between the subsurfaces. I found the center points of the subsurfaces through AREA element, and built solids onto them.
The solids are parametric, therefore their radius and number of edges can be changed with the sliders.

ATTEMPT 3:
Based on the same tutorial, create polylines (from points made with DIVIDE function) on different axis and loft them.

Bake this new surface, use it as base surface in Rhino and apply and existing pattern (taken from same tutorial).
ATTEMPT 4:
This is the example that required more effort. Build a surface and subdivide it, and create on each subsurface a circle, lofted to the bottom square.
The problem: lofting circles with rectangular surfaces and match the data from the two geometries!!! While rectangles are drawn in the program from the leftmost bottom corner, circles, which are not defined by points, start at a different point. Trying to loft the two curves needs a SEAM function slider attached to the circle, to reset its starting point to 0, to match the starting point of the rectangle.

6. ANIMATING THE PROJECT:
I implemented various parametric features in the final model, which are shown in the video.
- The surface is divided into two subsections: one section is attracted to a point placed on top of the surface, whereas the other is attracted by a point below. The shapes are extruded accordingly.
- The surface subdivisions, radius of the circles, as well as the loft rotation between the circles and the subsurfaces can be adjusted. - I calculated the distance between the center points of each circle and the attraction points. The amplitude of the resulting lofted shapes depends on such values.
1. Create point grids and surfaces:
- create grids of points, build polygons on it
- create grids of points, build solids on it
- subdivide surfaces and dispatch subdivisions to different effects
- build layers detached from surface and extrude surfaces
2. make patterns
- make modular patterns (lines or polygons) and apply to flat surfaces
- mirror patterns
3. modify surface based on other elements
- use attraction points/curves to change feature of surface elements (height, amplitude, colour)
- use image colours to create variation in surface
- colour surface based on values (this might be useful for 3d printing)
FILES DOWNLOAD LINK
HOME | ABOUT | WORK | CONTACT
Francesca Perona © 2015

This work is licensed under a Creative Commons Attribution-NonCommercial 4.0 International License
Original open source HTML and CSS files
Second HTML and CSS source
Francesca Perona © 2015

This work is licensed under a Creative Commons Attribution-NonCommercial 4.0 International License
Original open source HTML and CSS files
Second HTML and CSS source