
Output Devices
This week, I'll try to control a single stepper motor(Nema 17). A stepper motor may prove to be useful in the machine-building week. A stepper motor works by turning on and off electromagnets that are placed around the motor shaft and attract and repel points on the shaft. There is a good gif wikipedia which explain the principle well.
Designing the PCB
My starting point is Neil Gershenfelds work with a unipolar stepper motor. I use the same ATTiny44 and the 2 same motor drivers. The layout is basically the same; however, I have added two buttons that can be used as inputs to control my motor. My Board layout can be found here .
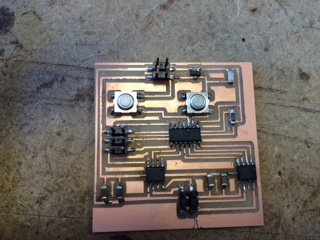
Here is the finished board.
Connecting the Motor
In the bipolar motors there are typically four wires. The wires are in pairs for each phase. There is a Phase A and Phase B. On the PCB there is a driver for each of the phases.
codeing the PCB
Since I used Neil Gershenfelds board layout, I could also initially used his code to test the functionality of the PCB. I then modified the code so it could be used to control the arm of a primitive 3D scanner. Neil Gershenfelds code is written so the motor first moves one step clockwise and then 2 steps counterclockwise, then 3 steps clockwise into it reaches up to 10 steps and then starts from the beginning. I have changed the code, so I can press button one and move the motor one revolution clockwise and when I press the second button the motor runs a corresponding number of revolutions counter-clockwise so that the motor is back at the starting point. I do this by making a "IF" function. So if the button is pressed the motor runs 200steps (one revolution). There after I make another "IF" function where if the second button is pressed the motor runs the total number of revolutions back. Neil Gershenfelds code is written so 1 step actually is 4 steps. He has defined a step so all four phases will be activated causing the motor actually moves 4 steps. If I have to use the motor in a scanner, I do not need 1 steps resolution so Neils Gershenfelds solution is ok, and I will not go deeper into this problem. My modified code can be found here .
I have also made a little video where you can see the motor and code in action, just follow the link
here
Design files can be downloaded here .