Mechanical Design Class
16th Worldwide gathering for Fab Academy 2015 feat. prof. Neil Gershenfeld
- Access the content mechanical design and machine design
- Watch the class video
- Discover successes and failures on this week's Global review session
20th May
to 3rd of June
Weeks Work
For this weeks work the 16th Assignment of the 2015 edition of FabAcademy will culminate into Groups task with total duration of two weeks. So here at Sitges Fab Lab, after class we got all together for brainstorming on what our goals should be and what should be the final machine.
Several ideas came to the table but non of them seamed reasonable enough at this early stage of the assignment. So we started by defining the level of axis complexity that we wanted to achieve with this machine and worked from there.
Defining 3 different degrees of freedom machine was then our goal so we started dividing tasks. Being three people now at the Lab made the task dividing easy. That being:
- Design Readjustments and Group Page Documentation - Maria Bento
- Electronics production - Adolfo Benitez
- Gestalt nodes and programming control - Anders Haldin
Despite of the assignment division we all agreed on switching from time to time so we could all have an idea of the different working processes required. At the same time it was important to set the schedule in the way we could work as a group and still have some free days to work on our Final Project.
For more information...
Machine Making Sitges Group Assignment [Web page]
Stages Design
First of, while Adolfo was producing the Fab hardware needed and Anders was getting power supply ready and checking the Gestalt requirements, I got the first look at the designs available from Nadya Peek's Github and Documentation Pages 1 and 2. The files I needed for the Design where a Rhino model with available grasshopper parametric file customizable features. For the first stage box we used Nadya's original design and did a test cardboard stage using our own cardboard thickness - 3.15mm - one that you can adjust using the options on the Grasshopper file and later baking them. The file came in inches and we work with the metric system so make sure your using the right values or otherwise make some converter component in grasshopper that can make the conversion for you, that's also an option. In this case we just kept everything in inches and carried on.
First test came out o.k.. We had to use the split version of the design since our laser cutter is limited to 21 by 12 inches and the flattened stages parts don't fit all at once.
with our Ful Spectrum laser cutter we had to cut 21.5 by 12.5 boards we used:
- RED LINES = 100 (SPEED) 25 (POWER)
- CUT LINES = 75 (SPEED) 90 (POWER)
We found the documentation to be not so accurate since the mock-up 3D model in the Rhino file was not constructed right, having several parts rotated that wouldn't match the final examples available making it, at one point, miss-leading and time consuming. Simultaneously, the only instructions step-by-step available are these looping images (animated gif.) on page 2 that were a bit annoying to follow so I got them at one entire image file to better understand all the steps.
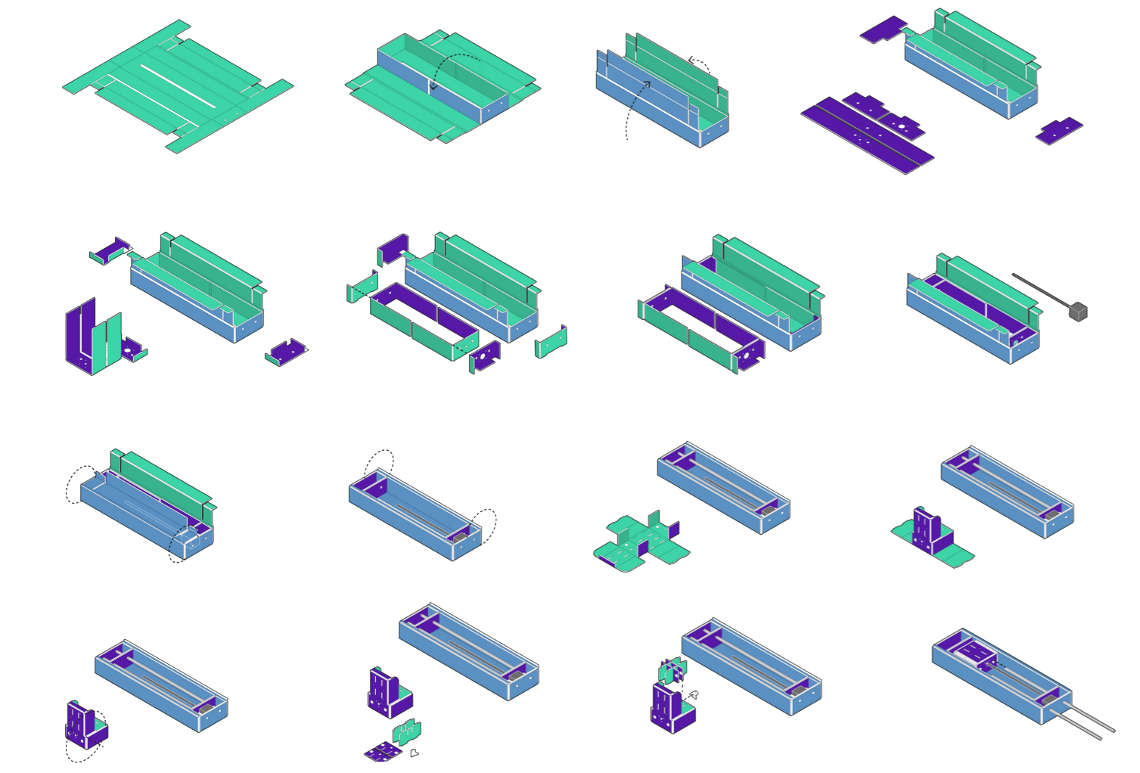
After the first assembled stage we felt the need of making some adjustments for better fittings. You can check those downloading our rhino file at the bottom of this page.
Strangely, although the file was double checked, later on we had a few issues with our laser cutter playing tricks on alignments, we guess it could only mean either the axis were getting loose or that while cutting the boards moved a bit, so make sure you have your cardboards flattened and well attached to the machines sacrificial layer/grid. Nevertheless, the shifts were not that big and we could manually fix the mistakes. Once those we out, assembling the cardboard parts was not that difficult.
End effector
At this point other ideas came to mind and I suggested that since our Lab is at the beach the end effector could be a portable drawing tool used to draw in a sand surface. The group was happy with the idea so we decided to keep that one for this assignment.
Inspired on 2014 Israel Pavilion at the Venice Bienalle that uses the working axis system of a regular cnc machine with a needle tool as end effector to draw maps. Our improvement to this would be its portability. This is obviously a rough prototype that will produce an ephemeral outcome, making it closer to Art installation more then a long lasting result. Nevertheless, if we pull this of it will be a fun project.
insert image of laser cut results
Designing the end effector was also a bit of a challenge since we wanted to be able to use the existent holes on the translating box attaching our design to it through the minimum fits and with less parts possible. For that reason we first though of designing it as a double curvature extruded surface that would be attached to that one with screws and twisted from the front of the box out and downwards until it would reach desired hight and thickness for drawing. For this we were considering doing it in 3D printing.
The 3D printing processes is known to be a long one that in a large print is more likely to produce some errors that can't be prevented rapidly and can be a wast of time waiting for. For that reason we thought that we could laser cut a flattened end effector in acrylic and twist its ending with a heat gun. Well, we have to admit this kind of technique does not come on Fab Academy list but we were trying to be creative with tools available and time. For your viewing pleasure here are the results of those experiments.
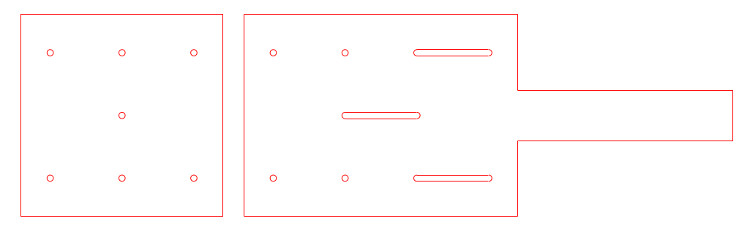
acrylic end effector design
In the end for many technical programing issues we had to change the end effector to a temporary LED and the machine became a Light Drawing machine instead. So design was not used.
Hard Coding with Grasshopper
When the time came that all the physical parts of the machine where done we had to figure out how we could hard code some kind of design into it.
I remembered that using Grasshoppers Divide curve and a simple continuous line design you can get all points from a curve in order by exporting the values from a panel.
So as an experiment I drew the word 'Ola' that means Hello in Portuguese.
The outcome was partialy a success the onthing was that the word was somewhat fliped so I guess it was a matter of rotating it or mirroring it to the right cartesian space.
I invite you to also visit our group page were a step by step version of the full assignment is done.
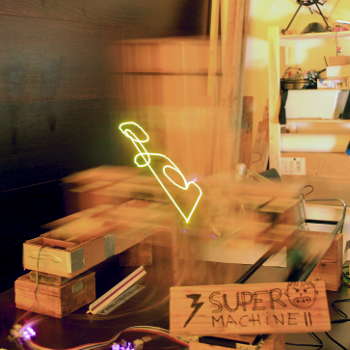
Ola word light design
Group Work
Within group work Designing, assembling and preparing group documentation were my main tasks for this double week assignment. I've also tried the testing of the stepper motors together with Anders and before the assembly was made so I got familiar with the Code associated and understand the process of programming each motor and gestalt node as well as have them working simultaneously in network. That way I could also be familiar with the Gestalt system and parts. The first week progressed slowly because we were to present our final project ideas on the 27th review session, and for that more time and attention was dedicated to final project instead of group work.
On the this last week we have all 4 stages ready and working well individually. It's still missing getting them to work all together and preform the desired drawing task that we still don't have clear from which software we will be performing the translation of data from digital to analog.
Failures & Successes
The biggest succes is a working machine. The biggest failure is that its hardware will not live for long - it's a very fragile structure and doesn't keep up with all modularity changes that we wanted to do.