W7 Embedded programming

Al-Jazari legacy

Introduction

First Maker

According to wikipedia:
The Kurdish medieval scientist Al-Jazari built a programmable automata in 1206 AD. Probably, first programmable mechanism in the world.

 Al-Jazari (1136-1206)  was a polymath: a scholar, inventor, mechanical engineer, craftsman, artist, and mathematician from Jazirat ibn Umar (current Cizre, Turkey), who lived during the Islamic Golden Age (Middle Ages). 

He is best known for writing theThe Book of Knowledge of Ingenious Mechanical Devices in 1206, where he described 100 mechanical devices, some 80 of which are trick vessels of various kinds, along with instructions on how to construct them.

Summary

Programming a micro

Download and install Arduino, Install attiny avr, bootload microcontroller and embed a program.

How to program a attiny44 with Arduino software!


Material and Software:

FabISP
ISP cable
FTDI cable (it depens on your ISP)

Windows 8
Arduino IDE
AVR ATtiny for Arduino
Virtual Serial Port

Step 1

Download and install Arduino IDE in Windows 8.1

There are many ways to embed instructions into a microcontroller. The common and easy way is to use an IDE that will help the programming with examples, libraries, debugger, and so on. For this assignment I have use Arduino IDE.

According to Arduino web page (www.arduino.cc):
Arduino is an open-source electronics platform based on easy-to-use hardware and software. It's intended for anyone making interactive projects.

Download from www.arduino.cc the software, cotribute if you wish, if not, you can download for free. At set up window click I Agree. Acept after installing. Open software looking for it on the "search window".

IDE (wikipedia): 

An interactive development environment is a software application that provides comprehensive facilities to computer programmers for software development. 

An IDE normally consists of a source code editor, build automation tools and a debugger.

Step 2

Installing AVR in Arduino

This will show to Arduino what microcontroller you want to set (bootload) and program. Each microcontroller needs his own settings. For this assignment, we are going to program an ATtiny44. Here it is the ATtiny board setting for Arduino:

Download AVR ATtiny for Arduino(attiny-ide-1.6.x.zip)

- In the Documents/Arduino folder, create a subfolder called: "hardware"
- Copy the attiny-ide-1.6.x.zip into folder "hardware" and unzip
- Restart Arduino IDE.

AVR (www.robotplatfom.com): 

AVR microcontrollers can be termed as a mini computer with all peripherals on the chip. A typical AVR microcontroller can contain peripherals like RAM, EEPROM, Flash memory, Input-Output (I/O) pins, Analog to Digital converters, PWM channels, Timers etc. It also has a CPU for processing, but not as fast and complex as the one within a computer. 

Atmel manufactures 3 variations of 8-bit microcontrollers:
TinyAVR
MegaAVR
XmegaAVR

Step 3

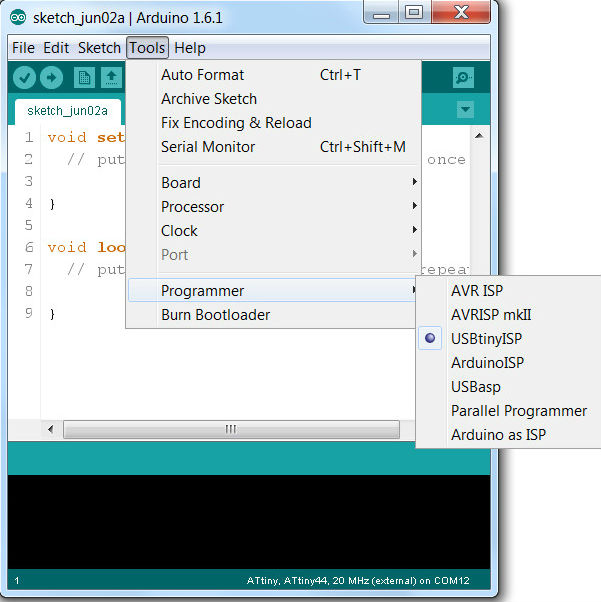
Set Microcontroller ATtiny44 on Arduino IDE

ATtiny should appear in Tools/Board

In Tools/Processor chose ATtiny44

For this PCB, we have installed an external 20Mhz clock. 
In Tools/Clock choose 20MHz

We are going to use the ISP (week 4 assignment), that is the same than the USBtinyISP.
In Tools/Programmer choose USBtinyISP

Step 4

Virtual Serial Port

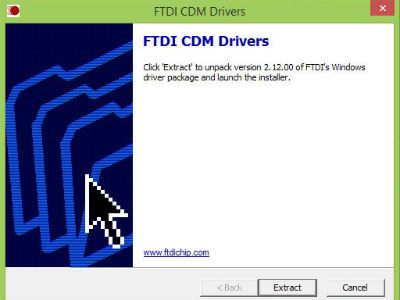
The communications it will be via serial port (FTDI). Nowadays, any laptop have serial port, so it is needed to install virtual serial port.


FromFuture Technology Devices International web page:
Download virtual serial port for windows

Step 5

Connect the FabISP to PCB

Connect the PC to FabISP via USB and FabISP to PCB via ICSP header (this ISP provides energy)

 Image from wikipedia. Creating user: Osiixy

ICSP HEADER
(in circuit serial programming)

Step 6

Burn Bootloader

After connect everything, and before any script embedded, burn the bootloader. Path: Tools/Burn Bootloader

Bootloader:

According to www.cs.tau.ac.il (Helicon technologies Computerized measurement systems): 
 Bootloader is a piece of code that runs before any operating system is running. Is used to boot any other software.

 According to wikipedia:
 Is the initialization of a computerized system. Is a computer program that loads an operating system or some other system software for the computer after completion of the power-on self-tests; it is the loader for the operating system itself

Step 7

Coding in Arduino IDE

I start from example code "BLINK", and made some changes:

Set two diferents blink frequency (50ms and 1s)
If the button is pressed, blink with frequency 50ms
If the button is not pressed, blink with frequency 1s.

Download the code here (.ino)

Mountain view of how to embed a script into a microcontroller


Hexadecimal file

Microcontroller just understand hexadecimal file, so this is our final goal:    .hex file

Many ways to get the   .hex file and embed it. In this tutorial we are going to see two:  Arduino IDE and makefile. I dismiss Atmel Studio because FabISP is not recognized.

Arduino IDE

www.arduino.cc

Support for C and C++ progrmming languages. Have microcontroller libraries are for easy programming.

Steps:
1.- Open Arduino IDE
2.- Write code in C. There are some libraries available to use.
3.- Press button: Compile
4.- Press button: Upload

After that, you get a single file .ino

Text editor + 
make file [GCC + AVRDUDE]

https://gcc.gnu.org

The GNU Compiler Collection includes front ends for C, C++, Objective-C, Fortran, Java, Ada, and Go

Real steps:
1.- Create script in C. (You should need a text editor like ultraedit, sublime or similar).
2.- GCC compile C code (ex.: WINAVR for windows).
3.- AVRDUDE for download and upload code to chip memories of Atmels's AVR microcontrolers.

Short cut steps:
1.- Create sript in C.
2.- make file

After that, you get 4 files: 
original.c
filetoGCCandAVRDUDE.make
file.hex
file.out

How to compile file.c to file.hex with a make file in ubuntu


make file

Make file will compile in hexadecimal a script in C and send it to a microcontroller. Here it is the hello.ftdi.44.echo.c script from Neil. Download here.

And here it is the make file. Download here.

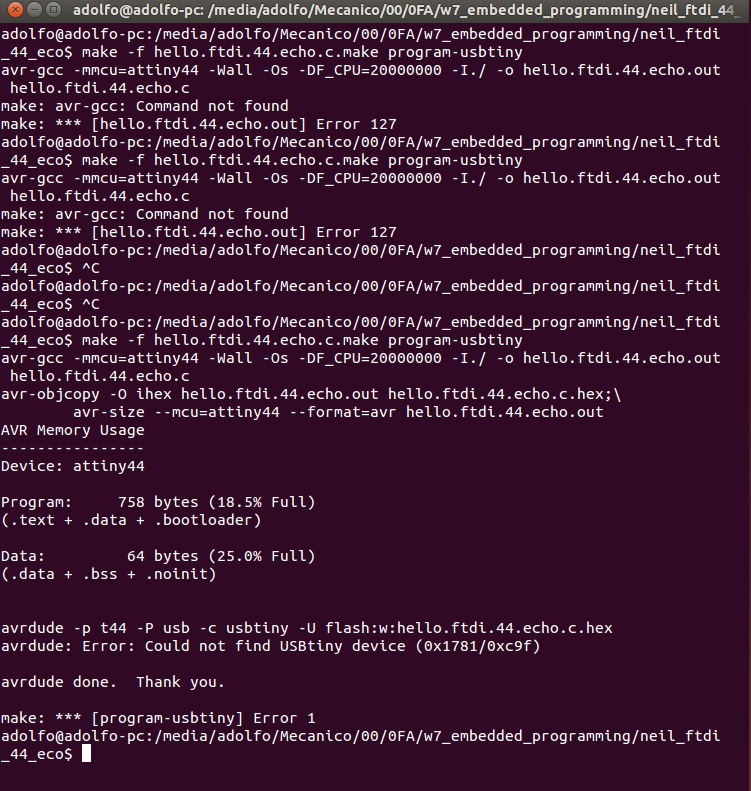
This screen capture was done just for make the file.hex and file.out. It wasn't connected usbtiny at that moment.

Ubuntu settings

Some packages installations

Is necessary to install the packages required manually. Go to Package Manager and install the following:

gcc-avr
binutils-avr
gdb-avr
avr-libc
avrdude

After install everything, create a folder with file.c and file.make. 
Open it in a terminal
tape: 
make -f hello.ftdi.44.echo.c.make program-usbtiny

                             
It will take a while and will make file.hex, file.out  and it will embed the script. 

Download hello.ftdi.44.echo.hex
Download hello.ftdi.44.echo.out