

The discussion today focused on molding and casting techniques.
UPDATE:
It seems the rules changed for this week after I had already finished. It now states that I have to "Design a 3D mold" and I might not be able to use a design downloaded elsewhere. So I'm doing this process for the second time... All of the steps are the same, but here I will post the images of my own custom design. The steps I used to mill the wax are exactly the same as the first time I did this (shown in the next sections of this page).
You can download my design files for this week here.
As for the design, I made some 3D printed fingerprints for my final project. I will use the same STL files for this mold.
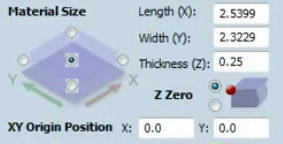
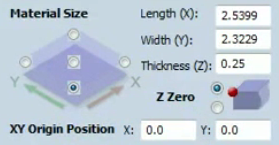
The concept here is that I have a robot hand as my final project, the fingerprints shouldn't look like human fingerprints, so I made a circuit design as the fingerprints. The way I did so was I took a small section of the circuit diagram I used in the fabmodules to cut traces on the controller board for the hand, and converted that image into an STL file using this java program. Once I had the STL file, I could import it into Partworks3D. The modified circuit image and all of the Partworks settings are shown below:

The STL file result shown in Partworks3D
Here's is a picture of the huge Shopbot wielding the mighty 1/32" endmill... Looks pretty ridiculous, but it works great!
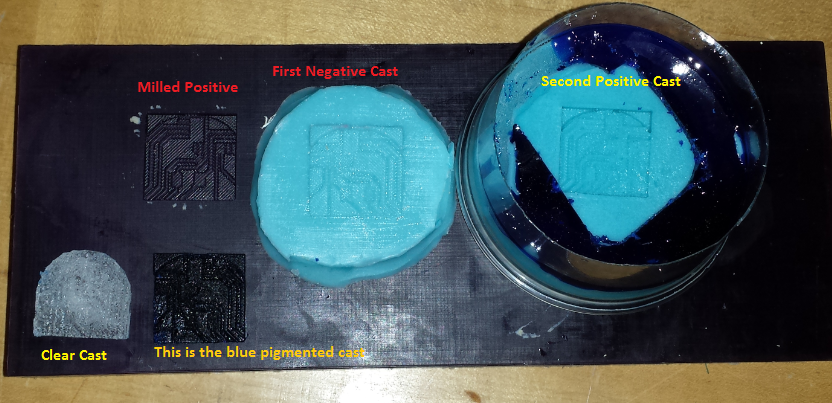
It was at this point the I realized that I carved out the positive of the mold when I wanted the negative. This isn't a big problem as I can just make multiple casts. So I cast a negative out of Mold Star 16 which cures in 30 minutes. Once this one cured, I LOADED it with mold release and then cast a positive silicone mold. This came out pretty well and I realized that I overused the mold release. The mold release caused a loss in detail in the new positive. (The negative is on the left, positive on the right.)
I then decided to play with some of the urethane materials I had in the lab to learn how to work with them some. I started with Smoothcast 365 which is an awesome product! It is practically clear in its natural form, very thin liquid so it fills in all the tiny details of the mold, and hardens in 10 minutes! I didn't notice any large amount of fumes or stink the mixture produced either. It was awesome to work with. I think these two products are "go to" products unless I need something else more specifically. Oh, and I forgot to mention SmoothCast 365 is designed to use pigments as well. I put an incredibly tiny amount of blue pigment in on my second cast of this stuff and I found out just how concentrated the pigment is...

I downloaded an STL file for the Hackaday.com logo from Thingiverse. I tried to edit the openSCAD file, but it was originally generated with a script and it doesn’t compile correctly so I couldn’t edit it. I ended up just importing the STL file into partworks3D. Here is a video i made to show how to set up the file (Start the below video at about 13 minutes).
(Click this link if embedded video is not working)
There are several steps involved in milling a 3D shape on the shopbot.
We will be using Partworks 3D (notice that this is not the same software as for cutting 2d objects). The inputs filetypes are limited to .v3d (shopbot partworks 3D files), STL, VectorArt 3D files (.v3m), 3D studio files (.3ds, .asc and .prj), DirectX (.x), DXF, lightwave(.lwo) MaxNC Digital Probe (.TXT) Shopbot digital probe (.sbp) VRML and wavefront(.obj) files.
Typically you would create an object in CAD, then export to one of the filetypes (or scan an item with a probe ont he shopbot for instance). In my case, I used an STL file.
Partworks 3D has a wizard that helps you set up the file for cutting. In the first step, it allows you to orient the model. Typically, you want to select "TOP" since that's what you will be cutting depending on how you designed and exported your model.
Then you will size the model. Here, you will select whether your measurements are in mm or inches. Then using the textboxes, type in the sizes you want. I will typically only type a value in for the Z (height). This is because the other two sizes (X and Y) are linked and will scale automatically. I generally know how deep I want the object will be cut into my stock material, so setting this will automatically size the other values as a ration. You have the option to uncheck a box titles "Lock XYZ ratio" which will allow you to change these dimensions independently if you need to do so.
The next step involves selecting where you would like to mill the design in the material. At the top, you select the material size/ Also, there is a graph that allows you to select where, on the design) you wish to begin cutting. By default, the center is selected. This is perfectly fine but you must remember to zero your X and Y at the center of your material before you begin cutting! This will begin cutting the center of the design at X0,Y0 on the machine, and the extremes will be (+/- X dimension/2) and (+/- Y dimension/2). I had to play around with this to figure out what worked best with my first design, but afterwards it all makes sense. I suggest doing an air cut before cutting your material to understand what is happening.

Another option I use a lot here is to just set the X0 Y0 at the actual X0,Y0 of the machine or material, then click the bottom radio button on the "Material Size" area. This will zero to the bottom left corner of the design (shStep 4: Finishing Toolpathown in the preview as the origin of the X and Y arrows) which is more typical of 2D milling. You can also select manual offsets here for X and Y but it is easiest to just reset the zeros on the machine itself where you want them to be. Also, I never mess with the size of the material here. It selects default values based on the size of your design and that is usually fine for my uses.

You also have the option to add margins to your design. This is useful if you plan to use this to cast a silicone mold directly from the finished milled piece. Typically, it is easiest to just type a small number next to "Symetrical" like 0.25 inches. This will give you a 0.25 inch wall around the entire model. Be sure to think about the depth here. If your model is too deep, then it won't be possible to mill the walls as the shank of the endmill is only so long. If the bit goes too deep, the collet of the router itself will smash into the top of your walls.
You can also select the depth of the model, I typically, use 0.0 and don't add tabs, but if you have an uneven top surface in your stock material, you can mill it flat before beginning to mill your model by selecting a depth here. I'm not sure what the tabs will do here.
Finally, I am not quite sure what the "cut plane" does, but there is an option here to set that as well.
Once you've selected all of your Material settings, click "Apply" and then "Slice Model" A window will pop up asking you to set the depth of each slice. This will separate your model into multiple slices that the machine will cut in a sequence form top to bottom. If you are cutting wax or foam, you can save time by setting this value to 0.25-0.5 inches or so. The default is 0.125 (1/8") which can take a very long time if you have a lot of slices (ie. if you have a large z height such as 3 inches tall). I'm not sure what this is for since you set the actual cut depth in the next step...
Then you can save this sliced file and click the "Next" button.
Here you will select the bit you have. Use flat-end 1/4" bits for most things as they are fast and accurate enough. You can set the feedrate and spindle speed. The maximum our machine can move is around 10-12 inches/sec. You can also set the pass depth. Again this will save you time if you are cutting wax or foam by allowing you to select a deeper cut for each pass. Since this is the rough cut, it doesn't have to be pretty. I suggest cutting as fast as possible with the material you have to save time.
Typically, I will do a X raster cut leaving the default values Click "Calculate" to get an estimate of how long it will take to perform the rough cut on the machine. You can view the cuts in the preview window and move the object around to see how it will separate and cut the object. Play with the cut depth and recalculate and view the results for an idea of what it will be doing. Then click" Next".
If you can use the same bit here as for the roughing, then do so. This will allow you to save both the roughing and finishing paths in the same file. If you cannot do that (for instance, you are using a ball nose for finishing but used a square end for roughing) you will just have to save each toolpath as a separate file and run them one at a time.
here the options are similar to the rough cut window, but you can select a different rastering angle. If you click "Create an extra pass at 90 degrees form the first" it will make two full rasters from different angles. For instance, if your first one is set for 45 degrees raster, if you click this checkbox the second raster will be at 135 degrees. This is highly recommended for precision shaped and a nicer overall finish. It will take a while to cut though.
Calculate the results and then click "Next"
This will cut to your maximum model dept all around the edges of your model. I didn't use this but it is pretty useful again if you plan to make silicone molds and such.
Click "Next"
Here you can watch an animation of each toolpath cutting into virtual stock material to see how it will cut on the machine. This is where you can go back and debug some of your mistakes from earlier steps.
Again, if you used the same bit for all three toolpaths, you can save them all to a single file. Otherwise (and if you just want to do them separately) you can save each toolpath as its own file. You will also get an estimate of all three toolpaths by clicking the checkbox next to their names.
At this point, you want to secure your stock to the machine (I used carpet tape with wax and foam, though foam doesn't weigh enough to stay down well, especially with deep roughing cuts). Zero the machine to where you selected in Step 2 (either the center of the stock or the X0,Y0 of the stock depending on your previous selection)
Insert the correct endmill for the toolpath you are cutting, and mill . Your workflow should match the steps from above, Roughing toolpath --> Finishing toolpath--> Cutout toolpath. watch my tutorial to see how to send something to the shopbot.
(Click this link if embedded video is not working)
The dimensions of the original design were WAY off, it was designed to be 5” thick and like 50 inches on each side. I entered 0.25” for the Z-depth and it autoscaled the other dimensions to about 2.3” each. I then selected a 1/8th inch ball-nose endmill (since that’s all we had). I left the rest default and clicked “next”
When the wax is completely milled, I cut off the section of my mold
with a bandsaw to make a roughly square piece. Then I evened out the
sides by scraping it with a razor knife and built up walls around the
piece with masking tape.
Finally on this window you will select the "Sides to machine". Again, I typically design the model to be cut from the top, so select "top" and then click the "Apply" button. Clicking the "Next" button at the bottom moves you to the next step in the wizard.
I found that when you think you are done mixing, you should actually mix some more. I also found that it is impossible to make a box around my silicone mold using tape (as I did with the wax) because nothing sticks to silicone. Try as I might, I couldn’t get a good seal around my silicone mold. The Drystone is much thinner than the silicone and is non-newtonian in nature. When I mixed it, it seemed more solid, however, when I let it sit, it liquified. Since it was sitting still for a long time, it found every crack and crevice between the tape and silicone. Next time I think I will either cut an outline around my mold in PartWorks3D (it gave me the option, but I didn’t use it) or I will first make walls of cardboard before taping around my silicone mold. Once you pour the Drystone in the mold, pick it up and tap it on the table for a little while to allow the bubbles to rise to the top.
I found the DryStone to be brittle, like plaster. Neil had said it is in the concrete family but it didn't really have much strength. I honestly can't say what I might use it to make in the future. As for my cast, I opted to keep the air bubble in my silicone mold and when it was cast, I think it looks pretty neat, like a teardrop or something.
Web template design: davereederdesign.com