

The discussion today focused on using the vinyl cutter and laser cutter to make designs. Neil showed examples of using the fabserver and talked about the possibilities of using the laser cutter to make half-toned stencils for screen printing images. Neil also showed examples of our homework assignment for this week.
You can download my design files here:
I've been thinking of building manipulatives for years. I love to build tools that help people learn and this was a perfect project for me. Sadly, all of my previous ideas were either already taken, too derivative, or too complicated to make on the laser cutter. I doodled all sorts of ideas in my notebook and did some research online for interesting ideas.
Case Studies:
Of course, everyone is familiar with the standard building manipulatives, LEGO, K'NEX, meccano/Erector.
I searched my bookmarks from the past several years to find neat projects I wanted to gain inspiration from. Sadly, this didn't help me come up with anything. My next step was of course to go to the google machine and look for new interesting ideas. Kickstarter has been a hotbed of activity for new ideas and I remembered a couple of good building manipulatives that have come from there so I went to their archive for inspiration.
My design started as many different concepts with elements of all of the above concepts baked right in. Realizing that this was too ambitious for the time I had I scaled it back. Taking a step back I realized the best manipulative would be something that have only a few different shapes, but can be used to make anything (like the original LEGO, with 1, 2, 4, and 8 peg designs). I narrowed my design down to just 3 parts. (though it could be just 2 parts). These include a spanner, and a connector. The connector is similar to the Strawbees design, utilizing the long part to connect the spanners and the circular part to allow for multiple dimensionality. I added an extra circular part that is detachable if not desired, but can be used to add rigidity to the design if needed. The spanners are also made such that they can easily be torn to make them any length desired. As a bonus, you can use the spanners and the connectors with plastic drinking straws to add another cool element to your designs.
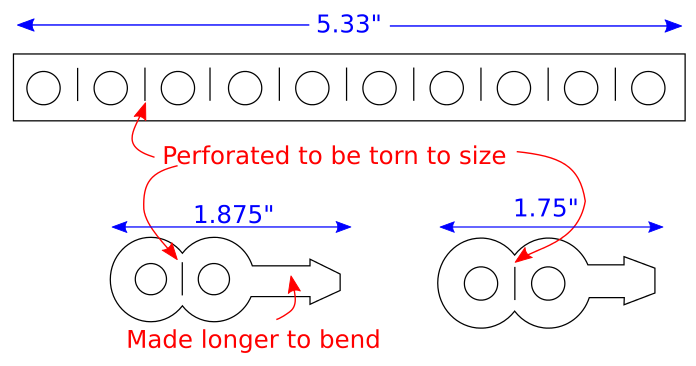
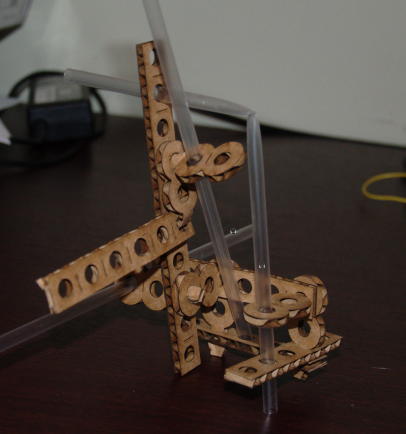
You can see how the connectors allow for any angle to be used for connections, and how they really open up the degrees of freedom I tore the spanners on a couple of the perforated lines to make them different lengths. The two connectors at the top show the 1 different uses of the connector pieces. The one that is folder over has an extra long "neck" to allow the holes to line up with the spanner when bent. This is then connected to reenforce the connection and the spanner at that spot. The straws are really an afterthought and not required at all.
I was rushed for time due to missing all of last week due to a snowstorm. I didn't have much time to get more familiar with the Fab Modules. I ended up using the standard Epilog print driver to cut these parts (I know, I know, not the point right?) Well, to make up for that fact, I tried different methods for printing from Inkscape. I ended up saving my designs as PDF, then printing from Adobe Acrobat. Foxit PDF reader wouldn't print correctly and only Adobe would work. I also couldn't print directly from Inkscape (...yet. I plan to write an Inkscape extension based on the Fab Modules Epilog script).
For the Vinyl Cutting, I again did not get a chance to use the Fab Modules on the Roland machine. However, I did cut a vinyl sticker for my laptop using the KNK Zing vinyl cutter. I know it isn't the same experience at all, however, I have spent a lot of time looking at how the fab modules work and how the Zing works. The Zing is a very capable machine and is much stronger than most vinyl cutters. It is designed to cut thicker materials and is a cheaper solution than a Roland machine. I looked at the internals of a few Inkscape plugins as well that support plotting (Inkscape Plotter, inkcut, and many more HPGL-based plugins). If I have the time, I plan to add a custom script to the Fab Modules to add the Zing to the fab modules suite. It shouldn't be complicated as the Zing uses a slightly modified version of HPGL, which means the CAMM script could be modified to allow the Zing to work.

My cool new vinyl sticker on my cool new laptop.
I can see why the laser cutter is the most used tool in the fablab. It is incredibly fast and simple to use. Neil had mentioned the vinyl cutter is not appreciated as much as it deserves. I think that would be true if the vinyl cutter were able to cut thicker materials like thick cardstock. The KNK Zing, which I still plan to write into the fab modules after this class is over, is a much more useful tool in this respect. The cheapest one has 750 grams of cutting force. I think our Roland only has 150 grams.