

The discussion today focused on Composite materials such as fiberglass and carbon fiber.
Download my design files for this project here
This week was very tough for me. I couldn't really get access to the shopbot when I needed it, so I had to make my mold by hand. WE hadn't ordered any materials for composite week, I suppose we used an older version of the fab academy BOM so we had to scramble to get everything we needed last minute. Time was short as I had to also turn in the final copy of my dissertation on top of all the other work I had going on.
As for a design, I couldn't really come up with anything in
particular I thought would be interesting. I was nearly resigned to
make a decorative (really ugly and not food safe) bowl. Then I
stumbled on a few instructables projects that sparked my interest. One
was of a guy making a carbon fiber guitar. Another was a
carbon fiber violin from scratch.
I thought those were both WAY more involved projects than I had
time for, so I opted for a composite ukulele body. In fact, on one of
the above instructables, someone had commented that they make carbon
fiber ukes for fun. While this is still more involved overall project
than I have time for, I thought it was better than a bowl I'd never
use. Not to mention I plan on finishing the uke over summer. I love the
laser cut fretboard design of this foldable ukulele and have
decided to give that a try when I have more time. I'm also going to
cut the soundboard from 1/8" plywood. It won't sound or look great,
but it's my first try. I already have ideas for how I'll do things
differently next time to make it better.
Since I really couldn't use the shopbot this week, I had to make a
mold by hand. I was kind of glad because making it by hand would be
faster than trying to get the curves like I wanted in Sketchup anyway,
which is what I planned to use. Also, I've been reading
a lot of stuff by the designer
Jude Pullen about different prototyping techniques using
cardboard, plastic, and
foam and have been itching to try them out.
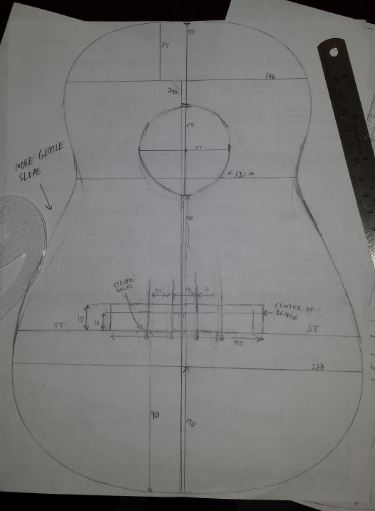
To make the mold, first I took measurements of a wooden ukulele I
own and made a template on paper.
Then I used a small amount of hot glue
to stackthree3 1-inch pieces of rigid insulation foam on top of each
other. I then traced my template design onto the top piece of foam.
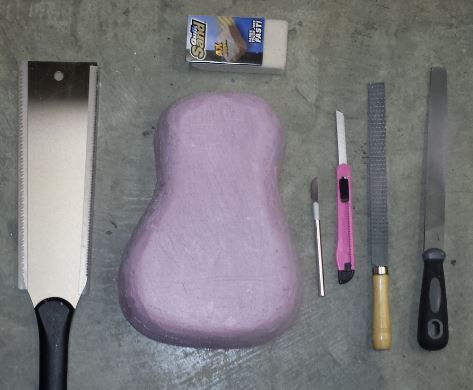
Then I used a variety of tools to rough out the design. To remove
large sections of foam, I used a Japanese Pull saw. For all of the
detailing work, I used a long skinny straight razor knife. When
extended all the way, the razor knife slices nearly all 3 inches of
foam very cleanly. I was sure to carve the design with a draft angle
which will make it easier to release the mold once I the resin had
dried.
(Click image to enlarge)
At this point, I needed to seal the foam and smooth out the surface. I had intended to make a vacuum form of this and use the vacuum form as a female mold and to vacuum infuse the resin to make the outside of the finished piece really smooth and require less finishing work. I prepared the mold for this process, but since access to the lab was limited I ended up just using the foam as my mold. I met with a composites dealer and got a specific smooth-on product for sealing foam, however it was too thin and urethane-based which I'd like to avoid as much as possible. Though I bought some of this material, I did not use it.
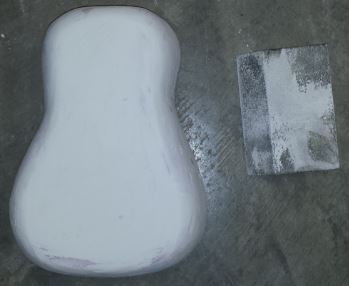
I ended up using wall joint compound. Jude Pullen suggests
spackle, and joint compound was what I had on hand. I slathered up
my uke body and left in the the garage for a few hours to dry. What
I didn't think about is that joint compound basically won't dry in
my garage since it had high humidity. After about 6 hours, it was
still moist. I brought it in the house which has a much lower
humidity and it dried in another hour or so. I sanded it smooth and
applied another layer of compound then sat it in the sun to dry. It
took about three coats of joint compound to get everything nice and
consistently smooth. I sanded it with a foam sanding block usually
used for sheetrock.
(Click image to enlarge)
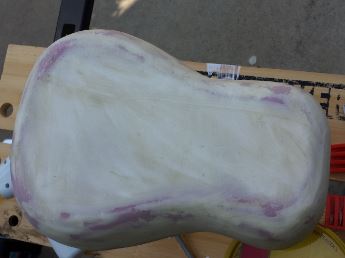
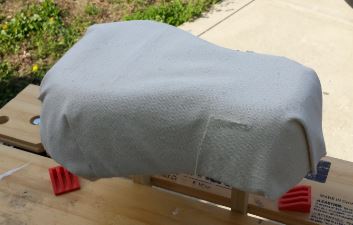
At this point, I was realizing I
would have to just use this as a positive mold and wrap the fabric
around it. Terence and I had discussed materials to use for our
respective projects and we had decided to use denim, but the fabric
store was sold out. Instead we got burlap and canvas. To prepare
for this, I used all-purpose SC Johnson wax as a release agent for
the mold and painted it on with a small foam brush.
(Click image to enlarge)
I didn't realize it at the time, but the canvas I used has a much tighter weave than actual carbon fiber. This makes it bunch up and not spread out when moving over curves. Had I known this, I would have made a bowl shape with more a subtle curve to it. Instead, I had to cut reliefs into the canvas and make folds which looks terrible. I also used hot-melt glue to tack the canvas to the mold. When I visited Terence, he was having trouble making the burlap he was using stick to his mold, so I decided to glue it for good measure.
I didn't take a picture of this, but I made a simple wooden
stand that I screwed into the foam on the underside of the mold to
allow it to sit up above my workbench and allowed me to clamp it
into place. You can see it in the picture above.
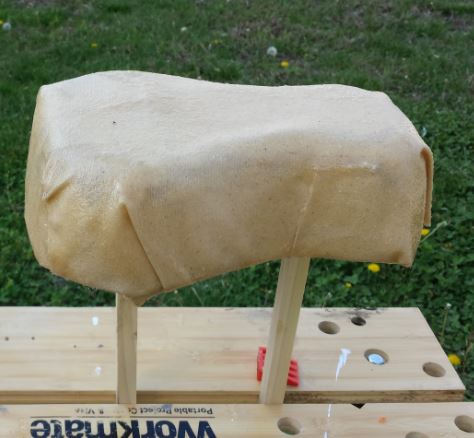
I mixed up some bondo fiberglass resin in
a paper bowl which I had measured the number of ounces using a scale
as I poured (10 drops of hardener per ounce of resin). I used about
50 ounces of resin per coat. Then that old familiar smell of bondo
took me back to working in the family autobody shop when I was a
teenager. I painted the canvas using a foam brush. The foam brush
was used because they are cheap and you will likely run through a
number of them since you will need a new one for each coat of
resin. I decided against vacuum bagging the mold. Looking back,
next tine I definitely will, especially if the fabric I am using
doesn't want to conform to the shape of the mold very well.
I have to say, repairing fiberlass
is WAY easier than doing an object from scratch!
I had to use enough of the resin to let it fully soak into the
canvas. This made a big of a mess, but I used some turpentine to
clean it up. It works great, but next time I'll get lacquer thinner
instead. I'm more familiar with that from when I worked in the shop
and how to use the right amount to thin out the resin and extend pot
life. It also doesn't smell quite as bad as turpentine (to me at
least). Here you can see the first coat of resin.
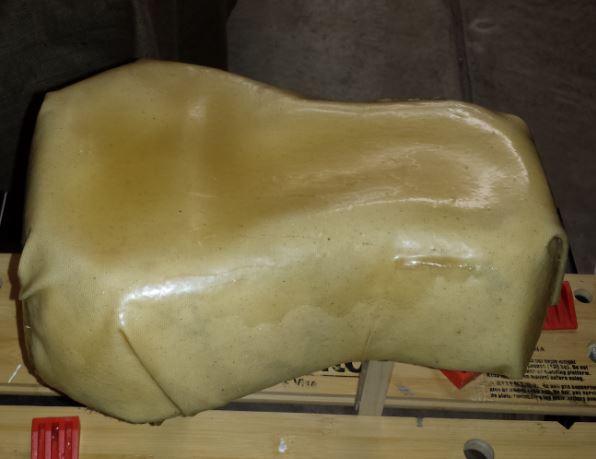
After about 2 hours, I gave it another coat. I need the
outside layer (this layer) to be strong enough to keep its shape for
the next stage which will be reinforcing the inside with batting
material similar to what was shown in the carbon fiber guitar
instructable. I will cut the fiberglass off the foam mold with a
hackwaw when it is hard enough. I let it set overnight and had to go
to work. Below is a pic of the mostly dried resin. I plan on
sanding out the drip lines. I was also trying to level out the top
a bit, hence the darker areas where I let the epoxy pool in the low
spots on my second coat.
I won't be home until late today and then I work another 12-hour
shift the tomorrow so I might not have time to update this webpage
to show the final result before FabAcademy class on Wednesday. If I
have enough time to take pictures and upload them I will!
I was informed that my first composites project was not up to
par for grading, so I redid it. While disassembling the first mold I
found that the canvas never saturates and the foam melted into goo
fro the fumes of the polyester fiberglass resin. I was also told
that Neil expected us to use the shopbot for the design of the mold
and to use either a vacuum bag or a 2-part mold so we can learn the
workflow and the process. So I began again from scratch.
I redesigned my Ukulele body to have fewer reverse curves so the
fabric would lay smooth against the mold and to remove all the folds
I had in the previous design. I made a bowl-shaped back that looks
more like a small lute than a ukulele. I assume the lute's shape
helps it have such a nice sound and I hope for the same effect with
my design.
I designed my new ukulele body in Sketchup which I admit is a
bad habit, but I find it incredibly useful for quickly sketching
concepts in. I started with a circle and then made a semi-spherical
cap. It wasn't quite round as I added a straight section on one end
to mount the neck once it is designed and built.

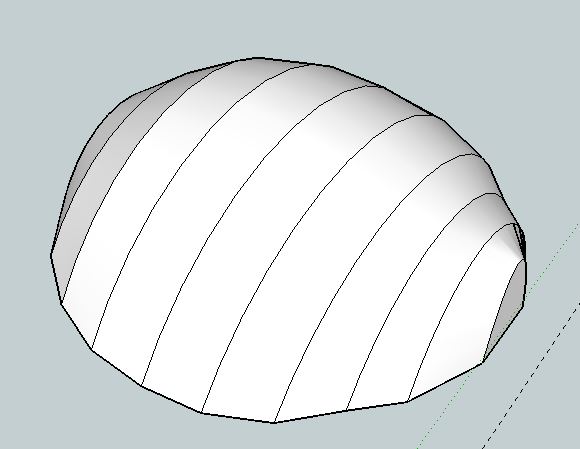
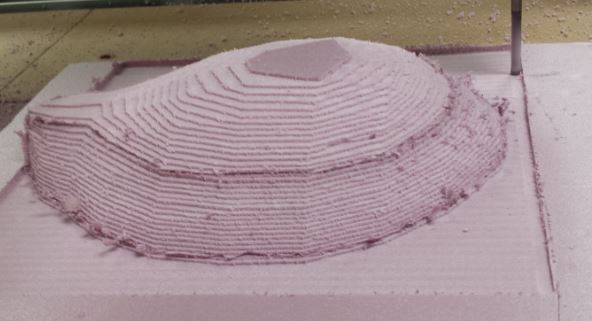
I milled this shape out on a Shopbot in rigid construction insulation foam. I used hotglue to stick three 1" pieces together. It took more than 3 hours to mill it out. I had to remove the dust show from the shopbot as it would have damaged the foam while cutting. This meant that I would have to stand there with a shop vac and try to suck the shavings away as they were cut... for more than 3 hours. Needless to say, this was an enormous mess and I should have worn a facemask to prevent the pink stuff from going up my nose. I really disliked this part of the project. It took longer to cut this than the more intricate one I had made by hand, and it was MUCH MUCH messier!
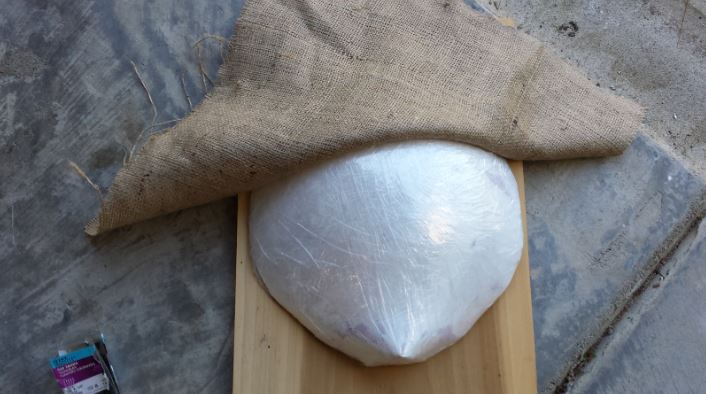
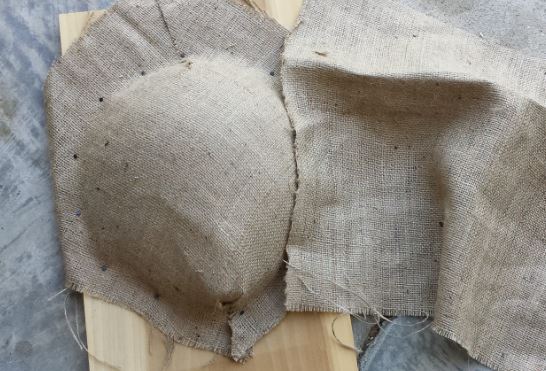
Once this was done, I decided to seal the foam again with drywall joint compound to try to protect the foam from the fiberglass resin, but after one coat, I decided against that (since even the joint compound didn't completely prevent my first mold from melting) and wrapped it in plastic cling. Instead of the massive roll suggested on the fablab partslist, I used a smaller 6-inch wide packing wrap. I then cut two pieces of burlap and configured them on top of the Ukulele body and cut reliefs into them in a couple of places. To keep the first layer in place, I tacked it down to a wooden board. (The little black dots in the second pic are the tacks I used to hold the first layer.) The second layer of burlap is not tacked down.
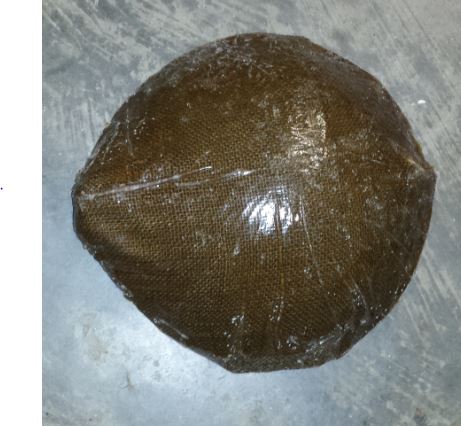
At this point, time became very important as I had to mix a lot of resin (in smaller batches) so I could completely saturate the bottom piece of burlap (held around the mold with tacks) and then lay the second piece on top in just the right way to line up my cuts with the shape of the mold, then shove all of this into a vacuum bag. I didn't get a picture of this process, but I have a picture of just after I bagged it.

Below you can see when I demolded this design. It seems the foam still melted a little bit, I used a Japanese pull saw to try and get the cut to be as flat as possible. I saw very surprised that it held my entire body weight!!! Now the outside is quite ugly, and it stinks still, but it is exactly what it was meant to be. The next step will be to add some excess area on the inside along the rim so I can have some thickness to add glue to be able to add the soundboard (yet to be designed) on there. I"m also going to make the neck and fretboard as well. Before I attach all these things, I will power-sand the outside with increasing grit sandpaper, and finally buff out the scratches. I will update this webpage if I can to show the newer steps. I'm already tweaking this design to make revision 3 as well.

I really wanted to figure out how to speed up my process. I tweaked the model design, then went through Part Works 3d and remade my cut files. This time, I selected a Z depth for each pass as 0.5 inches (my original pass depth was something like 1/8-1/16th inch). I also set the speed to 12 in/sec, which is the maximum our machine can handle anyway. The estimates time went down from more than 3 hours to about 25 minutes, including the finishing pass.

The next thing I did was to build some corner clamps our of 2x4s to prevent the foam blocks from moving when the endmill moves. Last time, I had an issue with the foam moving when the cut was only like 1/8" deep. I determined the foam doesn't weigh enough to make the carpet tape hold effectively. With a 0.5" cut depth, there's going to be a lot more force on the foam. the corner braces were placed ab on diagonally corners of the block, and I still used copious amounts of carpet tape. This worked perfectly! The block didn't move at all during milling. The bad thing was that the carpet tape was very hard to remove when I was finished. I found a very thing (1/32" thick) piece of wood that I was able to saw back and forth under the finished piece until the foam was released.
I need to focus on other projects at this point, but if I were to do this all again:
The next steps for the Ukulele would be to reinforce the rim of the interior of the body with foam batting soaked in resin, design an laser-cut soundboard (top) with a wicked cool soundhole design, reinforce it with cross bracing a little, add a neck, laser cut the frets as mentioned before, and design the pegbox or headstock. I think this design is similar to the shape of a lute, so maybe I will call it the lute-ulele.
Web template design: davereederdesign.com