


WEEK 10
[INPUT DEVICES]
One of the most expected weeks was the input devices, because we will have the chance to learn and test state of the art technologies that are being implemented and used to give inteligence to things. The applications are endless and we are going to test them!
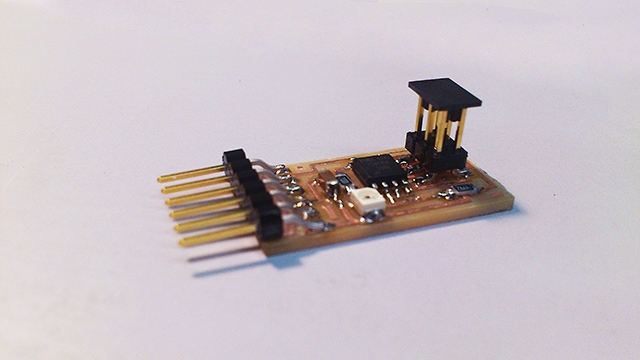
For a first step on this theme, I fabricated a light sensor. Neil provided us all the information, so I just needed to fabricate the board using the process acknowledged on week 4, use the ISP to upload the make file, learned on week_8, but instead of using Arduino to program the board, this time I will use a Python file from Neil.
The hard part here will be:
-
installing the right version of Python 64-bits for working with the extension packages we want,
-
make Python run on the command line.
The version 2.7.3 of Python is a stable one and worked perfectly with the extensions for me. You just need to be careful with the Windows version you have:
- x86 means 32-bits OS,
- x64 means 64-bits OS.
After that, download and install the extensions PySerial and Tkinter.
Again, pay attention to the Win versions!
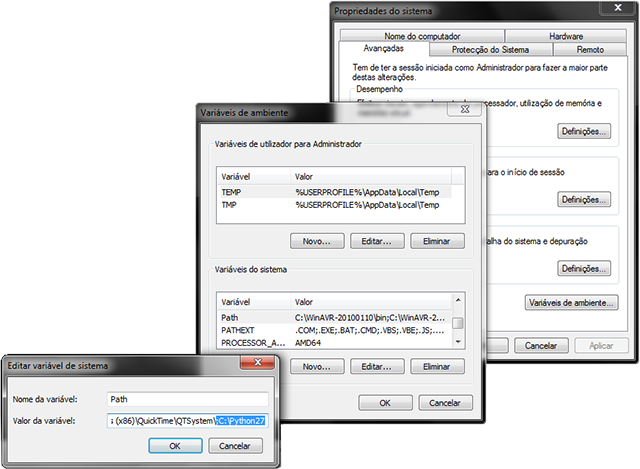
Finally, define the path for Python on the command line. Go to System Properties, click over Environmental Variables, choose "Path" variable and edit the parameter. On Variable value add a semicolon after the text already there and add:
C:\Python27
If you downloaded a different version of Python or changed the installation directory complete the following line: C:\[installation path]\Python[correct version#]
When you successfully complete the instalation process, connect the FTDI cable to your pc and light sensor, run the cmd line, go to the folder where you downloaded the phyton file and run the following line (don't forget to type the correct serial port):
python hello.light.45.py COM#
After that, a new window with a red bar should appear and you're done. Interact with your pc through your light sensor!
asdfdskjfnbwenfweinfiewnfowe