APPLICATIONS AND IMPLICATIONS
This week I further defined my final project idea.
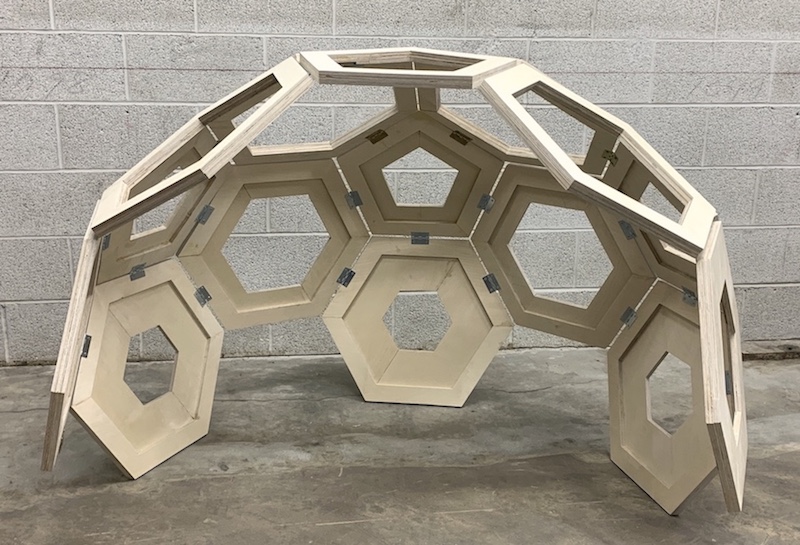
Over the next few weeks I will be working on my FabAcademy project, for which I am teaming up with Amanda. Back in Week 8, I helped to design and build a large wooden dome structure. My partner and I will be building onto this for our final project.
We took some time to answer these questions about the scope and planning of our final project. This will help us keep track of our ideas, timeline, and budget as we go into the final weeks of the class.
What will it do?
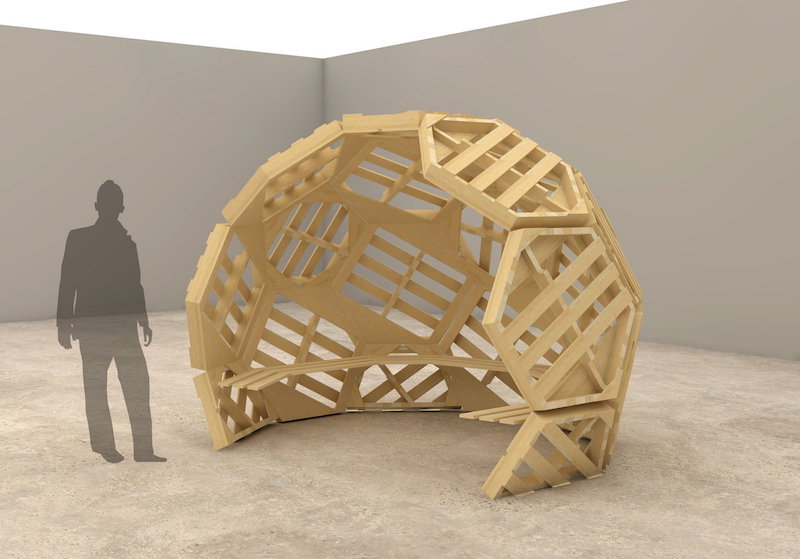
Since our Fab Lab is being relocated to another building, we figured our Lab could use some new furniture for the space. We are making a geometric seating pod where students can relax, read, or do their homework in. The hexagon seating pod can be assembled with modular parts, and it will have a lighting and sound system for ambiance.
Who's done what beforehand?
The idea of a sort of cave-like seating area is not new, nor is the fundamental shape of the dome structure. We drew much inspiration from the shape of this outdoor patio structure, by David Kelly, which you can find a link to here. The difference with our project is that we are designing our's for a smaller, indoor space, using modular design on the CNC router. Also, we're incorporating additional structural and functional elements, such as a floor and a lighting and sound system.
What will you design?
These are the parts that my partner and I will need to create:
- A dome structure for the main part of the seating area, with some wooden/acrylic designs for the individual hexagon/pentagon units.
- A base/floor to raise the dome up off the ground. This is what people will actually sit on. It will be done using the press fit construction method.
- A user interface panel, inside of the seating area.
- Electronics systems for sound and lighting which will include two PCBs with embedded programming.
Out of these things, I created the 3D rendering of the base structure and much of the dome in Fusion 360. Making the 2D designs and cut files for the individual hexagon and pentagon shapes was a shared task since there were multiples of those parts. The CNC operation and wooden assembly was also a shared task. As of Week 17, we have the dome constructed (minus the acrylic panels) and the base designed. In terms of separately functioning systems, I will design, manufacture, and program the board that will run the sound system. My partner, Amanda will work on the lighting system. Eventually, the integration of these parts into the physical structure will be a shared task.
What materials and components will be used?
This is a summary of my expected material costs, and where I will get those materials from. As a note, most of the electronics from my Fab Lab were purchased from DigiKey. **This list has been revised as of 6/17, it is the final Bill of Materials.**
| TYPE | ITEM | QUANTITY | SOURCE | UNIT PRICE | TOTAL |
|---|---|---|---|---|---|
| Design | Plywood Sheets (1/2" x 24" x 48") |
29 | Fab Lab | - | - |
| Hinges (2 pack) | 19 | Home Depot | $2.85 | $54.10 | |
| Acrylic Sheets (1/8" x 24" x 48") |
4 | Estreetplastics | $39 (avg) | $156 | |
| PLA Spools | 3 | Fab Lab | - | - | |
| Electronics (peripheral) | Speakers | 2 | Fab Lab | - | - |
| Passive IR Sensor (3 pack) | 1 | Amazon | $7.99 | $7.99 | |
| Programmable Fairy Lights (5m) | 1 | SparkFun | $19.95 | $19.95 | |
| Neopixel Strip (5m) | 1 | Fab Lab | - | - | |
| Buttons | 2 | Fab Lab | - | - | |
| Power Supply 5V 15A | 1 | Amazon | $26.99 | $26.99 | |
| Electronics (PCB) |
Copper laminate board | 2 | Fab Lab | - | - |
| ATtiny3216 | 2 | Fab Lab | - | - | |
| 1000uF capacitor | 1 | Fab Lab | - | - | |
| 0.1uF capacitor | 1 | Fab Lab | - | - | |
| LED (SMD) | 1 | Fab Lab | - | - | |
| 100Ω Resistor | 2 | Fab Lab | - | - | |
| 0Ω Resistor | 3 | Fab Lab | - | - | |
| 1x2 Male pin headers | 5 | Fab Lab | - | - | |
| 1x3 Male pin headers | 5 | Fab Lab | - | - | |
| 1x6 Male pin header | 1 | Fab Lab | - | - | |
| 1x3 Female pin header | 1 | Fab Lab | - | - | |
| 1x6 Female pin header | 1 | Fab Lab | - | - | |
| Total Cost: | $265.03 | ||||
What parts and systems will be made?
- Top Lighting System This will consist of the string lights which will be activated by an IR sensor. These lights are intended to bring gentle lighting to whoever is sitting in the pod.
- Sound System We will have some speakers which will play a selection of music and background sounds. These soundtracks will stored and played off of an SD card. We plan to use a remote control to select the track and to change the volume.
- Under Lighting System If we have time, we will create a secondary lighting system which uses standard Neopixels, and is controlled by a button. This lighting strip would go underneath the seating area, around the circumfrence of the base.
What processes will be used?
- 3D Design - in the modeling of the seating pod's dome, base, and electric compartment in Fusion 360.
- 2D Design - in sketching the cutting files for the CNC in Fusing 360. Also the acrylic shapes for the laser cutter in Illustrator.
- Additive manufacturing - using FDM 3D printing for the electronics compartment.
- Subtractive manufacturing - using the 3-axis CNC router for cutting wooden pieces, the laser cutter to cut the acrylic windows, and the CNC precision mill to make the PBCs.
- Electronics design and production - to create the PBCs for each of the systems listed above.
- Embedded microcontroller interfacing and programming - We will program each of the microcontrollers to have their lights or speakers respond to their respective inputs.
- System integration - We will incorporate the electronics systems into the physical structure so that they are not intrusive. The electronics systems will also share one power source. However, the systems will be individually operable, so they are fairly seperate.
What questions need to be answered?
A general question, not about my project, but about the assignment that I need to remembr to ask: does embedded microcontroller interfacing require a digital interface or can this just mean a method of interacting with the microcontroller?
Some questions I'm wondering about my project is how to program the remote control, if the IR sensors will keep lights on long enough (we might switch to pressure sensors), how will we secure the acrylic windows into the structure, and more.
In addition, my lab is in the middle of relocating and some of the major machines (CNC router, laser cutter) are yet to get up and running. We might need to find a way to simpify the base structure so that it doesn't require the CNC, and we may need to consider leaving out the acrylic panels.
How will it be evaluated?
A way to assess our work, is to check the functionallity of two systems: if the lighting and sound both work as you would expect. A qualitative way evaluate the project is to get feedback from lab members to see if the seating pod is user friendly and increases their enjoyment of the space!
The Plan
This is my partner's and my game plan for completing this final project.
| Dates | Task |
|---|---|
| May 26th - May 30 | - Prototype parts of the electronics systems on Arduinos. - Design and mill circuit boards. |
| May 31 - June 3 | - Program and debug the electronic systems. - Cut the rest of wooden parts (base, flooring, pentagon shapes) on the CNC. - Assemble and install these wooden parts into our dome. |
| June 2 - June 4 | - Design the electronics casing and 3D print it. - Design the electronics interface panel and 3D print it. - Cut the acrylic panels and install. |
| June 5 - June 7 | - Install the electronic systems and their casings/panels into the structure. - Finish various design elements: add a curtain to base, consider wood staining? |
| June 8 | - Update slide and video presentation. - Finalize documentation. |
Resources
- Week 01: Principles and Practices - initial ideas.
- Week 19: Project Development - tracking the entire process.
- Final Project - presenting the results.
Updated: June 15, 2021