

Embedded Networking and Communication:
In this Thirteenth week of Fab Academy, we had to explore various ways of Networking and the Communication Protocols followed by the devides and peripherals.
Objective:
1. Group assignment:
Details here.This week is having the following Objective for the Group-
Send a message between two projects
Learning Outcomes:
Demonstrate workflows used in network design
Implement and interpret networking protocols and/or communication protocols
Checklist:
Linked to the group assignment page ✔
Documented your project. ✔
Documented what you have learned from implementing networking and/or communication protocols. ✔
Explained the programming process/es you used. ✔
Outlined problems and how you fixed them. ✔
Included design files (or linked to where they are located if you are using a board you have designed and fabricated earlier) and original code.
Opening Quotes:
- "The Opposite of Networking is - NOT WORKING" ― Smart
- NETWORK: There is a thing about him data he never tells what is going on in his mind"
1. Group assignment: Details here.
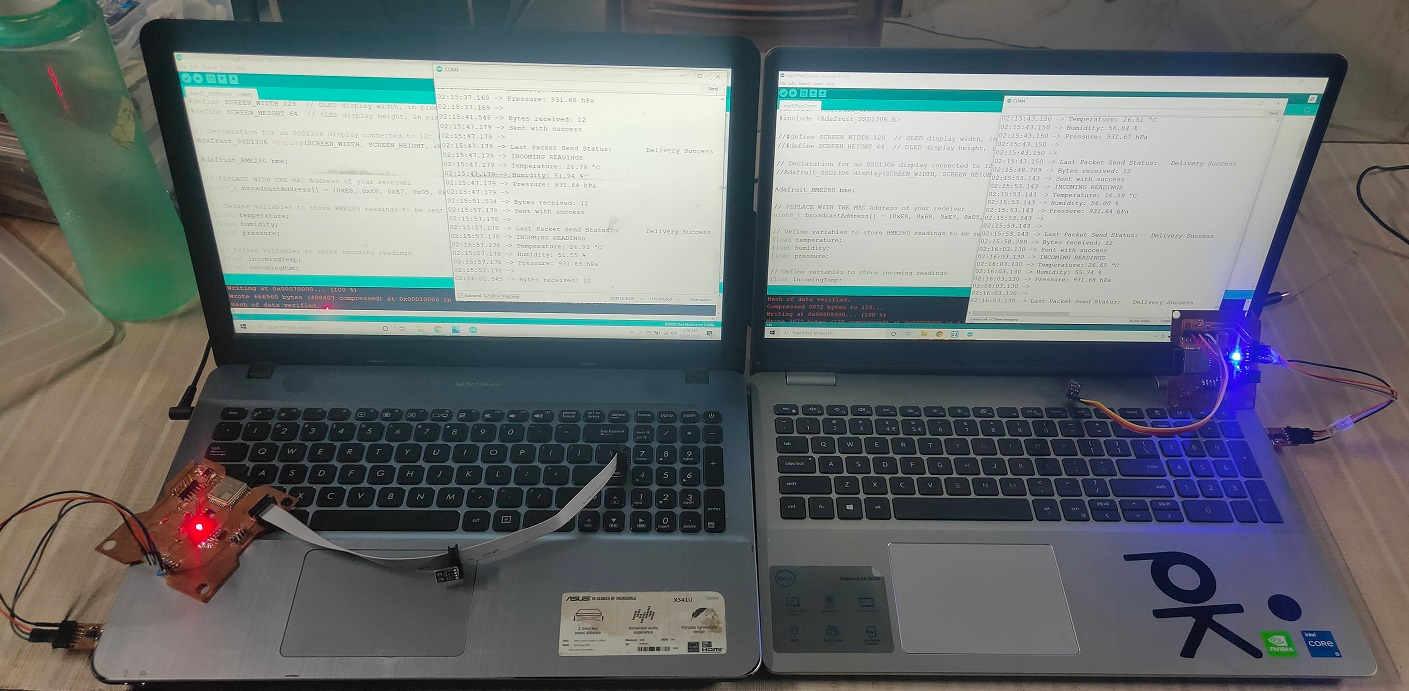
We had to send a message between two Projects. We decided to use Bluetooth/Wifi to do the communication. For this, we referred the Random Nerd Tutorials and executed the Sketch/Code for conducting the I2C communication between two ESP-32 Boards. One of the boards was of Anand and the other one was mine.
We found out the MAC Address of our Boards and then sent and received the data of Temperature, Humidity and Pressure sent from two BME sensors attached to our boards with each other.
The details of the Group Assignment could be found here.
ESP-NOW:
ESP-NOW is a connectionless communication protocol developed by Espressif that features short packet transmission. This protocol enables multiple devices to talk to each other without using Wi-Fi.
This is a fast communication protocol that can be used to exchange small messages (up to 250 bytes) between ESP32 boards. ESP-NOW is very versatile and you can have one-way or two-way communication in different arrangements.
PreRequisites:
- 2 ESP 32 Development Boards
- 2 BME Sensors
- Libraries: Adafruit_BME280 library and Adafruit Unified Sensor library, WiFi, ESP-NOW etc. If you want to use OLED and display the readings, then you might need the Adafruit_GFX, Adafruit_SSD1306 and Wire library as well.
Steps in the Group Assignment:
Getting the MAC Address of the two ESP-32 boards for communication.
Upload the following Code in Arduino IDE and find out the MAC adresses of the two ESP boards
                // Complete Instructions to Get and Change ESP MAC Address: https://RandomNerdTutorials.com/get-change-esp32-esp8266-mac-address-arduino/

                #include "WiFi.h"

                void setup(){
                Serial.begin(115200);
                WiFi.mode(WIFI_MODE_STA);
                Serial.println(WiFi.macAddress());
                }

                void loop(){

                }
After uploading the code, press the RST/EN button, and the MAC address should be displayed on the Serial Monitor.
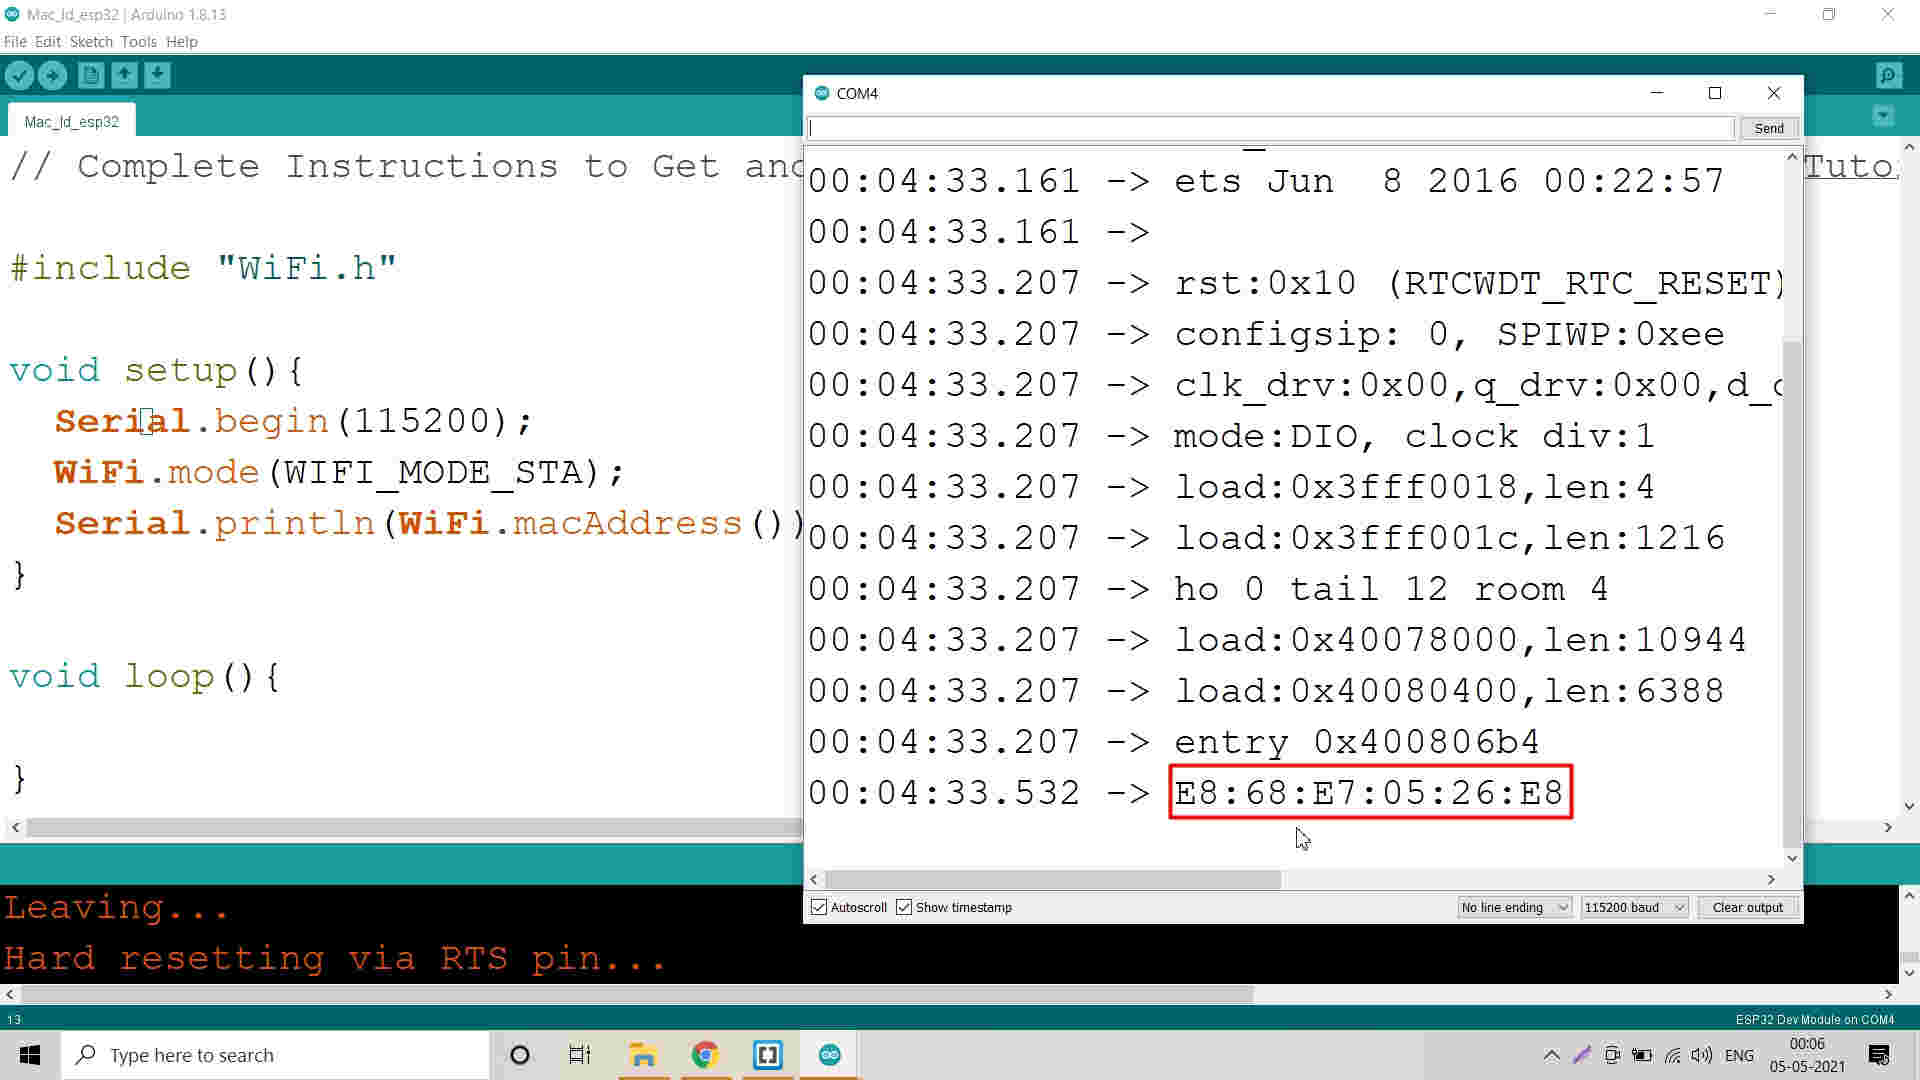
MAC ID of ESP-32 Board (GoatIT) of PAVAN KUCHAR
As the default program didnt get executed in Anand's Arduino IDE, he used other Sketch/ Code
                    #ifdef ESP32
                    #include "WiFi.h"
                    #else
                    #include "ESP8266WiFi.h"
                    #endif

                    void setup(){
                    Serial.begin(115200);
                    Serial.println();
                    Serial.print("ESP Board MAC Address:  ");
                    Serial.println(WiFi.macAddress());
                    }

                    void loop(){

                    }
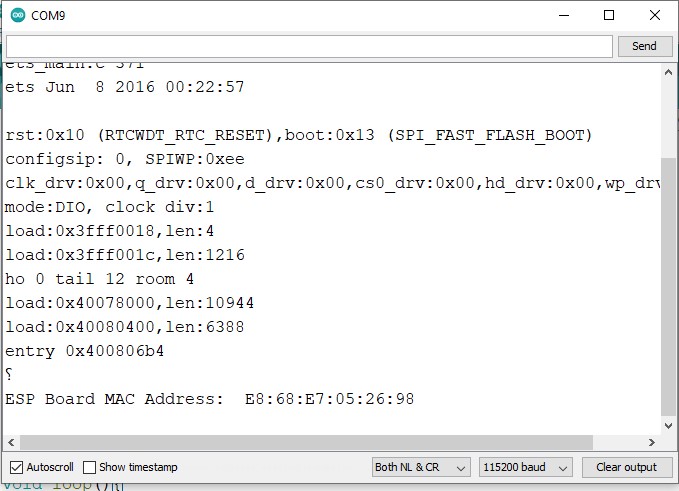
MAC ID of ESP-32 Board (SAMS) of ANAND TALE
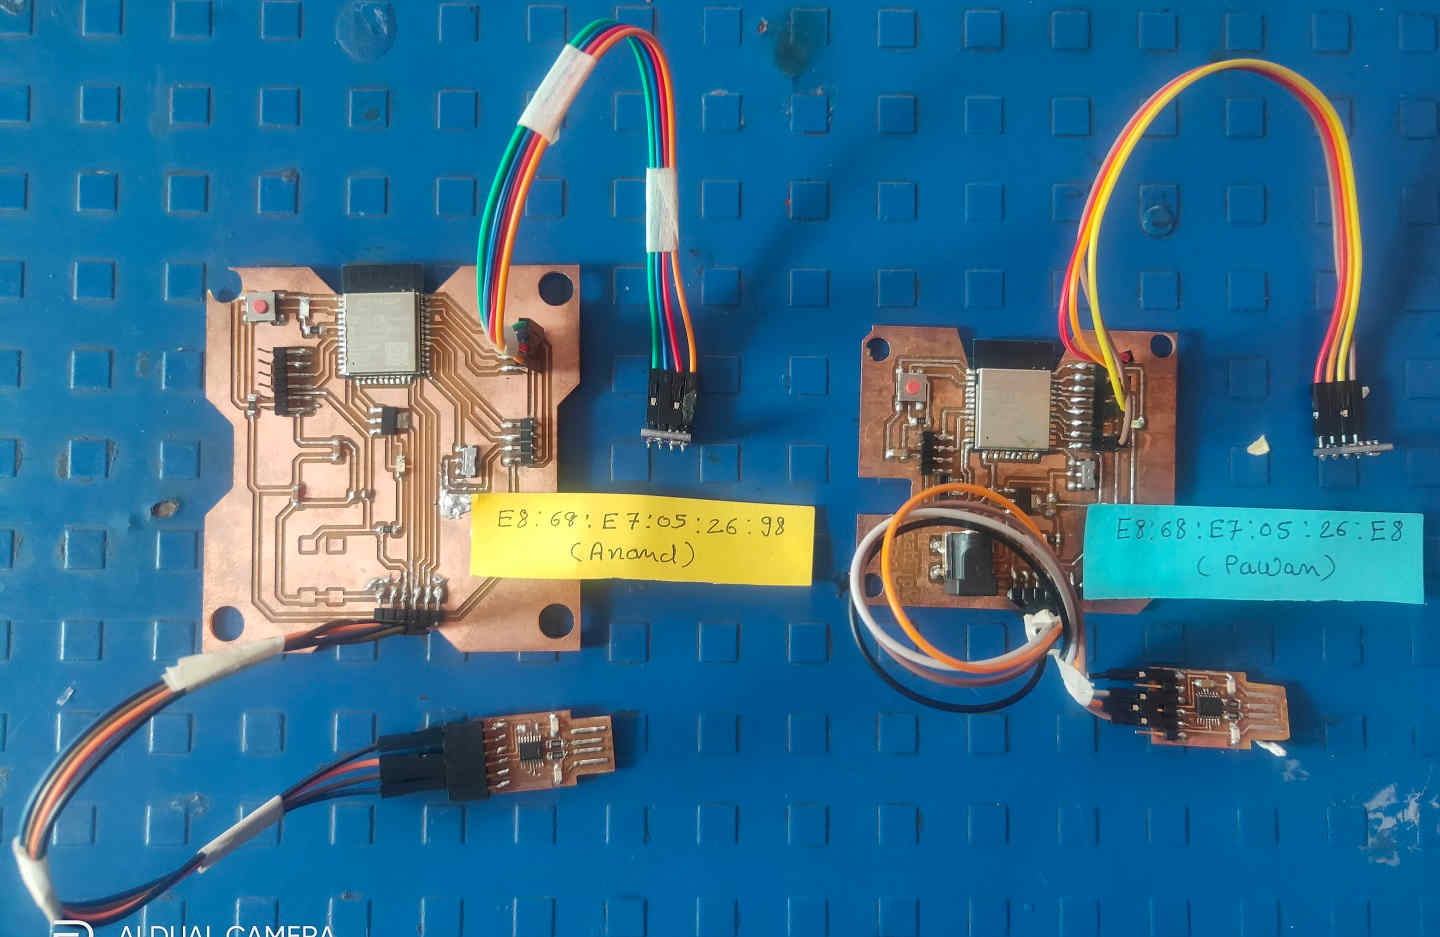 ESP-32 Boards with their MAC Addresses
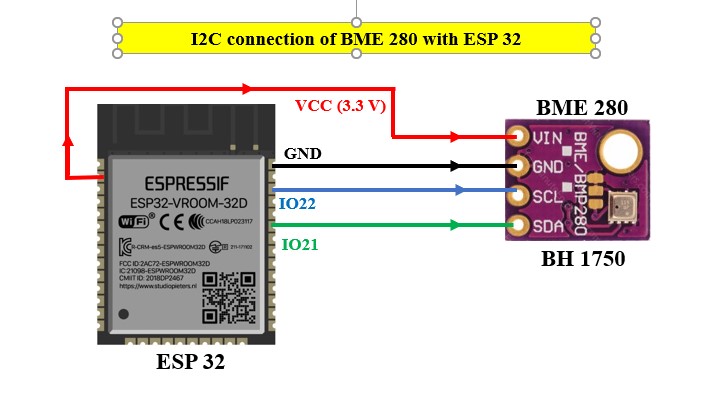
Schematic of the Connections of BME-280 Sensor with ESP-32:
 ESP-32 Boards connected with the FTDI and BME280 Sensor
Rui Santos
Complete project details at https://RandomNerdTutorials.com/esp-now-two-way-communication-esp32/
Permission is hereby granted, free of charge, to any person obtaining a copy
of this software and associated documentation files.
The above copyright notice and this permission notice shall be included in all
copies or substantial portions of the Software.
*/
#include "esp_now.h"
#include "WiFi.h"
#include "Wire.h"
#include "Adafruit_Sensor.h"
#include "Adafruit_BME280.h"
#include "Adafruit_GFX.h"
#include "Adafruit_SSD1306.h"
//#define SCREEN_WIDTH 128 // OLED display width, in pixels
//#define SCREEN_HEIGHT 64 // OLED display height, in pixels
// Declaration for an SSD1306 display connected to I2C (SDA, SCL pins)
//Adafruit_SSD1306 display(SCREEN_WIDTH, SCREEN_HEIGHT, &Wire, -1);
Adafruit_BME280 bme;
// REPLACE WITH THE MAC Address of your receiver
uint8_t broadcastAddress[] = {0xE8, 0x68, 0xE7, 0x05, 0x26, 0x98};
// Define variables to store BME280 readings to be sent
float temperature;
float humidity;
float pressure;
// Define variables to store incoming readings
float incomingTemp;
float incomingHum;
float incomingPres;
// Variable to store if sending data was successful
String success;
//Structure example to send data
//Must match the receiver structure
typedef struct struct_message {
float temp;
float hum;
float pres;
} struct_message;
// Create a struct_message called BME280Readings to hold sensor readings
struct_message BME280Readings;
// Create a struct_message to hold incoming sensor readings
struct_message incomingReadings;
// Callback when data is sent
void OnDataSent(const uint8_t *mac_addr, esp_now_send_status_t status) {
Serial.print("\r\nLast Packet Send Status:\t");
Serial.println(status == ESP_NOW_SEND_SUCCESS ? "Delivery Success" : "Delivery Fail");
if (status ==0){
success = "Delivery Success :)";
}
else{
success = "Delivery Fail :(";
}
}
// Callback when data is received
void OnDataRecv(const uint8_t * mac, const uint8_t *incomingData, int len) {
memcpy(&incomingReadings, incomingData, sizeof(incomingReadings));
Serial.print("Bytes received: ");
Serial.println(len);
incomingTemp = incomingReadings.temp;
incomingHum = incomingReadings.hum;
incomingPres = incomingReadings.pres;
}
void setup() {
// Init Serial Monitor
Serial.begin(115200);
// Init BME280 sensor
bool status = bme.begin(0x76);
if (!status) {
Serial.println("Could not find a valid BME280 sensor, check wiring!");
while (1);
}
// Init OLED display
/*if(!display.begin(SSD1306_SWITCHCAPVCC, 0x3C)) {
Serial.println(F("SSD1306 allocation failed"));
for(;;);
}*/
// Set device as a Wi-Fi Station
WiFi.mode(WIFI_STA);
// Init ESP-NOW
if (esp_now_init() != ESP_OK) {
Serial.println("Error initializing ESP-NOW");
return;
}
// Once ESPNow is successfully Init, we will register for Send CB to
// get the status of Trasnmitted packet
esp_now_register_send_cb(OnDataSent);
// Register peer
esp_now_peer_info_t peerInfo;
memcpy(peerInfo.peer_addr, broadcastAddress, 6);
peerInfo.channel = 0;
peerInfo.encrypt = false;
// Add peer
if (esp_now_add_peer(&peerInfo) != ESP_OK){
Serial.println("Failed to add peer");
return;
} // Register for a callback function that will be called when data is received
esp_now_register_recv_cb(OnDataRecv);
}
void loop() {
getReadings();
// Set values to send
BME280Readings.temp = temperature;
BME280Readings.hum = humidity;
BME280Readings.pres = pressure;
// Send message via ESP-NOW
esp_err_t result = esp_now_send(broadcastAddress, (uint8_t *) &BME280Readings, sizeof(BME280Readings));
if (result == ESP_OK) {
Serial.println("Sent with success");
}
else {
Serial.println("Error sending the data");
}
updateDisplay();
delay(10000);
}
void getReadings(){
temperature = bme.readTemperature();
humidity = bme.readHumidity();
pressure = (bme.readPressure() / 100.0F);
}
void updateDisplay(){
// Display Readings on OLED Display
/*display.clearDisplay();
display.setTextSize(1);
display.setTextColor(WHITE);
display.setCursor(0, 0);
display.println("INCOMING READINGS");
display.setCursor(0, 15);
display.print("Temperature: ");
display.print(incomingTemp);
display.cp437(true);
display.write(248);
display.print("C");
display.setCursor(0, 25);
display.print("Humidity: ");
display.print(incomingHum);
display.print("%");
display.setCursor(0, 35);
display.print("Pressure: ");
display.print(incomingPres);
display.print("hPa");
display.setCursor(0, 56);
display.print(success);
display.display();*/
// Display Readings in Serial Monitor
Serial.println("INCOMING READINGS");
Serial.print("Temperature: ");
Serial.print(incomingReadings.temp);
Serial.println(" ºC");
Serial.print("Humidity: ");
Serial.print(incomingReadings.hum);
Serial.println(" %");
Serial.print("Pressure: ");
Serial.print(incomingReadings.pres);
Serial.println(" hPa");
Serial.println();
}
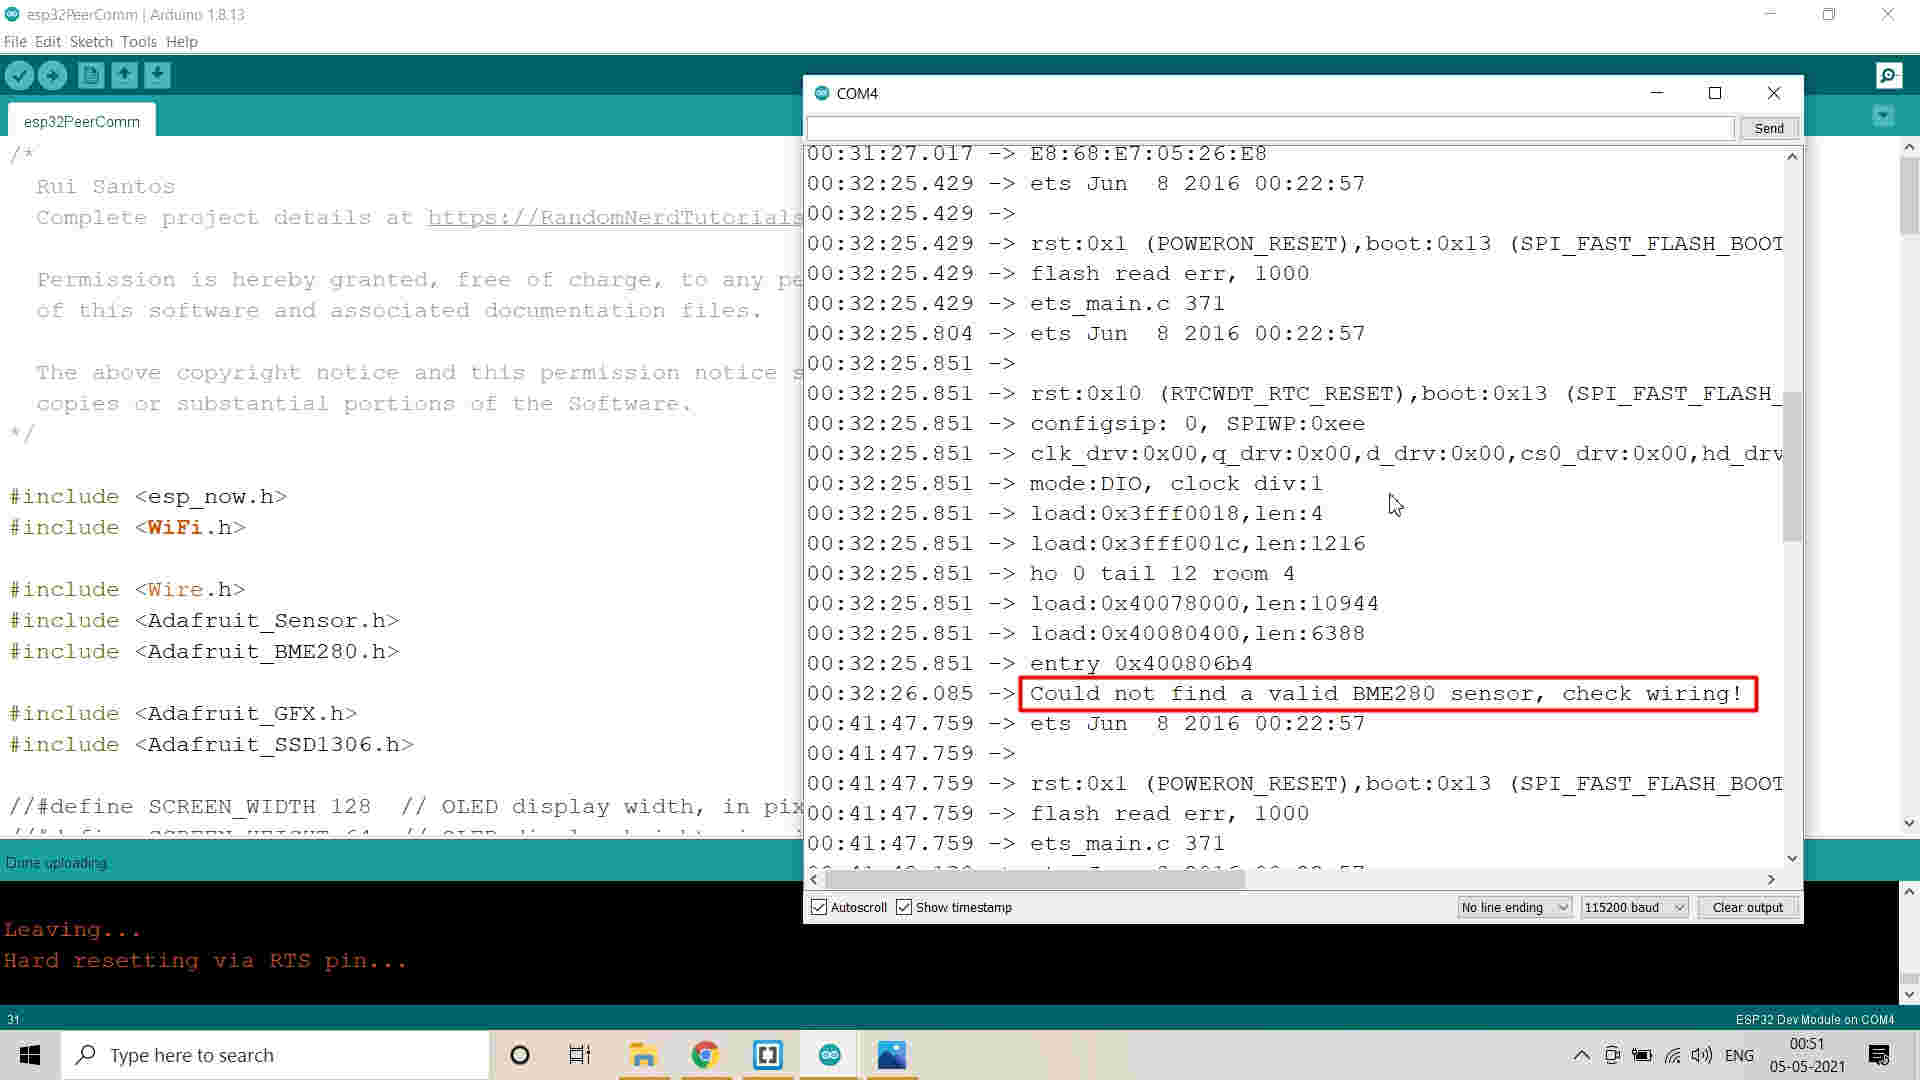
Error in Connections and I2C device was not detected
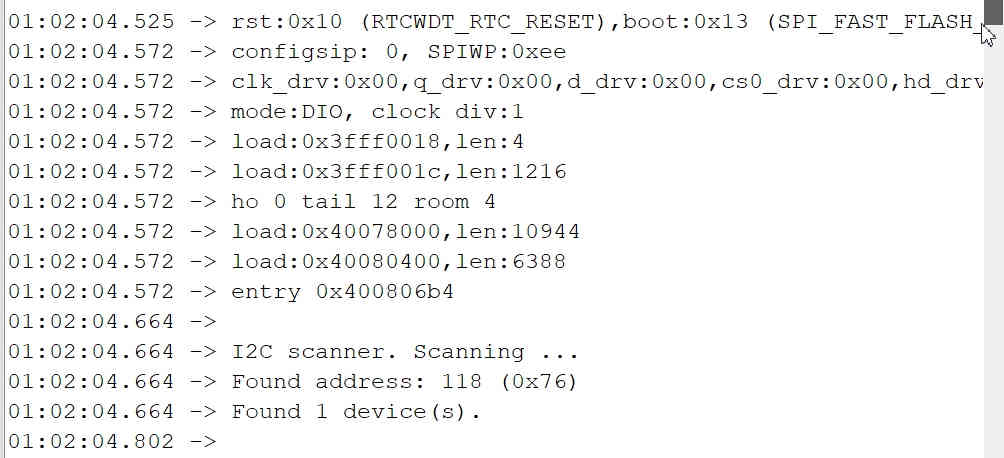
Ran I2C Scanner to detect the Address of the BME 280 Sensor
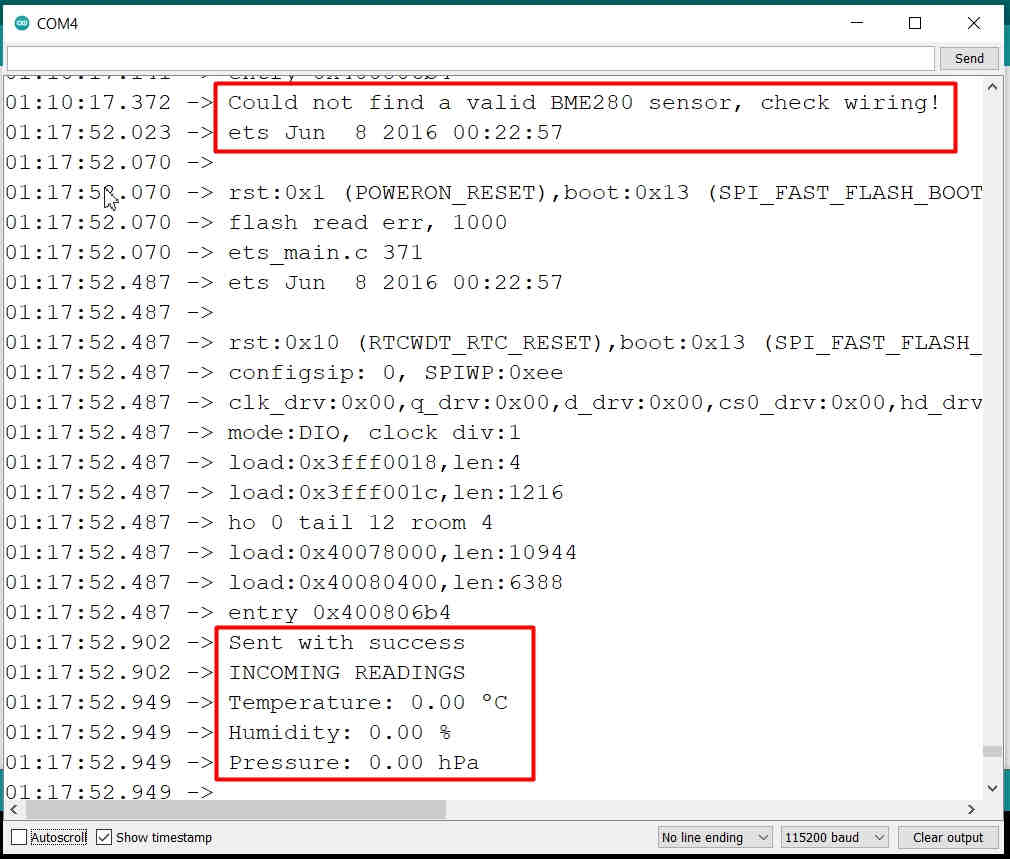
Issue was resolved and the data was sent successfully.
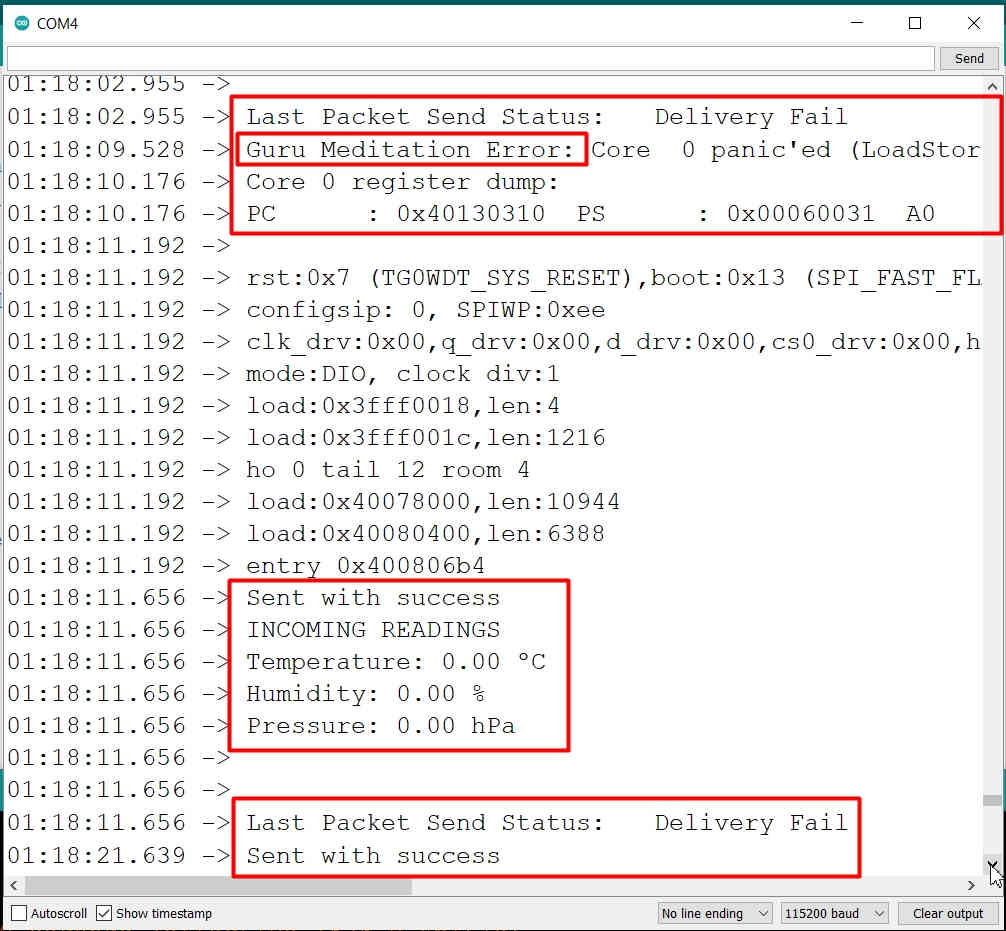
Guru Meditation Error was found
The Sketch could not be successfully veried on the other board. So, the data could not be exchanged.
"WiFi did not name a value" error was displayed. Later, he deleted all the Libraries realted to WiFi and again installed the libraries specified in the Code. After restart and updating the Version, the Sketch was successfully verified in his IDE.
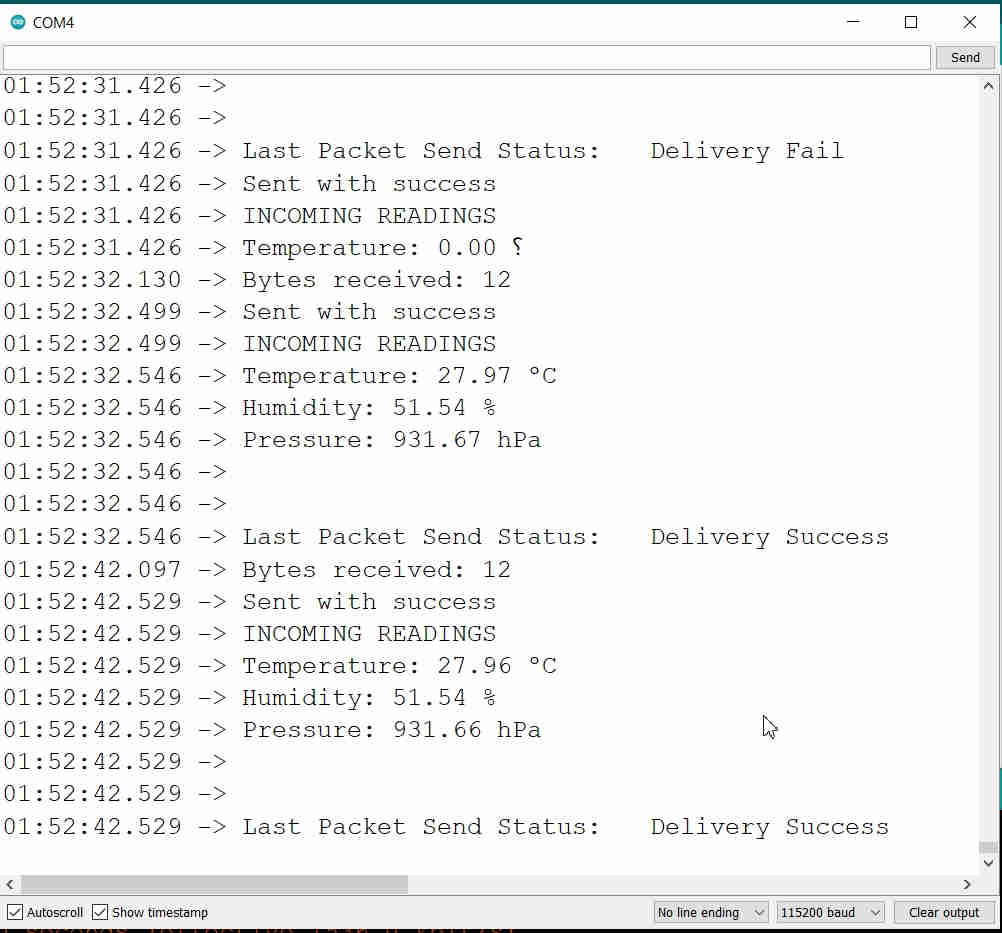
Serial Monitor Display from PAVAN's ESP 32 Board

Serial Monitor Display from ANAND's ESP 32 Board
How does the Code Works:
To use ESP-NOW, you need to include the next libraries.
#include <esp_now.h>
#include <WiFi.h>
In the next line, insert the MAC address of the receiver board:
uint8_t broadcastAddress[] = {0x30, 0xAE, 0xA4, 0x07, 0x0D, 0x64};
Here We have entered the MAC Address of each others ESP32 boards
Create variables to store temperature, humidity and pressure readings from the BME280 sensor. These readings will be sent to the other board:
// Define variables to store BME280 readings to be sent
float temperature;
float humidity;
float pressure;
Create variables to store the sensor readings coming from the other board:
// Define variables to store incoming readings
float incomingTemp;
float incomingHum;
float incomingPres;
The following variable will store a success message if the readings are delivered successfully to the other board.
// Variable to store if sending data was successful
String success;
Create a structure that stores humidity, temperature and pressure readings.
typedef struct struct_message {
float temp;mark>
float hum;mark>
float pres;mark>
} struct_message;mark>
Then, you need to create two instances of that structure. One to receive the readings and another to store the readings to be sent.
The BME280Readings will store the readings to be sent.
// Create a struct_message called BME280Readings to hold sensor readings
struct_message BME280Readings;
The incomingReadings will store the data coming from the other board.
// Create a struct_message to hold incoming sensor readings
struct_message incomingReadings;
Then, we need to create two callback functions. One will be called when data is sent, and another will be called when data is received.
OnDataSent() callback function
The OnDataSent() function will be called when new data is sent. This function simply prints if the message was successfully delivered or not. If the message is delivered successfully, the status variable returns 0, so we can set our success message to “Delivery Success”:
Serial.println(status == ESP_NOW_SEND_SUCCESS ? "Delivery Success" : "Delivery Fail");
if (status ==0) {
success = "Delivery Success :)";
}
If the success message returns 1, it means the delivery failed:
else {
success = "Delivery Fail :(";
}
OnDataRecv() callback function
The OnDataRecv() function will be called when a new packet arrives.
void OnDataRecv(const uint8_t * mac, const uint8_t *incomingData, int len) {
We save the new packet in the incomingReadings structure we’ve created previously:
memcpy(&incomingReadings, incomingData, sizeof(incomingReadings));
We print the message length on the serial monitor. You can only send 250 bytes in each packet.
Serial.print("Bytes received: ");
Serial.println(len);
Then, store the incoming readings in their corresponding variables. To access the temperature variable inside incomingReadings structure, you just need to do call incomingReadings.temp as follows:
incomingTemp = incomingReadings.temp;
The same process is done for the other variables:
incomingHum = incomingReadings.hum;
incomingPres = incomingReadings.pres;
setup()
In the setup(), initialize ESP-NOW.
if (esp_now_init() != ESP_OK) {
Serial.println("Error initializing ESP-NOW");
return;
}
Then, register for the OnDataSent callback function.
esp_now_register_send_cb(OnDataSent);
In order to send data to another board, you need to pair it as a peer. The following lines register and add a new peer.
// Register peer
esp_now_peer_info_t peerInfo;
memcpy(peerInfo.peer_addr, broadcastAddress, 6);
peerInfo.channel = 0;
peerInfo.encrypt = false;
// Add peer
if (esp_now_add_peer(&peerInfo) != ESP_OK){
Serial.println("Failed to add peer");
return;
}
Register for the OnDataRecv callback function.
esp_now_register_recv_cb(OnDataRecv);
loop()
In the loop(), we call the getReadings() function that is responsible for getting new temperature readings from the sensor. That function is created after the loop().
After getting new temperature, humidity and pressure readings, we update our BME280Reading structure with those new values:
BME280Readings.temp = temperature;
BME280Readings.hum = humidity;
BME280Readings.pres = pressure;
Then, we can send the BME280Readings structure via ESP-NOW:
// Send message via ESP-NOW
esp_err_t result = esp_now_send(broadcastAddress, (uint8_t *) &BME280Readings, sizeof(BME280Readings));
if (result == ESP_OK) {
Serial.println("Sent with success");
}
else {
Serial.println("Error sending the data");
}
Video Stream of the Two Way Networking and Communication and Exchange of Information between two ESP-32 Development Boards:
Downloads: Original Files
Original Sketch / Code used for conducting the Group Assignment could be foundhere.