Week 3
When you finished group work on monday and have only one day left for your personal assignment

Table of Contents
New week, new adventure going on, and probably so "far" this is the one that gets me the most! I thought about a lot of possible wooden projects while the lesson with Niel was still going on, then I realized that maybe I couldn't really create a balliste but something modular, the construction kit with a lot of different pieces to put together. So let's go into it and see what will come out of it!Laser Cutter and Group Work
Thinking about my Construction Kit
Creating It! Ups and Downs
Updates
Objectives
- Individual assignments Design, lasercut, and document a parametric press-fit construction kit, which can be assembled in multiple ways.
- Account for the lasercutter kerf.
- Cut something on the vinylcutter
Vinyl Cutter and Lessons
Review of the Assignment and Lesson about the machines
[11th of February]We started early today with a review of Niel's lesson and some in depth discussions about the assignments, the work to do and our plans for the days to come. I learned a lot of things about the process of cutting with a laser machine, which also involves having great care of the tool itself and respect for the next ones who will use that machine. I followed the whole explanation about the group assignment and all the variables, and I have to say that I really didn't thought about all of this yesterday when I came up with the genius idea of a medieval war machine construction. My Instructor pointed out that it's important to consider some things when you work with the laser cutter as concerning the power of the laser, the velocity of the process and the type of material that you are working on. With the group we're going to work on it tomorrow morning, trying to do our best to find the right parameters to use and steps to make, but I'm really grateful for this check up because it helps me to keep up with all the information and new things, ask a lot of questions a fill the gaps of my lack of knowledge.
Lesson with Flavio, our Instructor, about the Vinyl Cutter
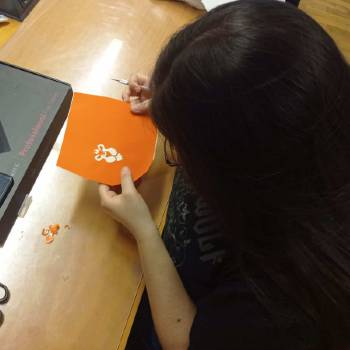
After the lunch break Flavio showed us how to use the Vinyl Cutter and how to transform our drawing from the computer into a beautiful sticker. I have to say, mine turned out quite ugly in the details, but I think I'll get addictive to this machine in particular. The most important thing is to pay attention with your fingers on the machine, because it has a sort of little knife that works on the sticker paper. Once you start it, you can pull the lever and open up the little holders in order to insert the paper, regulate it, and then pull the lever again to fix it.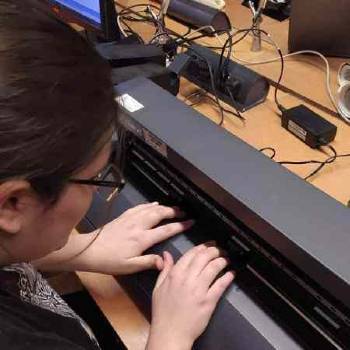
This is me trying to work on my sticker, the first one turned out badly because I failed to calculate the space that I need for the sticker to be complete: I tried to do a Pokemon, a Rayquaza, but at first it was 32 meters long and I had to resize it, then I adapted it to my piece of paper but still I didn't count the border that the machine itself takes in order to work (when you fix the holders). So my first attempt didn't go well, but I managed to work quite easily on the computer part about the vectors, the trasformation to Bitmap and the usage of Cut Studio, the software that our Vinyl Cutter uses (it's a Roland)! I might forget one or two passages from time to time, but given enough faith I'm able to do the job in the end.
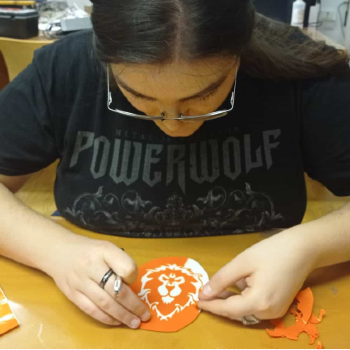
Then I tried to do something new and different, with another piece of sticker paper, paying more attention to the insertion of the paper into the machine and the measurements. I already said that I don't go along with maths, did I? Well, I'll have to deal with it sooner or later, but for now I can say that this worked out in the end. I didn't create my own design, I tried to do an Alliance Lion (from the videogame World of Warcraft), but I'll cut it tomorrow.
The first thing in the morning I came to the Lab to work on the sticker and cut it, it didn't come out beautifully but I'll try to take hand with it. I like the idea of using waste scraps of sticker paper to do little things or symbols instead of seeing them getting ruined in a box, I think I'll run out all waste sticker paper of the lab doing stickers (If I'll ever find free time).
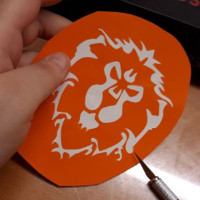
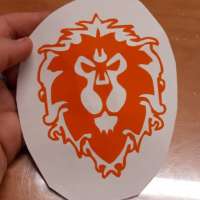
I'm not even an Alliance fan, but Lions are pretty cool! He will find a nice spot on a computer of sorts, but I'll definitely do some more, it's relaxing!
Some Laser Cutting and Group Work
Getting Started
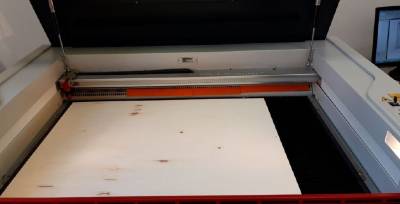
[12th of February]We then moved on to the Laser Cutter, where I'd really spend most of my time just cutting wood and doing shapes and engravings. We have four planks, one per each of us, and one for the entire group to find out the matrix, the kerf and to do all the important things for the group assignments. Flavio showed us how to use the machine, the safety measures and eventually all the important steps to clean it after use (if pieces of cardboard or wood remain). This is important because it's nice to find the machine clean so it's even better (and respectful) to clean it for those who will use it after us.
It was interesting to see the settings on the computer and the passages to do when trying to cut or to engrave the material that you put inside the machine. I was a little nervous about using it but also excited, which is why I would like to do a lot of things with this machine. I want to try the engravings in particular, I like how they take form on the wood and the different types of shades they have based on how much wood has been burned.
So, for the assignment, we tried to do some work with the laser cutter in order to better understand which degrees of power and speed have to be setted, we did some tries. We used the wooden plank that we have available for group work, which is the same as the ones that we have for our personal assignments.
It's actually quite nice that we have only one plank each, it forces us to take great care of our work and don't produce waste of materials, and also to take into consideration the possibility of cutting things in the wrong way so you really need a backup plan. I haven't touch my plank yet, I'll do it at the end when I'll be sure that I'm ready to engrave and work - I'll run some tests on cardboard first to try the dimensions, and on waste wood to figure out the different types of joints. But this will come later on this week!
This morning we tried to find the matrix and we agreed on certain parameters that we found, and we started to work upon the findings of the kerf, which initially proved quite difficult because most of us had different ideas on how to find it. I found myself loving more the "interactive" part of placing the wood inside the laser cutter, taking the focus, moving it in the right position and preparing the area for work rather than staying at the computer for the preparatory work - but we tried to rotate, so that everyone could do everything.
You'll find more about this on the group page
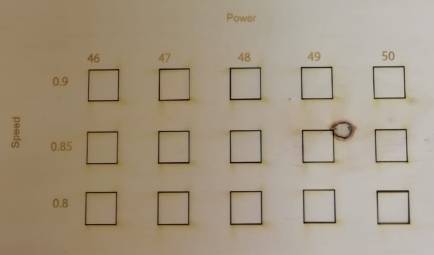
We settled on these numbers in particular after three or four tries, which you can find on the group page, and we decided to move from these ones forward. We tried to find the best option in matter of speed and power in order to do a neat cut, without too much burning going on - the intention was that to find the perfect setting for a clean work without the shading of the fire. Some of these squares fell on their own (in particular the ones near 50), while the other ones need a gentle push in order to fall - which personally I think it's the best option, and it's somewhat more satisfying.
Theory and Practice - A few notes about Kerf
We learned about the Kerf from Simone and then we had to do some research in order to better comprehend how to find it. There is some material online and different tecniques, I personally find some maybe more easier than others, but you will (again) learn more about our group choices on the webpage that I linked before. Here you'll find what I personally think about it, how I'm going to try to find it and use it, and the work that I'll do about it.When working, the laser burns away some material when it cuts through, and this is known as the laser kerf, which can be a really small unit of measurement depending on the material and other important variables such as the speed of the laser and the power that it uses. It can range from 0,08mm to 1mm, but it depends, since it's determined by material properties and their thickness, by the focal length of the lenses and the preassure of the air, and the fact that the kerf can vary even on the same plank of material from top to bottom or from right to left.
Thinking about my Construction Kit
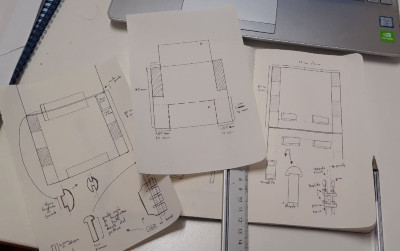
Starting to browse for ideas and sketching them
[From 12th of February till 17th]As I said earlier, I really looked online for a lot of laser cut projects and I fell in love with most of them. I ranged from beautiful boxes to useless war machine toys, such as this fatal balliste that I wanted to create before even knowing that here in Santa Chiara we have a trebuchet as well (you can check this nice project on Matteo Sirizzotti's Fab Page: Trebuchet). As mentioned, I couldn't go for these projects because they are not modular nor paramatric, nor even construction kits that you can create, disasemble and do again in a different way (unless you find a way to disasemble a balliste and make it become a catapult but I find it difficult). So, since I really enjoyed this Dungeon Kit and the beautiful work that Lena has done, I tried to think about something bigger that I could ideate myself without obviously copying the idea itself. I worned you that I might think about some Dungeons and Dragons related, and here is it: The Idea is to do a Dice Castle, which you can disasemble and transform into something else when you don't need it.
To do so, I have to do a vectorial image and pay attention to the colors that I use because the machine will read them differently and I can also choose which ones will cut or engrave with which intensity and speed. I learned these days in the laboratory that I have to remember the cutting line (which is usually around 0,001mm wide) and a few important passages that I have to do like:
- Select "Avoid Drawing Area"
- Check Settings and control the dimensions of the surface, the colors and so on.
- Control everytime that I have a dotted line around the perimeter of the images, because this means that everything is in order (if not, the machine might have a temporary bug or I setted something wrong).
- And then: Magic!
From Inspiration to Creation: Some problems in between
I really enjoyed this idea from Ugears, but for someone who has never done anything somewhat geometrical before, not to say joints of any type or wood-working, I think it's simply too difficult to recreate. I didn't want to drop the idea though, so I tried to do something way easier in order to maintain the original concept of this kind of construction kit.The idea is to create some pieces that can be assembled together to form a dice-holding cube, or you can use them to create a tower which traditionally has some diagonal parts on the inside that allow the dice to roll better and arrive at the bottom rolling on. I tried to sketch some ideas about how to simplify these kind of complex joints (there are some circular parts like weels that are greeped by other forcs on the top, and a complex external structure on both sides of the original Ugears Tower that I'm not able to create). So I had to start simple, at least to understand which could work or couldn't.
Then the next step is to try and simulate this and I'll be doing it on Fusion 360, giving some parametric measurements that I'll change (I hope) quite easily when I'll calculate the Kerf of my wooden plank. We did a group work in finding the Kerf and it turned out to be of 0,14mm, and our Instructors explained us how to use them when drawing in Fusion or other CAD programs to better create our kits and ideas. Without further ado, since it was already late when we finished all this, we found ourselves with one day and a half left to work on our personal work.
Creating my Dice Tower
When everything goes wrong and your collegue goes to the Laser Cutter Room

A day of failures
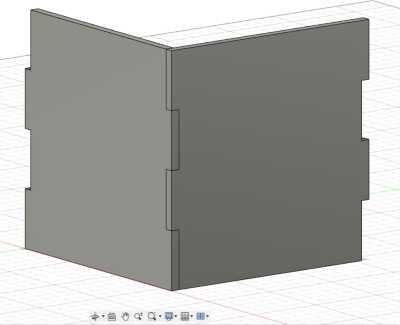
[16th of February]I started to work upon my Fusion file trying to draw some simple lines, the main idea was to start with something simple and then move from it to something more complex - so I wanted to create a cube with some finger joints, since (as you saw before), I couldn't possibly recreate the complex and difficult joints and structures that Ugears had. So the idea was to create a couple of cubes that could be linked together not only horizontally but also vertically with some kind of system that could be something more that just gravity.
- So, the first step was to think how to do this. I have to really thank my collegue here in Fab Academy, Alberto Porri, which helped me throughout the whole initial process of design thinking and gave me really nice and good ideas about how I could reach my aim. I do suggest you to check his page, he did a beautiful work with this week assignment and writes always long and detailed documentations that might help you out. He has helped me to keep focused and try different kind of solutions, even if that meant to lose some time and get really stressed about the possible result of my work. I later changed most of the things that we decided together for the project, but I appreciated it and I wanted to write it down because I this week I really understood why teamwork is important and why having someone by your side is vital for your sanity as the week goes on.
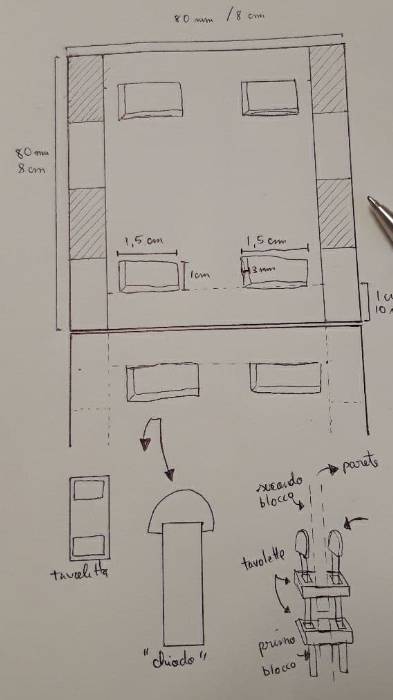
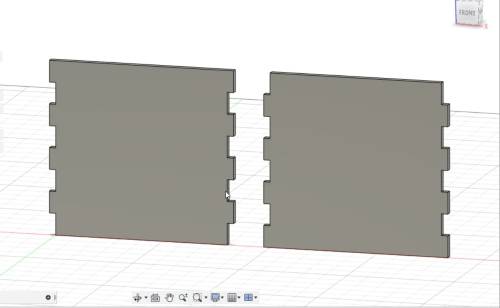
- The final idea, as you can see in the drawing up ahead, has to create finger joints for horizontal purposes and then to create a different kind of joint for the vertical structure of the future Tower. I usually tend to do more things that I can or to complicate my life with stuff that can give a lot of problems instead of going for something simple, and this is the case - because I wanted to create small joints in which you have to insert another piece that holds them together.
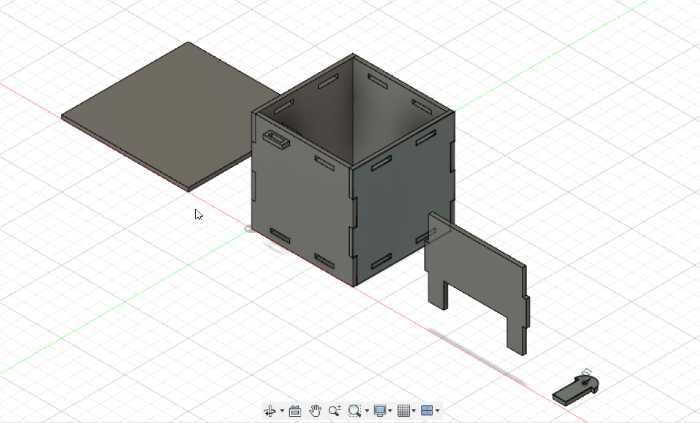
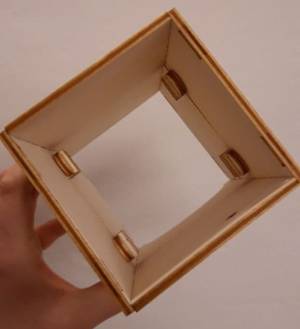
So I had to create some boxed like this and put them upon one another, with the first one which has an opening for the dices to roll out of. Having decided that, I started to work creating first the box.
I took my measurements and started to create a wall and then another one. I usually tend to use both computer and paper for my working process, simply because I do love pen and paper more than computer even if it would be even easier having all the measurements right before my eyes on the screen. So I usually work like this: I create the object, I take the measurements in the program and then I write them on paper as well, it helps me to keep a good and better track of all the things that I change time to time.

The problem was that the finger joints were probably too few and they couldn't keep it, but I do think that probably I did something wrong when setting the kerf as well. I'm sure that the kerf was right because we used it and it worked, but it was really really late during the day and I think I messed something up when moving from Fusion to Illustrator.
- So, if I might give an advice, if you have to work when you are extremely tired and you don't feel particularly well, don't do it. Turn back home, relax a while and the next day start all over again. I really got frustrated that the measurements didn't work , I started a new file and it didn't work as well, and I started to feel things fall apart. My Instructors helped me to keep it all together and not lose hope, reminding me that it can happen for things to turn out the opposite as we wanted to and that it's ok to fail. It happens to fail, to lose it and to feel like everything is simply wrong - but the important thing is to keep going, without giving up and have the courage to start again and try to reach your objective. So, for this day it was all a complete failure and I turned back home completely sad and angry, but tomorrow is another day and maybe things will turn out differently.
Main problems that I think were responsable for this are:
- The number of finger joints (it probably has to be bigger)
- Control better the paths on Illustrator before deleting them
- Double check the size of you wooden (or whatever) plank
- Messy file and drawings from the start
The Dawn of a New Day
[16th of February]With the new day I tried to start all over again. I made a new file from zero during the night, trying to change those things that I think were responsible for my failures the day before. With that being said, I made more finger joints to keep it all better together and I had a better look at the kerf settings and the parameters in my Fusion files. Probably yesterday I made some mistakes on the Illustrator files as well when cancelling the path that I didn't need anymore, and thus things didn't turn out as I wanted. So I tried to start anew.
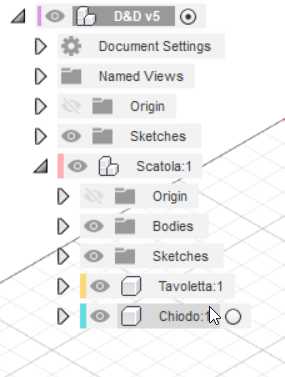
- If I really learned something about this is that it's easier if you keep all your sketches, bodies and components in order, so that you can select them, modify and find them sooner and without a lot of mistakes (and I really made a lot of them). [Solved]
- Beware when you do a lot of lines and figures to always check if the dimensions are right, if something turns out wrong and help yourself with costraints and parameters for this.[Solved]
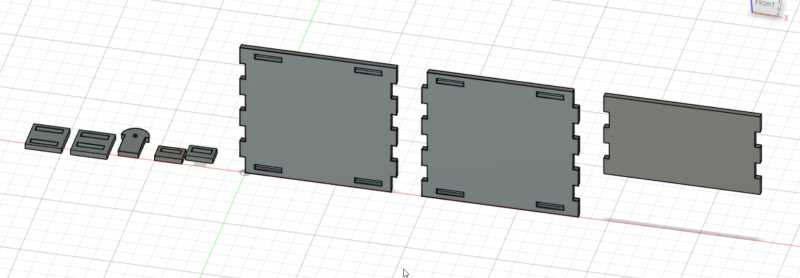
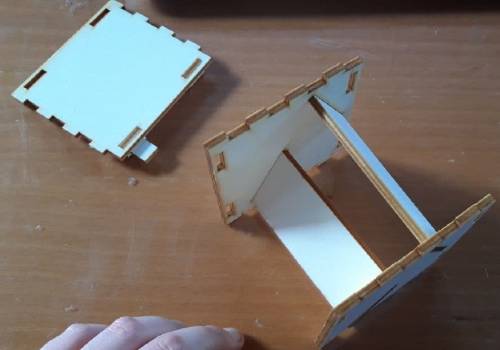
I then started working upon what could keep the boxes together vertically. It would have been easier to simply do four rectangular big walls and join them together in forming the tower, but I wanted to create something somewhat modular even if not similar to the Ugears' Tower. The idea was then to use these:
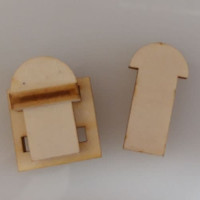
I really wanted to create something somehow challenging, it may not seems so for those who have experience with all of this but for me everything is new so every detail is a challenge - mainly because I imagine something in a way and then it turns out in another, so I have to adapt my ideas to what I can concretely create. I could create some finger joints also for the vertical direction, but I didn't want to - so I imagined and created these tiny wooden planks that have to be inserted in the wholes on the walls and then closed between each other with this long closure.
As I imagined, these didn't work. Why? Because I still have to face two main problems that I wrote before: the dimension of my wooden plank and the challenge of the kerf depending of where I laser my pieces. I wanted to avoid creating a lot of wooden walls with holes that didn't work, so I decided to do tiny little pieces with different dimensions in order to check which one would work with the joint system that I wanted to have - being careful to write them down and check them one by one, time from time.
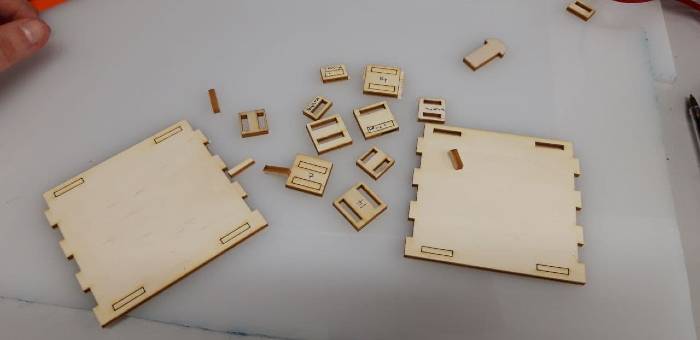
I really made a lot of them, in the end the problem was that the plank was not 3mm as I thought but between 3,80mm and 3,90mm depending on where on the plank I made my measurements. Yesterday I had all holes with 3mm of space, today I have setted them on 3,80 with the usual kerf of 0,007 to everything and it turned out well, it worked, they joint together.[Solved] After several attempts, I finally managed to solve this problem as well. So with a lot of hope and expectations I began to cut my parts, eager to see them connected together and to see how they worked.

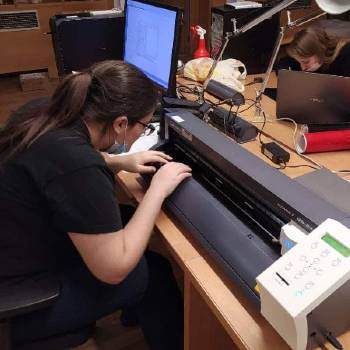
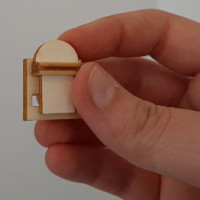
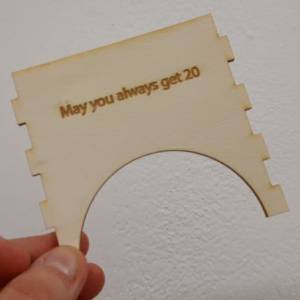
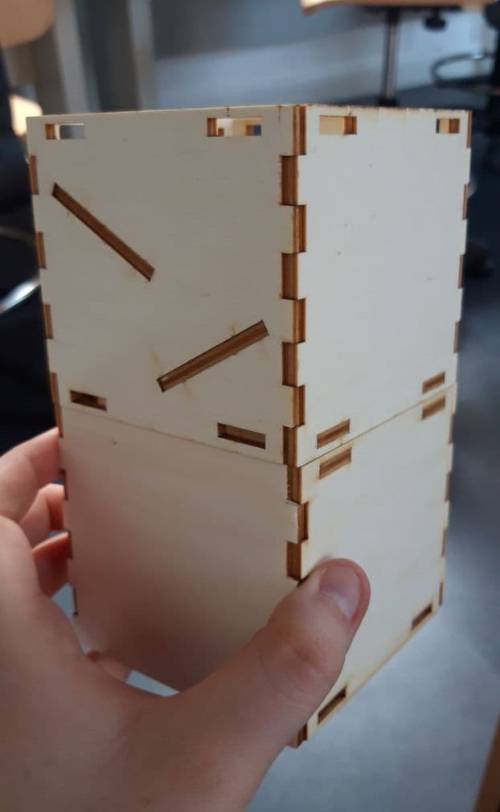
Assembling the boxes I noticed that it isn't really necessary to have these kind of joints along all four walls of my work so I decided to modify a bit the design of my project and transform all "B type" walls in pieces without holes. I went again to the laser cutter and I started working on them, trying also to do the "Front Door" of the Tower in order to let the dices roll out easily when you drop them from the roof of the tower. So, I made some tests and I also tried a simple engraving to see how that turned out!
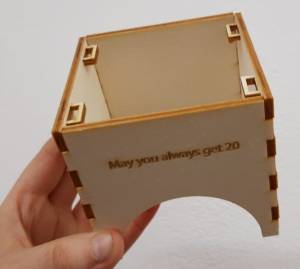
I'm kinda happy with my first attempt with this Week, but my Tower is far from perfect. I still have to figure it out how to make the dices roll better on the inside, because the joints are not enough to trouble them and make them roll, I'll have to figure that out - but for this week's assignment I think it went pretty well. The joints work, the kerf in the end worked as well, and my desire to try something different at the end proved to be satisfying - even if this project is nothing complex compared to other capable students that are out there around the other Labs in the world. For me, since I've never tried to do this stuff and I'm not very capable on my own, it's been a hell of a journey but a satisfying and rewarding one.
The Start of the new Week
[17th of February]It's not so bad, seeing it all together. I must admit, I will try to find some spare time sooner or later to try to make this Tower a better one, because right now it's not even near to the result that I would like it to have. This has nothing to do with getting a very complex model as a reference from the beginning, because I'm perfectly aware that I could never create something like the Ugears's Dice Tower, but maybe one day ... I will!

Given enough time and practice, maybe one day I'll at least be able to create this with better knowledge and, most of all, judgement, because seeing it backwards I realize that maybe with time I can develop a different and more useful mindset to do this kind of stuff. I'm not saying that I would change the idea and do something less pretentious, because I wanted to stick to the original idea even in front of a lot of failures, but I'm saying that maybe next time I'll try to find a better way to manage my time and the stress that I get from things that don't go the way I want them to. I'm rather stubborn so this might help out.
I'll try to work on this more in the weeks to come, if I find some spare time. I still have some of my wooden plank left with free space, so I might try something different with it or the possibility to add some platforms on the inside to make the dices roll better. So turn back here from time to time, you might find something new!
Updates
[20th and 21th of February
So, in the Weekend I started to browse a little more in search of things that could improve my Tower - since I don't want to give up, and if I don't have time I'll create it. I started working on my "A type" wall, and create some diagonal spaces where you can insert some tiny wooden planks that have the purpose of making the dices roll. And a few (... more than a few) tries I made it!

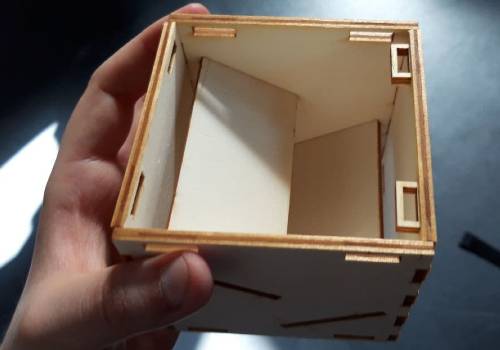
Now it makes the dices roll! It's still quite ugly, but you never know - I might decide to blow everything up and do this as my final project - with a lot of windows, balconies and medieval bricks.
Just kidding.
Download Files
DnD Basic Dice Tower