Mechanical Design (part 1 of 2)
Wednesday
.Design a machine that includes mechanism + actuation + automation .Build the mechanical parts and operate it manually. .Document the group project It is time to start building a machine, for this we will divide it into two parts, first there will be the mechanical design and then the design of its operation.
Introduction
¡Welcome to the Latin flavor! This first week of April, for our assignment, the Peru team together with Honduras has gotten creative but also super culinary. Here we will tell you everything we have done and created step by step for our machine.
¿Have you ever tasted Peruvian food? If the answer is no, we really recommend it, worldwide our cuisine has been recognized in various competitions and competing in different categories with many other countries, one of the most amazing things is the variety, both marine, Andean and jungle food offers us true original flavors that thanks to the biodiversity of our country and the amount of climates we have we can enjoy.
That is why this time we have chosen to make an invention that we are sure many will want to know, a Causa Machine! And what is a causa? Why did we choose this dish? Below you will learn all about this delicious dish from Lima.
Origin
For all of you who are wondering about this typical Peruvian dish, here is some information.
The causa limeña is a typical dish of the capital of Peru; Lima, this is a cold dish made of potato, yellow chili, lemon and has different presentations according to the type of preparation and filling that is placed. It is said that its name comes from the Quechua word kausaq, name given to the potato and whose meaning was "sustenance of life". Historical data indicate that the ancestors already had their version of boiled potato mixed with chili, this was called rokro or ruxru.
This was originally born in 1820 during the Liberation Expedition of Peru, which sought to free the country from the Spanish regime; the leader of the expedition was General José de San Martín. Well, in order to support those soldiers, some collections of inputs were organized to prepare food and sell it, so it was that having potatoes, in quantity, many women put their creativity to prepare it and thus generate income for the purchase of medicines, food and other things they needed for the war. It was then that to sell this dish was used the slogan: "For the cause" in reference to the struggle that was taking place, over time and thanks to the delight of the flavor that had been created, this dish was named Causa Limeña and so all Peruvian families enjoy it in their homes.

Preparation
Now that we know its history, let's know how to prepare it, here we will tell you some secrets. To create a Lima cause we basically need to use:
- Yellow potatoes - Oil - Lemon juice - Yellow chili - Salt and pepper - Hard boiled eggs, cut in slices - Black olives - For the filling: shredded chicken or fish, diced peas and carrots, and mayonnaise. and mayonnaise. In reality, many other ingredients can be used but the original cause starts with these main ingredients. To start with the preparation you need to take the potatoes, boil them, press them, spread them with oil, crushed garlic, salt, pepper and a few drops of lemon juice. Then different layers are placed alternating the potato dough with the filling, here is an image to understand the reference. As you can see, there are also different colors in the potato dough, this is because some ingredients of boiled vegetables in paste are added to mix with the potato, so you could have a cause of the color you like the most.
GREAT FUN FACT
In Peru there are more than 3500 varieties of potatoes, the largest in the world. Here we show you some of them and their characteristics. Take a look!
Yellow potato
This potato of an intense yellow color is the jewel in the crown of Peruvian potatoes and is used in a multitude of traditional dishes such as causa limeña, stuffed potatoes, mashed potatoes, or even as simple and delicious french fries. Its texture is earthy, so it is not recommended to boil it without peel or prick it to check the level of cooking.

Tomasa Potato
It is the popular white potato variety that has a longer cooking time and a more robust texture. In Peru, it comes from the Huancavelica and Ascension Valleys and can be found in most restaurants and fast food chains as fried potatoes or in the classic papa a la huancaina.

Huayro Potato
This potato has a cream color with purple tones, with an intense flavor and is recommended in stews or dishes with sauces as it has absorbent properties. It can be served boiled (cooked) with sauces, used to make causes, mashed, stuffed potatoes, potato cakes or baked in the oven.

Canchan Potato
Popularly known as "Rosada" potato because of the color of its skin, it has a pleasant texture similar to tomato paste and is usually used to prepare locro, stuffed potato or the traditional pachamanca. Its cultivation is not only limited to the highlands, it is also grown on the coast.

Huamantanga Potato
Tuber very appreciated in Peru for its flavor and texture, very similar to the yellow potato, while its appearance is more similar to the white potato. Of a smaller average size than other potatoes, they are an excellent option to be served fried, or to be used in stews or casseroles.
 Source:"Perú: el país de las 3,000 papas"
Excellent! Now we already know 5 types of potatoes, we only need 3495 :D
Causa Machine Design (part 2 of 2)
Actuate and automate your machine. Document the group project
Now that we know more about this delicious dish is time to elaborate a better explanation on my we decided to build the "Causa" Machine. Prepping this dish is not that complex do to its geometry (mostly cylinder) and it's separated by layer. The ingredients aren't supposed to be hot so we can eliminate the need of a heating element. Deciding the shape of the machine was an interesting task to accomplish. Now you'll see are workflow addressing this dilemma.


Many of the sketches that we initially made had reference to some 3D food printers. There is a variety of this machines that function with different mechanisms. Choosing the correct one is key to are success.

Causa Machine-Gurus
After gathering enough ideas that covered most of the machine's design, we turned to are teachers for advise. We would like to thank are instructor, Beno Juárez for helping us arrange a meeting with Chef José Duarte. He is a famous Peruvian chef, currently living in Boston. Chef Duarte gave us a lot a feed back on how to prepare the causa the correct way. Cooking the smashed potatoes the correct way is really important due to the texture it should have.
Causa Machine - Scans
After many conclusions about the preparation of a cause, and the considerations that had to be taken into account to make it work with our systematization, each one of us made a test of materials. The important thing in this phase was to explore the consistencies, because depending on the texture generated by the quantity of the ingredients, the dough could really come out in different ways. The following are some of the scans performed and their conclusions.
TEST 1 Ingredients: -Pink potato -Liquefied yellow chili -Tuna -Salad of green beans, peas and carrots. -Oil -Lemon
While running Test #1, we realized that the consistency of the pink potato had very high viscosity, therefore when testing extrusion through a cylinder it was very difficult to extrude. When I tried a plastic sleeve and put the ketchup cream it came out without any problem, but by adding the potato mixture new problems appeared. The current proportion wont help facilitate the extrusion of the material due to its texture. We need to achieve a more pasty texture.
With Test #1 we came to the conclusion that we have to try a different type of potato and experiment with the different outcomes to find the one that suits us more.
TEST 2 Ingredients: -BELLS Cause Mix -Water

The chosen material for Test #2 was a commercial dehydrated potato. Hot water needs to be added to the mixture. Changing the ratio of both ingredients changes the properties of the mixture. A 20 ml. syringe was used as an extruder to try to mimic a 3D printer extruder. The tests evaluated the uniformity of the extrusion, the adhesion between layers of the mixture, and the resistance of the mixture to collapse when forming thin walls or several layers.
Conclution The consistency of the mixture obtained with these ingredients seems very promising due to the simplicity and speed of execution, it has good mechanical properties when extruded in a syringe, homogeneous material and it adheres very well between layers of the same material. The thin walls of a row do not collapse under their own weight and the overlapping layers do not collapse or lose consistency when allowed to sit for several hours. One con of this mixture is that unlike natural potatoes, the result is sticky and with a texture more similar to a puree than a causa, but that can be corrected with the addition of a binder such as flour or cornstarch but considering the possible change in taste.
TEST 3 -Conchan potato || Yellow potato + Conchan potato || Yellow potato -Vegetable Oil -Lemon -Salt -Shredded Chicken -Mayonnaise

In Test #3 we used conchan potato and yellow potato (they are the most common to prepare causa) and the ratio in 50/50. Extrusion was tested with a stainless steel plunger and with a syringe. The mixture contains oil, lemon and crushed potato. Everything is stirred, but it is not kneaded. This gives the dough adequate plasticity to be handled and extruded and it doesn't stick to the walls of the plunger. The resistance and continuity of the material used as filament of the three types of mixture varied, although all three had the same proportions.
Conclution In Test #3 we observed several qualities of these potatoes. The mixed Conchan potato gave us good filament like extrusion properties. The 50/50 ratio between yellow potato and Conchan gave us average filament like properties because it breaks a little when it comes out through the extruder. The yellow potato gets too segmented when it comes out of the wide extruder and gives us bad filament like properties. However, the three mixes are improved by being in a thinner extruder like the syringe. Conchan potato is drier, on the other hand, yellow potato resulted in a mixture very similar to plasticine. We also tried a mix of powdered potato bag with water mix, and this results in a much more uniform mix. Therefore, I can say that the previous process of how we mash the potato is very important. We must pulverize the tuber very well so that we get a homogeneous mixture and with fewer air bubbles, which does not fragment so much.
Causa Machine - Design definition
Now that we have a better understanding of the material, we can elaborate a design that makes easier the handling of the potatoes. A second meeting with Chef Duarte and Beno helped us settle on a better potato ratio and an interesting machine design. The idea of an extruder was eliminated. The machine wont work like a 3D printer anymore. Acquiring the components will be are new problem because Peru is going to complete lockdown do to the upcoming holydays (COVID-19 percussion measures).
For the first iteration we thought of an extruder that had a central container. In this container all the ingredients to create a "causa" would merge and extrude to make aa final product. Taking to account the amount of time we have this design generates a lot of complication. The biggest problem would be finding the best way to move the ingredients to the main chamber. We would probably face the problem of air gaps in the extruders.

The second iterations has a completely different method. Beno (are instructor) gave us a really good idea. A machine with a cylindrical geometry. The machine would push the needed materials to the top surface and somehow assemble them to create a "causa". We started designing around this idea to create something different and fun. The machine could eventually become modular.

Third iteration is basically the same as the second. The only difference this one has is that an ink extruder on the top of the machine. The point of this was to create a hidden shape between the potato layer. The only way of seeing the hidden shape is by taking a bite. The ink extruder was discarded because Chef Duarte told us that this would add moister to the potato. Doing this would increase the difficulty of manipulating the potato.
The fourth iteration has a lot of mods. The machine will be divided in layers like a "causa". On the top the "causa" will be assembled with the help of a clock hand like part. The potato and the toppings will be enclosed in cylinder. This cylinder will work like pistons with the help of some stepper motors. On this point the mechanism is almost complete. Now we have to design everything in a way we can fabricate the parts whit the machines and material at are disposal.

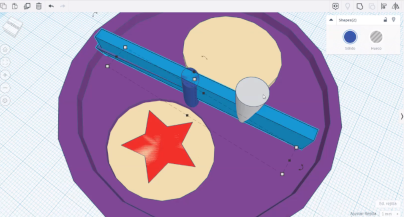
Fifth: In addition, a rotary plate is considered, which could solve the cutting precision and the movement of the material.

Sixth: With respect to the mechanical system, it is considered to have 4 pistons in the lower part so that together with the motors a vertical movement is achieved, in this way the cylinders containing the materials are raised and in this way it is possible to have layers of potato dough and the filling.

Seventh: As a next step we made a redesigned and detailed proposal in SOLID WORKS, for this we had to detail the design of the parts and fasteners. One of the new proposals was to reduce the number of cylinders to optimize the system so we stayed with 3. The dimensions considered for each cylinder is 80 mm in diameter and 100mm high, the platform where these cylinders are placed has a measure of 250 mm in diameter and 5 mm thick since we have a material of these characteristics.

Eighth: Inside the cylinders

Ninth: Regarding the pistons

Tenth: To better understand the dimensions, we have this final scheme to guide us on the spaces needed for each element and components to be used.

In conclusion we will use three cylinders to place the materials, these will have three motors that will use couplings and studs to complete the system with the pistons and thus be able to lift the potato and avocado layers. Once the mechanical system and the general design were defined in a large percentage, we started to make a physical prototype. Let's take a look at the following segment.
Causa Machine - Fabrication
After generating all the possibilities in design both by hand and digital we decided to make a first mockup to place the components and really know the measures of the pieces we were designing, we had already had consideration about the necessary spaces when designing but it was time to make the simulation on a real scale. We resorted to distributed manufacturing since we are each at home without the possibility of meeting because of the confinement, those who have 3D printers at home were able to test some parts and then meet and discuss the necessary improvements in the design. Here we will show all the explorations that had to be done step by step.
The system has a job very similar to that of a cnc because we will handle 3 axes for each of the pistons, which is why the components we will use will be almost the same as those used to revive the cnc in past assignments .
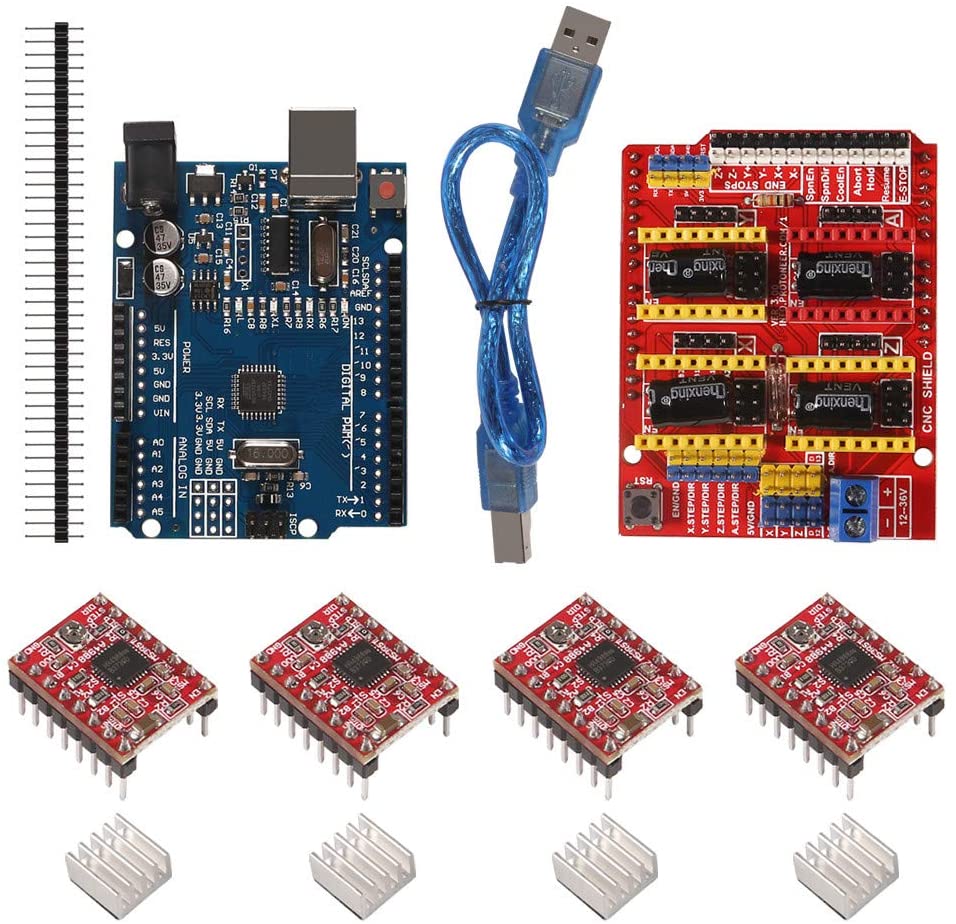
The motors we used were stepper motors because we need great precision but without losing power so that they can exert pressure when pushing the mashed potatoes.

These nema17 motors have to go together with some couplings so that they can be attached to the studs that will later be placed in their respective holes to be able to place the potato slices inside.

The electronic system was developed based on 4 motors which are bipolar stepper motors but placed in unipolar configuration so that they can be used with the driber a4998 of the cnc shield, on the other hand it is important to note that these motors are 0.8 degrees per step which was perfect for the task to develop, this whole system was controlled by an arduino nano that was recorded with the Grbl program.
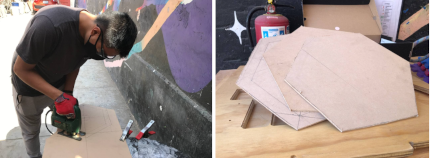
Once the electronic part is done, it is time to assemble the different platforms so that the rest of the machine can be assembled, for that hexagonal bases that were cut by hand were used.
Tentative location of the motors and mode of attachment.


Simulation of the location of the engines and cylinders with beer cans.

Trapezoidal nuts (T8) are used to connect the pistons to the rods in order to transform the rotary movement of the rods into linear movement of the piston (stroke) from top to bottom. These nuts are normally made of bronze. Due to the difficulty of obtaining them for the assembly of the machine, it was decided to print some models in PLA to test which one works better. The model chosen was this TR8X8 8mm Flange Lead Screw Trapezoidal Nut available in thingiverse. We decided on this model as it was the correct thread size for the rod, however the prints had to be post processed as there was some resistance to threading which was smoothed out by screwing and cleaning the plastic residue several times. The connection to the pistons is made by self-drilling screws, for a next iteration it can be solved by including the T8 in the piston impression.

First printing and tolerance test of the piston: The printing of the piston took about 4 and a half hours. The piston is designed to be printed without supports following the normal 3D printing constraints. The piston fits and slides inside a cylinder containing the cause material. The tolerance between piston and cylinder is 0.3mm so when printed both parts have considerable resistance to displacement. This is partly due to the print seam that has to be sanded, the texture of the 3D print that is not completely smooth, the initial "elephant foot" type extrusion that slightly widens the first layer of the piston, another printing error is slight protrusions at the ends of the four guides. All of these printing imperfections have been sanded out to improve movement between parts. A possible solution is that the tolerance can be increased perhaps up to 0.5mm to print both parts (piston and cylinder) in one print.
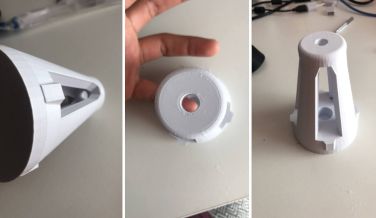


First printing and testing of the cylinder tolerances In this test we printed the cylinder which was 3mm thick and the rails for the pistons were 0.8mm, it was the first proposal taking into account some time constraints, we tried to reduce the volume of the part to take less hours of 3d printing. We tested it using some force, and the thinner parts broke, so we decided to use the original thickness of the part of 5mm.
PRE-ASSEMBLY RENDERINGS


FINAL ASSEMBLY
We were able to laser cut the parts in 5 mm polystyrene material, (material data sheet), this material seemed interesting to us to use because due to its transparency we could better visualize the internal process of our machine.

Parts of the machine structure.


Complete 5 mm polystyrene structure

Location of pistons and container cylinders in the machine structure.

Finally, a video was made that summarized all our experience at the time of making this machine, the video was made thanks to Mayra.