PROJECT MANAGEMENT
I signed and uploaded Student Agreement in week 1.
First weeks' assignment is design and build a personal website. To implement this I did the following: First, we download a startbootstrap template for my project web site.
![]()
After that I used visual studio code which is a open source-code editor made by Microsoft for Windows, Linux and macOS.
![]()
I started editing my website by changing page titles to be related to its contents.
![]()
The website became:
![]()
The next step is to upload the web site to Fab Academy cloud using gitlab. Firstly, I changed my gitlab account password. This GIT tutorial is very helpful to starting this task. After that I downloaded and installed git bash to create SSH key (Secure Socket Shell) .
![]()
Configure my Git username by typing: git config –-global user.name “Abdelfattah Alwerfalli”
Configure my email used in gitlab by: git config -–global user.email “abdelfattah@fablablibya.org”
next we use "ssh-keygen -t rsa -C "$abdelfattah@fablablibya.org" to generate ssh key.
the generated ssh key eill be something like:
![]()
After that I copied the generated SSH key to my profile on GitLab
Now it the time to download and install SmartGit to push my files to my gitlab account.
To communicate between my account and SmartGit, I clone with ssh key
I coped the link and paste it on SmartGit
![]()
Any change in the files will appear in the SmartGit window. To push it click on "stage" then commit & push
![]()
![]()
My essue: When I start using SmartGit, I faced an essue with cloning that I must clone every time I use it. I solved it in "preferences" by removing check from "Automatically set up tracking for new branches"
If you do not want to use a software to push your files you may push them directly using git bash command line. First steps are same, but instead of using "smartgit" you may use this commands: * Add the new files to git: git add xx.xxx upload file by fileFinally it works good.
git add . upload all files at once * Download the last copy from the repository: git pull * To have a working copy of your repo: git merge * Name updates to know what any changed: git commit -m ‘Updates’ * Upload to the Repository: git pushHTML, CSS and JavaScript work together to form the front-end design of a website by applying information that affects content, style and interactivity of a site. I prepared a tutorial about these languages. I will try to introduce them shortly.
1. HTML Language: HTML stands for Hypertext Markup Language, and it is the most widely used language to write Web Pages. HTML code structure: HTML is based on tags (<>). We have to know that: • All HTML documents must start with a document type declaration: which defines that this document is an HTML5 document. • The HTML document itself begins with < html > and ends with . • The visible part of the HTML document is between < body > and . • A tag is closed this way: . For example, < head > is closed with < /head >. • Changes are held between tags (For example, the code between < b > and < /b > becomes bold. The html tag: Everything is contained inside < html > tag. • It is a crucial tag. It tells the browser that the content is located between < html > and < /html>. • It is also called the “root” element. Body tag: The body element appears after the head element in the page. It should contain all the content of your web page: text, images, and so on. All web pages have 1 single body element, in order to understand the tags inside the body, we will divide them into: • Headings. • Text Formatting and Line Breaking Tags. • Paragraphs. • Images. • Audio and Video. • Links. • Lists. • Tables. • Buttons. • Forms and Inputs. The head tag: The head element contains information about the web page. You can put many elements inside of it such as: <Title => Sets the title of the page <Link => links elements to html, such as the page icon, CSS files...Etc. Heading tags: The HTML standard has five additional text heading elements, appropriately defined from < h1 > to < h6 >. They are considered as Paired Tags (We have to close them). Paragraph tag: The < p > Tag defines a paragraph in HTML. The browser breaks a line without the need of the < br> tag. Paragraphs are automatically separated by a line break.It's like when you write a paragraph in a word document, paragraphs need to be separated from each other to give them sense. For other elemnts, a short tutorial in next links: Images. Videos. Links. Lists. Tables. Buttons. Forms. Inputs.
2. CSS Language: Cascading Style Sheets (CSS) is a simple design language intended to simplify the process of making web pages presentable. CSS handles the look and feel part of a web page. Using CSS, you can control the color of the text, the style of fonts, the spacing between paragraphs, how columns are sized and laid out, what background images or colors are used, layout designs, variations in display for different devices and screen sizes as well as a variety of other effects. Linking CSS to HTML: There are three possible ways to attach CSS to HTML: Inline: by using the style attribute in HTML elements. Internal: by using a <style> element in the <head> section. External: by using an external CSS file. More details about linking in this tutorial.
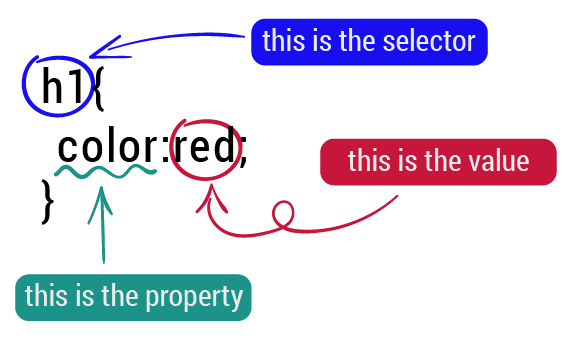
 CSS Syntax If we want to change the style of a particular element in our HTML page, We have to select that element. To do so, CSS provides a set of rules, each of which consists of a selector (To indicate which elements, you are trying to modify), followed by a declaration block that contains a set of properties and those properties values.
![]()
JAVAScript:
The job of JAVAScript in web development is to make the web pages interactive and dynamic. It is the most widely used scripting language on Earth. It has the largest library ecosystem of any programming language.
For instance, in-browser JavaScript is able to:
• Add new HTML to the page, change the existing content, modify styles.
• React to user actions, run on mouse clicks, pointer movements, key presses.
• Send requests over the network to remote servers, download and upload files (so-called AJAX and COMET technologies).
• Get and set cookies, ask questions to the visitor, show messages.
For training, I designed a shoping cart using JAVAScript as shown below:
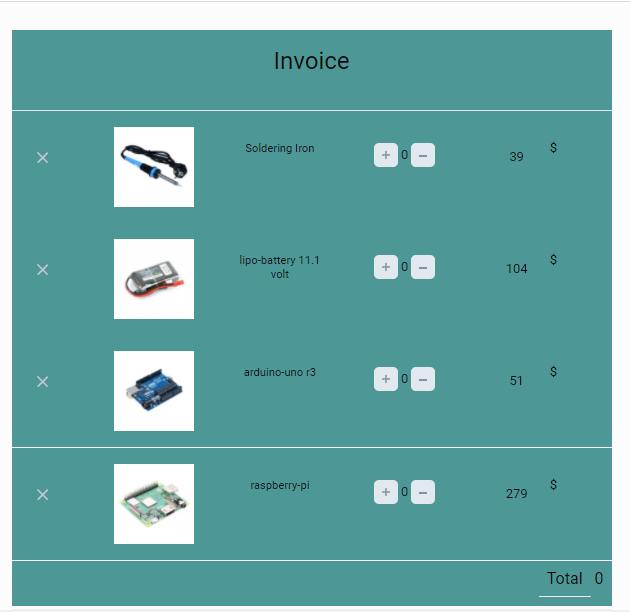
You may download shopping cart example from this link.
What I have learned?
Useful Links htmlreference.io "HTML". w3schools "HTML". tutorialspoint "CSS". w3schools "JAVAScript".