3D Scanning and Printing
WEEK 05
(28/02/2021 18:35 p.m.) Sunday afternoon. This week started with a lot of motivation. After Neil's class on Wednesdays, I was happy because we were going to rest with electronics and we were going to be able to design and print in 3D!! 😍😍
Thanks to the new and routine Saturdays that I spend with my crewmate Alberto (and his friend Javi, who taught us how to use the CNC machine) at the Fab Lab UE, I was able to relax and change a bit of mind.
Today Sunday, I have decided to sleep a little more, I have gotten up, I have sat down to work, I have put on epic soundtracks music and I have focused a little on what I can and cannot do for this next Wednesday.
The week is not being as productive as I would like, but despite it ... Let's move on!! 💪💪
The week song changes radically. I do not know if, you, reader, have read the Saga A Song of Ice and Fire or have seen at least Game of Thrones. As a geek, I belong to the Targaryen team, so the week song is Dragonstone by Ramin Djawadi.
NOTE: If you haven't watch the series, here, this is the scene from Game of Throne, where Daenerys Targaryen lands on the island where she was born, Dragonstone. Here you can see two of my favorite places in the North of Spain, the Flysch in Zumaia (Guipuzkoa) and the stairs of San Juan de Gaztelugatxe (Bizkaia).
Shall we begin? 🐲🐉
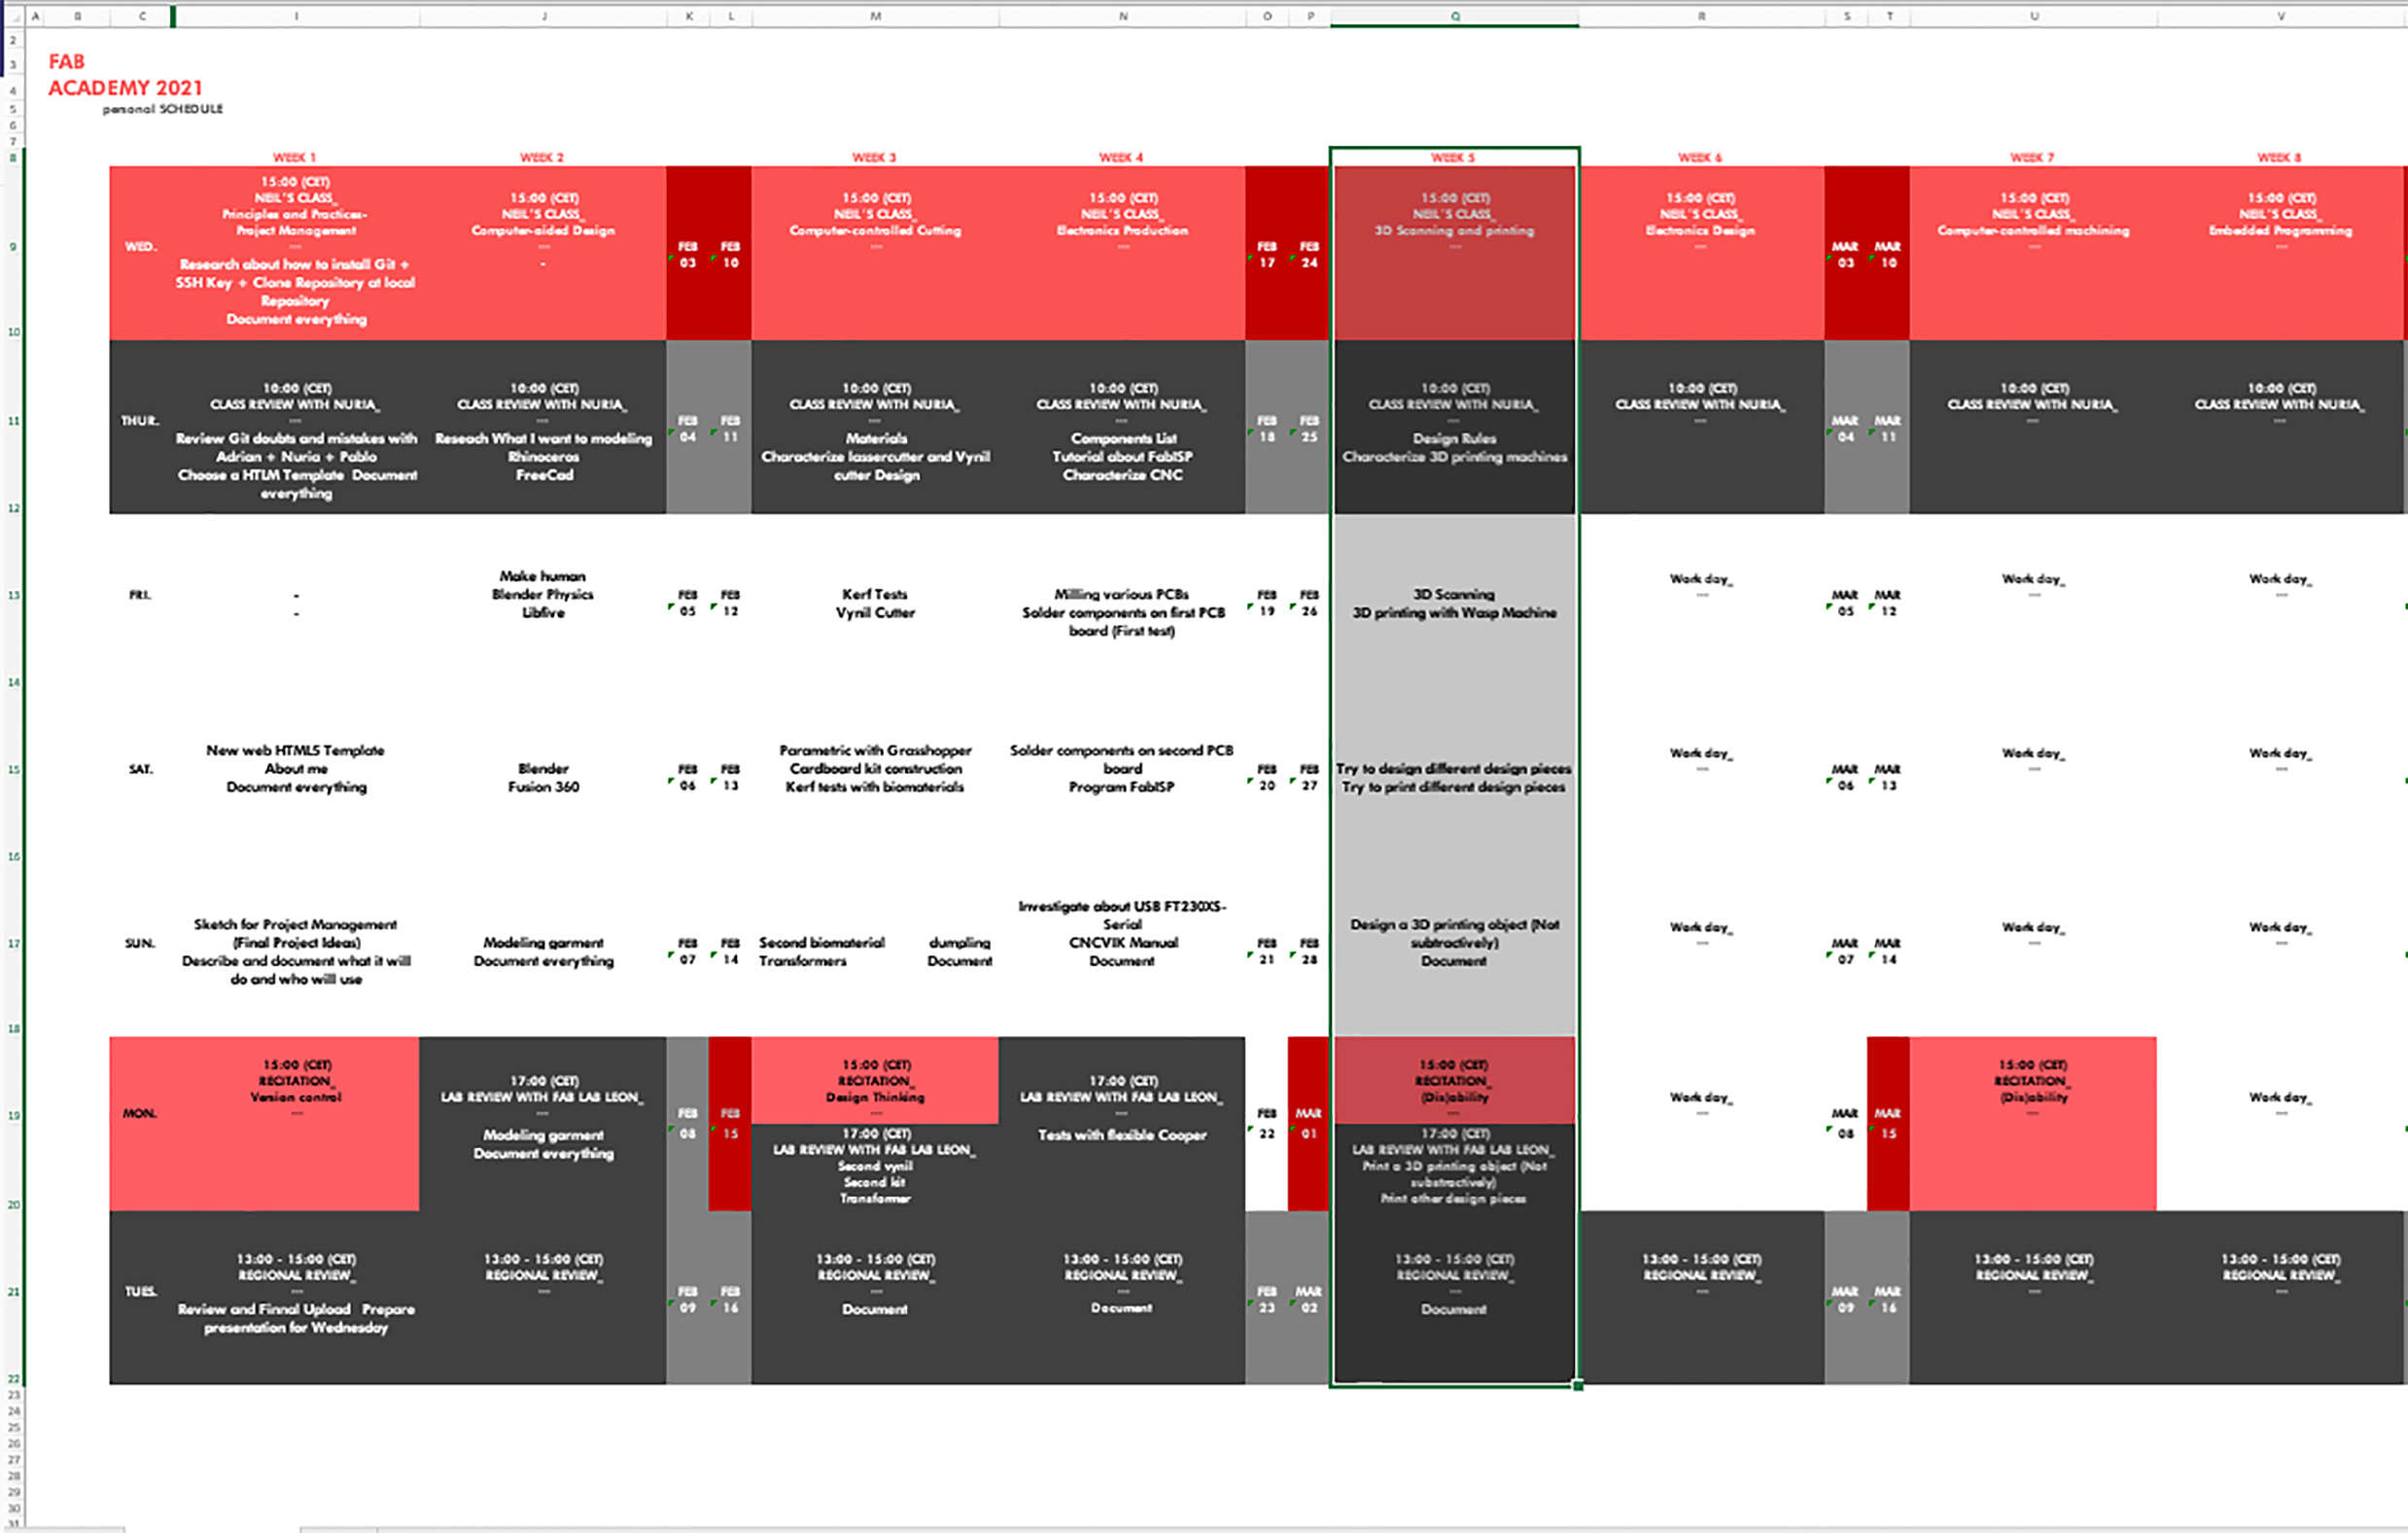
Organizing tasks
Like last week, we have again two types of assignments, one's group and other individual. So as usual, I organize my schedule and here the following Evaluation Criteria that we have to approach to complete the Assignment:
- ✓ Characterize the design rules for our 3D printers
- ✓ Document our work with the 3D printers and explain what are their limits and what are we learned from testing the 3D printers
- _3D Printing
- ✓ Design and print a 3D model object (few cm3, limited by printer time) that could not be made subtractively
- ✓ Explained what you learned from testing 3D printers and the 3D printing models done
- ✓ Included our original design files for 3D printing. (Both CAD and 3D printing format files)
- _3D Scanning
- ✓ 3D scan an object
- ✓ Documented how we scanned
- ✓ Prepared an object (for 3D printinng) and included our original 3D Scanning object file. (Both CAD and 3D printing format files)
Extra credit
- ✓ Include a "hero shot" with our 3D printing and scanning models
- _3D Scanning
- ✓ Print it our 3D scan object
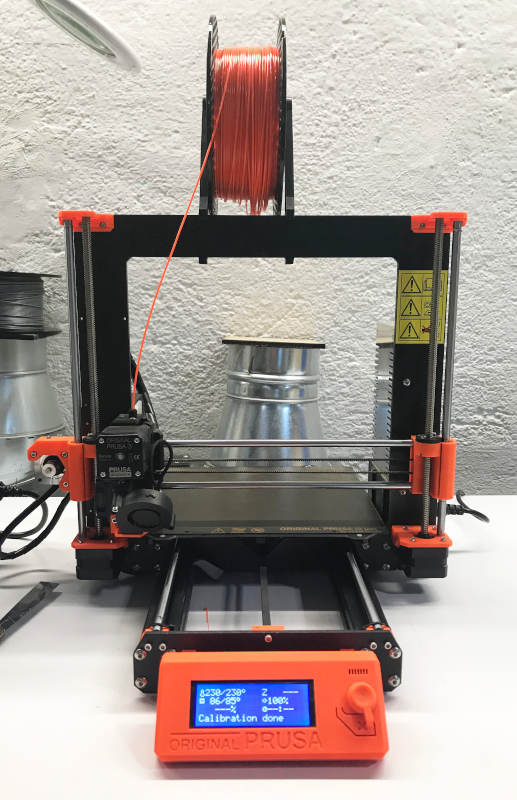
- PRUSA MK3 - MK3S
- Model: Prusa MK3
- Type: FDM (Fused Deposition Modeling)
- Nozzle Diameter: 0.4 mm
- Layer Thickness: 0.05- 0.35 mm
- Filament Diameter: 1.75 mm
- Build volume: 250 x 210 x 210 mm
- Slicer: PrusaSlicer
- Materials: PLA, ABS, PETG, ASA, FILAFLEX, Wood Filament
- Temperatures to work:
- PLA: 215º Bed: 60º
- PETG: 230º Bed: 85º
- FLEX: 240º Bed: 50º
- Others Automatic Mesh Bed Leveling, Automatic Axis-Perpendicularity Compensation, Removable Magnetic Bed.
- CREALITY ENDER-3
- Model: Creality Ender-3
- Type: FDM (Fused Deposition Modeling)
- Nozzle Diameter: 0.4 mm
- Layer Thickness: 0.1- 0.4 mm
- Filament Diameter: 1.75 mm
- Build volume: 220 x 220 x 250 mm
- Slicer: Cura
- Materials: PLA, ABS, Wood, Flexible, Carbon Fiber, PA...
- Temperatures to work:
- PLA: 221º Bed: 60º
- Others Manual Mesh Bed Leveling, Automatic Axis-Perpendicularity Compensation, Removable Glass Bed.
- DELTA WASP 3MT 3.0 INDUSTRIAL
- Model: Delta Wasp 3MT Industrial 3.0
- Type: Pellet Extruder
- Nozzle Diameter: 3 mm
- Layer Thickness: 2-6 mm
- Pellets Diameter: 2- 6 mm
- Build volume: Ø 1000 x h1000 mm
- Slicer: Cura
- Materials: PLA, ABS, PETG, TPU, Polypropylene
- Temperatures to work:
- PLA: 220º Bed: 60º
- Others Manual Mesh Bed Leveling, Automatic Axis-Perpendicularity Compensation, Removable Glass Bed.
- DESIGN RULES FOR THE 3D PRINTERS
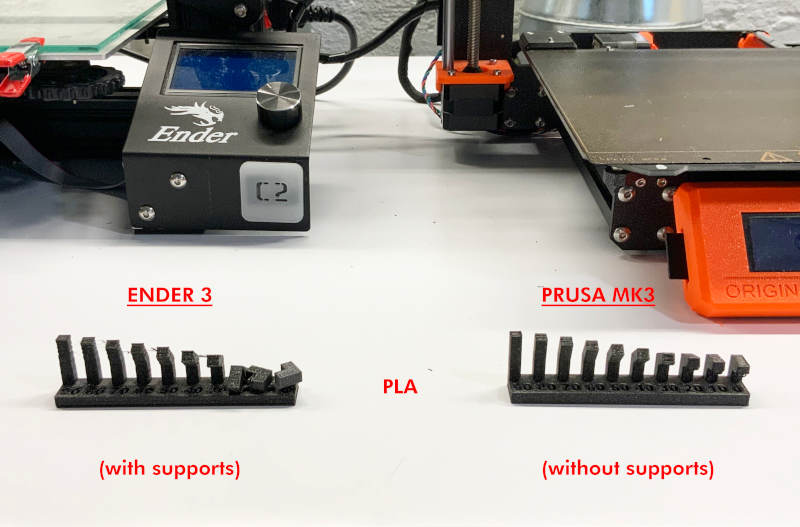
- Ender3. At 20º needs supports. On this model we added supports, and when they were removed the piece was very fragile and it broke. The angle test takes 2 hours and 4 minutes.
- Prusa MK3. At 20º needs supports like Ender 3. On this model we didn´t add supports, it is resistant and in one piece. The angle test takes 54 minutes.
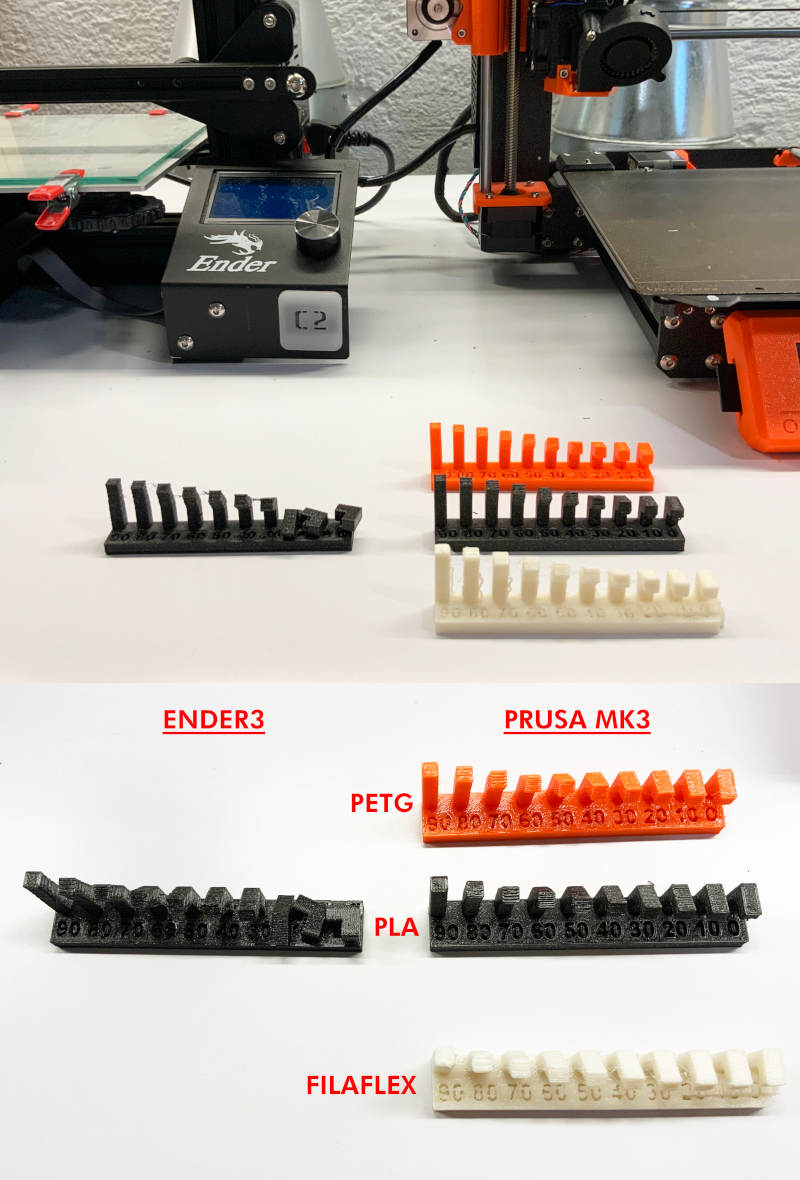
- ABS. With the ABS filament, we had problems getting the filament to adhere to the base. After several attempts we had to give up.
- PETG. At 20º needs supports. On this model we didn´t add supports, it is resistant and in one piece. The angle test takes 1 hour and 4 minutes.
- PTE (Filaflex). At 20º needs supports. On this model we added supports, but it is not highly recommended to put them on, since the material is very elastic and it costs a lot to remove them. The angle test takes 2 hours and 15 minutes.
- DESIGN AND 3D PRINT AN OBJECT THAT NOT COULD BE MADE SUBTRACTIVELY
- PRINTING WITH FILAFLEX
- EXTRA CREDIT_ FIRST SHOTS FOR MY FINAL PROJECT
- Armor Links. STL
- Armor Links Voronoi. STL
- Filaflex Textile Test Stripes Threads. STL
- Filaflex Textile Test Curly Threads. STL
- Bracer Base.STL
- Bracer MeshMixer. OBJ
- Voronoi Bracer.gh
- Bracer Voronoi Superior.STL
- Bracer Voronoi Interior.STL
- Hydroalcoholic Pot.STL
- Lorena´s Bust Broken.STL
Group Assignment
3D PRINTERS
At Fab Lab IED Madrid we have a specific room where we have small 3D printers located. Around the fab lab, you can find other types of small printers that are old, not working and are for decoration. 🤣
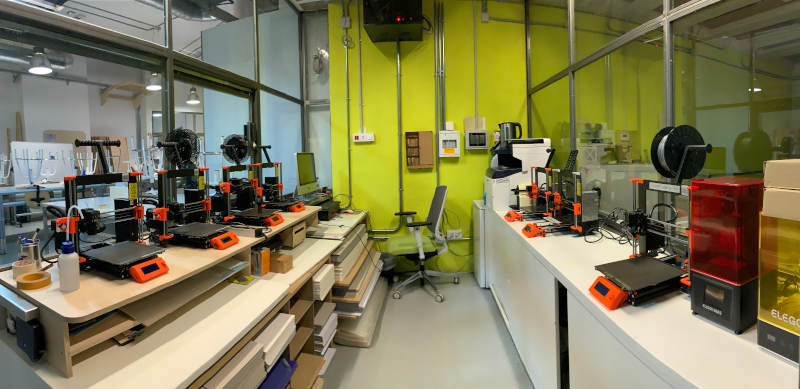
But, mainly, we use these three types of 3D printers:
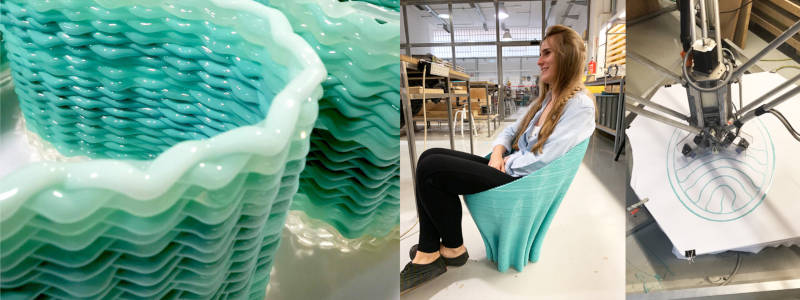
(18/01/2020 11:58 a.m). My first contact with the 3D printers, and specifically the Prusa´s, was last year in theMaster of Fashion Futures, where we ventured to try to print PLA filaments in elastic textiles such as lycra. In my case, I dared to test the machines trying to create volumetric patterns on the fabric using Filaflex and PLA on top. These were some of the tests, successes and mistakes I made on textiles.
(25/02/2021 17:34 p.m). After a year without using a 3D printer, I had to be re-instructed about the machines uses to refresh my memory 😅. Thanks to the technicians of the fab lab, Luis and Gonzalo, they have re-taught me how to calibrate and use other filaments that I had never tried before.
These 3D printers are the ones we mainly use in the manufacturing lab to print small objects. One of the advantages of Prusa is that it is self-calibrating and has a removable magnetic bed. This is very useful to avoid having to calibrate the printing tray every time we finish printing a piece, and in the case of textile printing, the magnetized bed allows the fabric to be held with the same force as the magnet.
However, every time we move the base, we have to recalibrate the first layer. In the case of PLA, Filaflex and PETG, for the best adherence of the material to the base, the Sheet Smooth is located at -1.825. While if we print on fabrics (lycra in my case) the Sheet Smooth adheres better to -0.7809.
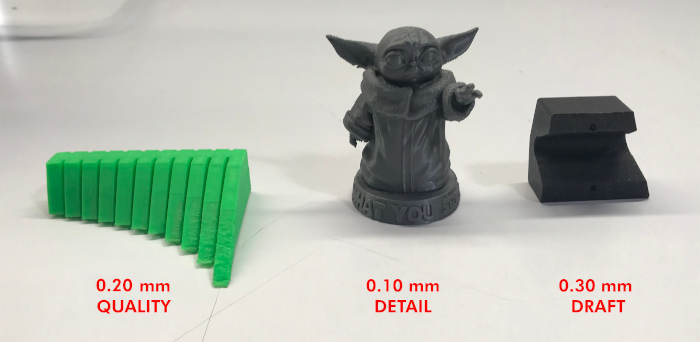
Before printing, with the PrusaSlicer software, we can modify the printing settings of the printer to achieve more or less detail in our models.
At the fab lab, some tests have been done using some of the extrusion sizes. When more definition the object has, less the extrusion thickness should be.
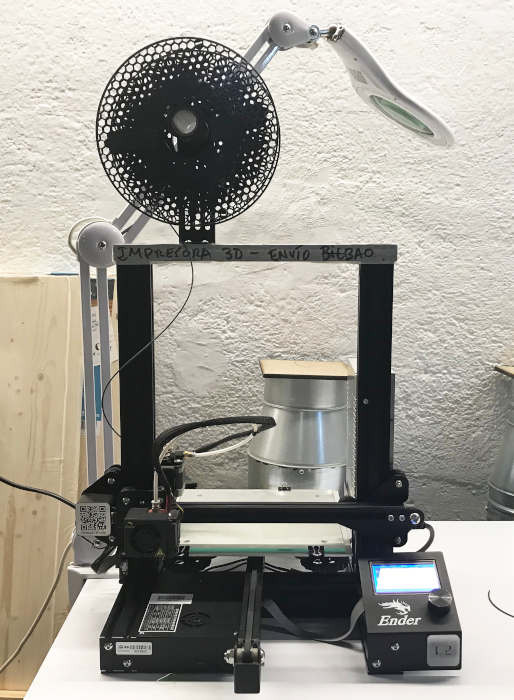
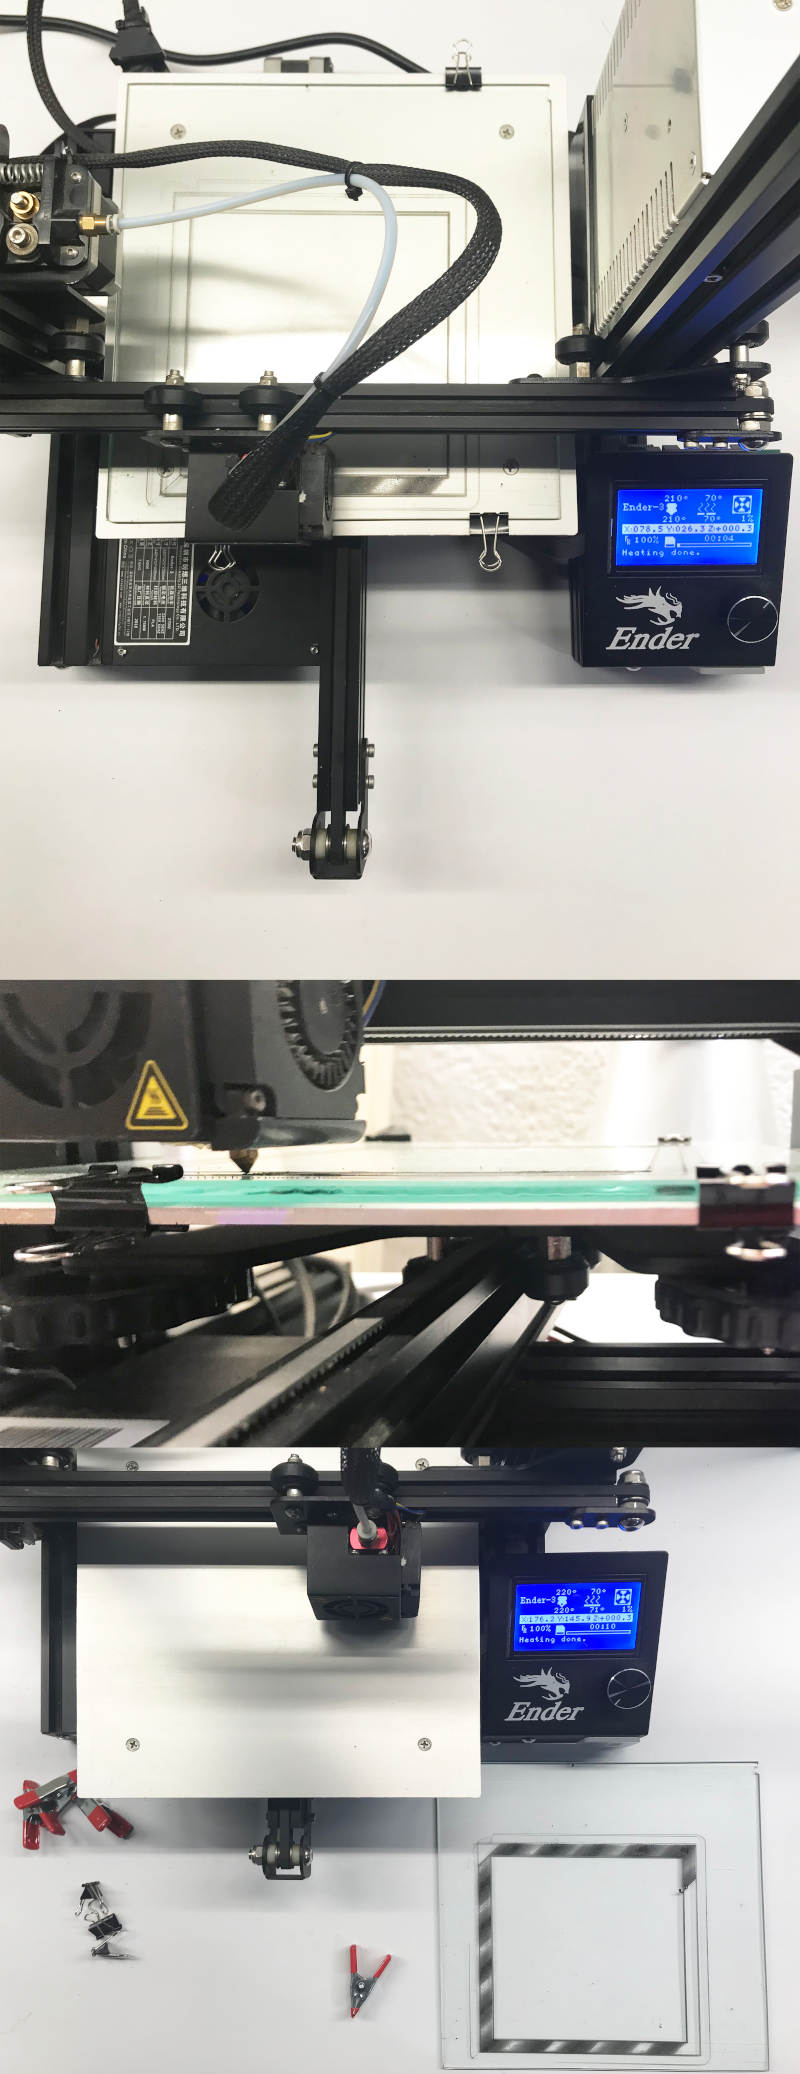
(25/02/2021 17:21 p.m). With the Ender 3, I had a bit more trouble calibrating the base. Unlike the Prusa, the calibration is manual and the base, made of glass and without any type of support, is very sensitive to movement. Here you can see the manual clamping system of the glass tray, using clamps.
In addition, the fact that we have to calibrate almost every time we launch an object to print, means that we cannot use all the filaments indicated by the manufacturer. Only with PLA we achieve an optimal result. I tried ABS and Filaflex but as I started to print, the filament did not adhere well to the bed. 🙂🙃
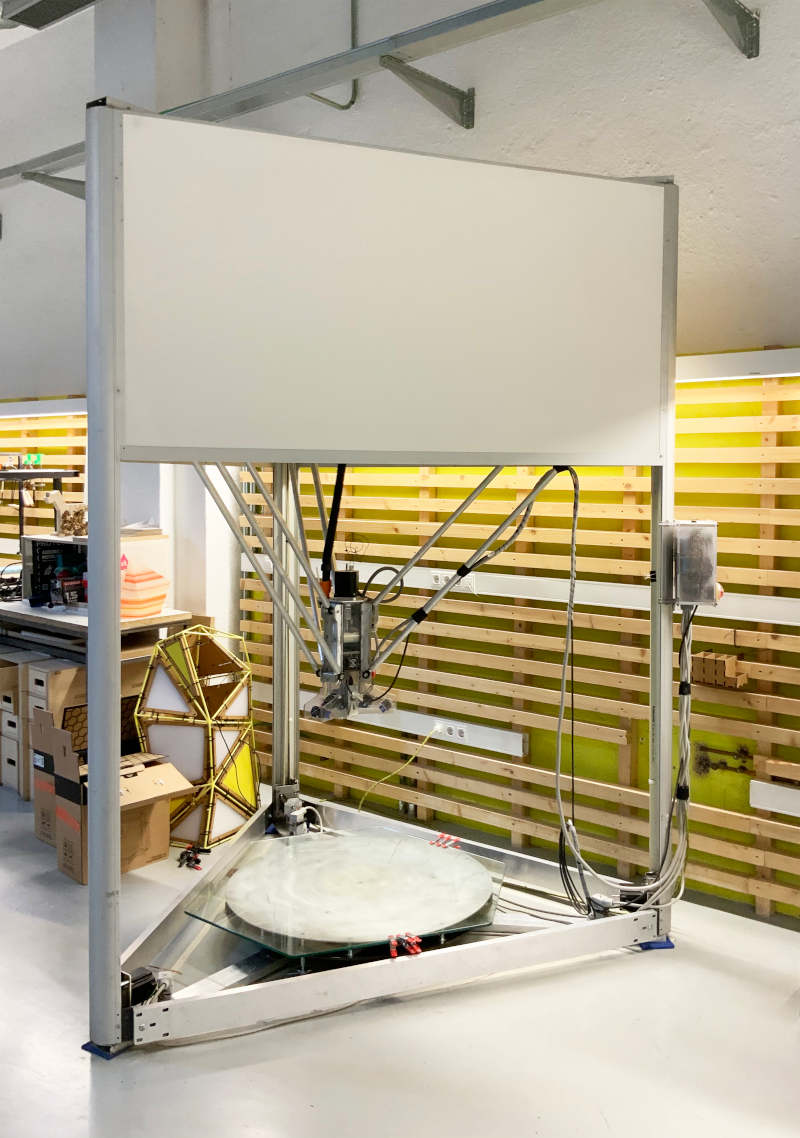
The Delta Wasp is one of my favorites 3D printer, along with the Prusa MK3S. It is a machine that works with Pellets and allows printing large objects.
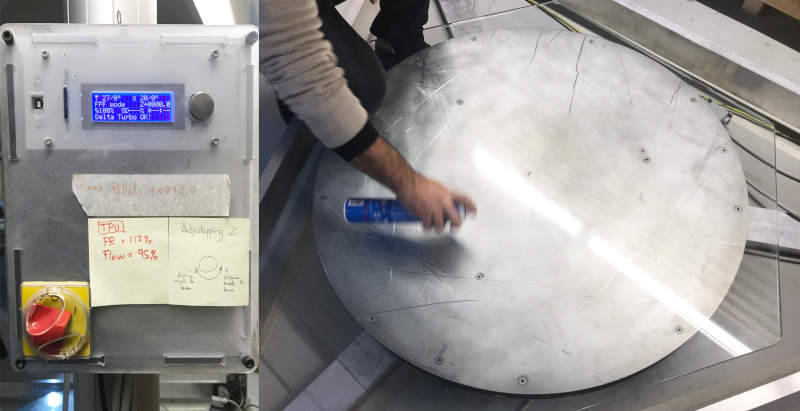
For its correct operation, we have to calibrate the extruder and the removable bed (also with glass base) manually. In this printer it is very important to clean the base well and use plenty of hairspray for the best adhesion of the object to the glass base.
(23/12/2019 15:00 p.m). With this machine, we were able to work a lot last year with the Master of Digital Fabrication to create colored furniture and print on fabric with PLA Pellets.
(25/01/2020 19:27 p.m). It is also possible to change the extruder for an FDM type. In this case, we made the switch to be able to experiment on a large scale with 3D printing on Lycra from Filaflex + PLA.

To carry out the desgin rules for printers, I have used one of the tests that Neil taught us in class (with and without supports): the angle model.
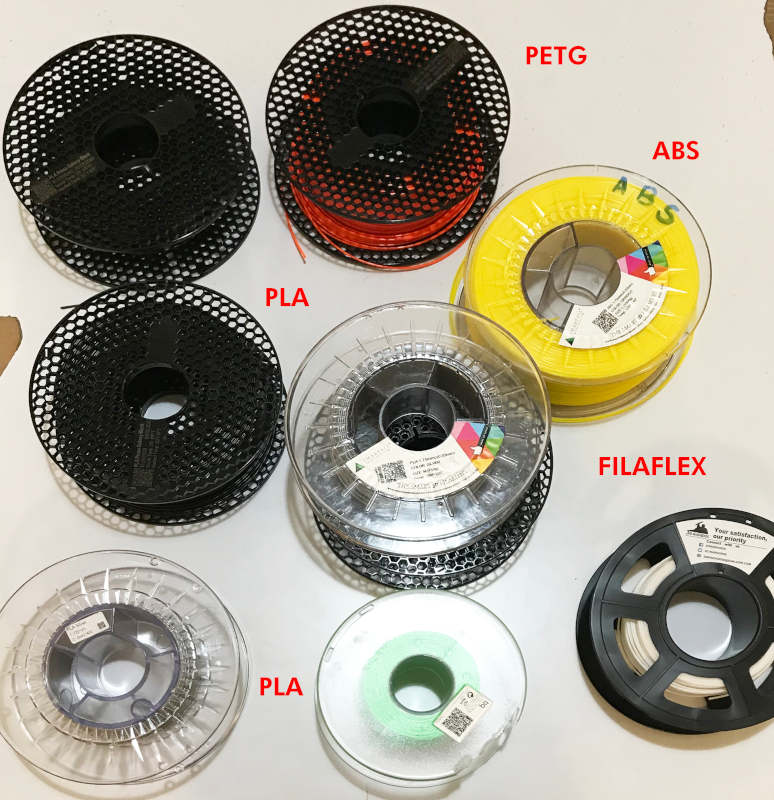
At the fab lab, we have several types of materials, with we are going to experiment to print our angle model. We mainly have PLA (of different colors and textures) but we also have PETG, ABS and PTE (Filaflex).
I started using the same type of PLA to compare the Ender 3 and Prusa MK3 (with and without supports) printing type. These were the results:
Later, we wanted to try the same test with other types of materials to: check the time, the type of extrusion, the finish and the properties of each material.
(25/02/2021 21:08 p.m). With the Ender 3 printer, we started using ABS, but as it was printing, it clogged and I couldn't keep working with it. 😭
In the case of the Prusa MK3, we were able to run some interesting tests with:
Individual Assignment
3D PRINTING
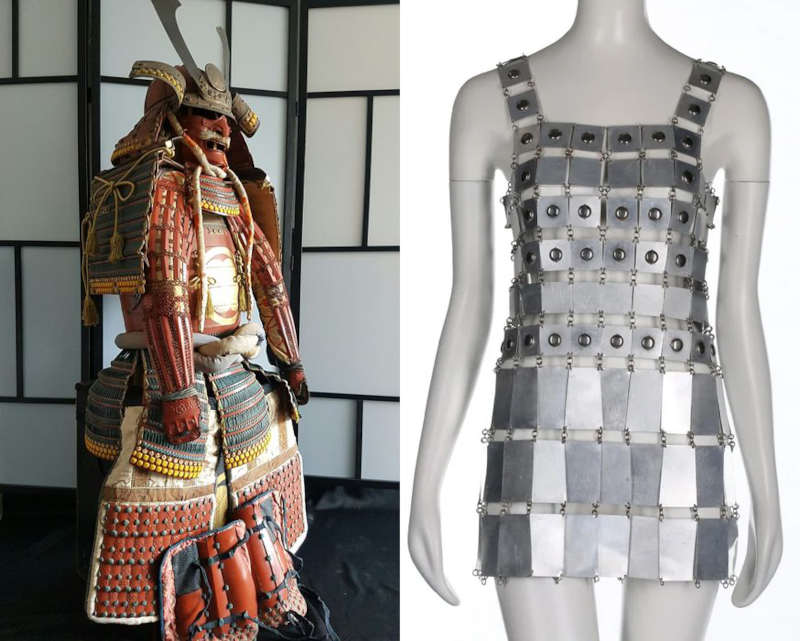
To carry out the design, I looked for references of rigid woven fabrics, and automatically I thought of medieval armor, specifically those of samurais and Paco Rabanne´s suits made of metal plates in the 60-70s.
Thinking about the links of an armor, I designed a geometric piece that could interlock between itself vertices and in the midpoints of its curved edges.
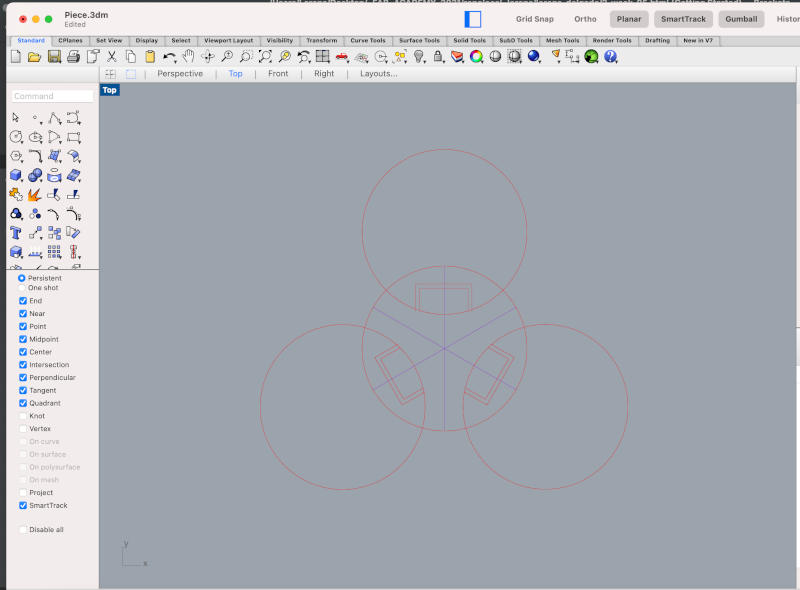
At first I wanted the piece to be joined in the most geometrically pure way possible. But after several attempts and designs, I discovered the best way to interlace the vertices to achieve movement between them was by means of rectangular hooks at the midpoints of their edges.
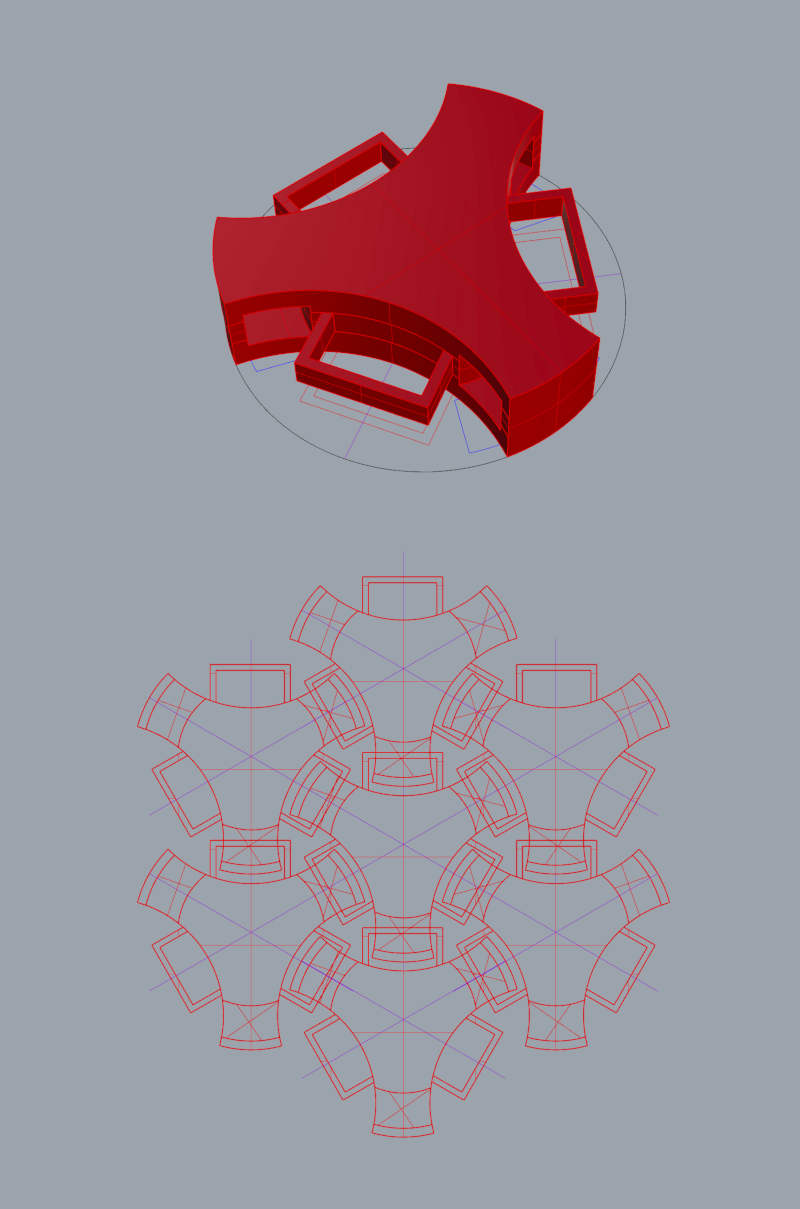
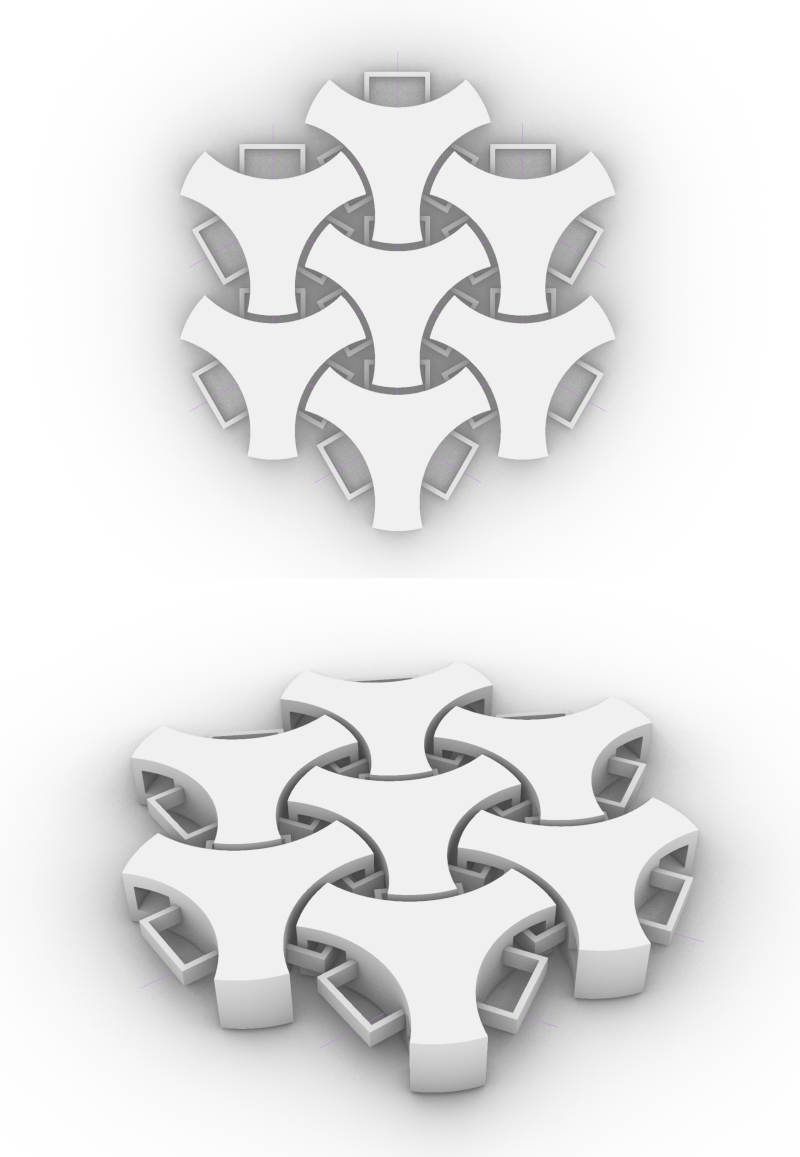
Here you can see a render of the final result of the interlaced links. Armor Links. STL 😍
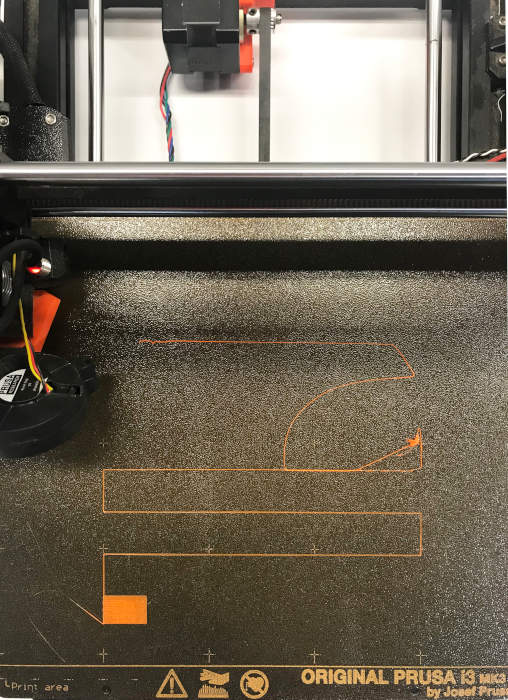
Once our design is finished and exported as a .STL or .OBJ file, I import the file into PrusaSlicer to obtain the .gcode that will print the armor pieces on our Prusa MK3S. 😊
As the rectangular hooks of the edges are "in the air", it is necessary to place around the piece several supports so that it prints well.
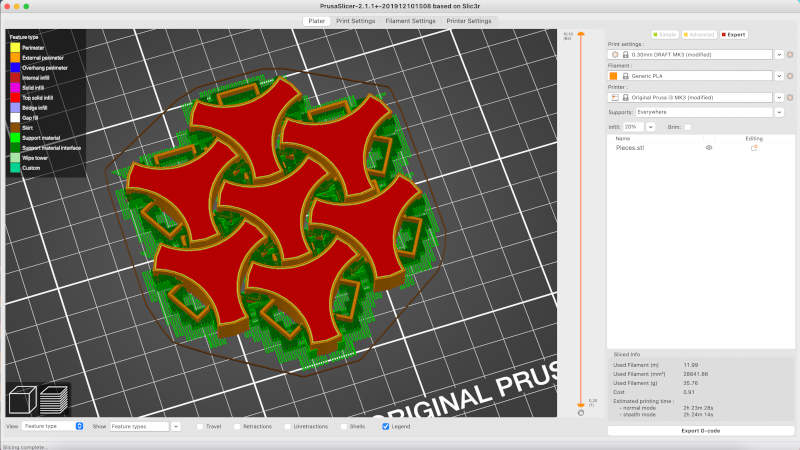
Obtained the .gcode file, we started to print our file with a special PLA filament of space brown color. 😮😮
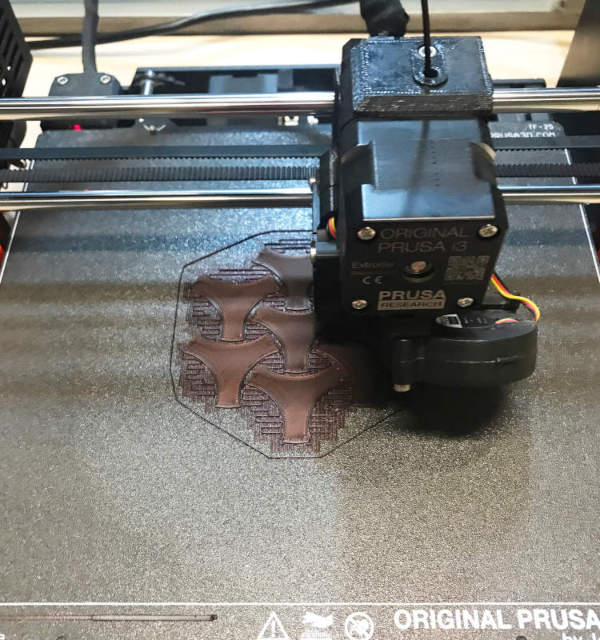
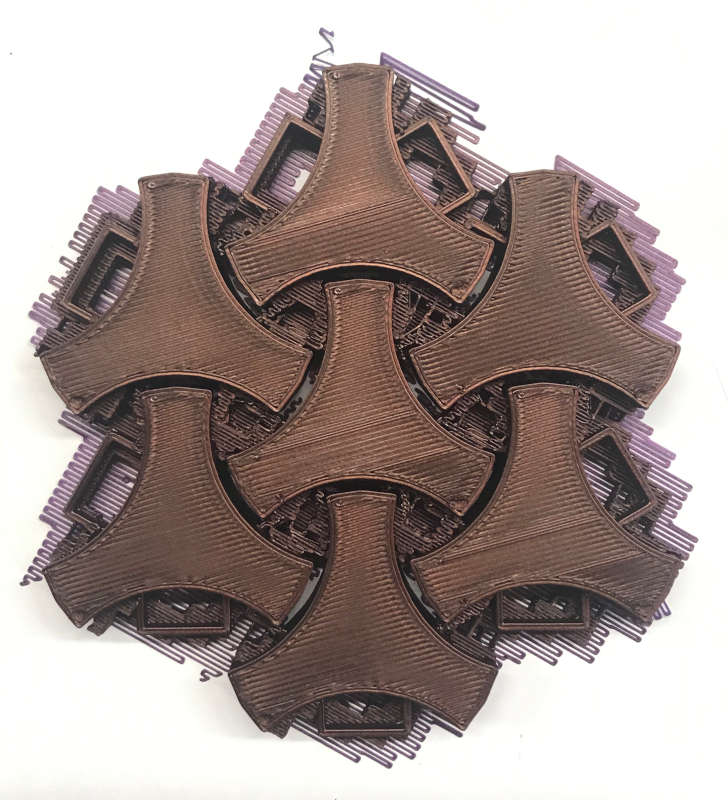
After 2 hours and 54 minutes of printing, the end result was success! 🎉🎉 The PRUSA MK3S did not give any problem when printing and the effect of the filament was very good.
(01/03/2021 16:37 p.m). The only drawback was, when we added the supports to the piece, I put on PrusaSlicer software supports Everywhere and it made supports inside the holes of the vertices. These little mistake had very difficult to eliminate in the inner vertices of the center. 😅
Here you can watch a short video of the final piece and the movement tolerance between the interlocking links.
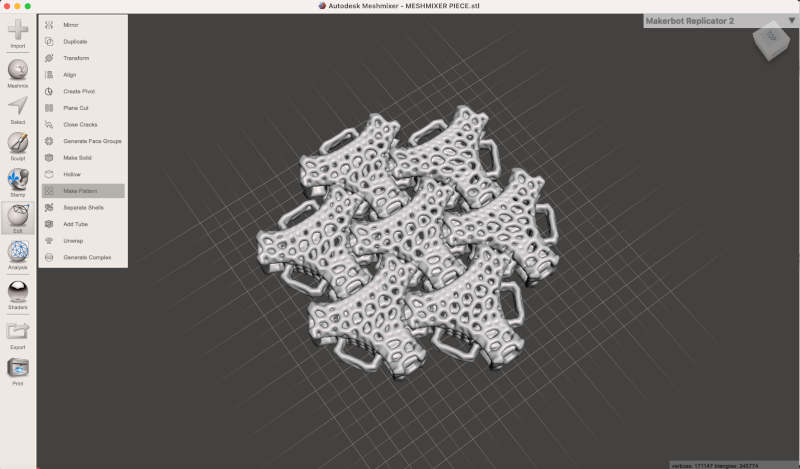
To give the piece a more organic look, our instructors from the Fab Lab León 💚 shared with us some links on how to use some design tools in MeshMixer.
In my case, I ventured to use a Voronoi pattern using Edit > Make Pattern tool.
To print this new design, my instructor Adrián 💚 recommended me to update my PrusaSlicer software to Version 2.3.0+. This update includes a new tool called Paint-on supports. It is a kind of paint brush that allows you to draw manually where you want to put supports or not. (For this, it is important on the right bar > Supports we have it in: For support enforcers only).
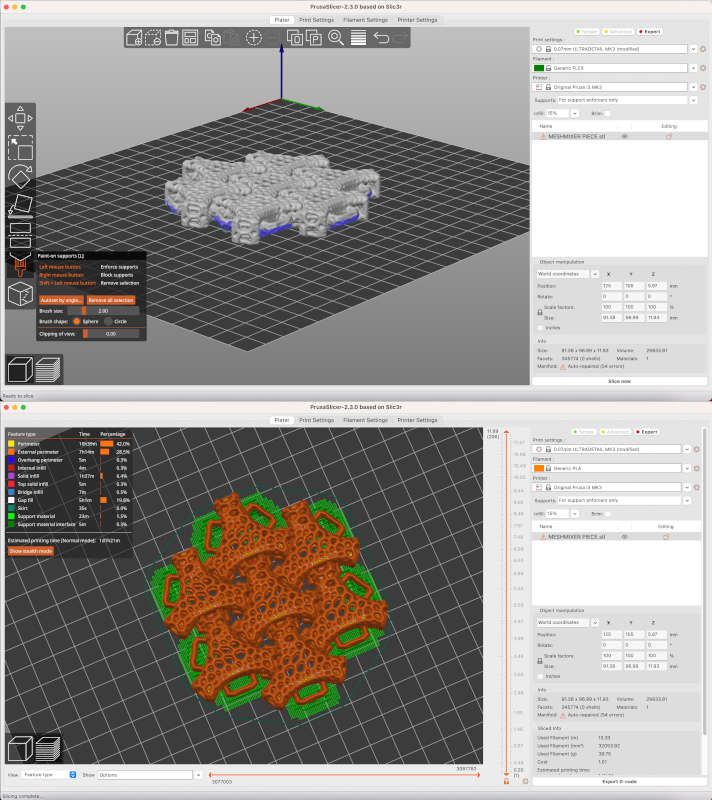
The issue I had with this model was when calculating the printing time, PrusaSlicer estimated that it could take 15 hours and 24 minutes 😱😱.
Given the time it was going to take, I preferred to focus on another kind of test with the 3D printer, and I left this design to print in the near future.
Here you can see a 3D model of the final piece. Armor Links Voronoi. STL
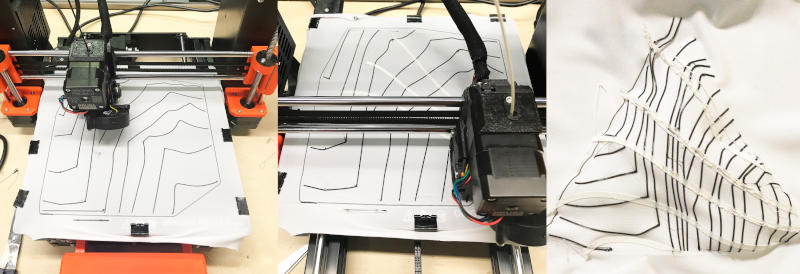
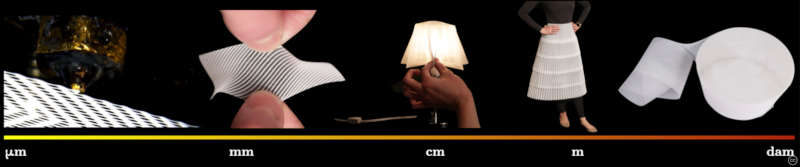
During last Neil's class, I was excited about some projects from MIT Media Lab was doing with their DefeXtiles project.
This project reminded me very much of my previous experience with 3D printing on textiles, and I was enthusiastic to see that it was possible to extrude meters and meters of 3D printed textiles.
And it gaves me an idea. Could I create my own 3D fabrics from zero for my wearable final project? 🤔
To start with, I thought I would design a small textile piece swatch in Rhinoceros. The first thing, I created a thiny 0.1 mm bed on which I added some horizontal stripes of 0.3 mm high that would simulate the spinning of a fabric. Filaflex Textile Test Stripes Threads. STL
When I export the file to my PrusaSlicer software, the program does a very curious thing. When creating the Slice now, the program recognizes the horizontal stripes as stripes that must be printed on the bias 😳🤷.
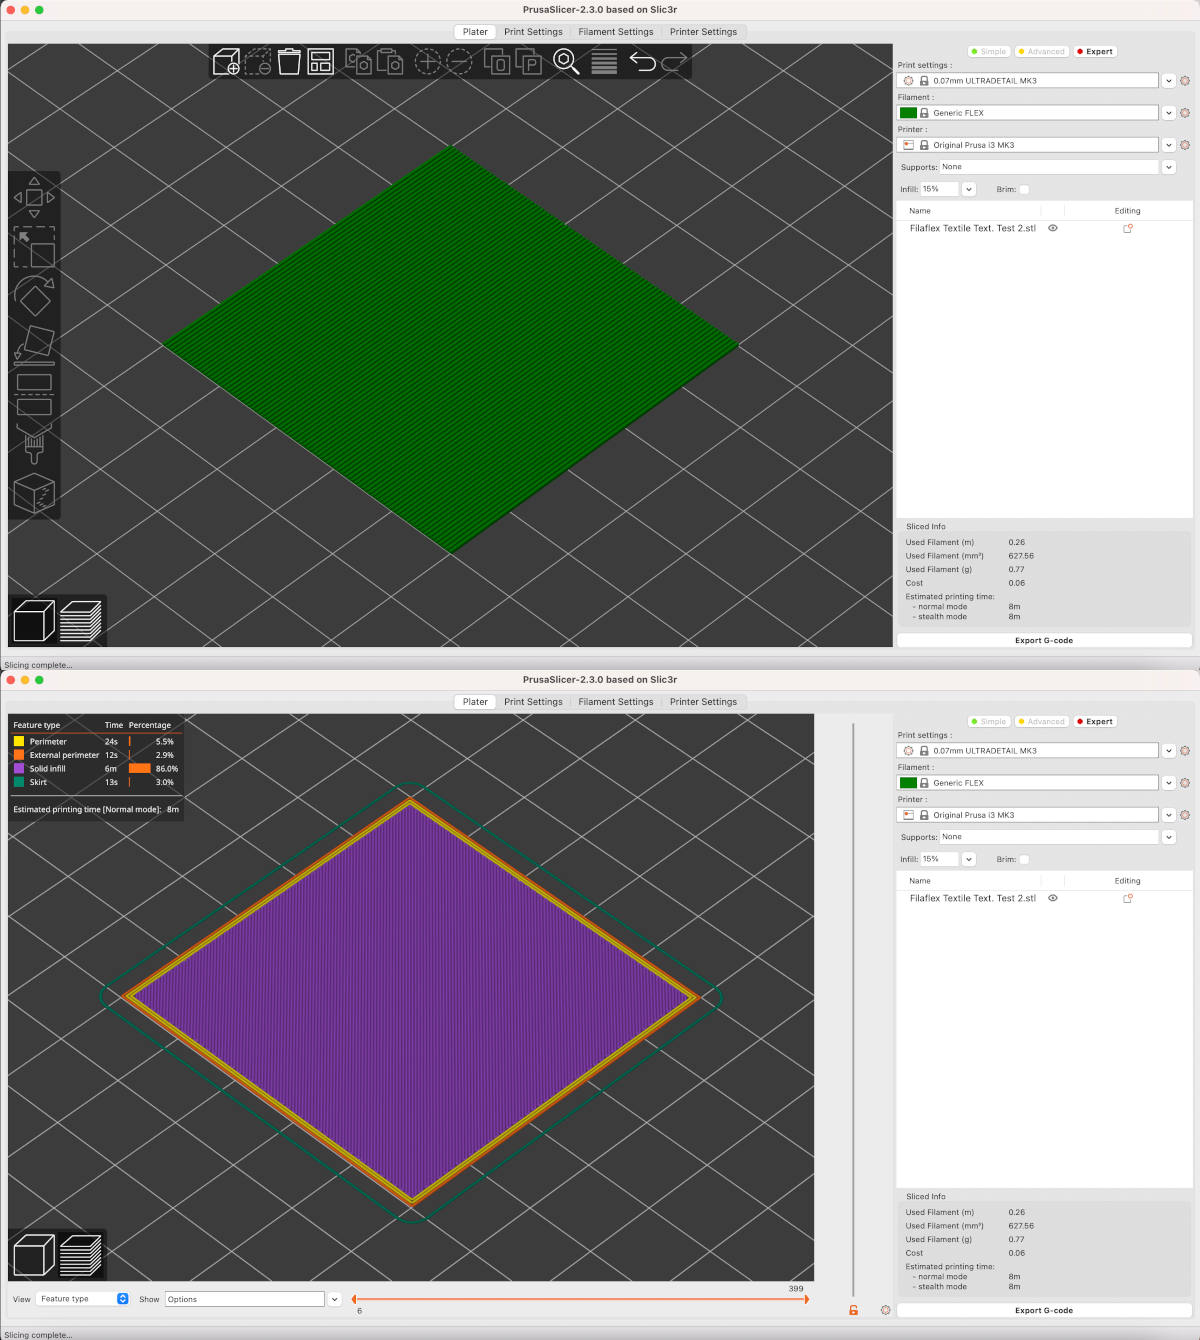
This was the final result of the test! 😮 As you can see, the program effectively recognized the horizontal stripes as bias lines. And in detail, you can perceive the spinning effect of the Filaflex print.
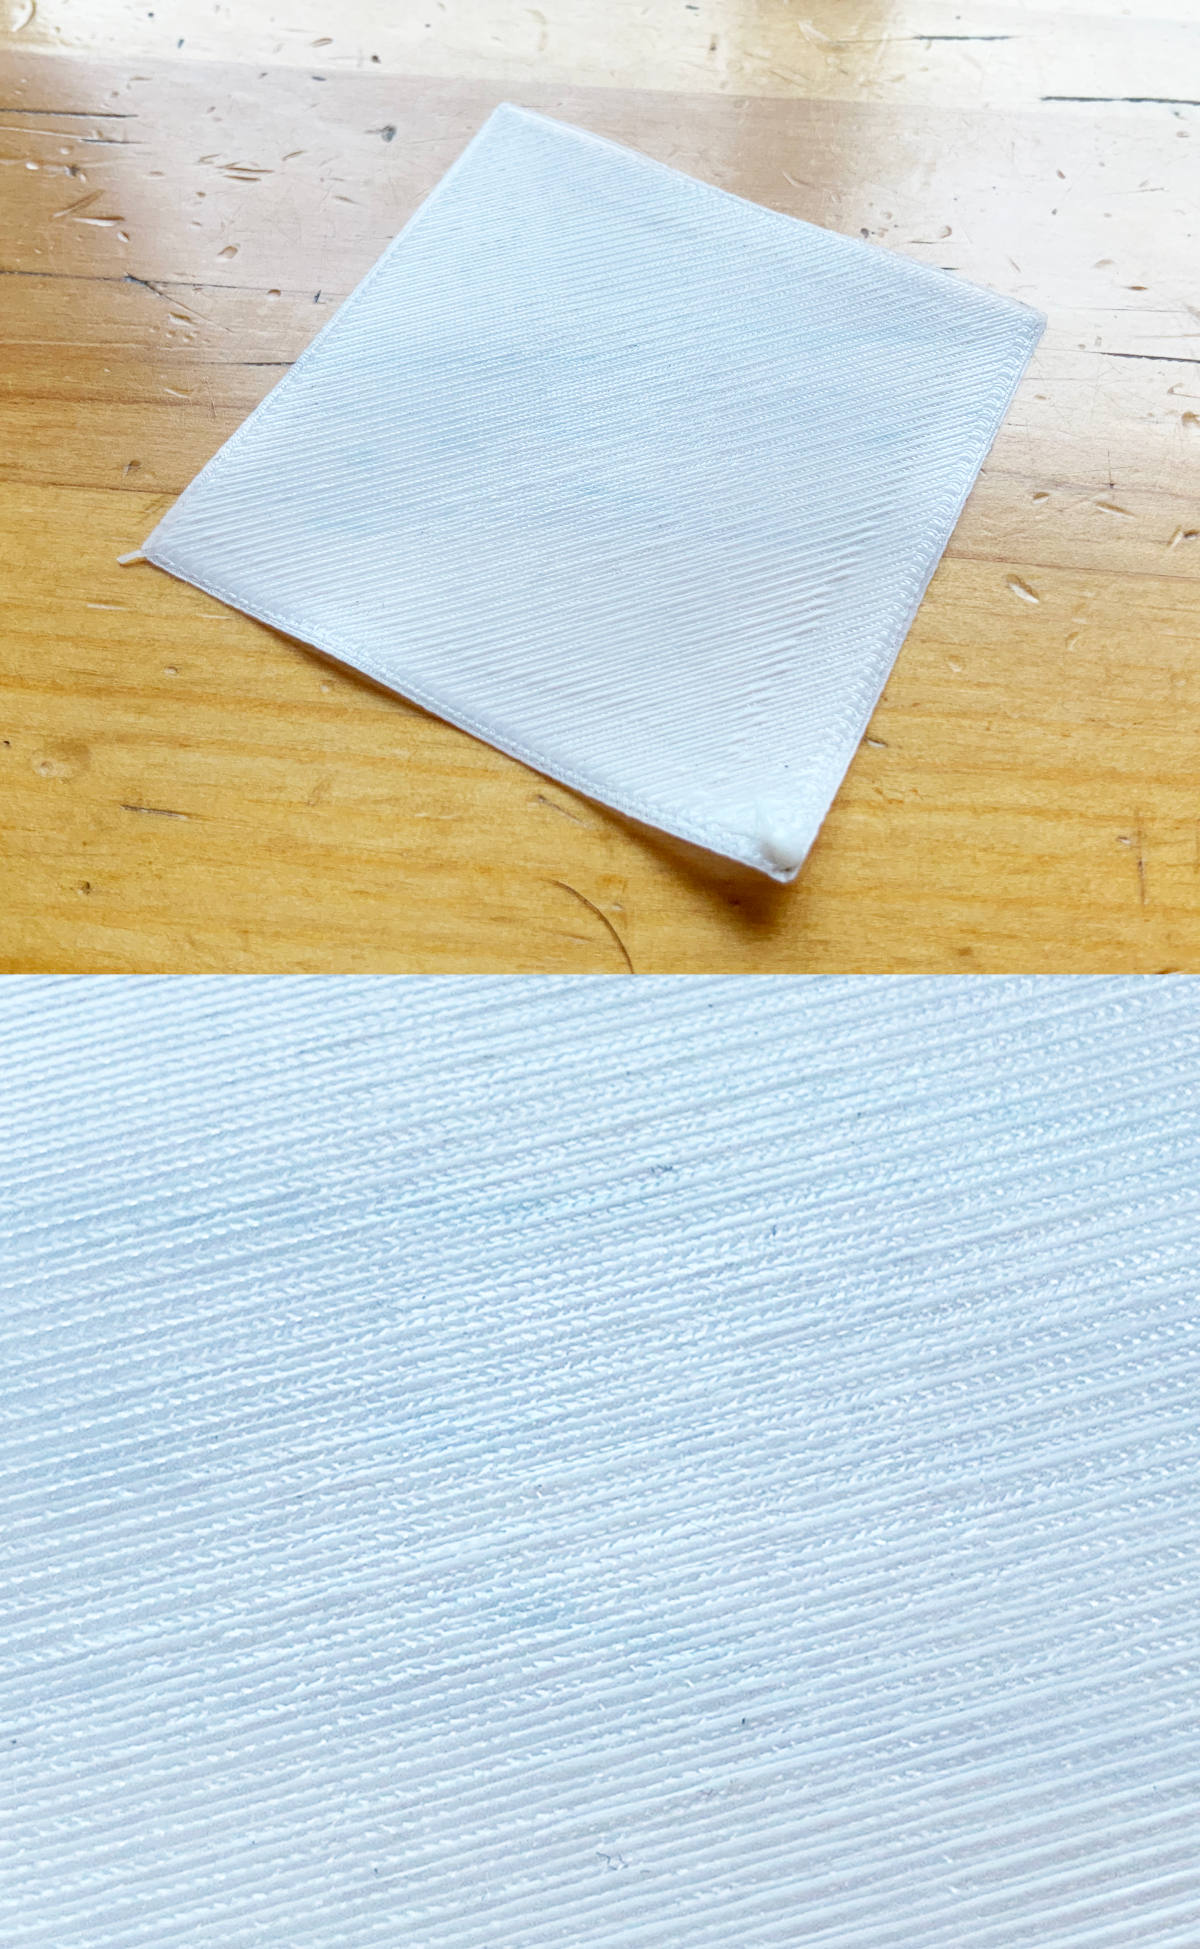
From min 0:26, you can watch the flexibility and elasticity test that I did with the sheet that I printed. It is quite resistant and flexible. It is not very elastic, but it does allow some stretching.
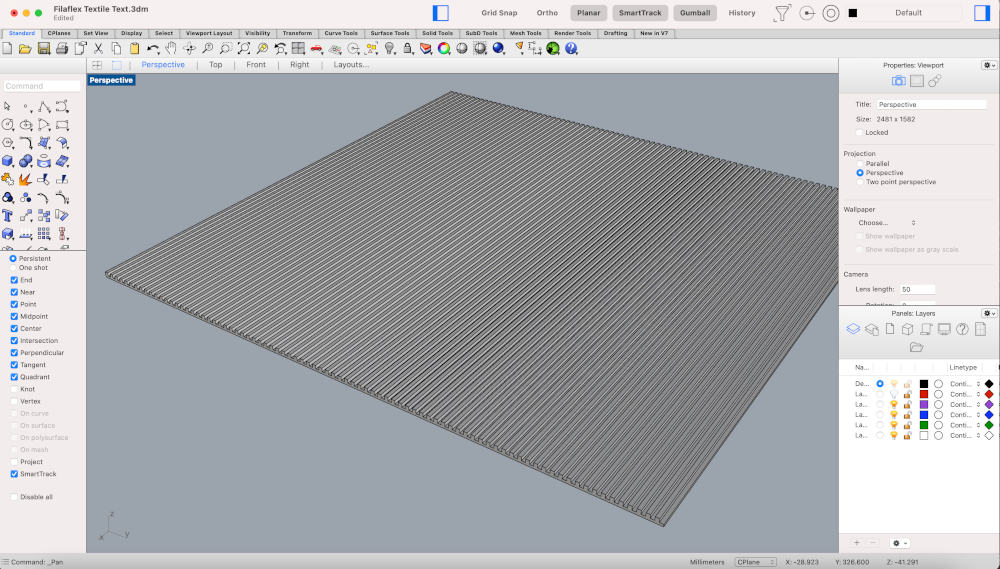
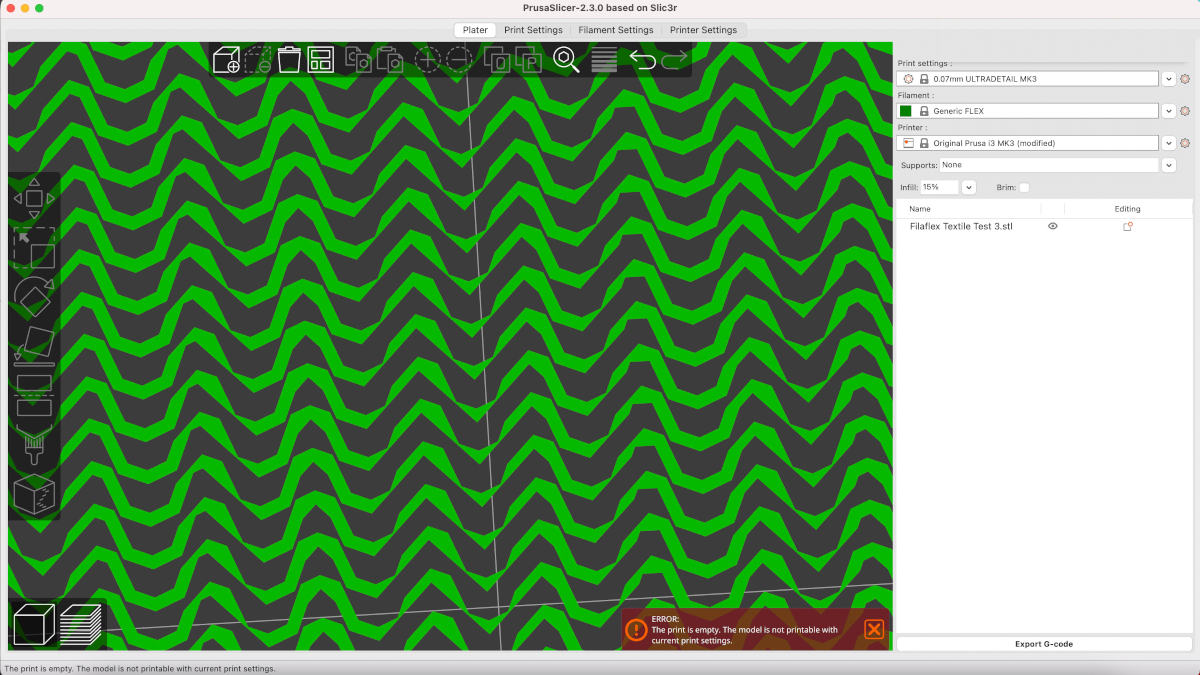
Another test that I created in Rhinoceros, was a other kind of spinning fabric. This time without any base bed and creating the curved shape of the woven threads with 0.3 mm high.
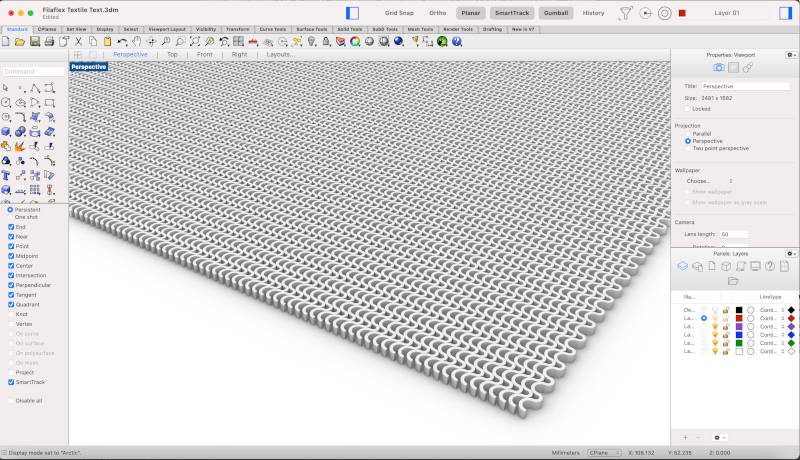
(01/03/2021 19:42 a.m.). When I export this new file to Prusaslicer, another funny thing reappears. When exporting the file, the curved shapes do not recognize them well, and when trying to make the Slice, the program gives an error, and does not create any .gcode. 😰
I have tried to make the same design with a 0.1mm bed under the shape, I have doubled the size of the initial shape ... and still the program keeps giving an error! 😩😩
Despite these minor drawbacks, my instructors and crewmates have given me some recommendations that I could try 😍. I hope to get optimal results in the next few days. I will continue to report! 💪💪. Here you can download the Filaflex Textile Test Curly Threads. STL
For my final project, one of the targets I had planned to do was the bracers where part of the wearable electronics will be embedded. These bracers were thought to be a rigid structure that would wrap the lower part of the arm, between the wrist and the elbow).
Using the base mesh I created in Rhinoceros at Week 02, I have tested different kind of designs and 3D printers, to see different types of finishes I could make.
-
_BRAZERS WITH DELTA WASP 3MT
One of the attempts that I wanted to try was to limit the extrusion angles that the machine supports, without putting any type of supports on the object.
For do it, I have used the Bracer Base.SVG and export it the file in Cura with the corresponding Wasp 3MT settings.
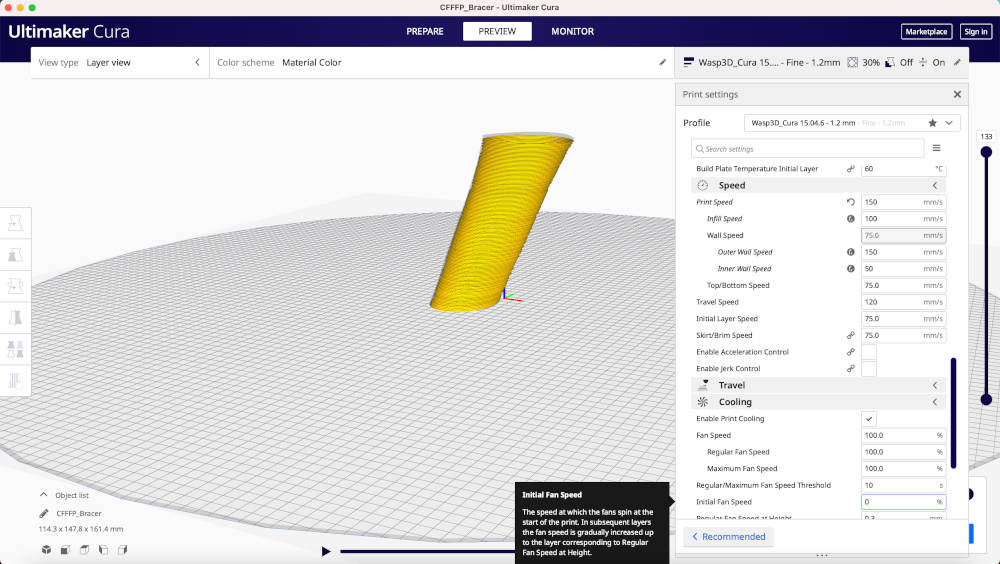
When I started to run the file, despite having been calibrating the printer base previously, I had problems extruding pellets from the first layer of the bracer. 🙂🙃
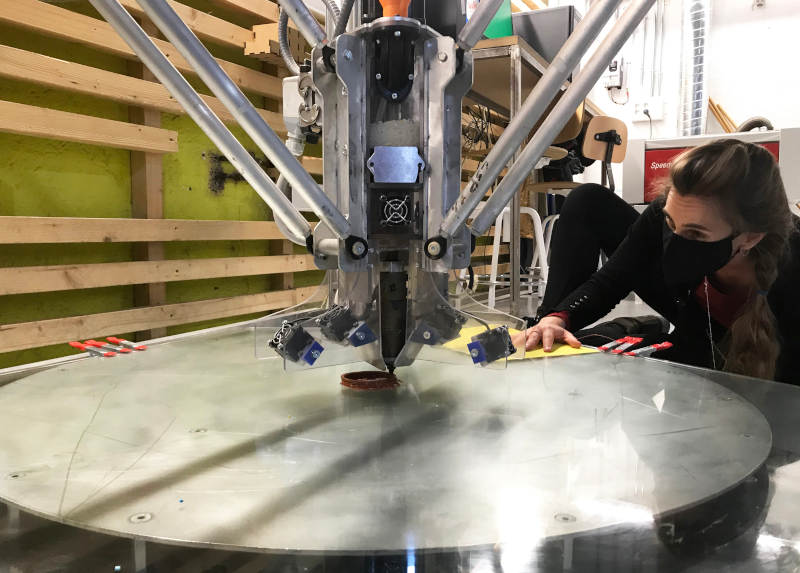
The first layer that I started to extrude was making it in the air. So when he began to extrude the rest, the piece was not being well attached to the glass bed, it moved and the model extrusion was half.
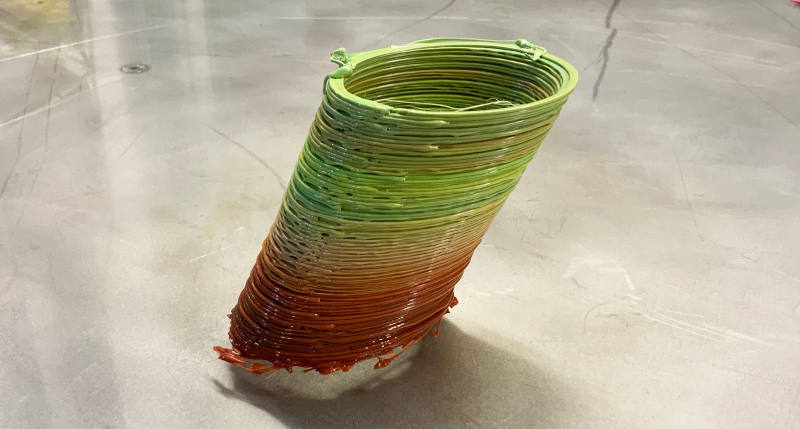
Although I made an initial mistake, we could observe two great successes: despite the piece not being well adhered to the bed, it held the proposed angle inclination and the size piece adjusted well to the measures that I designed at Week 02 with my body measurements in Make Human.
As a extra, in the pellet mix, I added colored dyes to create different gradients on the piece.
(For every 100 grams of pellet, 5% of colored beads must be added to dye the filament).
-
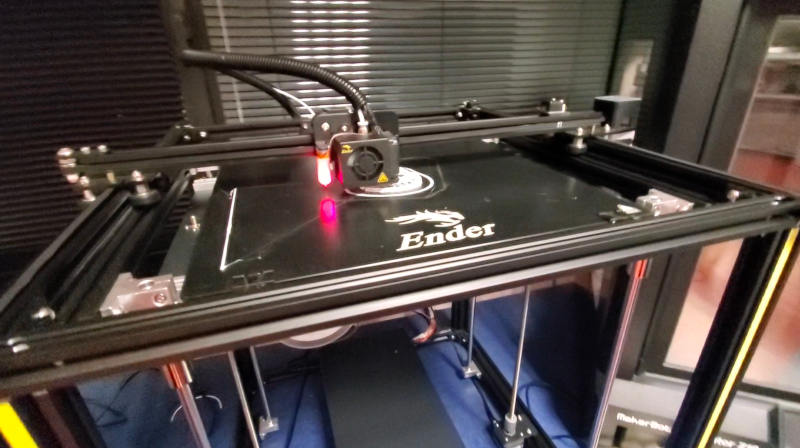
_BRAZERS WITH MESHMIXER + ENDER 5 PLUS
(27/02/2021 17:19 p.m.).On Saturdays, as tradition is beginning, I went back to Fab Lab UE Madrid with my friend and crewmate Alberto. That day, his workmate, Javier, taught us how to use the CNC machine and in the afternoon we were able to design and launch some designs to print on his machines: all of them Ender 5 and Ender 5 Plus.
To continue with various modifications to the bracer patterns, I tried using (as in the model that could not be sustractable) a Hexagonal mesh with the default MeshMixer tools.
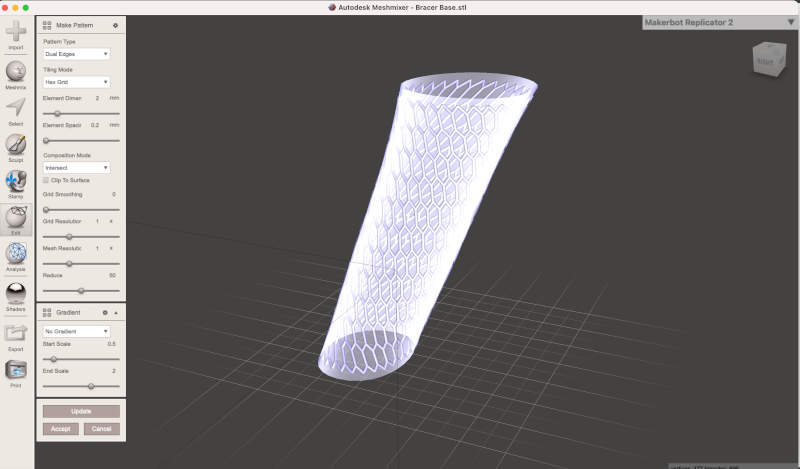
Here you can watch and download the Bracer MeshMixer. OBJ
Once the file was exported in Cura, and the .gcode was obtained, the idea was to launched the file to print on the Ender 5 Plus throughout the Saturday night.
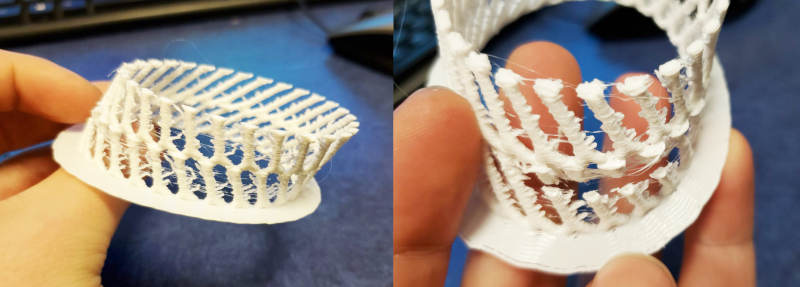
After two hours of printing, my crewmate Alberto had to stop printing because in certain areas of the printing the extruder was printing (again) in the air 🙃.
In a second attempt, Alberto released the file to print the rest of Saturday night and part of Sunday morning. (It was going to take about 15 hours aprox. to print).
(01/03/2021 10:04 a.m.).On Monday morning, the printed part had the same printing errors again 😩😩 and it was this way:

In the third and last attempt, Alberto tried to make some modifications in Cura, but despite this, we had the same problem again and we gave the experiment as failed! 👎
In spite of everything, I want to thank Alberto 💚 very much for the time and help he has given me these days, sharing successes and mistakes in mutual company.
-
_BRAZERS WITH PRUSA MK3 + MK3S
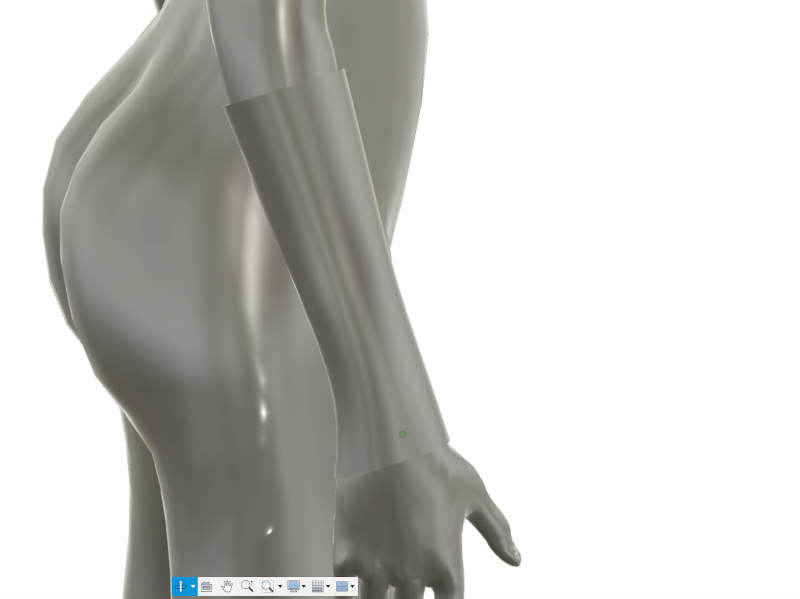
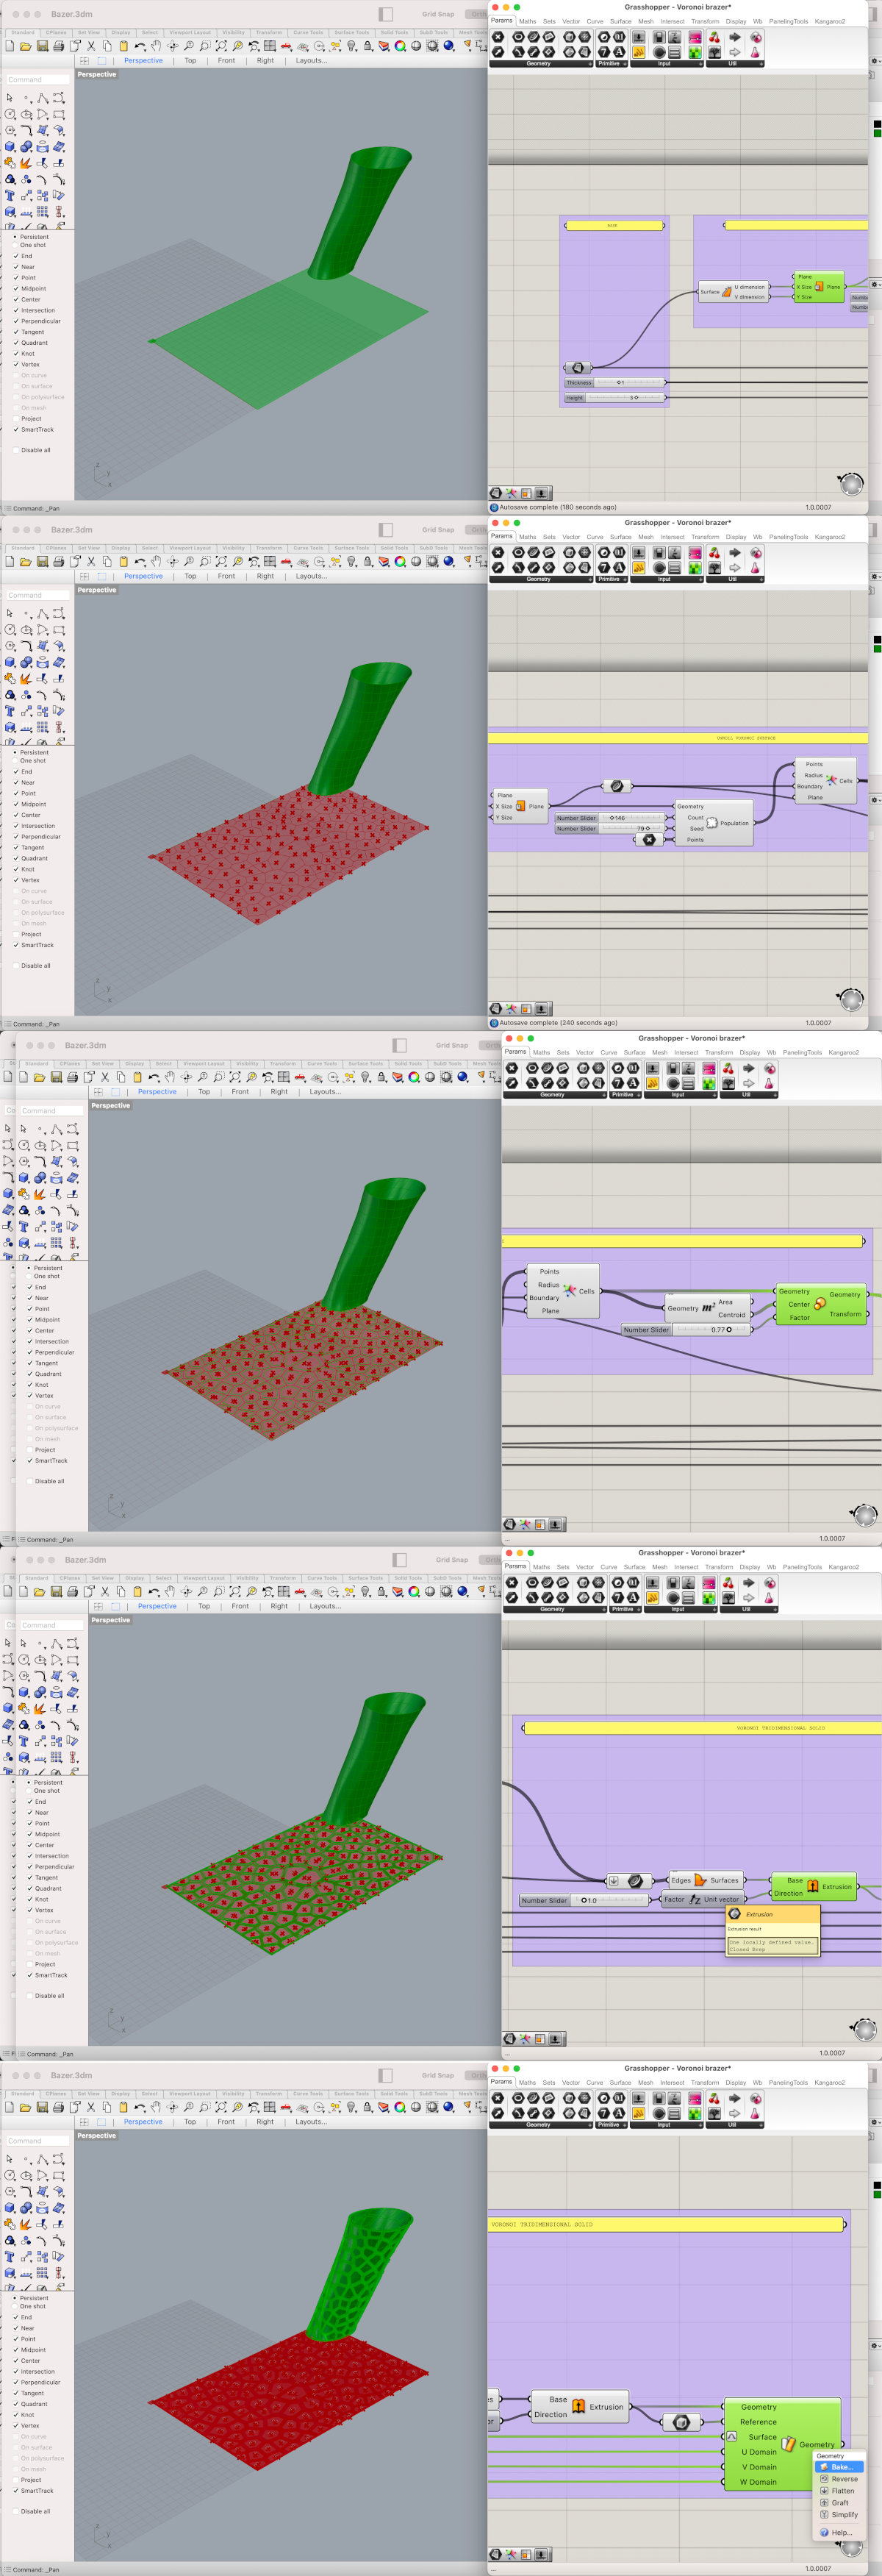
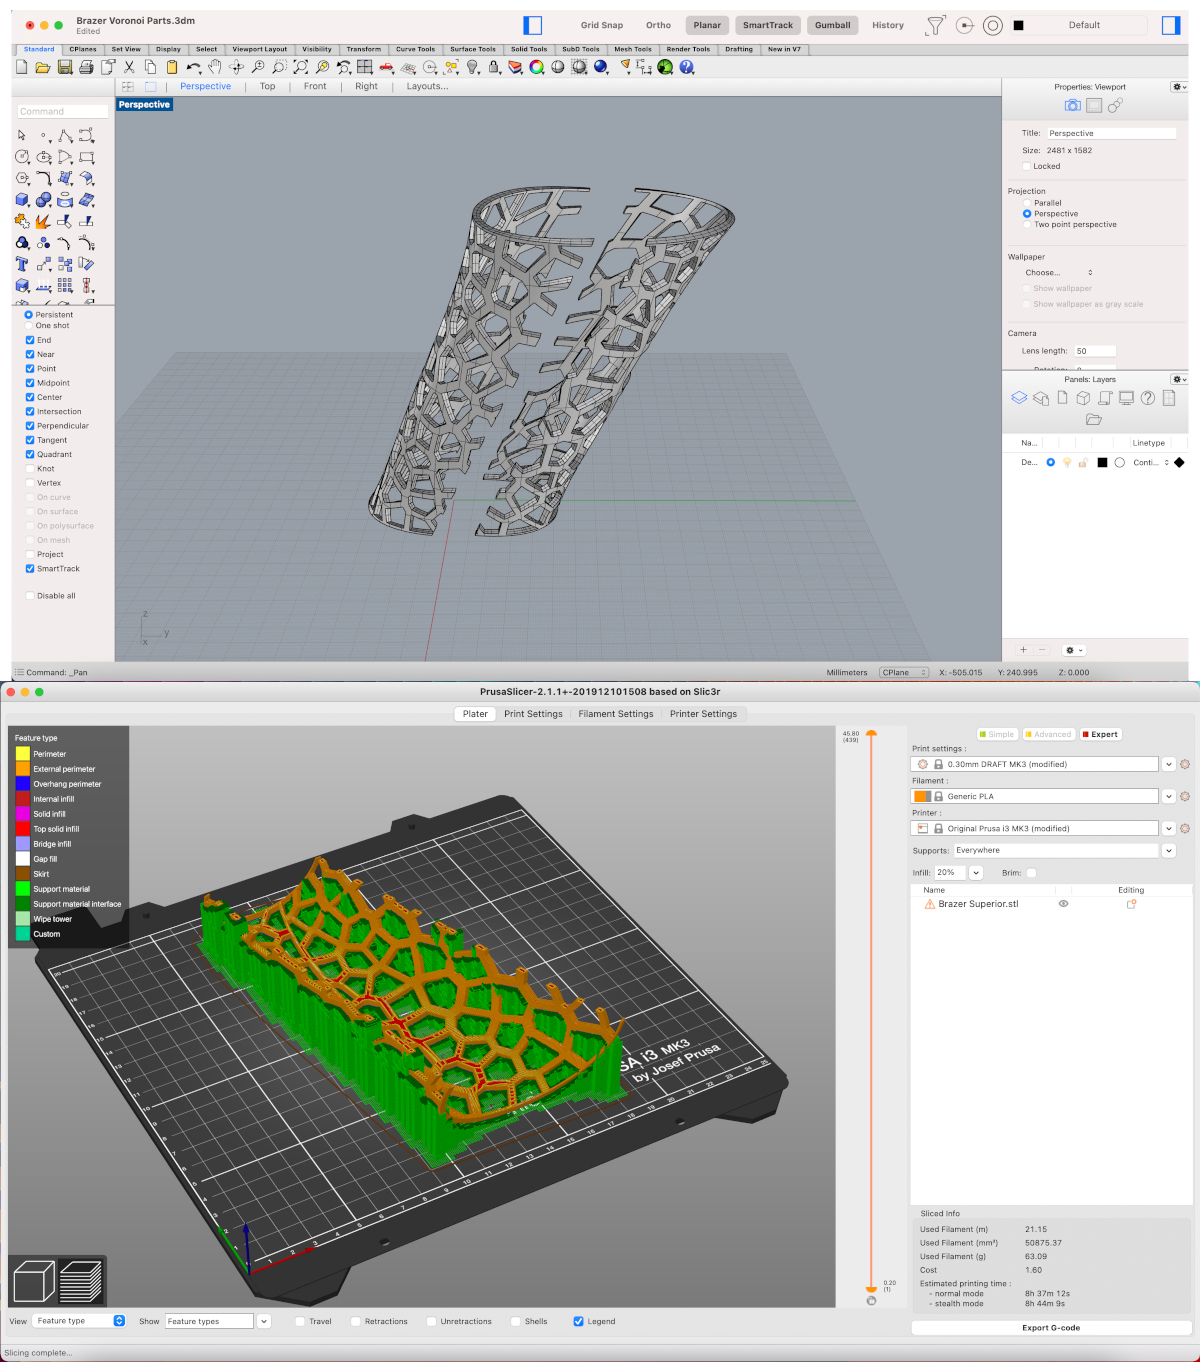
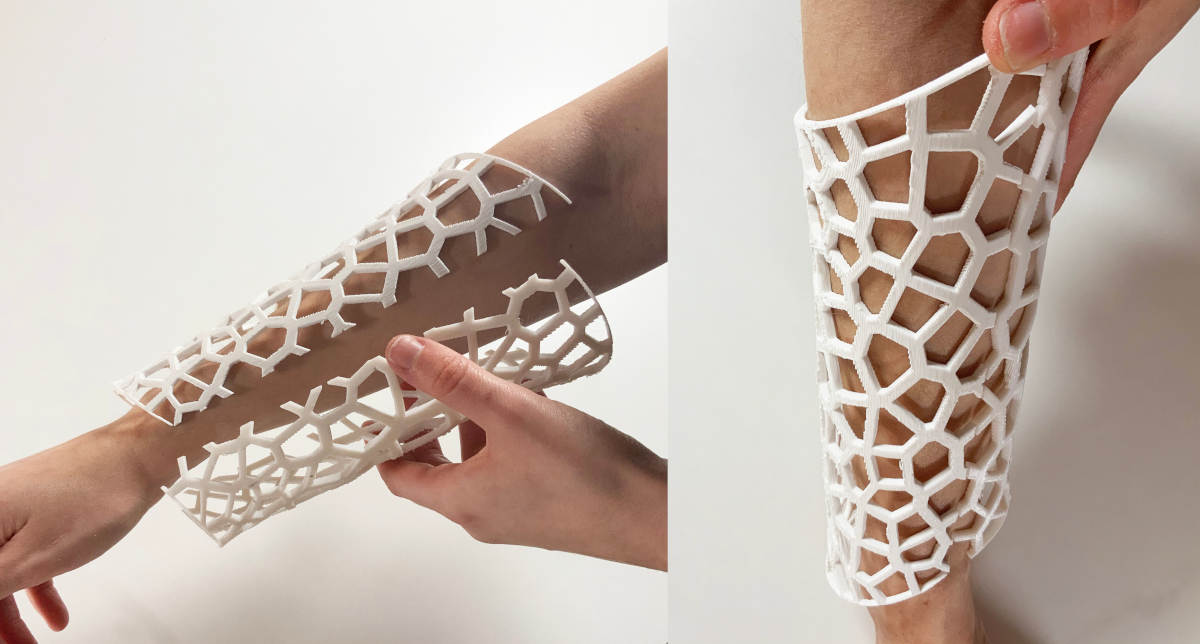
In my last attempt to pattern design on the bracer, I designed a Voronoi parameterized in Grasshopper that would wrap the entire three-dimensional surface.

To make this piece in Grasshopper, the first thing I do is define the flat surface where I'm going to design my voronoi pattern.
With the Population command, we define the organic segments of the pattern. On this area, we apply an offset in the XY plane with Scale command, and with Extrusion we make an offset in the Z plane.
Finally with the command Surface Morph, we move the 2D pattern to the three-dimensional surface that we have previously defined, and with the right button on the geometry we make a BakeHere you can download the Voronoi Bracer.gh
.
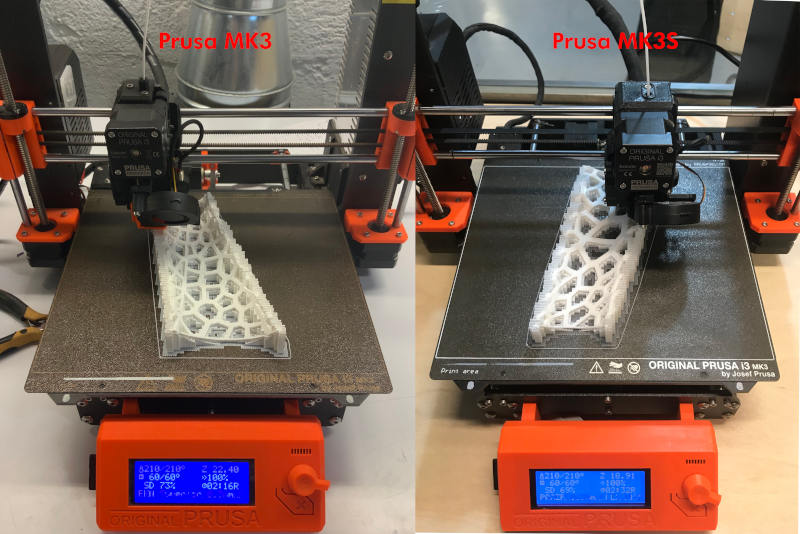
To avoid the issues we had with previous bracer prototypes, I have subdivided the piece in two parts: the upper and the lower. And I have launched them separately on two different machines: the Prusa MK3 and the Prusa MK3S (in this way, we are going to check which of the two machines performs the best finish of the model.
(01/02/2021 9:39 a.m.). As each of the parts was going to take 8 and a half hours to print, in the morning I left the machines printing at the fab lab while I went to work at the architecture studio. When I returned in the afternoon, I saw the 3D printers were giving good results! Love to Prusa!! 😍😍
Once finished, the most tedious part was removing all the supports wrapped from the bracers geometry (it took me about an hour and a half to remove all the material to be discarded and a few scratches on my hands 😅).
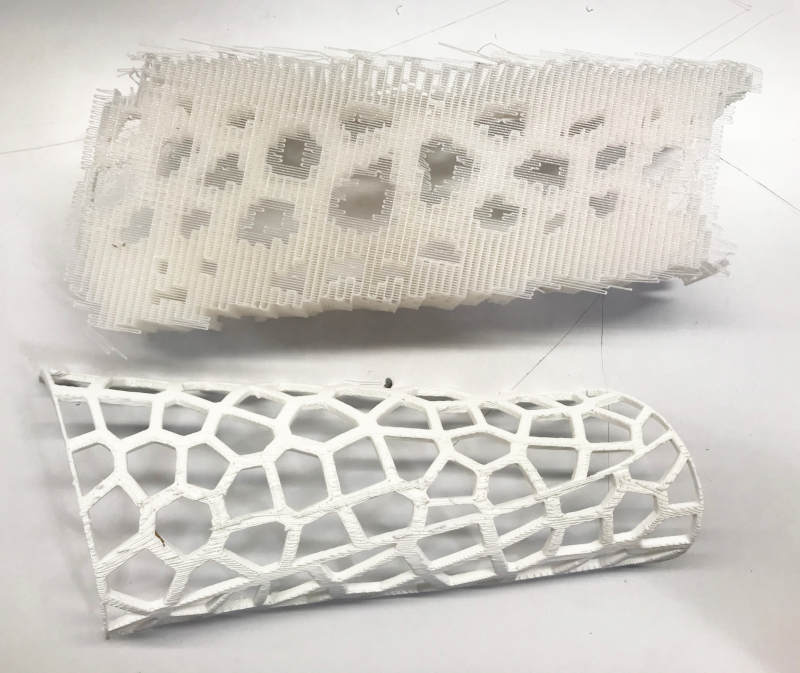
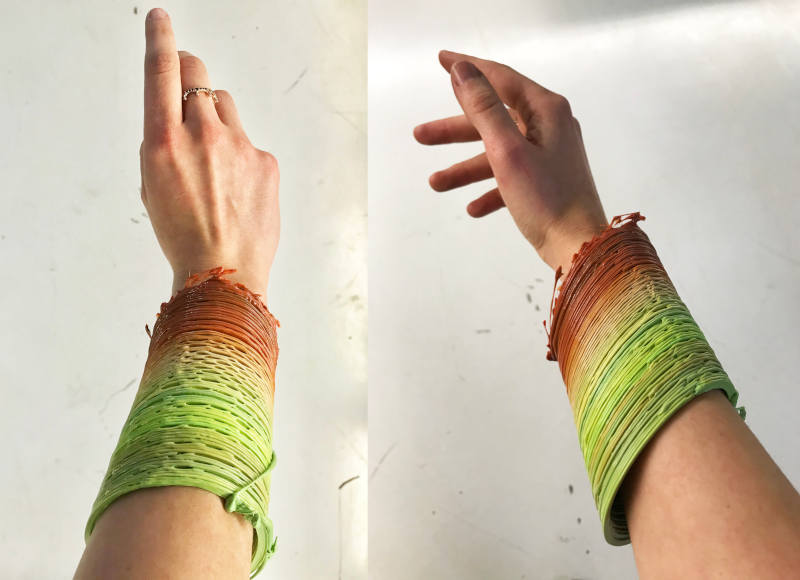
Finally, these were the results!😍😍 In the images, you can see that using Prusa filaments and extruding the model in the Prusa MK3S we get more precise details than using filaments from another brand in the Prusa MK3.
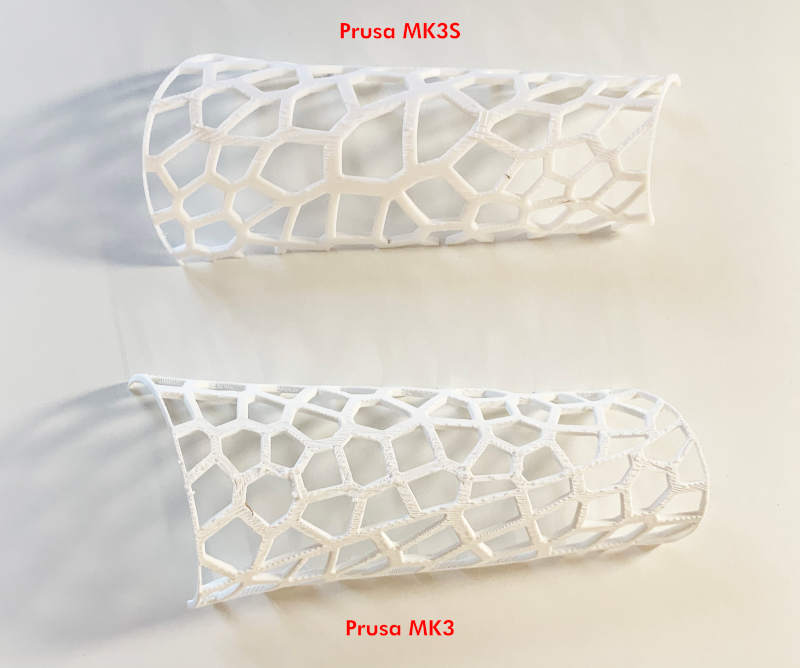
Here you can watch some of final results adjusted to my own arm: 🤩🤩
3D SCANNING
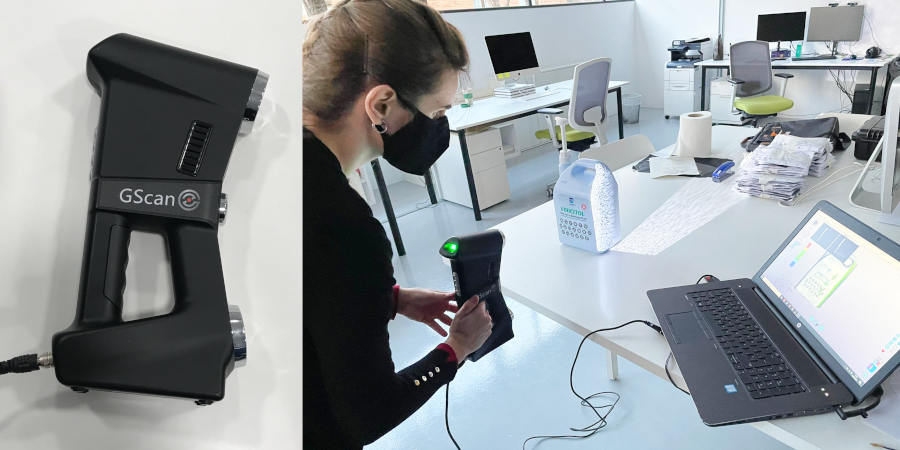
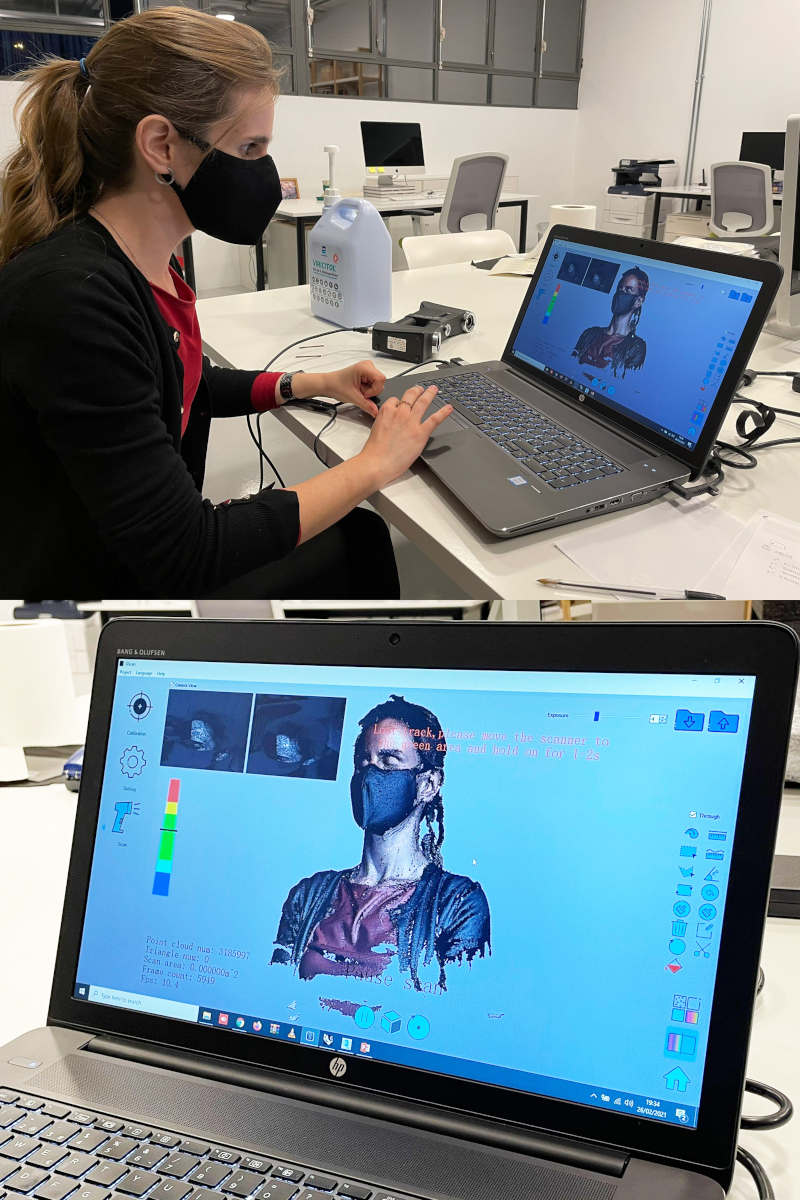
For the 3D Scanning part, at the fab lab IED Madrid we use the GScan, it is a Sense type scanner. (26/02/2021 9:39 a.m.). It is new and it is the first time that someone uses this scanner. So I was fighting for a long time with him.
The cameras and sensors must first be activated by means of a point recognition table, which prepares the machine before it can scan objects.
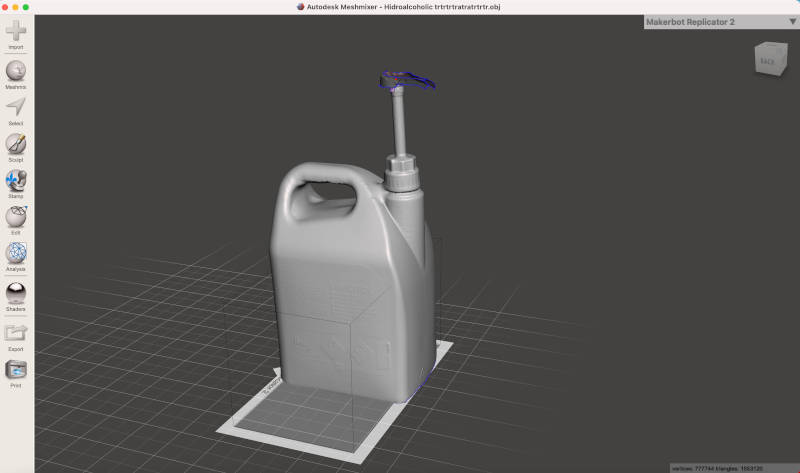
After these 10 minutes of recognition, our machine is ready to start scanning! To begin practicing with it, I started by scanning one of the hydroalcoholic gel pots that you can find in whole spaces of the fab lab IED Madrid. 🤣🤣
When we have (more or less) scanned the object, we export the files in .OBJ and we open them in MeshMixer to close the mesh holes, which we have not been able to scan.
(01/03/2021 17:48 p.m) In the local review, my crewmate, Sergio, gave us this video tutorial on Monday on How to use the MeshMixer tools to clean up scanned objects.
In some areas of the piece that were pure white, the machine had a hard time and don´t recognizing and scanning those surfaces (as happened in the part of the liquid dispenser). When the unscanned areas are very large and irregular, MeshMixer is not able to close the mesh, and creates strange contours 😕.
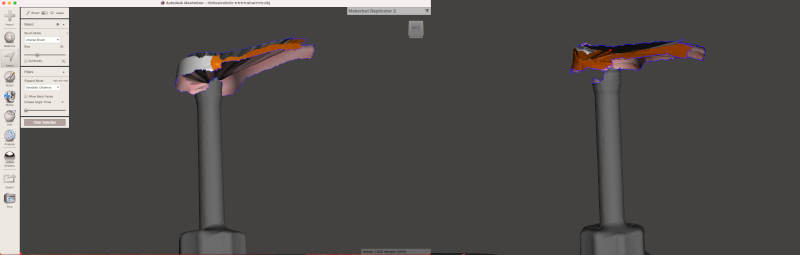
Here you can download and visualize the Hydroalcoholic Pot. STL :
With the Head Director of the fab lab IED, Daniel, we tried to do another 3D scan test, but this time of myself. For about 20 minutes aprox., I had to be very still and close my eyes when the laser passed near my eyes. It left me a little blind!
When we got a defined model, we exported the file (again) in .OBJ and discovered that we could export the scan textures/ color in .jpg to be able to render the model in Rhinoceros or other 3D render software.

Once the file is opened in MeshMixer, we see that the scanned model has a lot of holes between the wrinkles of the black jacket and the hair on my head (especially the short hairs).
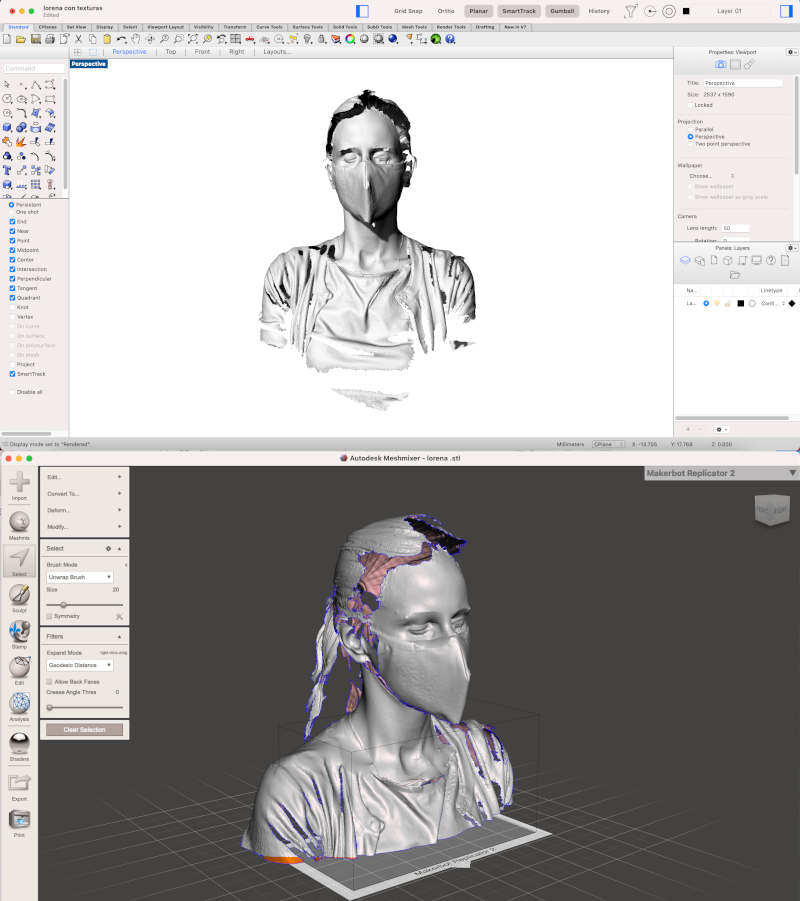
As I happened with the hydroalcoholic gel pot, when I tried to close some surfaces that were too large and irregular, Meshmixer did not know how to recognize the contour that it had to fill. So, after several trials, I had to give the test failed!😔😔
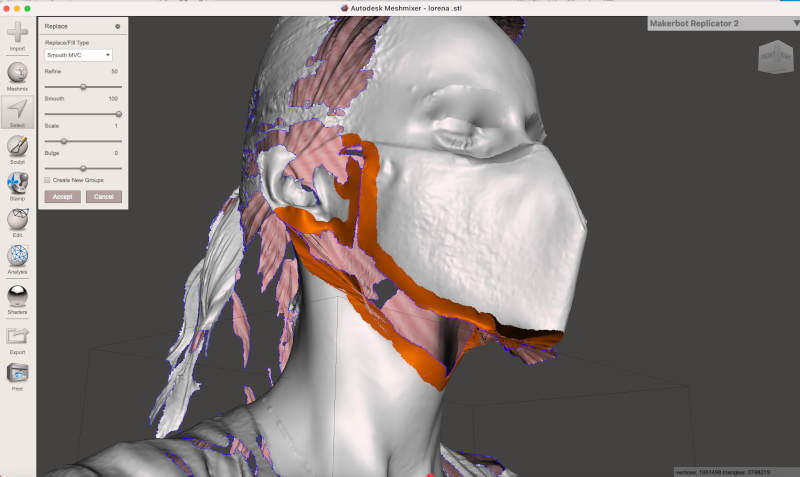
However, once I have learned what the scanner limitations are, I know what kinds of objects could be scanned in the future, and what parts of the body we will not be able to define well with this scanner brand.
Here you can download and visualize my 3D Scanning broken bust. STL :
FILES
DESIGN AND 3D PRINT AN OBJECT THAT NOT COULD BE MADE SUBTRACTIVELY
PRINTING WITH FILAFLEX
EXTRA CREDIT_ FIRST SHOTS FOR MY FINAL PROJECT
3D SCANNING