Objectives
Individual Assignment
1)Add an output device to a micro-controller board you've designed,
and program it to do something.
Group Assignment
1)Measure the power consumption of an output device.
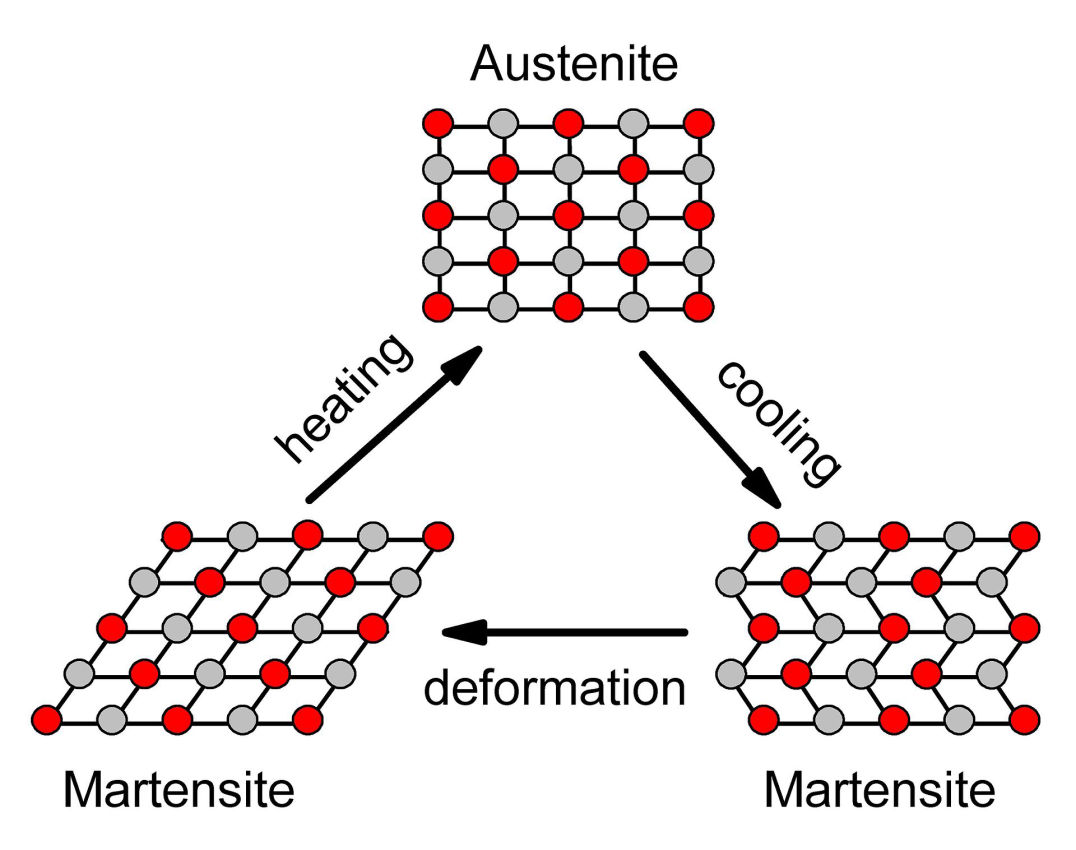
What's behind this is a mechanism called twinning. Essentially, some deformations of the material are possible without breaking atomic bonds because atomic planes are allowed to slip past each-other.The same is true in reverse. By stretching a Nitinol wire and looking at it with a thermal camera, we can see that local spots are undergoing this transformation and releasing heat in doing so.They are light, silent and can be "turned on" by simply running current through. The shape that they change to can also be set.
Must Visit. Inspirations
1.Flapping origami crane-jie qi.
2.http://technolojie.com/origami-robotics/
3.Petals of the flower are made from a shape memory alloy.
4.Shape-shifting robots.
5.Shape Memory Textile Jacket.
6.Soft autonomous earthworm robot at MIT
7.Shape Memory Alloy Haptic Compression Garment for Media Augmentation in Virtual Reality Environment
8.NASA Glenn's Shape Memory Alloy Tires.
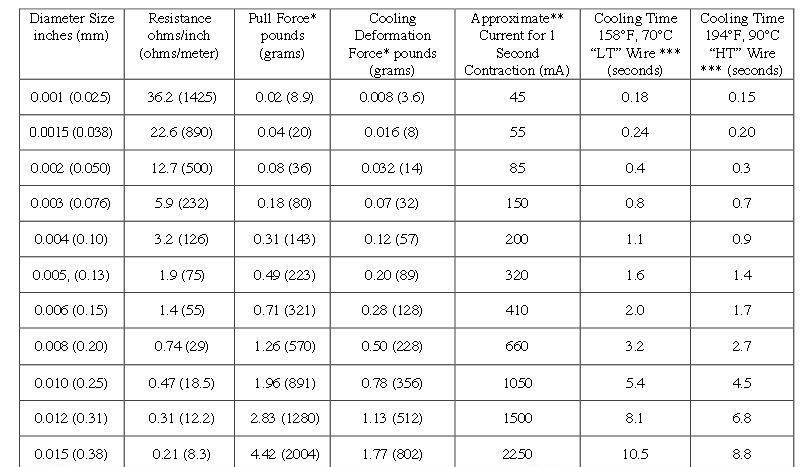
The general trends are:
1.All wires take about 1 second to heat up and contract.
2.Higher diameter wires have more pulling force than lower diameter wires.
3.Higher diameter wires have longer off times (it takes longer for the wire to return to its original, un-contracted shape) .
4.Higher-diameter wires have lower resistance and draw more power. Thus, they are more likely to overheat and lose its original contraction abilities. Wires that are 0.006" or smaller can be kept on constantly without fear of overheating.
5.High-Temperature (90C) wires have faster off-times than Low-Temperature (70C) wires
The amount of current that needs to goes through depends on different parameters that this chart illustrates :>
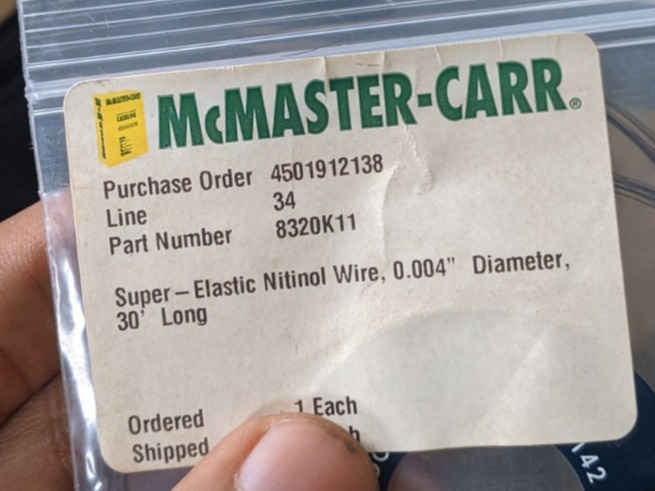
Our LAB only had 0.004" Super Elastic Nitinol Wire .
https://www.mcmaster.com/8320K11/
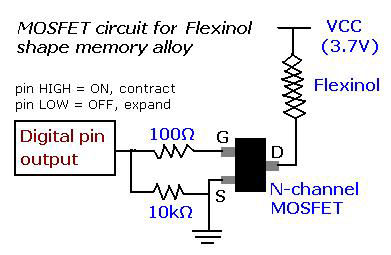
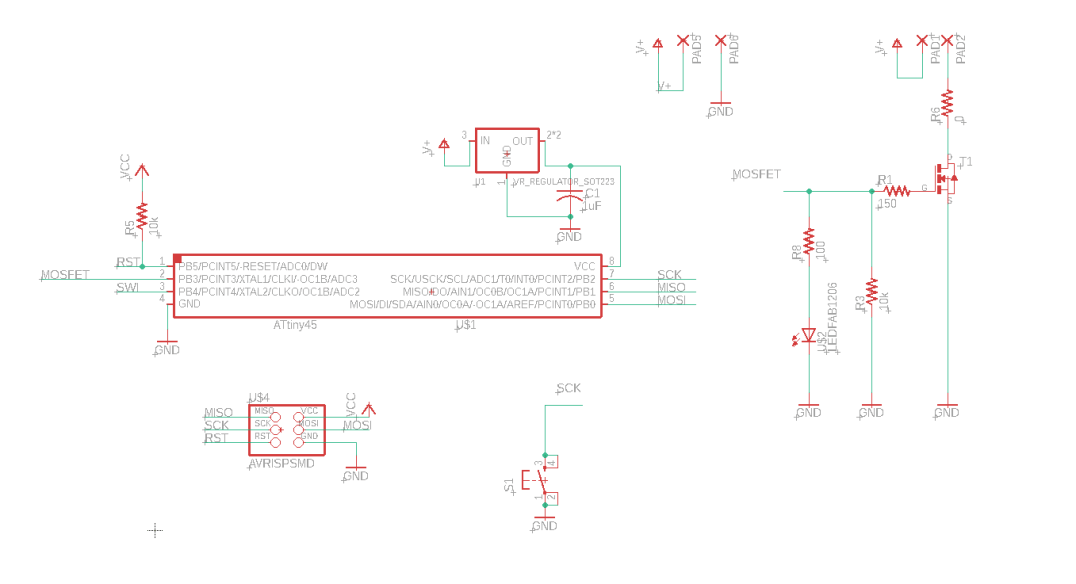
I used a standard MOSFET circuit which is a digital switch that can be turned on and off using a microcontroller.
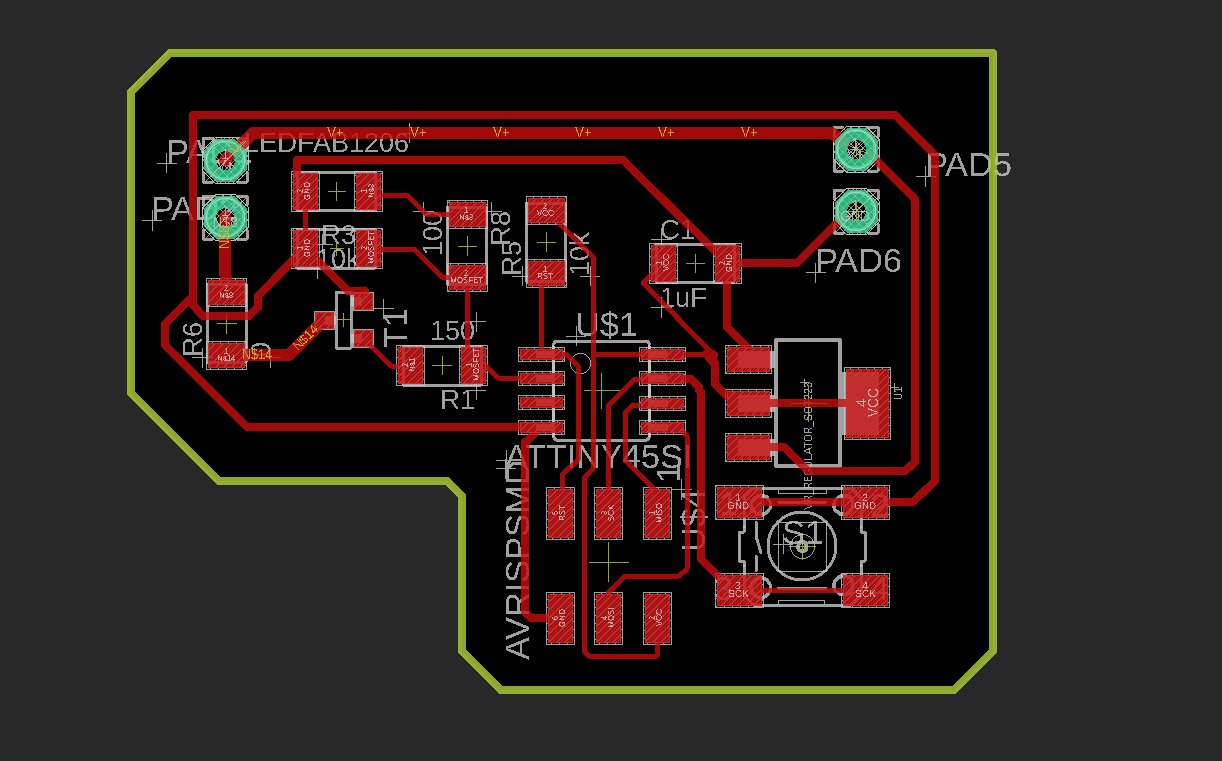
I used a standard MOSFET circuit which is a digital switch that can be turned on and off using a microcontroller.I also want to "see" when the current flows in the wire so I add LEDs for this and dded 0 ohm resistor in the nitinol circuits in case I need to limit the current going through them, then I would just replace them by appropriate resistors.There is much more current passing through some traces I made them thicker.
Routed Circuit
Schematic in Eagle
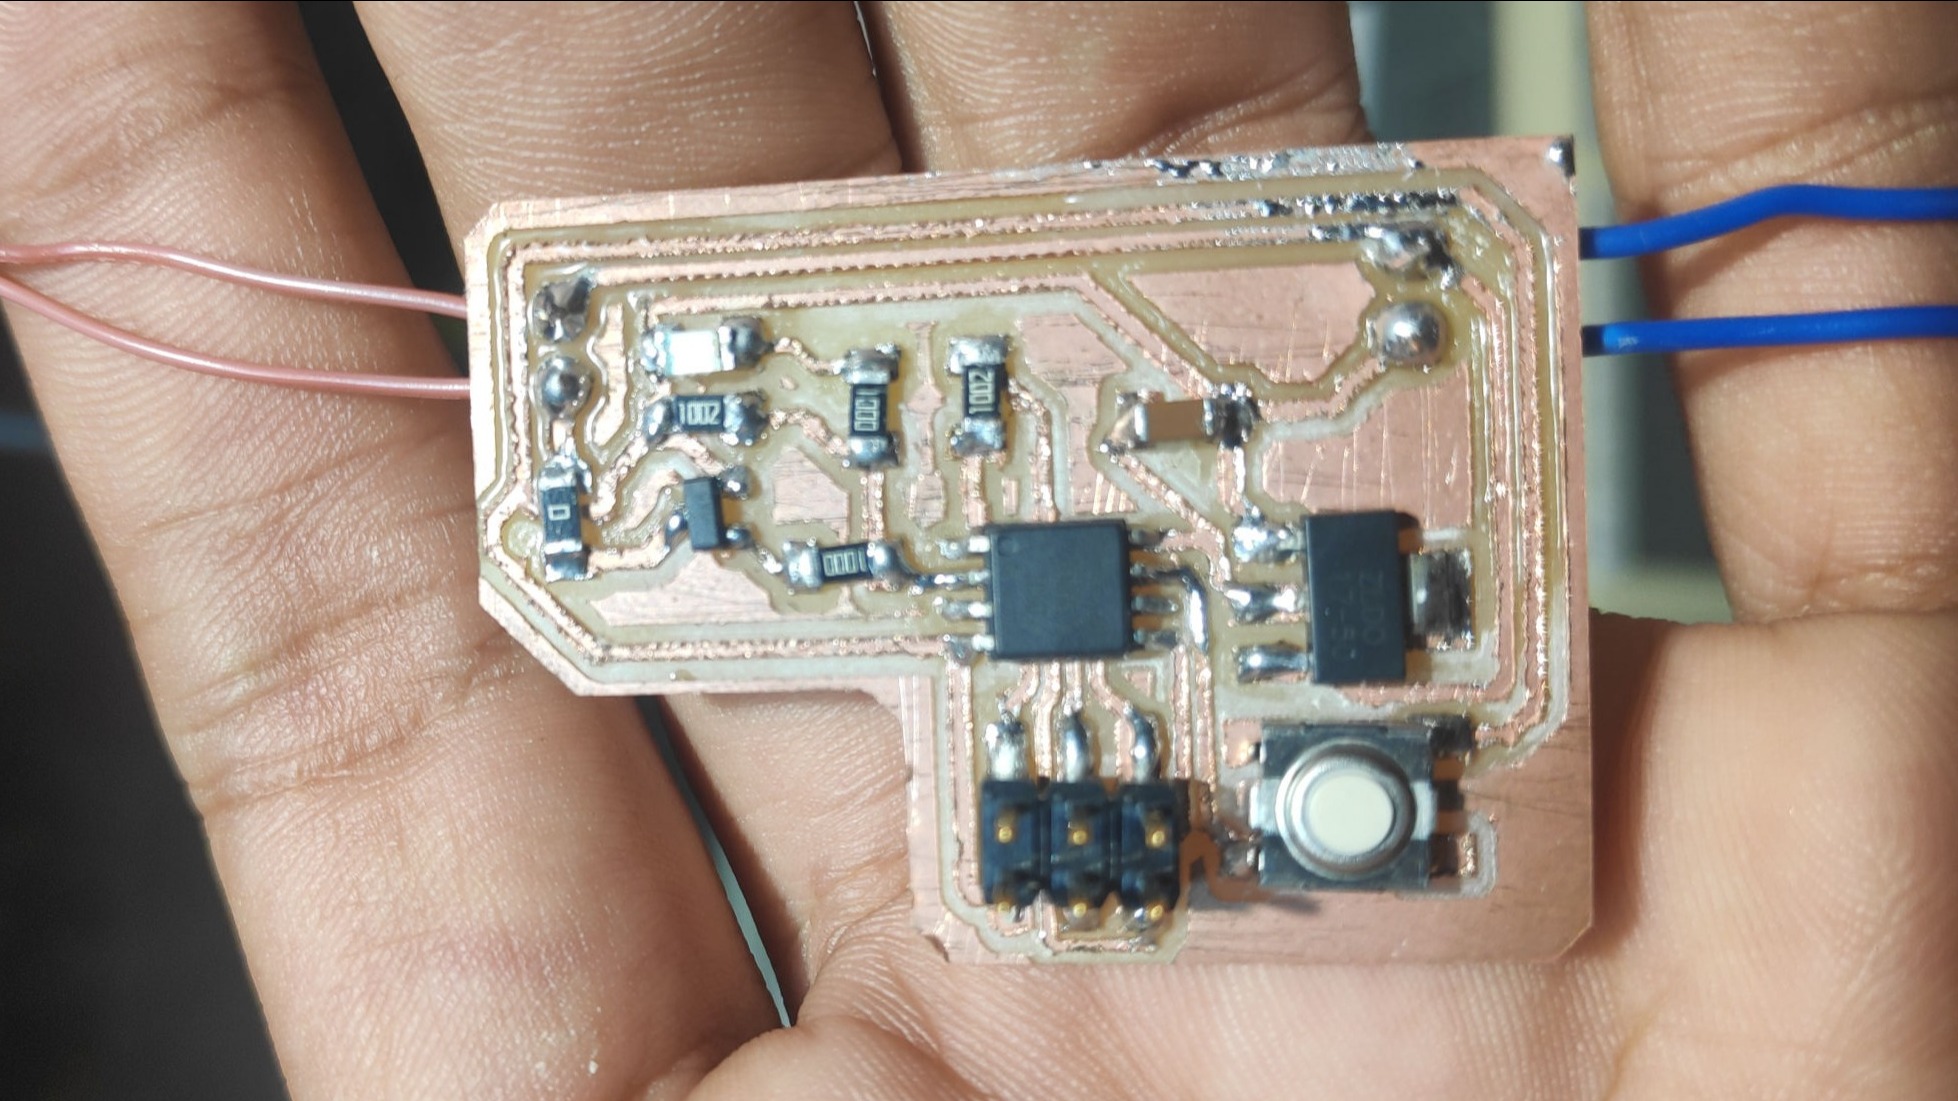
Soldered Everything to place.Traces are bad Since the bit is dead situation.
#include< avr/io.h
#include< util/delay.h>
#define output(directions,pin) (directions |= pin) // set port direction for output
#define input(directions,pin) (directions &= (~pin)) // set port direction for input
#define set(port,pin) (port |= pin) // set port pin
#define clear(port,pin) (port &= (~pin)) // clear port pin
#define pin_test(pins,pin) (pins & pin) // test for port pin
#define bit_test(byte,bit) (byte & (1 << bit)) // test for bit set
#define PWM_delay() _delay_us(77) // PWM delay
#define delay_ms(time_ms) _delay_ms(time_ms) // delay
#define output_port PORTB
#define output_direction DDRB
#define Nitinol (1 << PB3)
#define input_port PORTB
#define input_direction DDRB
#define input_pins PINB
int main(void) {
//
// main
//
// variables that won't change
unsigned char count, pwm, intensity = 255;
//
// set clock divider to /1
//
CLKPR = (1 << CLKPCE);
CLKPR = (0 << CLKPS3) | (0 << CLKPS2) | (0 << CLKPS1) | (0 << CLKPS0);
//
// initialize LED pins
//
clear(output_port, Nitinol);
output(output_direction, Nitinol);
//
// main loop
//
while (1) {
//
// NITINOL ON
//
for (count = 0; count < 255 ; ++count) {
clear(output_port, Nitinol);
for (pwm = intensity; pwm < 255; ++pwm)
PWM_delay();
set(output_port, Nitinol);
for (pwm = 0; pwm < intensity; ++pwm)
PWM_delay();
}
// NITINOL COOLING
clear(output_port, Nitinol);
delay_ms(5000);//5 seconds delay
}
}
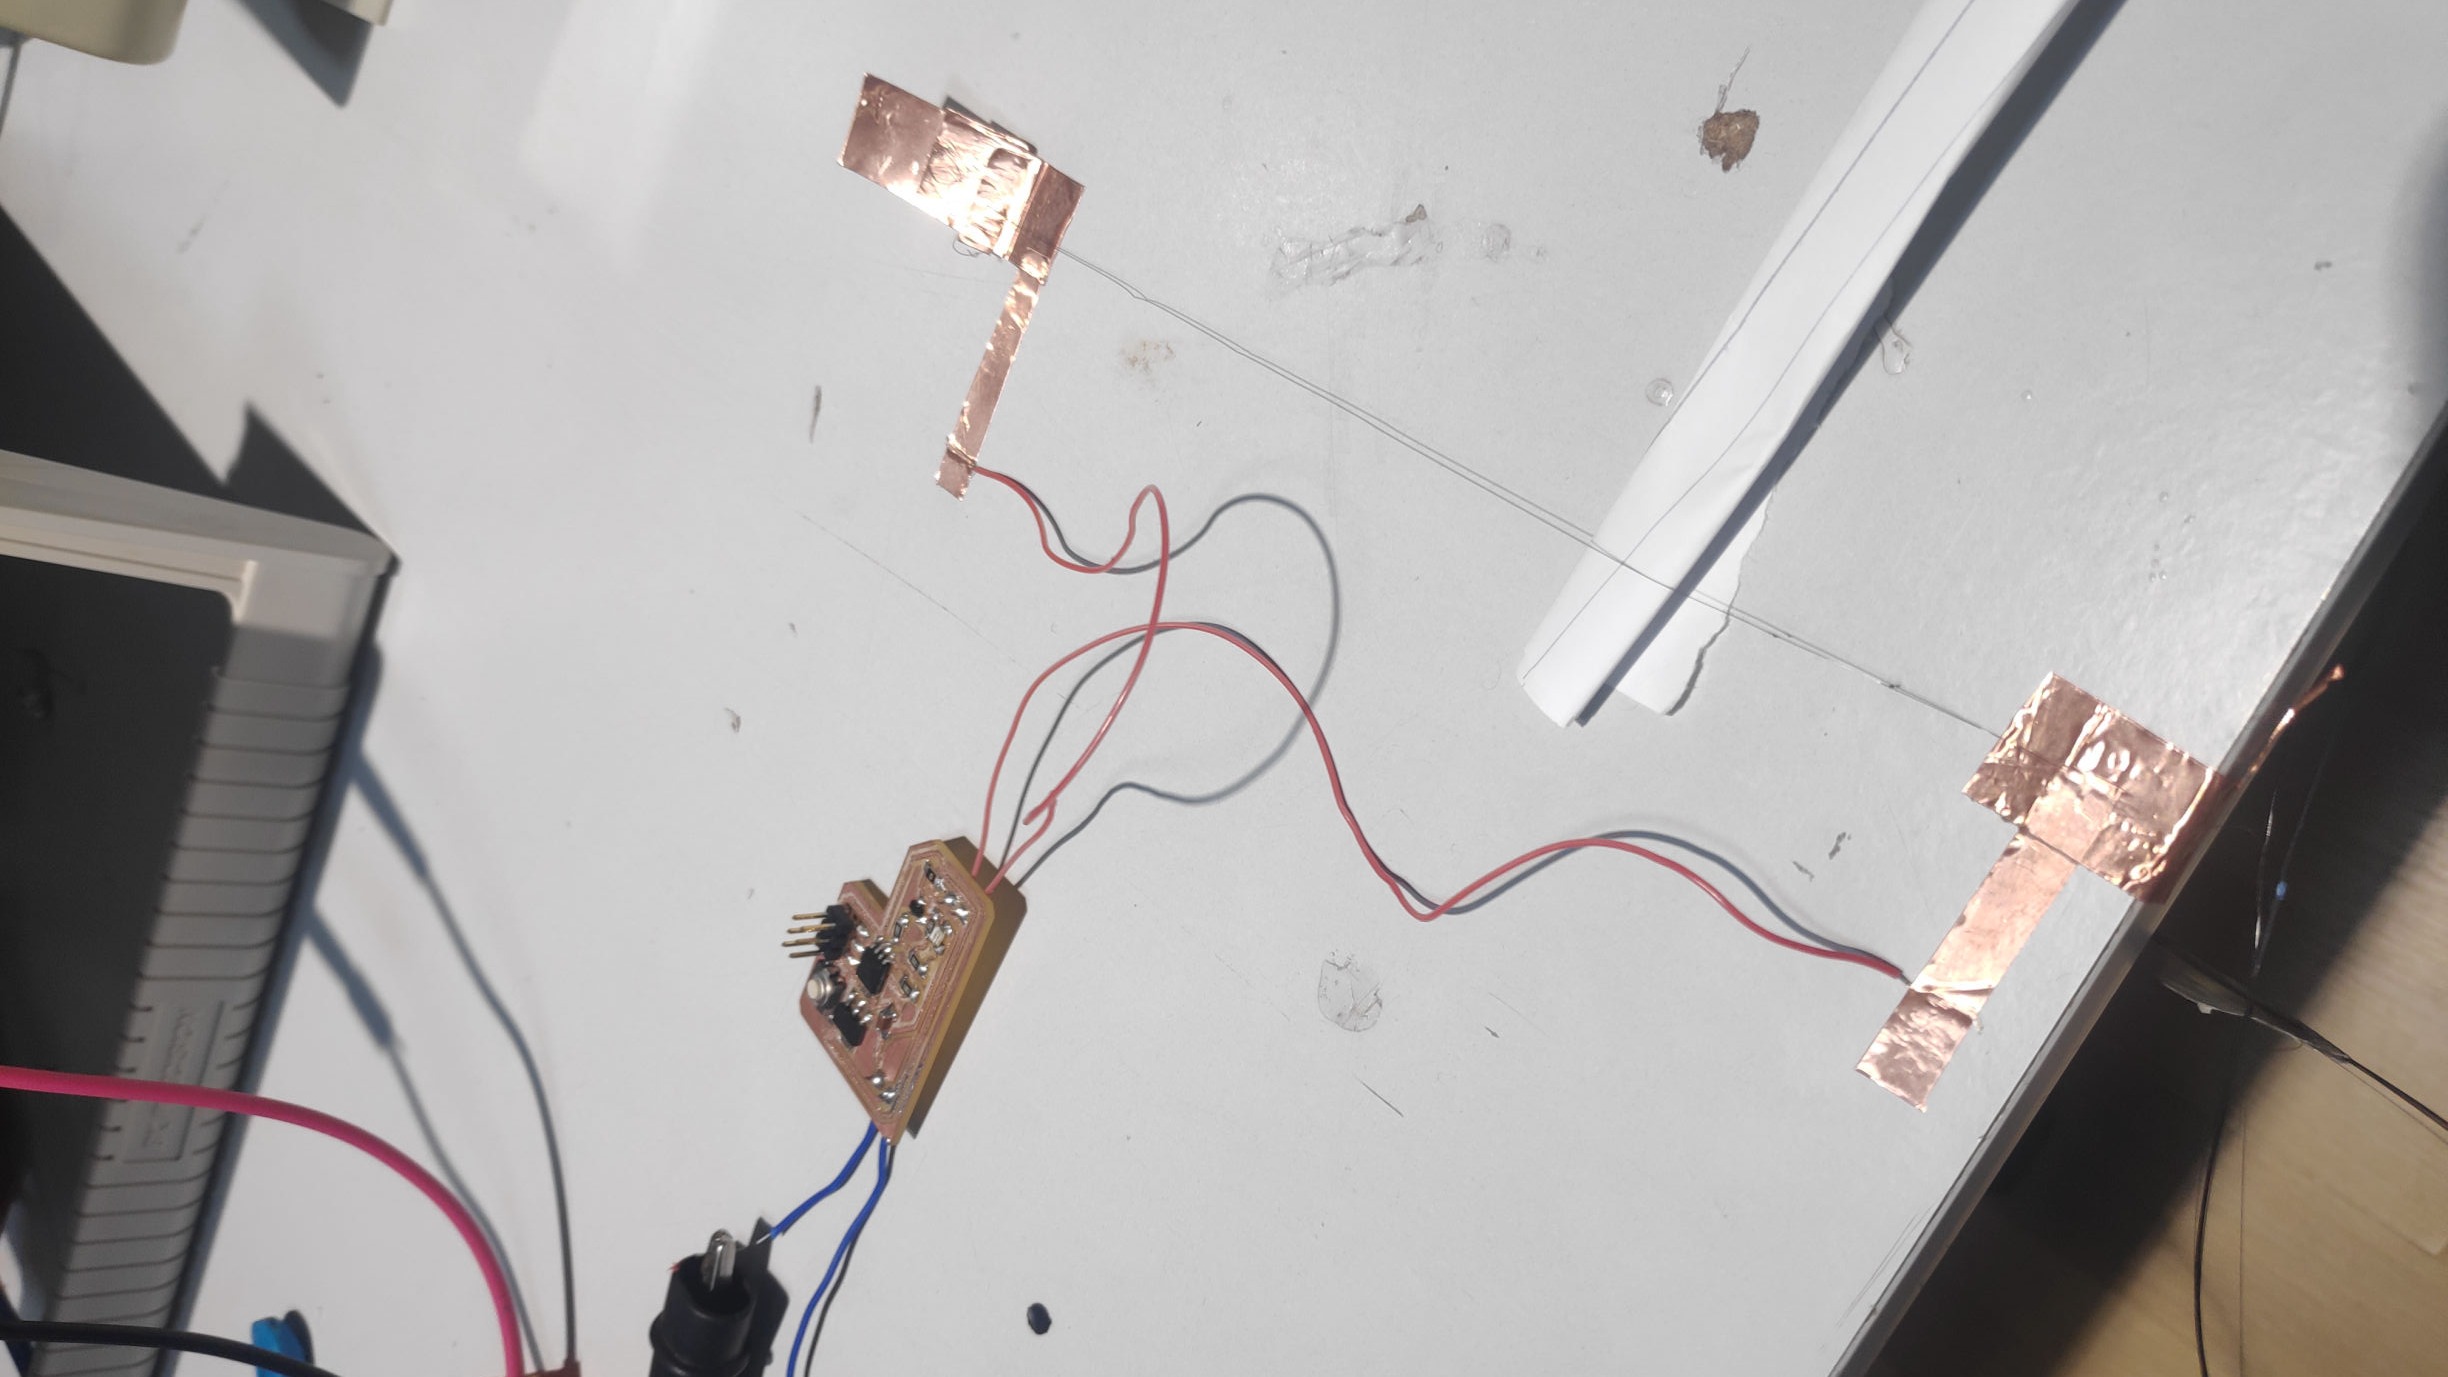
For final testing of circuit I employed this setup to test .Using copper sheet i placed and connected the Nitionl wire.
Micro actuator Using Nitinol Working.yeeaaaeee.
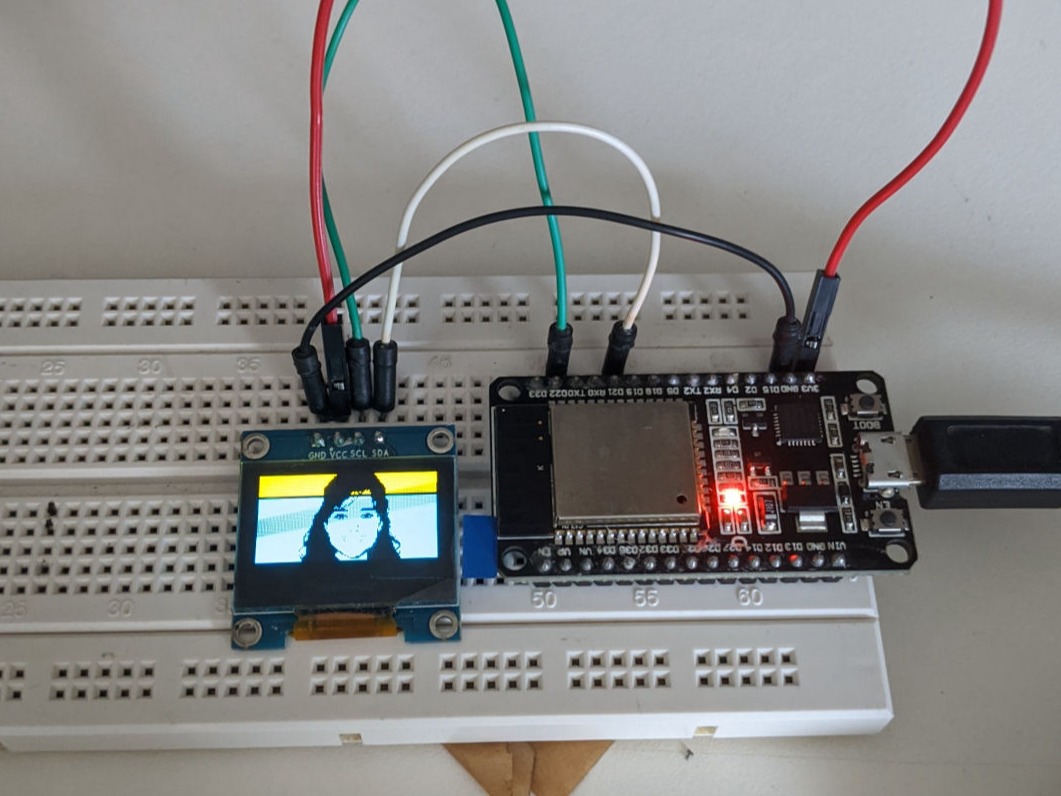
Pin -- ESP32
Vin -- 3.3V
GND -- GND
SCL -- GPIO 22
SDA -- GPIO 21
https://github.com/adafruit/Adafruit_SSD1306.
https://github.com/adafruit/Adafruit-GFX-Library.
https://github.com/adafruit/Adafruit_BusIO.
Follow the next steps to install those libraries.
1. Open your Arduino IDE and go to Sketch > Include Library > Manage Libraries. The Library Manager should open.
2. Type “SSD1306” in the search box and install the SSD1306 library from Adafruit.
3. After installing the SSD1306 library from Adafruit, type “GFX” in the search box and install the library.
4. After installing the libraries, restart your Arduino IDE.
After wiring the OLED display to the ESP32 and installing all required libraries, you can use one example from the library to see if everything is working properly.
In your Arduino IDE, go to File > Examples > Adafruit SSD1306 and select the example for the display you’re using.
If your OLED display is not showing anything:
Check that the OLED display is properly wired to the ESP32
Double-check the OLED display I2C address: with the OLED connected to the ESP32, upload this code and check the I2C address in the Serial Monitor
#include <Wire.h>
#include <Adafruit_Gfx.h>
#include <Adafruit_SSD1306.h>
#define SCREEN_WIDTH 128 // OLED display width, in pixels
#define SCREEN_HEIGHT 64 // OLED display height, in pixels
// Declaration for an SSD1306 display connected to I2C (SDA, SCL pins)
Adafruit_SSD1306 display(SCREEN_WIDTH, SCREEN_HEIGHT, &Wire, -1);
void setup() {
Serial.begin(115200);
if(!display.begin(SSD1306_SWITCHCAPVCC, 0x3C)) { // Address 0x3D for 128x64
Serial.println(F("SSD1306 allocation failed"));
for(;;);
}
delay(2000);
display.clearDisplay();
display.setTextSize(1);
display.setTextColor(WHITE);
display.setCursor(0, 10);
// Display static text
display.println("Hello, world!");
display.display();
}
void loop() {
}
You can display 128×64 bitmap monocolor images on the OLED display.
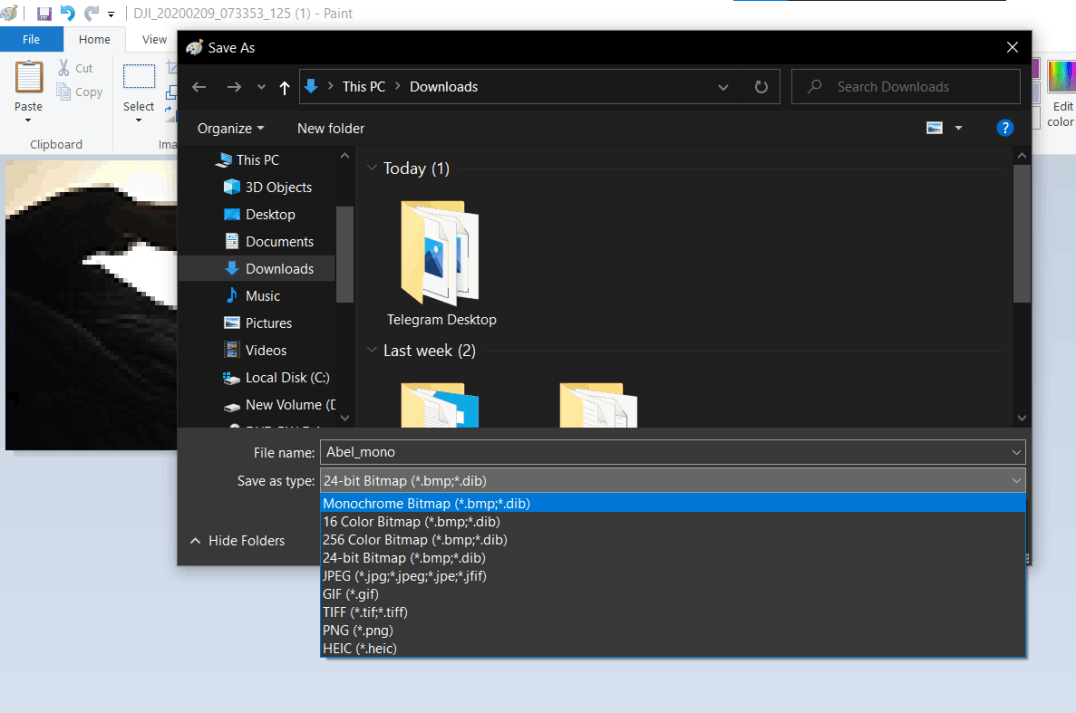
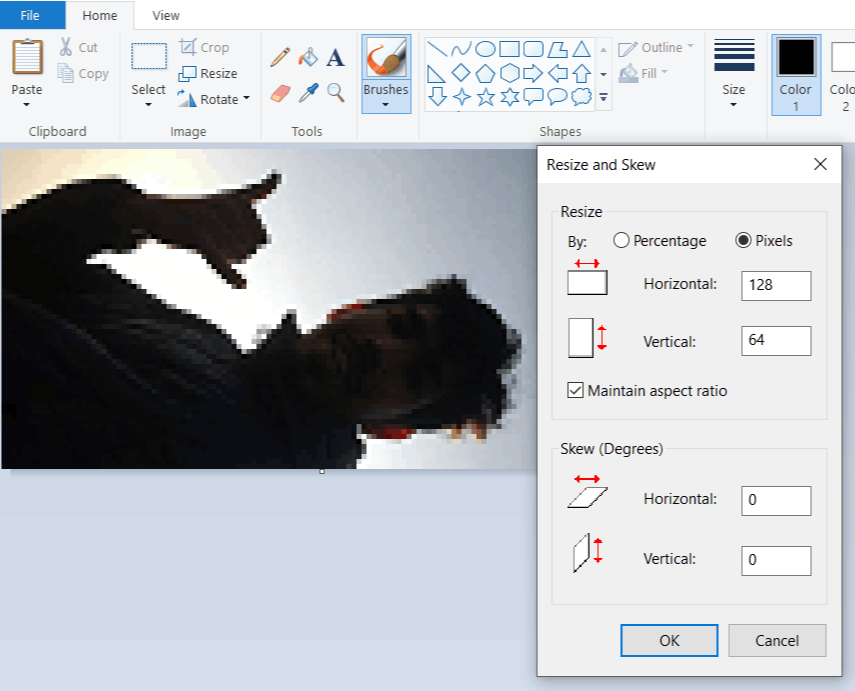
First, use an imaging program to resize a photo or picture and save it as monochrome bitmap.
You can use paint(Windows).
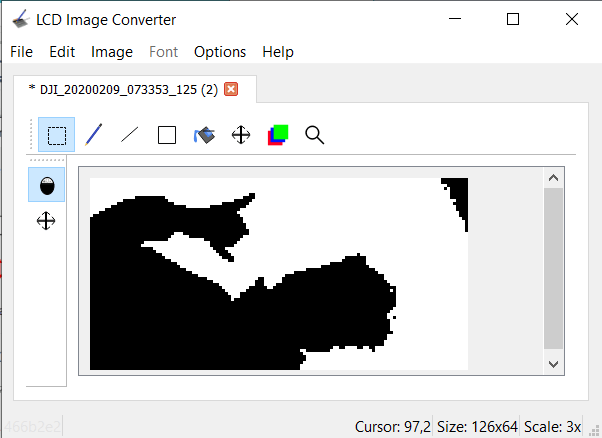
Then, use a Image to C Array converter to convert the image into an array. I’ve used LCD Image Converter.
Save as Monochrome bitmap.
Resize image to 128*64.
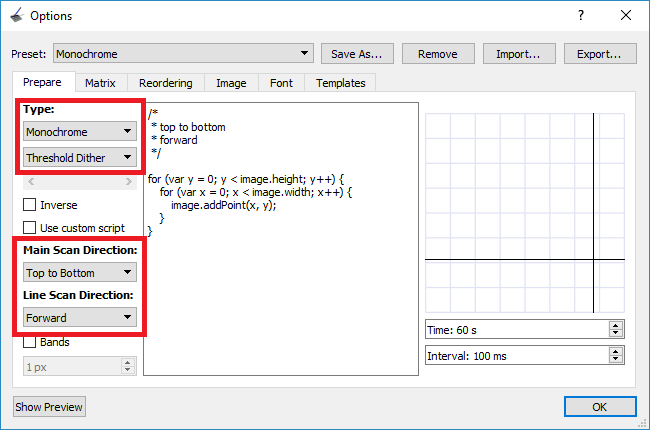
Go to Options > Conversion and in the Prepare tab, select the following options:
Type: Monochrome, Threshold Dither
Main Scan Direction: Top to Bottom
Line Scan Direction: Forward
Run the program and start with a new image. Go to Image > Import and select the bitmap image you’ve created earlier.
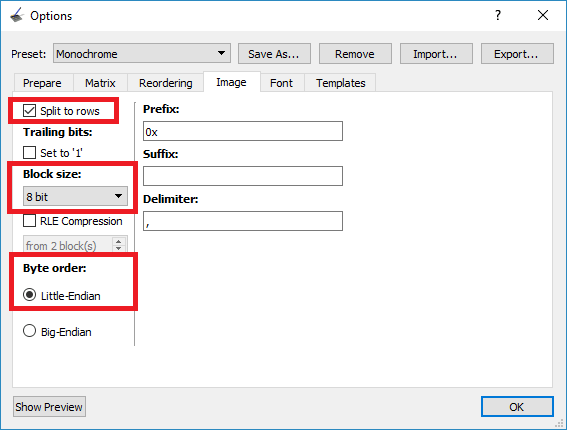
Go to the Image tab and select the following options:
Split to rows
Block size: 8 bit
Byte order: Little-Endian
Then, click OK. Finally, in the main menu, go to File > Convert. A new file with .c extension should be saved. That file contains the C array for the image. Open that file with a text editor, and copy the array.
How drawBitmap() works?
Copy your array to the sketch. Then, to display the array, use the drawBitmap() method that accepts the following arguments (x, y, image array, image width, image height, rotation). The (x, y) coordinates define where the image starts to be displayed.
#include< Wire.h
#include <Adafruit_GFX.h
#include <Adafruit_SSD1306.h>
#define SCREEN_WIDTH 128
#define SCREEN_HEIGHT 64
Adafruit_SSD1306 display(SCREEN_WIDTH, SCREEN_HEIGHT, &Wire, -1);
static const uint8_t image_data_Saraarray[1024] = {
0xff, 0xff, 0xff, 0xff, 0xff, 0xff, 0xff, 0xff, 0xff, 0xff, 0xff, 0xff, 0xff, 0xff, 0xf8, 0x00,
0xff, 0xff, 0xff, 0xff, 0xff, 0xff, 0xff, 0xff, 0xff, 0xff, 0xff, 0xff, 0xff, 0xff, 0xfe, 0x00,
0xff, 0xff, 0xff, 0xff, 0xff, 0xff, 0xff, 0xff, 0xff, 0xff, 0xff, 0xff, 0xff, 0xff, 0xfd, 0x00,
0xff, 0xff, 0xff, 0xff, 0xff, 0xff, 0xff, 0xff, 0xff, 0xff, 0xff, 0xff, 0xff, 0xff, 0xff, 0x00,
0xff, 0xff, 0xff, 0xff, 0xff, 0xff, 0xf9, 0xff, 0xff, 0xff, 0xff, 0xff, 0xff, 0xff, 0xff, 0x00,
0xff, 0xfe, 0x00, 0x7f, 0xff, 0xff, 0xe1, 0xff, 0xff, 0xff, 0xff, 0xff, 0xff, 0xff, 0xff, 0x00,
0xff, 0xe0, 0x00, 0x3f, 0xff, 0xff, 0x03, 0xff, 0xff, 0xff, 0xff, 0xff, 0xff, 0xff, 0xff, 0xc0,
0xff, 0x80, 0x00, 0x0f, 0xff, 0xf0, 0x07, 0xff, 0xff, 0xff, 0xff, 0xff, 0xff, 0xff, 0xff, 0x80,
0xfe, 0x00, 0x00, 0x00, 0xff, 0x00, 0x0f, 0xff, 0xff, 0xff, 0xff, 0xff, 0xff, 0xff, 0xff, 0xc0,
0xf8, 0x00, 0x00, 0x00, 0x00, 0x00, 0x3f, 0xff, 0xff, 0xff, 0xff, 0xff, 0xff, 0xff, 0xff, 0xc0,
0xe0, 0x00, 0x00, 0x00, 0x00, 0x00, 0x7f, 0xff, 0xff, 0xff, 0xff, 0xff, 0xff, 0xff, 0xff, 0xe0,
0x80, 0x00, 0x00, 0x00, 0x00, 0x00, 0x3f, 0xff, 0xff, 0xff, 0xff, 0xff, 0xff, 0xff, 0xff, 0xe0,
0x00, 0x00, 0x00, 0x00, 0x00, 0x00, 0x1f, 0xff, 0xff, 0xff, 0xff, 0xff, 0xff, 0xff, 0xff, 0xf0,
0x00, 0x00, 0x00, 0x00, 0x00, 0x00, 0x1f, 0xff, 0xff, 0xff, 0xff, 0xff, 0xff, 0xff, 0xff, 0xf8,
0x00, 0x00, 0x00, 0x00, 0x00, 0x00, 0x0f, 0xff, 0xff, 0xff, 0xff, 0xff, 0xff, 0xff, 0xff, 0xf8,
0x00, 0x00, 0x00, 0x00, 0x00, 0x00, 0x07, 0xff, 0xff, 0xff, 0xff, 0xff, 0xff, 0xff, 0xff, 0xf8,
0x00, 0x00, 0x00, 0x0e, 0x00, 0x00, 0x07, 0xff, 0xff, 0xff, 0xff, 0xff, 0xff, 0xff, 0xff, 0xfc,
0x00, 0x00, 0x00, 0x1f, 0x80, 0x00, 0x1f, 0xff, 0xff, 0xff, 0xff, 0xff, 0xff, 0xff, 0xff, 0xfc,
0x00, 0x00, 0x00, 0x3f, 0xfc, 0x00, 0x3f, 0xff, 0xff, 0xff, 0xff, 0xff, 0xff, 0xff, 0xff, 0xfc,
0x00, 0x00, 0x3f, 0xff, 0xff, 0x00, 0x7f, 0xff, 0xff, 0xff, 0xff, 0xff, 0xff, 0xff, 0xff, 0xfc,
0x00, 0x00, 0x7f, 0xff, 0xff, 0x00, 0xff, 0xff, 0xff, 0xff, 0xff, 0xff, 0xff, 0xff, 0xff, 0xfc,
0x00, 0x00, 0x07, 0xff, 0xff, 0x87, 0xff, 0xff, 0xff, 0xff, 0xff, 0xff, 0xff, 0xff, 0xff, 0xfc,
0x00, 0x00, 0x03, 0xff, 0xff, 0xc3, 0xff, 0xff, 0xff, 0xff, 0xff, 0xff, 0xff, 0xff, 0xff, 0xfc,
0x00, 0x00, 0x00, 0xff, 0xff, 0xe1, 0xff, 0xff, 0xff, 0xff, 0xff, 0xbf, 0xff, 0xff, 0xff, 0xfc,
0x00, 0x00, 0x00, 0x7f, 0xff, 0xf0, 0xff, 0xff, 0xff, 0xff, 0xf8, 0x0f, 0xff, 0xff, 0xff, 0xfc,
0x00, 0x00, 0x00, 0x1f, 0xff, 0xfc, 0xff, 0xff, 0xff, 0xff, 0xf0, 0x0f, 0xff, 0xff, 0xff, 0xfc,
0x00, 0x00, 0x00, 0x07, 0xff, 0xff, 0xff, 0xff, 0xff, 0xff, 0x00, 0x0f, 0xff, 0xff, 0xff, 0xfc,
0x00, 0x00, 0x00, 0x03, 0xff, 0xff, 0xff, 0xff, 0xff, 0xf8, 0x00, 0x07, 0xff, 0xff, 0xff, 0xfc,
0x00, 0x00, 0x00, 0x00, 0xff, 0xff, 0xff, 0xff, 0xff, 0x00, 0x00, 0x01, 0xff, 0xff, 0xff, 0xfc,
0x00, 0x00, 0x00, 0x00, 0x3f, 0xff, 0xff, 0xff, 0xf0, 0x00, 0x00, 0x00, 0xff, 0xff, 0xff, 0xfc,
0x00, 0x00, 0x00, 0x00, 0x0f, 0xff, 0xff, 0xff, 0x80, 0x00, 0x00, 0x00, 0x3f, 0xff, 0xff, 0xfc,
0x00, 0x00, 0x00, 0x00, 0x01, 0xff, 0xff, 0x3f, 0x00, 0x00, 0x00, 0x00, 0x3f, 0xff, 0xff, 0xfc,
0x00, 0x00, 0x00, 0x00, 0x00, 0x7f, 0xfe, 0x3f, 0x00, 0x00, 0x00, 0x00, 0x1f, 0xff, 0xff, 0xfc,
0x00, 0x00, 0x00, 0x00, 0x00, 0x1f, 0xfe, 0x3c, 0x00, 0x00, 0x00, 0x00, 0x0f, 0xff, 0xff, 0xfc,
0x00, 0x00, 0x00, 0x00, 0x00, 0x0f, 0xf8, 0x18, 0x00, 0x00, 0x00, 0x00, 0x03, 0xff, 0xff, 0xfc,
0x00, 0x00, 0x00, 0x00, 0x00, 0x07, 0xf0, 0x00, 0x00, 0x00, 0x00, 0x00, 0x0b, 0xff, 0xff, 0xfc,
0x00, 0x00, 0x00, 0x00, 0x00, 0x03, 0xc0, 0x00, 0x00, 0x00, 0x00, 0x00, 0x03, 0xff, 0xff, 0xfc,
0x00, 0x00, 0x00, 0x00, 0x00, 0x01, 0xc0, 0x00, 0x00, 0x00, 0x00, 0x00, 0x03, 0xff, 0xff, 0xfc,
0x00, 0x00, 0x00, 0x00, 0x00, 0x01, 0x00, 0x00, 0x00, 0x00, 0x00, 0x00, 0x03, 0xff, 0xff, 0xfc,
0x00, 0x00, 0x00, 0x00, 0x00, 0x00, 0x00, 0x00, 0x00, 0x00, 0x00, 0x00, 0x03, 0xff, 0xff, 0xfc,
0x00, 0x00, 0x00, 0x00, 0x00, 0x00, 0x00, 0x00, 0x00, 0x00, 0x00, 0x00, 0x07, 0xff, 0xff, 0xfc,
0x00, 0x00, 0x00, 0x00, 0x00, 0x00, 0x00, 0x00, 0x00, 0x00, 0x00, 0x00, 0x0f, 0xff, 0xff, 0xfc,
0x00, 0x00, 0x00, 0x00, 0x00, 0x00, 0x00, 0x00, 0x00, 0x00, 0x00, 0x00, 0x1f, 0xff, 0xff, 0xfc,
0x00, 0x00, 0x00, 0x00, 0x00, 0x00, 0x00, 0x00, 0x00, 0x00, 0x00, 0x00, 0x1b, 0xff, 0xff, 0xfc,
0x00, 0x00, 0x00, 0x00, 0x00, 0x00, 0x00, 0x00, 0x00, 0x00, 0x00, 0x00, 0x0f, 0xff, 0xff, 0xfc,
0x00, 0x00, 0x00, 0x00, 0x00, 0x00, 0x00, 0x00, 0x00, 0x00, 0x00, 0x00, 0x07, 0xff, 0xff, 0xfc,
0x00, 0x00, 0x00, 0x00, 0x00, 0x00, 0x00, 0x00, 0x00, 0x00, 0x00, 0x00, 0x1f, 0xff, 0xff, 0xfc,
0x00, 0x00, 0x00, 0x00, 0x00, 0x00, 0x00, 0x00, 0x00, 0x00, 0x00, 0x00, 0x3f, 0xff, 0xff, 0xfc,
0x00, 0x00, 0x00, 0x00, 0x00, 0x00, 0x00, 0x00, 0x00, 0x00, 0x67, 0x99, 0xff, 0xff, 0xff, 0xfc,
0x00, 0x00, 0x00, 0x00, 0x00, 0x00, 0x00, 0x00, 0x03, 0x00, 0xff, 0xfd, 0xff, 0xff, 0xff, 0xfc,
0x00, 0x00, 0x00, 0x00, 0x00, 0x00, 0x00, 0x00, 0x01, 0xff, 0xff, 0xff, 0xff, 0xff, 0xff, 0xfc,
0x00, 0x00, 0x00, 0x00, 0x00, 0x00, 0x00, 0x00, 0x00, 0xff, 0xff, 0xff, 0xff, 0xff, 0xff, 0xfc,
0x00, 0x00, 0x00, 0x00, 0x00, 0x00, 0x00, 0x00, 0x01, 0xff, 0xff, 0xff, 0xff, 0xff, 0xff, 0xfc,
0x00, 0x00, 0x00, 0x00, 0x00, 0x00, 0x00, 0x00, 0x03, 0xff, 0xff, 0xff, 0xff, 0xff, 0xff, 0xfc,
0x00, 0x00, 0x00, 0x00, 0x00, 0x00, 0x00, 0x00, 0x03, 0xff, 0xff, 0xff, 0xff, 0xff, 0xff, 0xfc
};
void setup() {
Serial.begin(115200);
if (!display.begin(SSD1306_SWITCHCAPVCC, 0x3C)) {
Serial.println(F("SSD1306 allocation failed"));
for (;;);
}
delay(2000); // Pause for 2 seconds
// Clear the buffer.
display.clearDisplay();
// Draw bitmap on the screen
display.drawBitmap(0, 0, image_data_Saraarray, 128, 64, 1);
display.display();
}
void loop() {
}
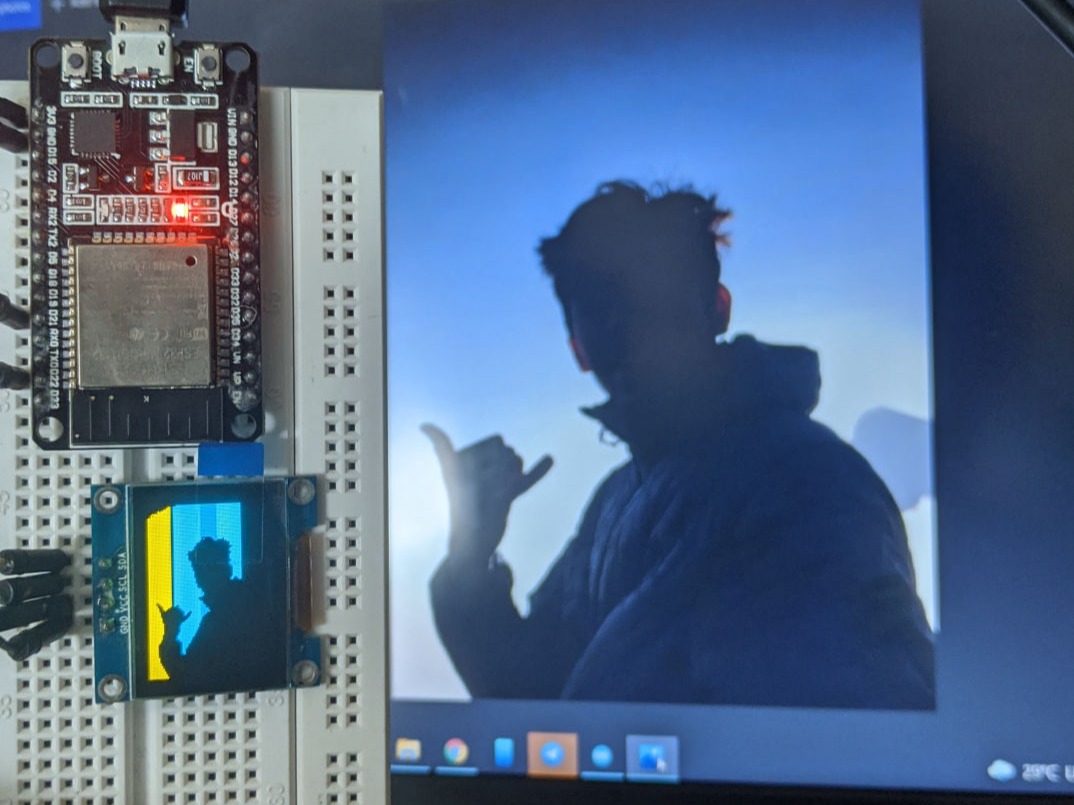
After uploading the code, this is what we get on the display.
There was a yellow shade in the display Idk why but my friend Saheen said that it maybe due to the loose contact with pixel display flat wires.
Wrong I2C address.
The I2C address for the OLED display we are using is 0x3C. However, yours may be different. So, make sure you check your display I2C address using an I2C scanner sketch.
SDA and SCL not connected properly .
Please make sure that you have the SDA and SCL pins of the OLED display wired correctly. In case of the ESP32, connect SDA pin to GPIO 21 and SCL pin to GPIO 22.
Website was designed with Mobirise site theme