WEEK15 Interface and Application Programming
Group Assignment
compare as many tool options as possible
Individual Assignment
write an application that interfaces a user with an input &/or output device that you made
My Idea
From my research before the local session, I got interested in two interfaces, Processing and MIT App Inventor.
MIT App Inventor needs ESP boards which I haven't made yet, so I decided to try it in Group Assignment using my instructor's ESP32 board.
For Individual Assignment I chose to try Proceccing with using my ATTiny3216 board and weight sensor (load cell) which I have made on Input Devices week.

(Actually I’ve already tried this on the input devices week, so I wrote about it in the details as follows)
The overview is as follows:
1.Put something on the weight sensor.
2.The circle shown on the Processing screen gets bigger dipending on its weights.
Processing
1.Setting
“Processing is a flexible software sketchbook and a language for learning how to code within the context of the visual art” (Quote from the official website of Proceccing)
Firstly, I downloaded Processing from here.
As a refference II used website below (Japanese) which my instructore told me.
Ref:ArduinoとProcessingでシリアル通信(1) ArduinoからProcessingに値を送ってみる
2.Write the Code for Arduino
  #include
  // https://github.com/bogde/HX711
  #include "HX711.h"

  const int DT_PIN = 1;
  const int SCK_PIN = 0;

  HX711 Scale;

  void setup() {
    Serial.begin(9600);
    Scale.begin(DT_PIN, SCK_PIN);

    Scale.set_scale(-386.3);
    Scale.tare();
  }

  int gram = 0;

  void loop() {
    gram = Scale.get_units(10) + 0.5;

    Serial.write(map(gram, 0, 1000, 0, 255));

    Scale.power_down();
    delay(5000);
    Scale.power_up();
  }
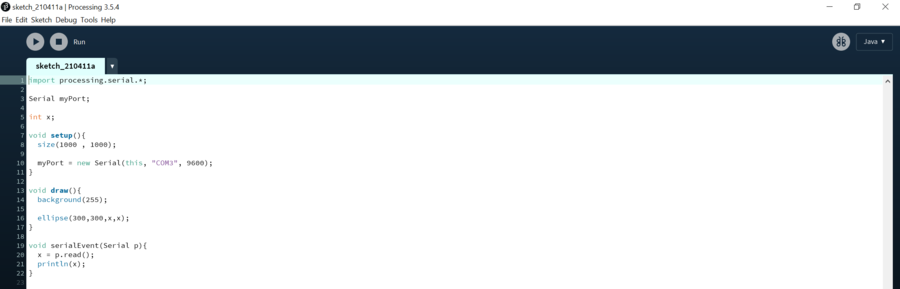
3.Prepare the Code for Processing
    import processing.serial.*;

    Serial myPort;

    int x;

    void setup(){
      size(1000 , 1000);

      myPort = new Serial(this, "COM3", 9600);
    }

    void draw(){
      background(255);

      ellipse(300,300,x,x);
    }

    void serialEvent(Serial p){
      x = p.read();
      println(x);
    }
4.Activate the Code
By pushing the ▶button on the top of Processing screen,the code will be activated. The result will be shown on the screen.
Problem
I didn't close the serial monitor on Arduino for the first trial.By this mistake nothing has shown on the Processing screen initially.You need to close the serial monitor on Arduino when you are activating the code for Processing!
5.Results
I had fun putting many things on the weight sensor….such as strawberries, an orange, an apple, a clock, a teapot ,and the heavy pot (which is about 4.2kg!)
Hero Video
Thoughts
learned many kinds of UI this week and the difference of the necessary boards depending on which UI I would like to use. Making an app and operating the device from my smartphone sounded much fun at first, but it needed another board(ESP series), and I had to reconsider if I really needed this function for my final project… When I hear new ways or possiblities , I feel like I woudl like to try as many things as I can ,but in this timing , sometimes I need to triage the things by the priority to fihish my final project by the deadline…!
Files
Code for Arduino
Code for Processing