♦ Embedded Programming♦
This week is all about embedded programming.As I am familiar with programming I decided to explore new things.Our local instructor suhas sir took review what we have to do in this week.Also he told about programming and its different IDE and how to read datasheet.So I decided I will run my program using Linux,Windows.I started working on different programming language like embedded C or using arduino.
Please refer group assignment here:
Group Assignment: Compare the performance and development workflows for other architectures.
Individual Assignment:Read a microcontroller data sheet
program your board to do something,
with as many different programming languages
and programming environments as possible.
Individual Assignment:
The embedded hardware primarily includes the processor, memory, bus, peripheral devices, I/O ports, and various controllers.The embedded software usually contains the embedded operating system and various applications.There are basically two types of architecture that apply to embedded systems:Von Neumann architecture and Harvard architecture.
Von Neumann Architecture: In a Von-Neumann architecture, the same memory and bus are used to store both data and instructions that run the program.Since you cannot access program memory and data memory simultaneously, the Von Neumann architecture is susceptible to bottlenecks and system performance is affected.
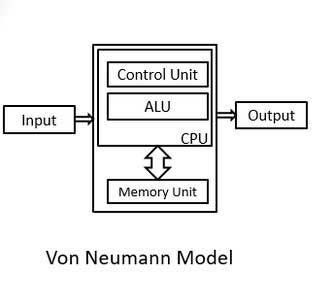
Von Neumann
Harvard Architecture: Compared with the Von Neumann architecture, a Harvard architecture processor has two outstanding features.First, instructions and data are stored in two separate memory modules;instructions and data do not coexist in the same module.Second, two independent buses are used as dedicated communication paths between the CPU and memory; there is no connection between the two buses.
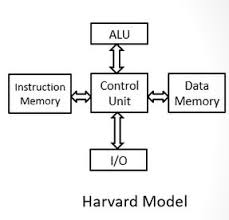
Harvard
Comparison between Von neumann and Harvard Architecture:
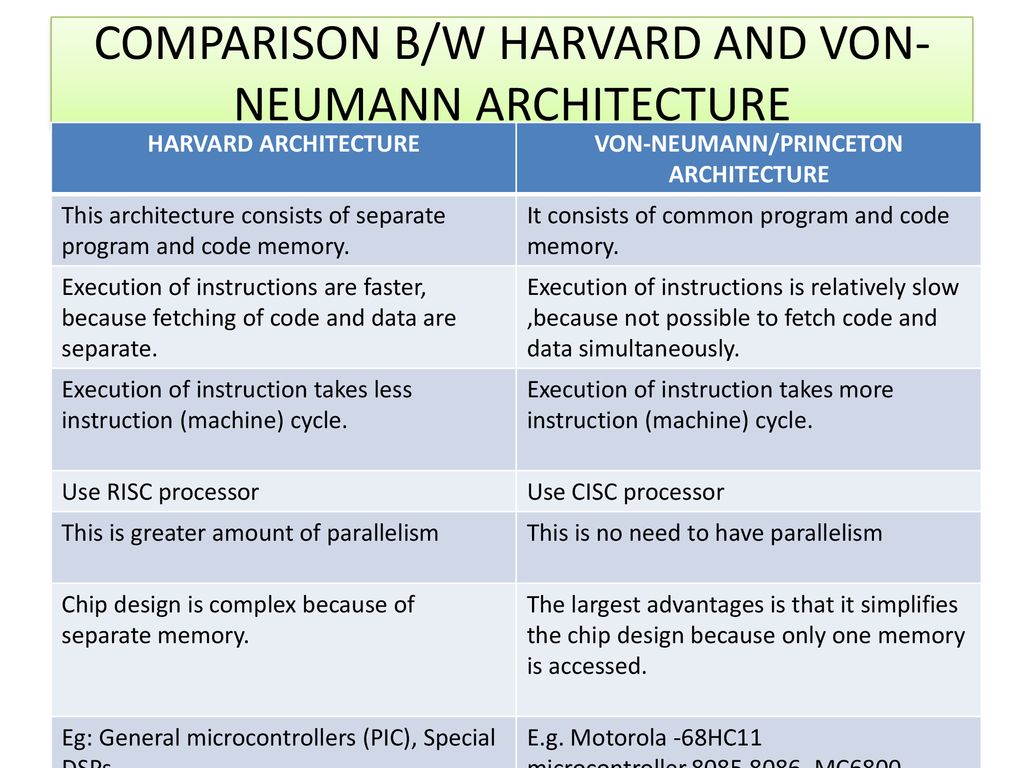
Comparison
RISC and CISC:
RISC:The term RISC stands for ‘’Reduced Instruction Set Computer’’.It is a CPU design plan based on simple orders and acts fast. This is small or reduced set of instructions. Here, every instruction is expected to attain very small jobs.In this machine, the instruction sets are modest and simple, which help in comprising more complex commands.Each instruction is about the similar length; these are wound together to get compound tasks done in a single operation.Most commands are completed in one machine cycle.This pipelining is a crucial technique used to speed up RISC machines.
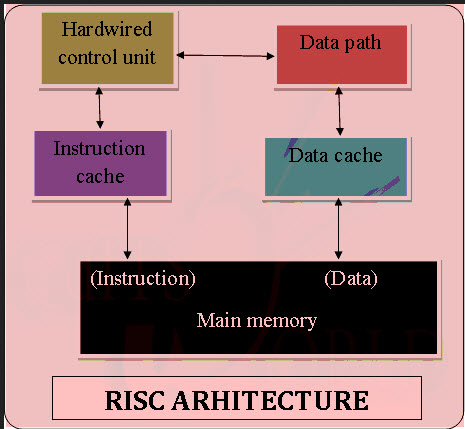
RISC
CISC:The term CISC stands for ‘’Complex Instruction Set Computer’’.It is a CPU design plan based on single commands, which are skilled in executing multi-step operations. CISC computers have small programs.It has a huge number of compound instructions, which takes a long time to perform. Here, a single set of instruction is protected in several steps; each instruction set has additional than 300 separate instructions.Maximum instructions are finished in two to ten machine cycles.
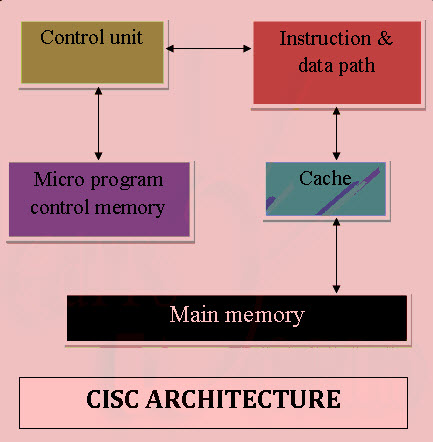
CISC
Comparison between RISC and CISC:
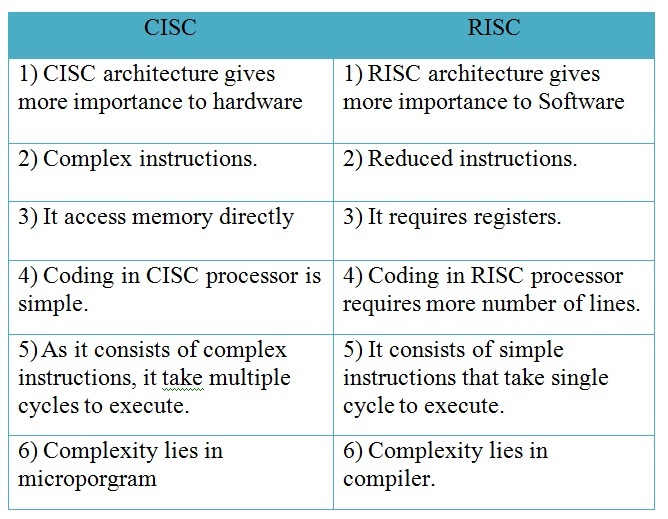
Comparison
Microprocessor and Microcontroller:
Microprocessor:Microprocessor is a silicon-based integrated chip with only a central processing unit.It’s the heart of a computer system which is designed to perform loads of tasks that involve data.Microprocessors don’t have RAM, ROM, IO pins, Timers, and other peripherals on the chip.They are to be added externally to make them functional.It consists of the ALU which handles all the arithmetic and logical operations;the Control Unit which manages and handles the flow of instructions throughout the system; and Register Array which stores the data from memory for fast access.
Microcontroller:Microcontroller is like a mini computer with a CPU along with RAM, ROM, serial ports, timers, and IO peripherals all embedded on a single chip.It’s designed to perform application specific tasks that require a certain degree of control such as a TV remote, LED display panel, smart watches, vehicles, traffic light control, temperature control, etc.It’s a high-end device with a microprocessor, memory, and input/output ports all on a single chip.It’s the brains of a computer system which contains enough circuitry to perform specific functions without external memory.
Reading Datasheet:
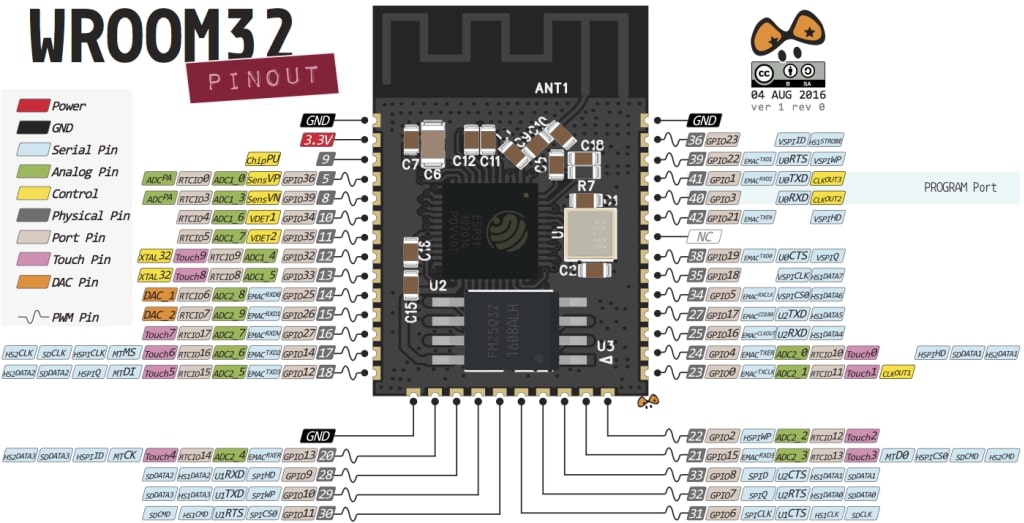
Individual task is to read datasheet.As I am familiar with how to read datasheet I decided I will finilize my final project controller.Datasheet contain all specification of controller like its memory , architecture ,registers,ports.It contain detailed specification which will help us to choose controller.In Electronics Design assignment I have used Attiny45 so I decided I will read this datasheet also.For my project I finilized ESP32.I read ESP32 datasheet.ESP32 is from Extensa family ,which contain in build wifi and bluetooth module.
ESP32 contain 48 pins ,which have different functions.ESP32 have GPIO pins,GND,VCC,RESET.One single pin have two or more function.From this diagram u can get idea about ESP32 IC.
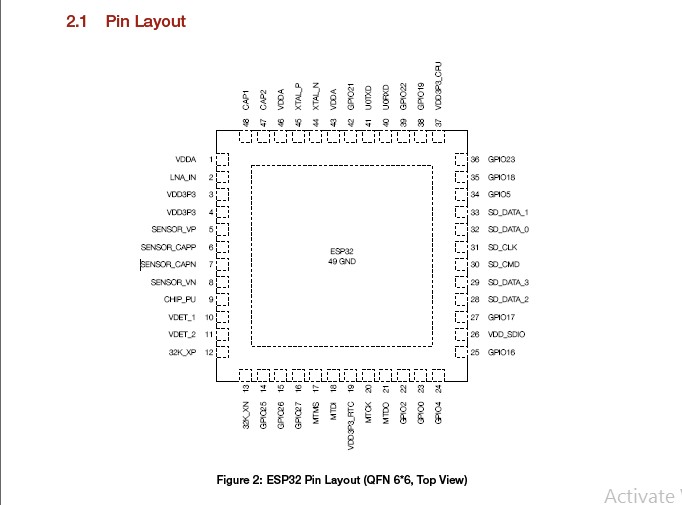
Pinout
Block Diagram of ESP32 contain its registers ,memory allocation ,DAC,ADC,timer,counter.From diagram we understood which function ESP32 does.
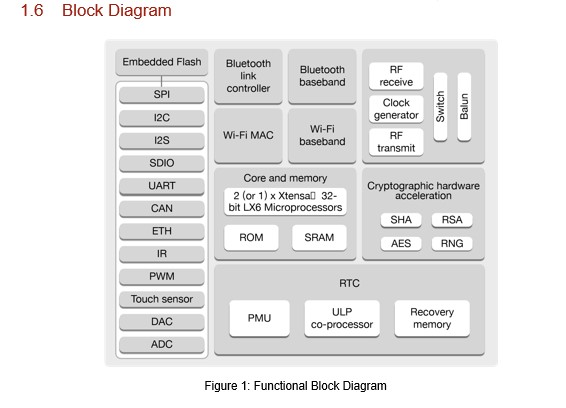
Block Diagram
This figure shows the specification of ESP32,like how much timer and counter it have.Also it gives information about input voltage and I2C and SPI protocol and also about GPIO pins.
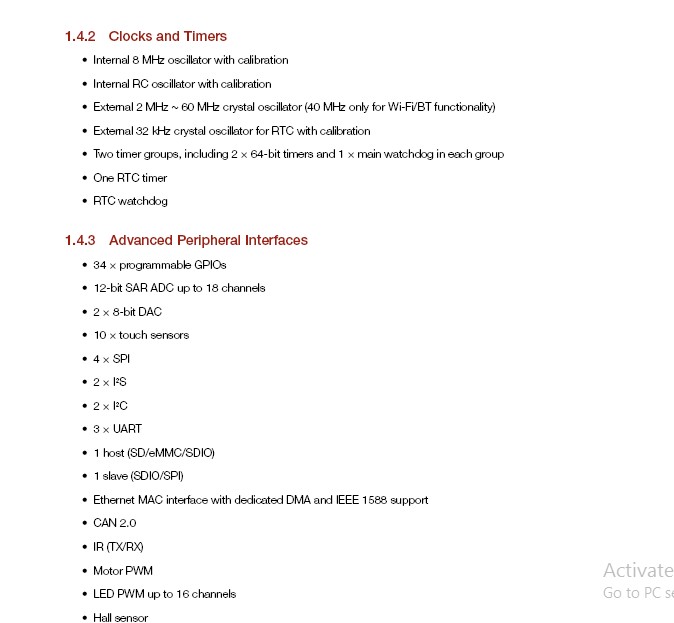
Specification
Programming:
Second task in individual assignment is to do programming in different langauge and also use different environment IDE like Arduino,Atmel Studio.I decided to program my board using Arduino.Also I decided to do program in embedded C. First I wrote code for button and Led.When I pressed Button ,Led will glow otherwise it will off.As I have used attiny 45 for my last assignment.I am using that board to program my code.So I need to add library for Attiny45.I already downloaded that library in Arduino.I started working on coding.
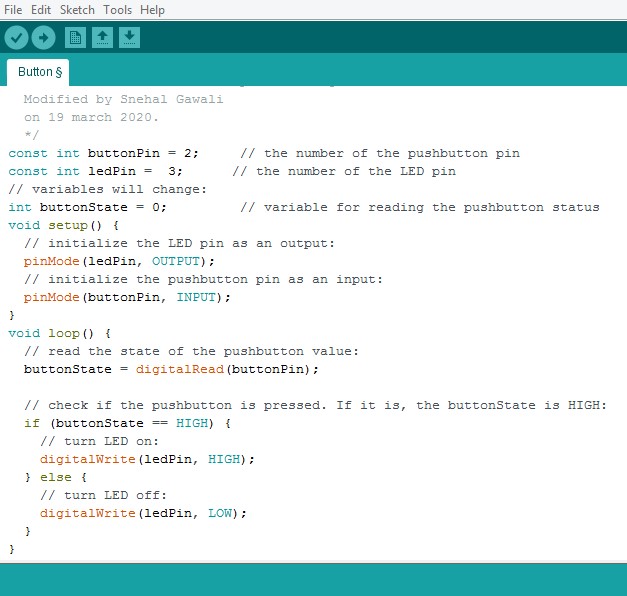
Coding
When I completed my coding ,I need to do setting of arduino.As shown in figure you need to select board and programmer as per your requirement.I have used my Fab isp as a programmer and board as Attiny45.Now compile the code.After compilation uplaod the code.In code I have written comment to understand the code.Each comment decribe what it does.
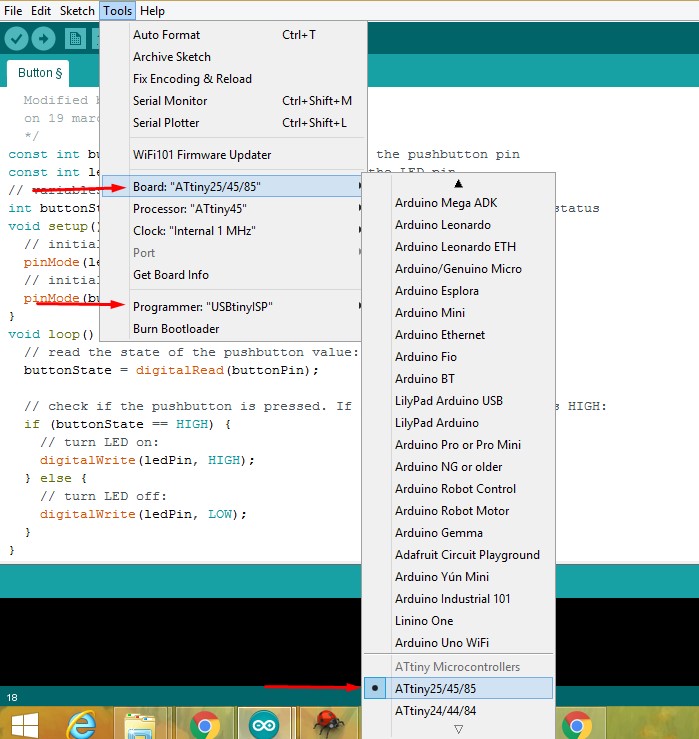
Setting
After successfully complition of arduino programming,I decided to start work on embedded C .I have wriiten C code in notepad and save it as .C file.As I made my board ,so I decided to write code for Led blinking alternately. Embedded C is little bit complex than normal arduino programming.In embedded C we have to set port as high or low.We have to write that using hexadicimal number systemor binary number system.
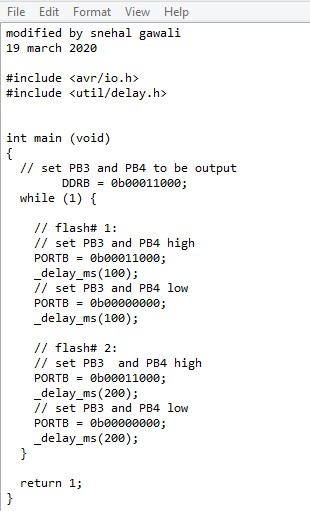
Coding
/*Modified by Snehal Gawali
on 19 march 2020*/


const int buttonPin = 2;     // the number of the pushbutton pin
const int ledPin =  3;      // the number of the LED pin

// variables will change:
int buttonState = 0;         // variable for reading the pushbutton status

void setup() {
  // initialize the LED pin as an output:
  pinMode(ledPin, OUTPUT);
  // initialize the pushbutton pin as an input:
  pinMode(buttonPin, INPUT);
}

void loop() {
  // read the state of the pushbutton value:
  buttonState = digitalRead(buttonPin);

  // check if the pushbutton is pressed. If it is, the buttonState is HIGH:
  if (buttonState == HIGH) {
    // turn LED on:
    digitalWrite(ledPin, HIGH);
  } else {
    // turn LED off:
    digitalWrite(ledPin, LOW);
  }
}
After writing code I decided to upload this code in my board using Linux platform. I dont have linux operating system ,but my collegue tejswini have linux .So I used her laptop to upload code using FABISP.I have used some commands for uploading the program.To upload C code,make file is required.I downloaded make file from syllabus.Make file and C file saved in one folder.
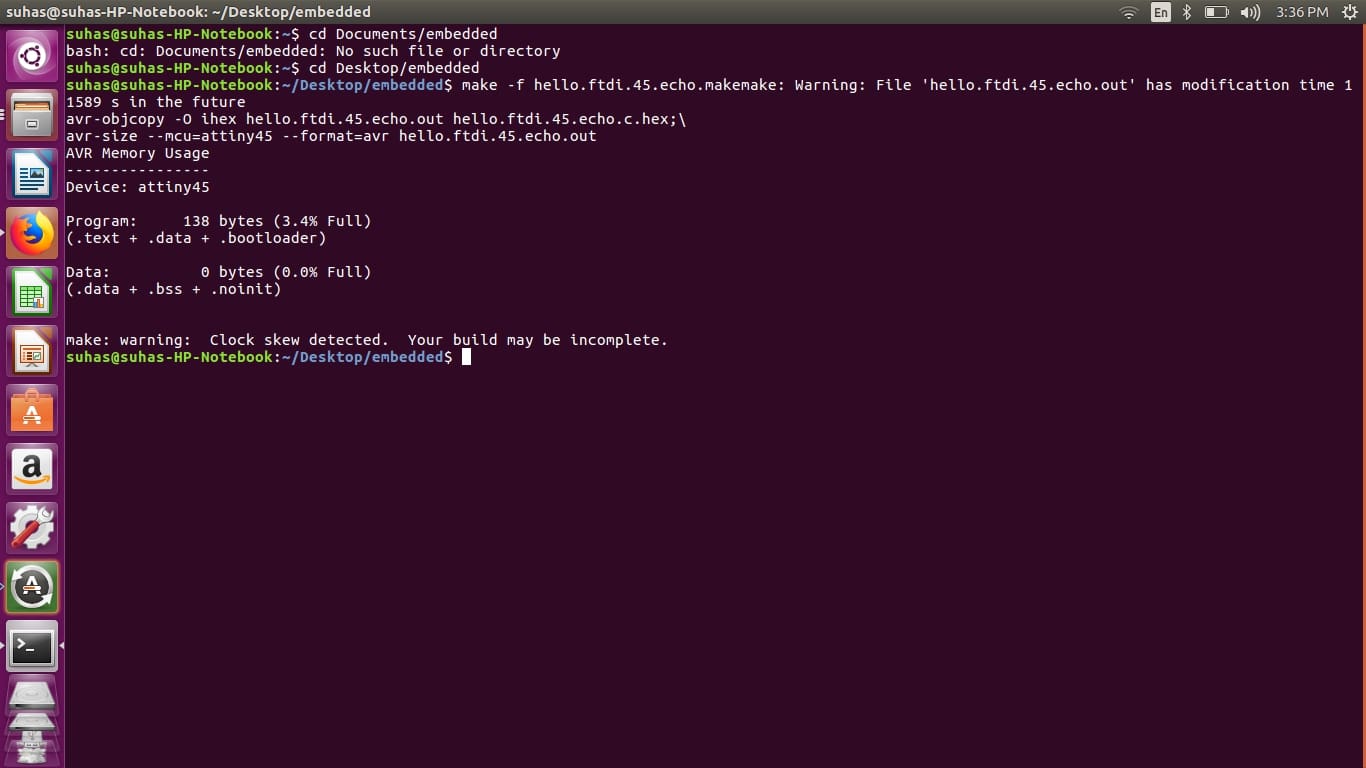
Commands
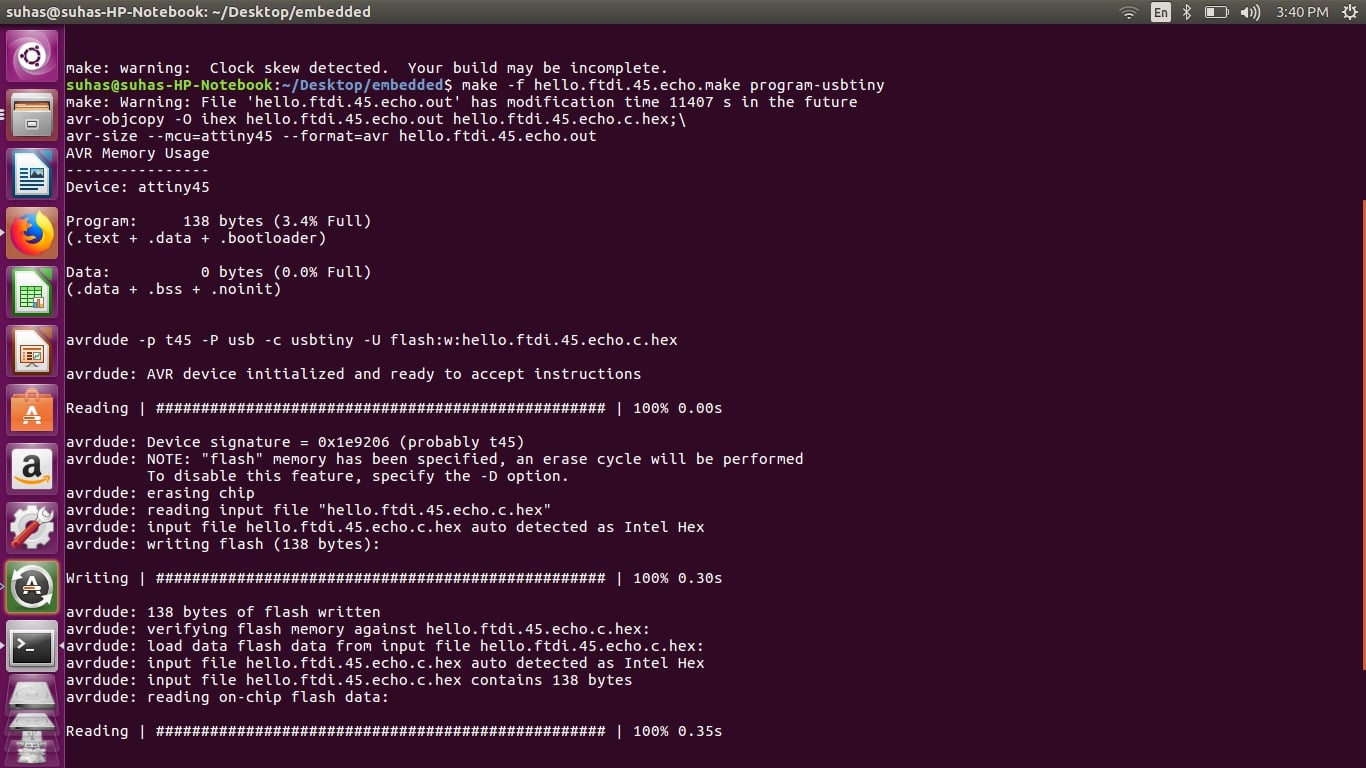
Commands
Apart from this I did programming using Git Bash.Also I tried Atmel Studio and XOD environment.I tried different examples from arduino like motor program also LED fading ,temperature sensor.
Group Assignment:
In group assignment we have to study different architecture.Our instructor Suhas Sir took lecture on Rasberry pi and ESP32.He explained about Rasberry bi,how it works ,what function it does.To upload the code in Rasberry pi,we required code written in python.So he told about how to write code in python.Also we studied ESP32 board.We uploaded Led blinking code using arduino.
ESP32
After ESP32 ,we studied rasberry pi.Rasberry pi is like mini computer.We can connect it our PC instead of CPU.We can connect camera to rasberry pi.It has ethernet port and usb port.We can programit using python.Rasberry pi has ARM processor,which can do multiple tasks.Suhas sir told about its pinout ,its hardware,how to interface led to rasberry pi.
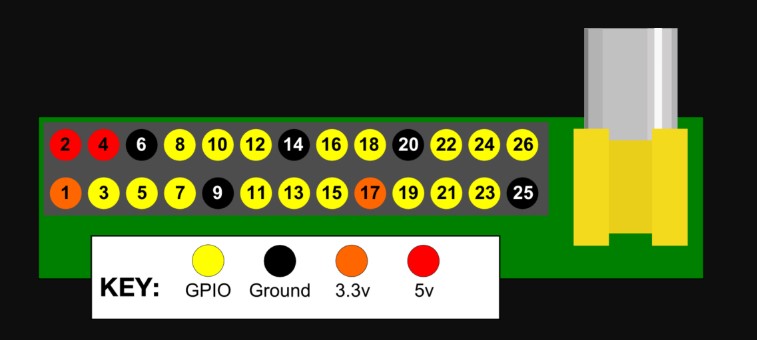
Pinout
Learning Outcome:
From this I learned different programming languages.I used different environment for programming.I uploaded code using various platform like linux,git bash.Also I have learned different controller families like AVR,ARM,EXTENSA.Also used ESP32 and rasberry pi.I did LED blinking and button program,also I tried different program for sensor, motor.
