In this week we are required to add an output to our microcontroller. I used my final project board atmega328 to finish this week assignment. I will use I2c screen as an output device.
The link of the group assignment can be found here
Introduction
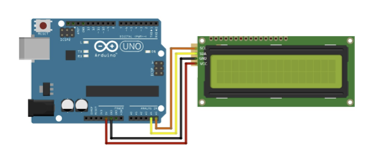
This is a 16x2 LCD display screen with I2C interface. It is able to display 16x2 characters on 2 lines, white characters on blue background. Usually, Arduino LCD display projects will run out of pin resources easily, especially with Arduino Uno. And it is also very complicated with the wire soldering and connection. This I2C 16x2 Arduino LCD Screen is using an I2C communication interface. It means it only needs 4 pins for the LCD display: VCC, GND, SDA, SCL. It will save at least 4 digital/analog pins on Arduino. and since I don’t have alot of pins on my atmega328 board I choose this screen to use it for my final project. To get familiar with the I2c screen I watched a video on YouTube to learn more about it. How to use it, what I need to downloads and how to connect the wires.
Steps
I download the required library which is liquid crystal library
I tested the screen using the hello world code:
// include the library code:
#include "Wire.h"
#include "Adafruit_LiquidCrystal.h"

// Connect via i2c, default address #0 (A0-A2 not jumpered)
Adafruit_LiquidCrystal lcd(0);

void setup() {
  // set up the LCD's number of rows and columns:
  lcd.begin(16, 2);
  // Print a message to the LCD.
  lcd.print("hello, world!");
}

void loop() {
  // set the cursor to column 0, line 1
  // (note: line 1 is the second row, since counting begins with 0):
  lcd.setCursor(0, 1);
  // print the number of seconds since reset:
  lcd.print(millis()/1000);

  lcd.setBacklight(HIGH);
  delay(500);
  lcd.setBacklight(LOW);
  delay(500);
}#include <Wire.h>
#include <LiquidCrystal_I2C.h>
int ThermistorPin = 3;
int Vo;
float R1 = 10000;
float logR2, R2, T;
float c1 = 1.009249522e-03, c2 = 2.378405444e-04, c3 = 2.019202697e-07;
int led = 10; // the PWM pin the LED is attached to
int brightness = 0; // how bright the LED is
int fadeAmount = 5; // how many points to fade the LED by
void setup() {
pinMode(led, OUTPUT);
Serial.begin(9600);
}
void loop() {
int sensorValue = analogRead(A2);
// print out the value you read:
Serial.println(sensorValue);
delay(1);
digitalWrite(led,HIGH);
Vo = analogRead(ThermistorPin);
R2 = R1 * (1023.0 / (float)Vo - 1.0);
logR2 = log(R2);
T = (1.0 / (c1 + c2*logR2 + c3*logR2*logR2*logR2));
T = T - 273.15;
T = ( T - 32.0 )/1.8;
lcd.print("Temperature: ");
lcd.print(T);
lcd.print(" C");
delay(500);
}This video is show how the screen is working.