Print, Scan, Repeat
Exploration in methods of 3D scanning and printing.
3D Print
The world of 3D printing is relatively new and yet it has developed so much over last years. Having just barely interacted with it over last couple of years in IAAC in Master of Advanced Architecture. Which is why it has been a curious experience to play with it freely testing it’s limits.
Printer
Our lab in Tinkerers has a wide range of 3D printers: 2 RepRaps, BCN3D Sigma, Formlabs, (and potentially Sharebot and 2 delta printers of Wasp currently on maintanance).
.jpg)
– Printers in Tinkerers Lab –
Based on these two files: by Neil, by previous FabAcademy student, and inspired by examples like this one, - I parametrically recreated test files to be printed:
– TODO: Add Script Screen –
TODO: add file link
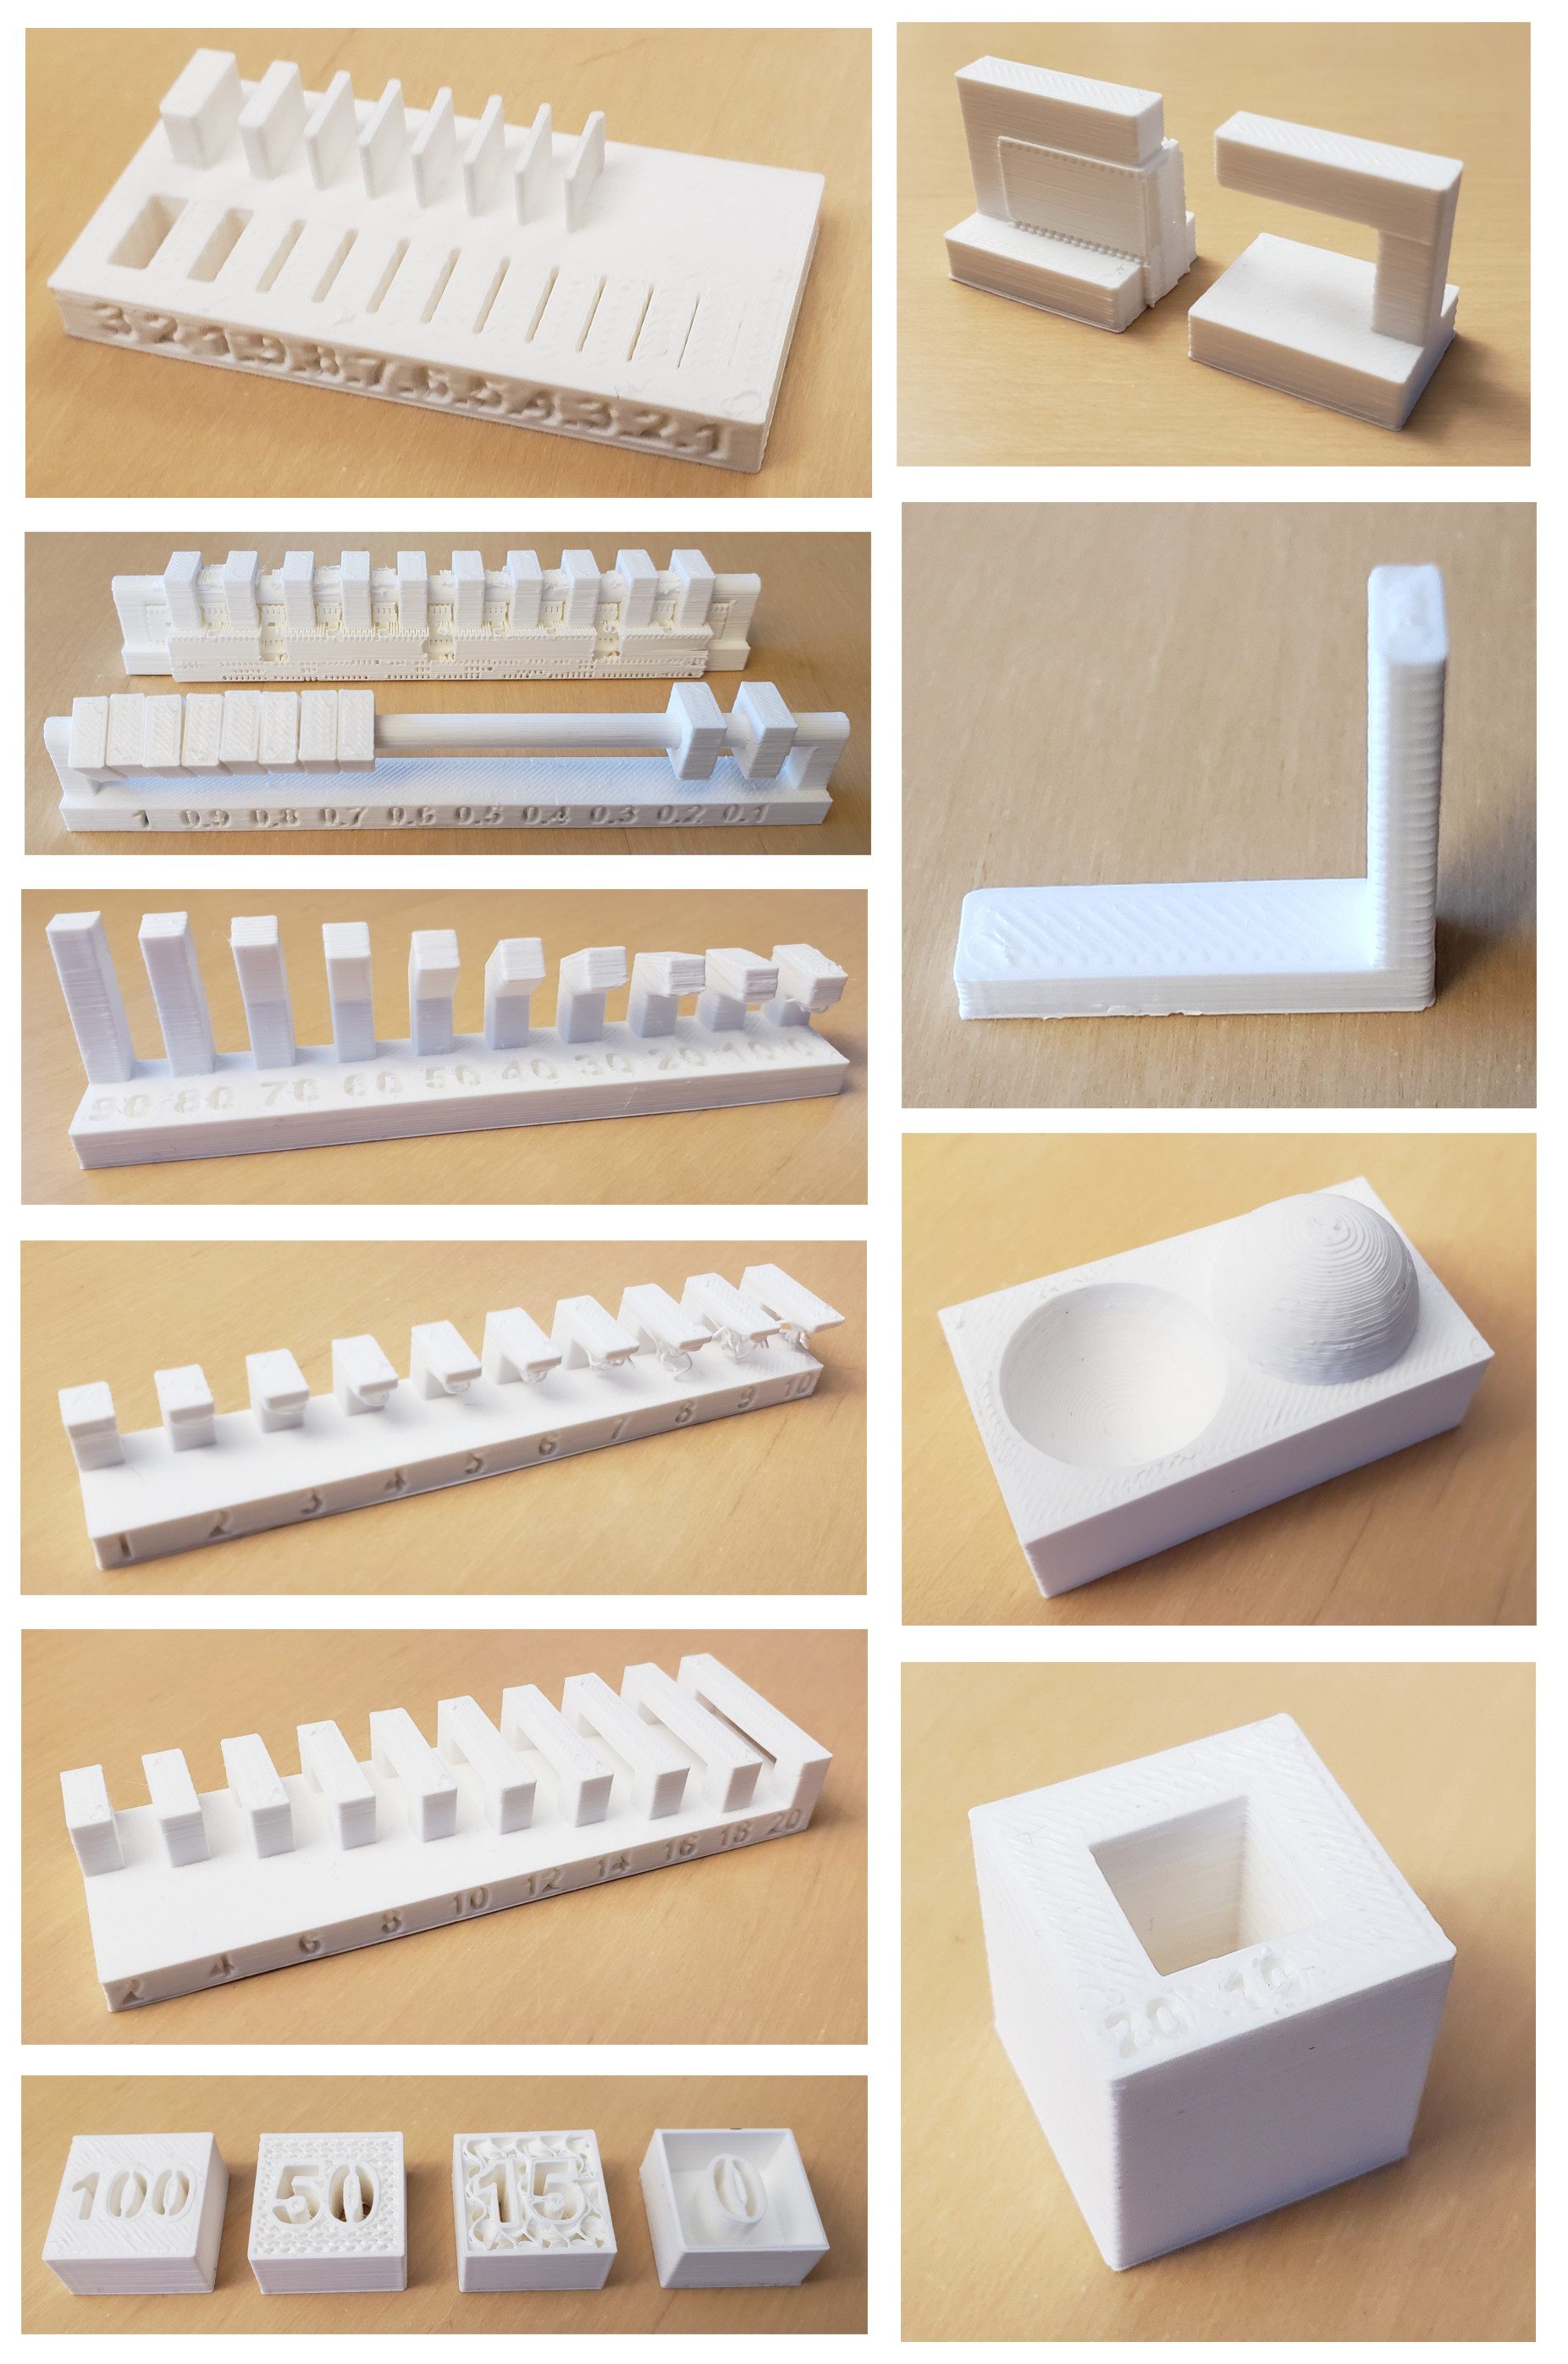
First test being a smallest I produced about the variation between vartical and horizontal layers of print.
.jpg)
.jpg)
.jpg)
.jpg)
– First Test –
.jpg)
.jpg)
– Preparing Files –
.jpg)
.jpg)
.jpg)
.jpg)
– Printing Tests –
As one of the experiments I applied different filling algorithms - normal grid versus rotated cube filling. This resulted in an interesting pattern internally:
.jpg)
– Filling Algorithm Variation –
.jpg)
.jpg)
.jpg)
– General Test Result –
As a comparison I wanted to try to print the same file on another printer to compare quality settings as well as filament differences. Unfortunately other printer wasn’t accurate enough to reproduce the same geometry. Upon discussion, the retraction with such a minute details was too much causing highly-detailed and involute parts of the print to fail. Which is why the base surface ended up in a superior quality but everything above it essentially was unusable.
.jpg)
.jpg)
.jpg)
.jpg)
– Other Printer Tests –
Using different filaments didn’t help noticeably (though rather curiously surface quality was better with yellow filament).
.jpg)
– Filament Used –
Conclusions:
- Surface quality while being clear and typical 3D print shows how much it depends on the layering height as well as on retraction and speed - longer waiting on connections result in more noticeable seams.
.jpg)
.jpg)
.jpg)
– Surface Quality –
- Inclinations up to 70 degrees and bridges of all tested lengths behaved rather reliable. It is both logical and somewhat unintuitive that overhangs of even smallest length were failing completely
.jpg)
.jpg)
– Geometry Rules –
- the results are highly isotropic which has to influence orientation of prints and geometry itself.
.jpg)
– Layering result –
- It is curiously appropriate that this week the lab has a big file to test which due to nozzle clogging ended up a massive pile of filament. Since these prints take such a long time management aspect of the lab has to balance supervision and productivity - having two opposing effects on machine use. In this case the test was internal and was taking over 30 hours and it was decided to leave over weekend not to occupy machines during the week.
.jpg)
– Failed Print –
- these small machines while being extremely powerful have obvious accuracy limitation: when geometry is comparable in local scale to the filament height the accuracy of geometry reproduction goes noticeably bad. In my case first machine was able to work with pieces of 3X3 mm but it was clearly at it’s limit (obviously surpassed on the second).
– Clearance issue for support removal –
Results
.jpg)
– Prints –
Robot
One of the most notable experience was with the example shown in the local additional class on robotic non-planar 3D-printing. As compared to conventional (it is weird to say that) it allows for the nozzle of the printer to be inclined and thus reflect local differences of the structures in print. The geometry thus is being represented with respect to local geometrical inconsistencies.
.jpg) – Custom Robotic Print-head –
– Custom Robotic Print-head –
.jpg) – Robot Controller –
– Robot Controller –
.jpg)
.jpg)
– Calibration Process –
.jpg)
– Loading Filament –
.jpg)
– Voltage Adjustment for in Robot Additional Electronics –
.jpg)
– Starting to Print –
.jpg)
.jpg)
– First Layer –
.jpg)
– Second Layer –
.jpg)
.jpg)
.jpg)
– Printing Process : ) –
It is interesting how geometric interpretation of a surface into print file coupled with the accuracy of the robot movement resulted in a noticeable and characteristic geometric outcome.
.jpg)
.jpg)
– Result –
3D Scan
As a logical complement to the experimentation I participated in some tests of digitalization tools for the physical objects. It is curiously both related and reversed to the limits of 3D printing: main geometrical issue is mesh interpretation, main problem is resolution (though in this case from big scale down), etc.
Kinect 2
Conducted in IAAC we saw the potential of the technology with Kinect 2 via Skanect program. It is interesting how it can get resolution up to small creases in clothing.
Another curious thing to note is how use of robotic arm can be applied in here as well. In this case it provides controlled and varied perspective for the sensor to keep track of the model.
.jpg)
.jpg)
.jpg)
– Scan Tests –
Kinect Azure
As a comparison I wanted to test the new Kinect. Unfortunately it is still in a development stage so it is lacking proper tools and integration into other existing scanning tools.
.jpg) – Scan Tests –
– Scan Tests –
.jpg) – Testing Interface –
– Testing Interface –
.jpg) – Scanned Proximity –
– Scanned Proximity –
.jpg) – Combination with Color Information –
– Combination with Color Information –
.jpg) – Scan Resolution –
– Scan Resolution –
MRI
To apply these technologies and somewhat symbolically to commemorate first year after my accident I decided to recreate some of the imagery from my accident. Following this tutorial I managed to extract some crazy-looking geometry. Here are the steps I took:
-
Export DECOM model from medical software on disc given by hospital;
-
Import data it into InVersalius;
-
Play around with the range for slicing;
-
Generate the surface;
-
Export it as .STL;
-
Combine, clean and prune model to prepare for printing;
-
Send to print.
.jpg) – MRI –
– MRI –
.jpg) – MRI –
– MRI –
.jpg) – MRI –
– MRI –
After experimenting with scans of different resolution and of different parts of the body the most interesting result I achieved from slicing and overlaying different layers of the head: bones, breathing tracks, skin even with the breathing mask at the time.
Unforutnately the resulting mesh was extremely heavy and required a lot of cleaning steps. This tutorials helped a lot: cleaning with Meshmixer, cleaning with MeshLab, and here as well as applying previous experience of working with Rhinoceros and Grasshopper.
.jpg) – Before Cleaning –
– Before Cleaning –
.jpg) – After Cleaning –
– After Cleaning –
– TODO: Add script image from Grasshopper –
Next steps will include manual ways of simplification like the ones described here, here or here as well as try to limit area.
To be continued . . .
Again in a lucky coincidence the lab is looking forward to setup and test a Sharebot printer which would give much higher resolution. Moreover, I might get opportunity to print using Formlabs printer with excellent resolution and potentially with semi-transparent resin which in this case especially would make for an interesting look.
Post Scriptum
Photgrametry testing
After the pandemic that hit the world, I got curious in face mask design. One of the common problems with 3D printed designs is that the hard material during prolonged usage itrritates skin and actually causes brusing on contact. As a personal chalange and a side-project at work in Tinkerers I thought I could investigate potential of scanning the face with Phogrametry and creating Parametric Design that would one one hand prefectly match shape of your face and on the other - be personalizable to individual users.
After some preliminary investigation, the software of choice was MeshRoom - the documentation is rather straightforward and the default file managed to deal with the images I extracted from a video of myself I shot with my GoPro as described in my Software Exploration Week.
After hilarious experiments (like putting over 500 HD frames extracted from video to reconstruct over night -only to get cut out of meshing and thus get very detailed background reconstruction), my buttle with Photogrammetry continues. For now it resulted in following conclusions:
-
Having smaller files with lower resolution helps to drastically reduce the time for the algorythm;
-
Cropping images around the subject didn’t seem to mprove the outcome;
-
Manually removing problematic frames did improve recognition rate for frames;
-
Setup has to be well organized - having light into camera reduces chance of reconstruction, having background of matching brightness to the subject reduces chance of reconstruction; but having no feature on background also reduces chance of reconstruction;
-
Algorythm is extremely sensitive to movement of subject - slightest movement resulted in confusing reconstructions;
-
Extracting frames from video looses camera information, which seemed to decrease the reconstructability;
-
Throwing more data at the algorythm didn’t improve results - frames really should be very well curated and stable;
-
Optimal setup requires a camera with as high focal length as possible to reduce distortions (especially if no metadeta is there since otherwise software cannot account for distortion).
Some of the furstrating results I managed to acheive:
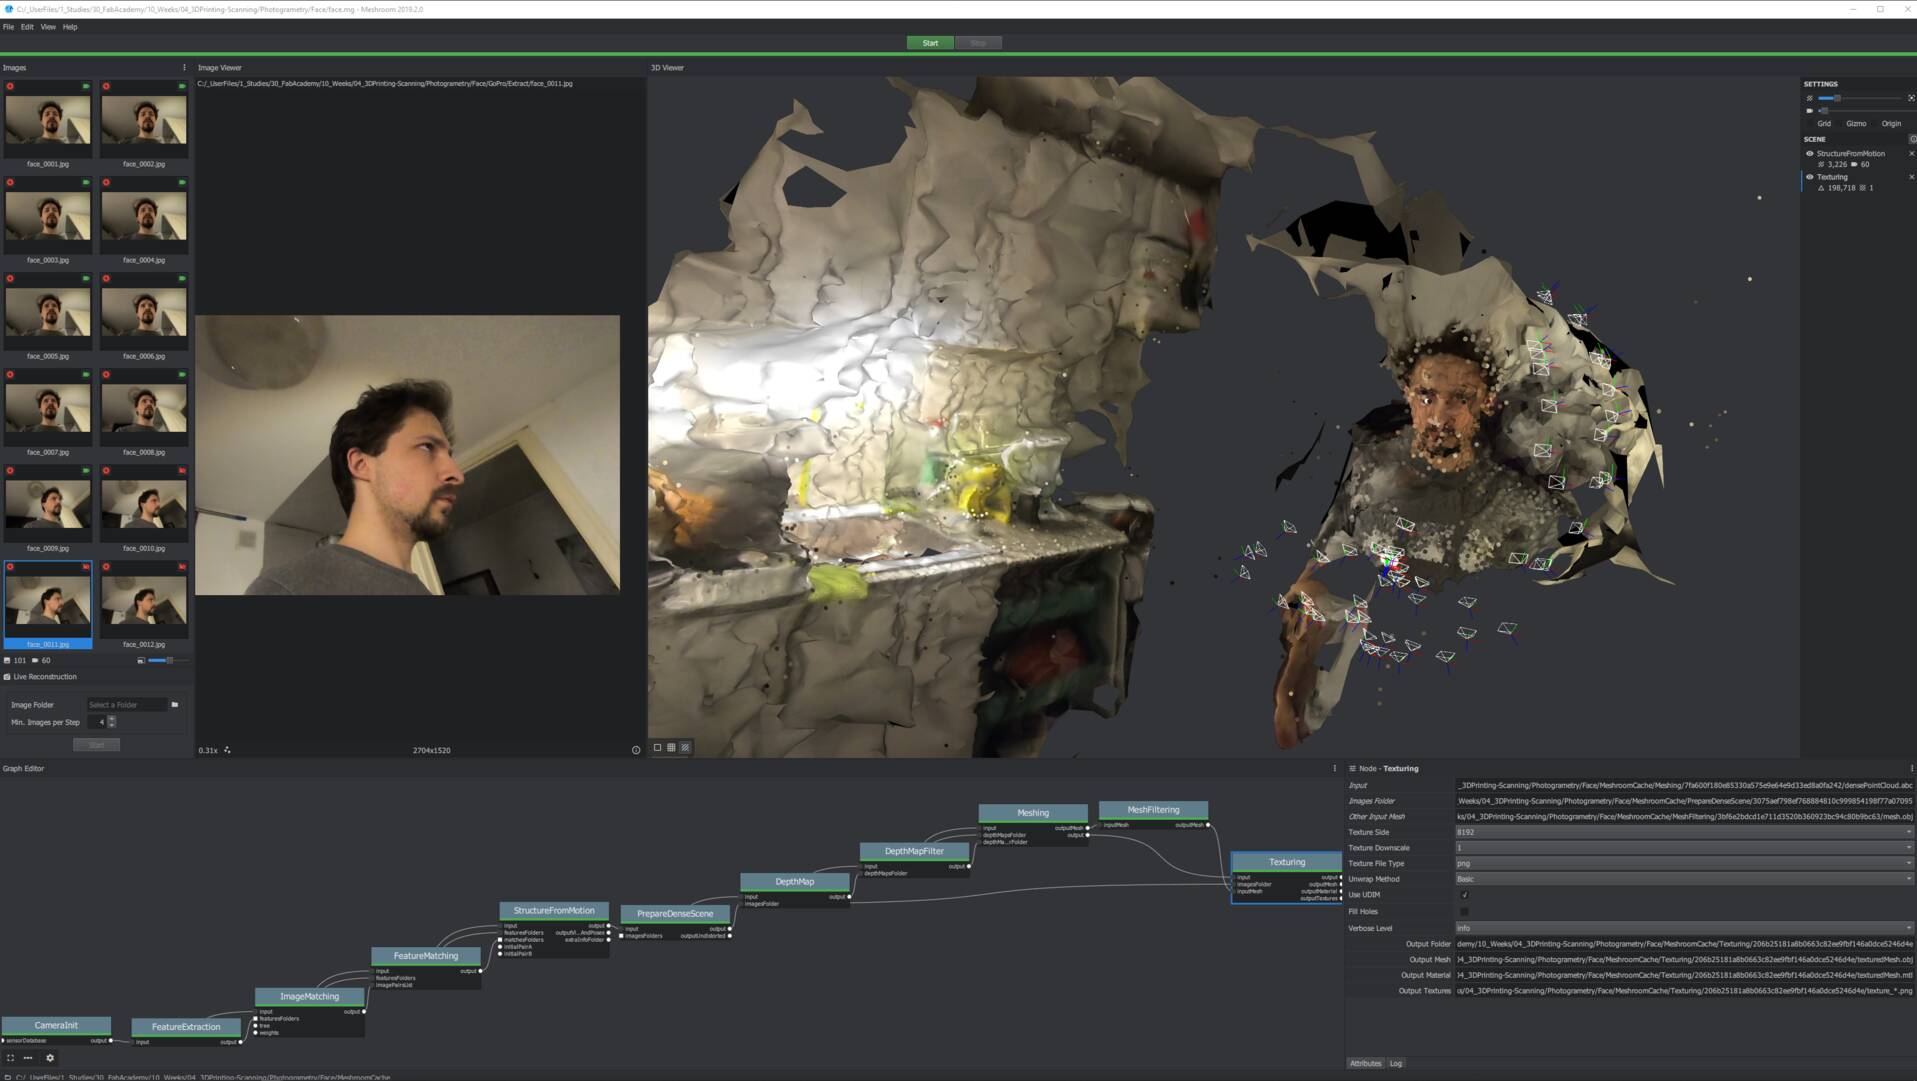 – Initial test: OK –
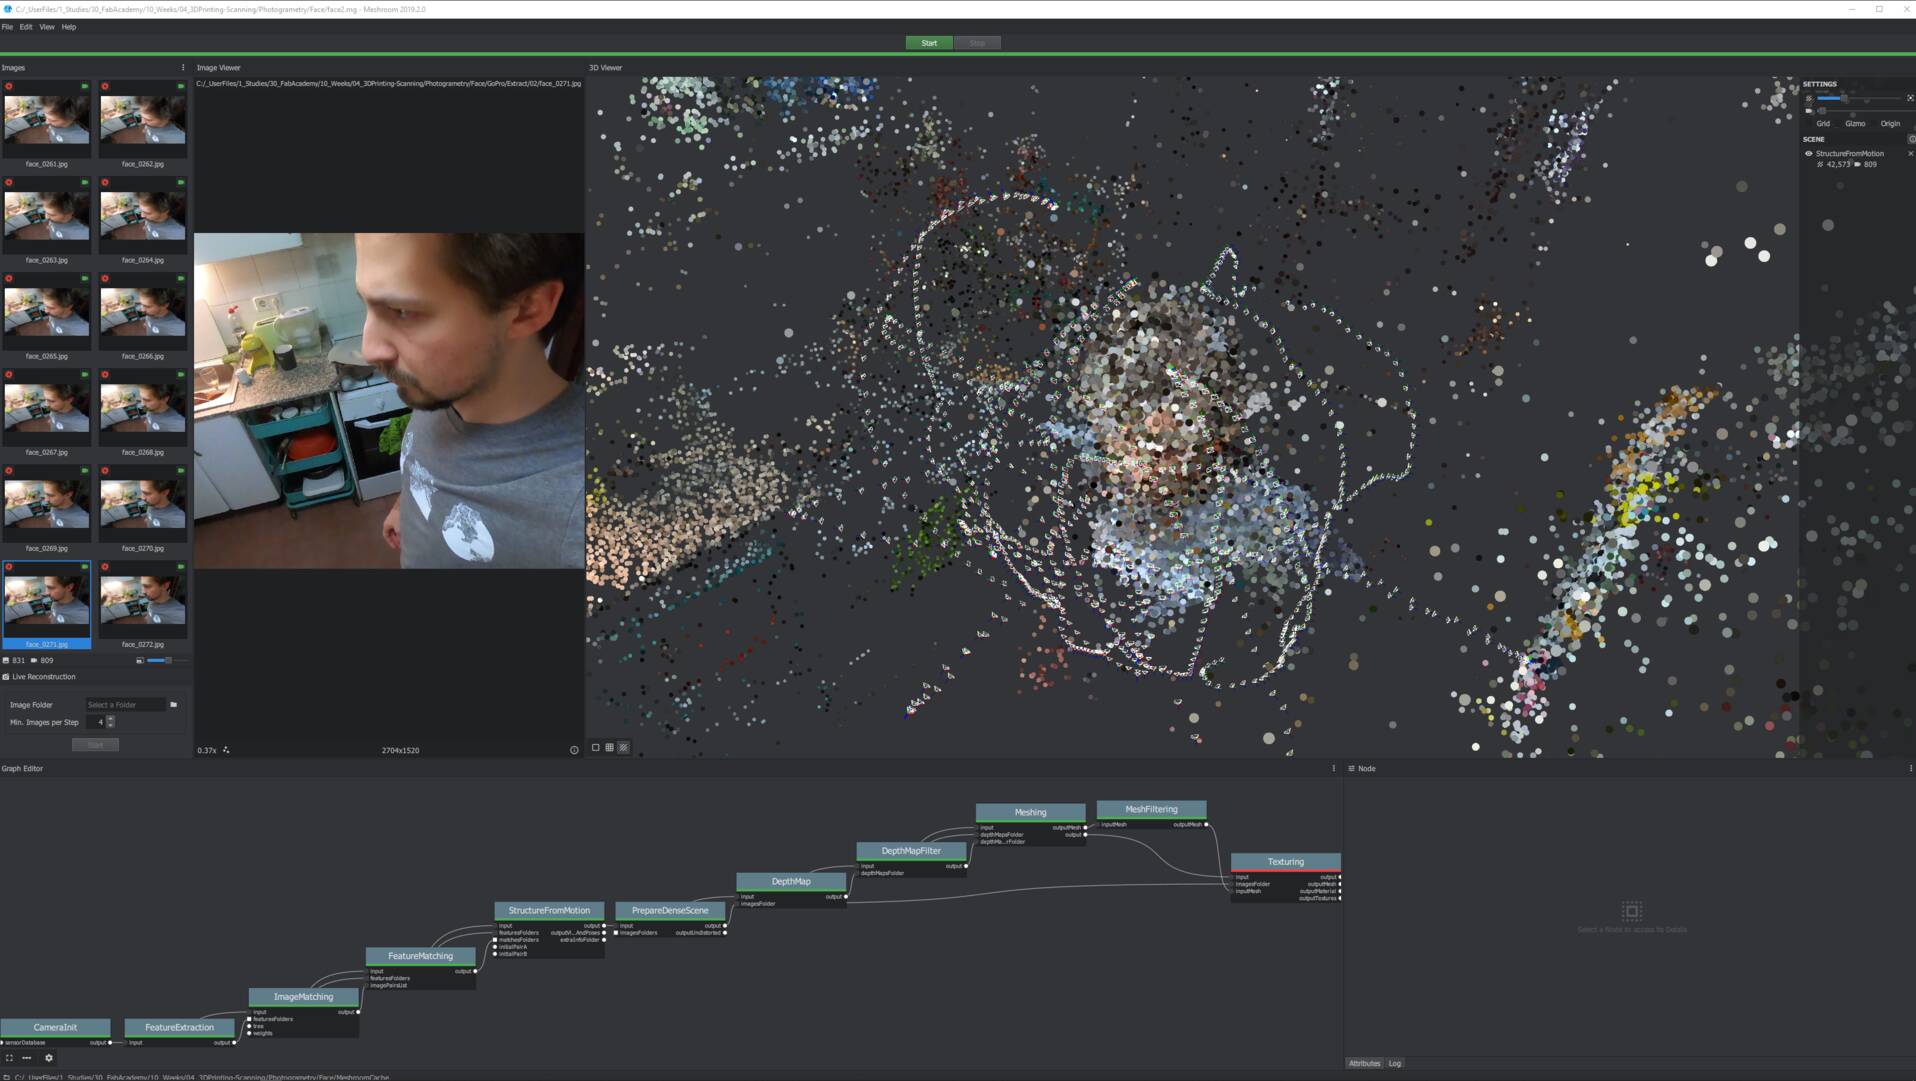 – Second test: features detected: OK –
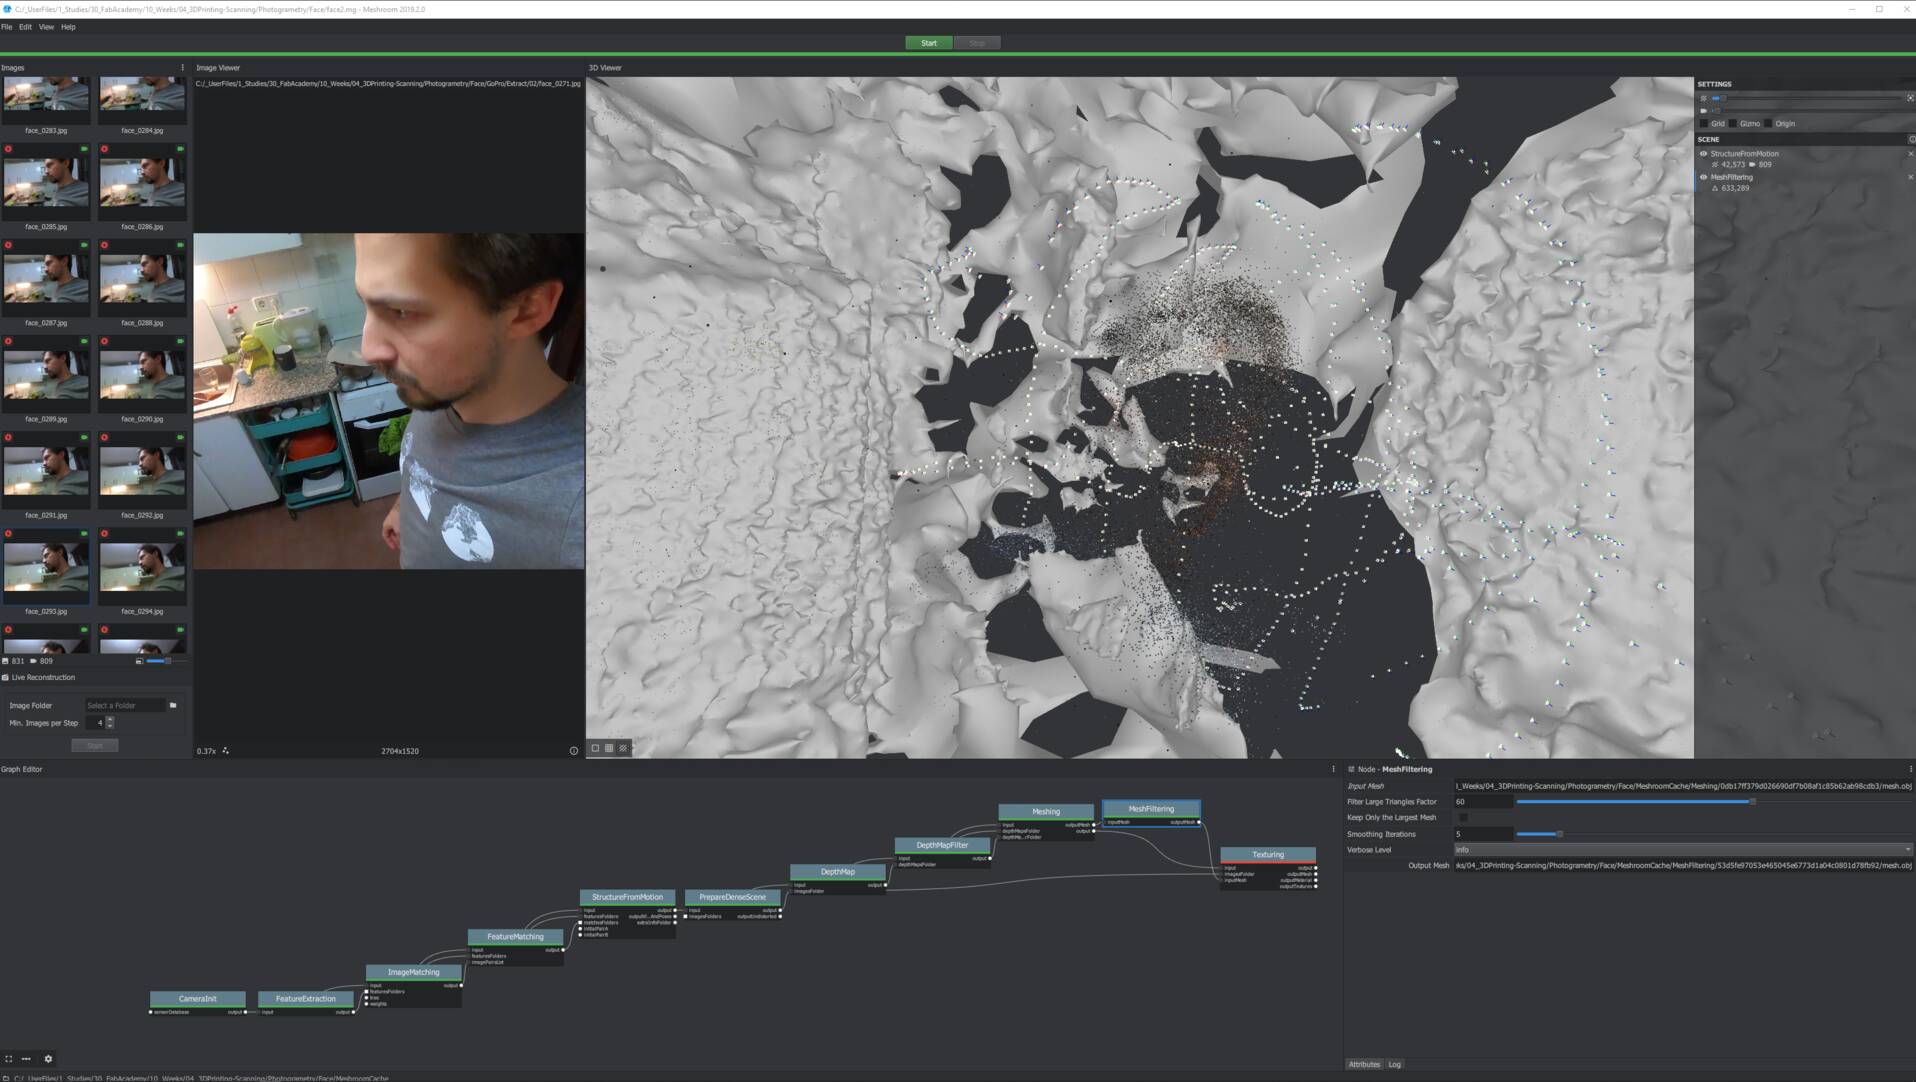 – Second test: meshing - subject lost –
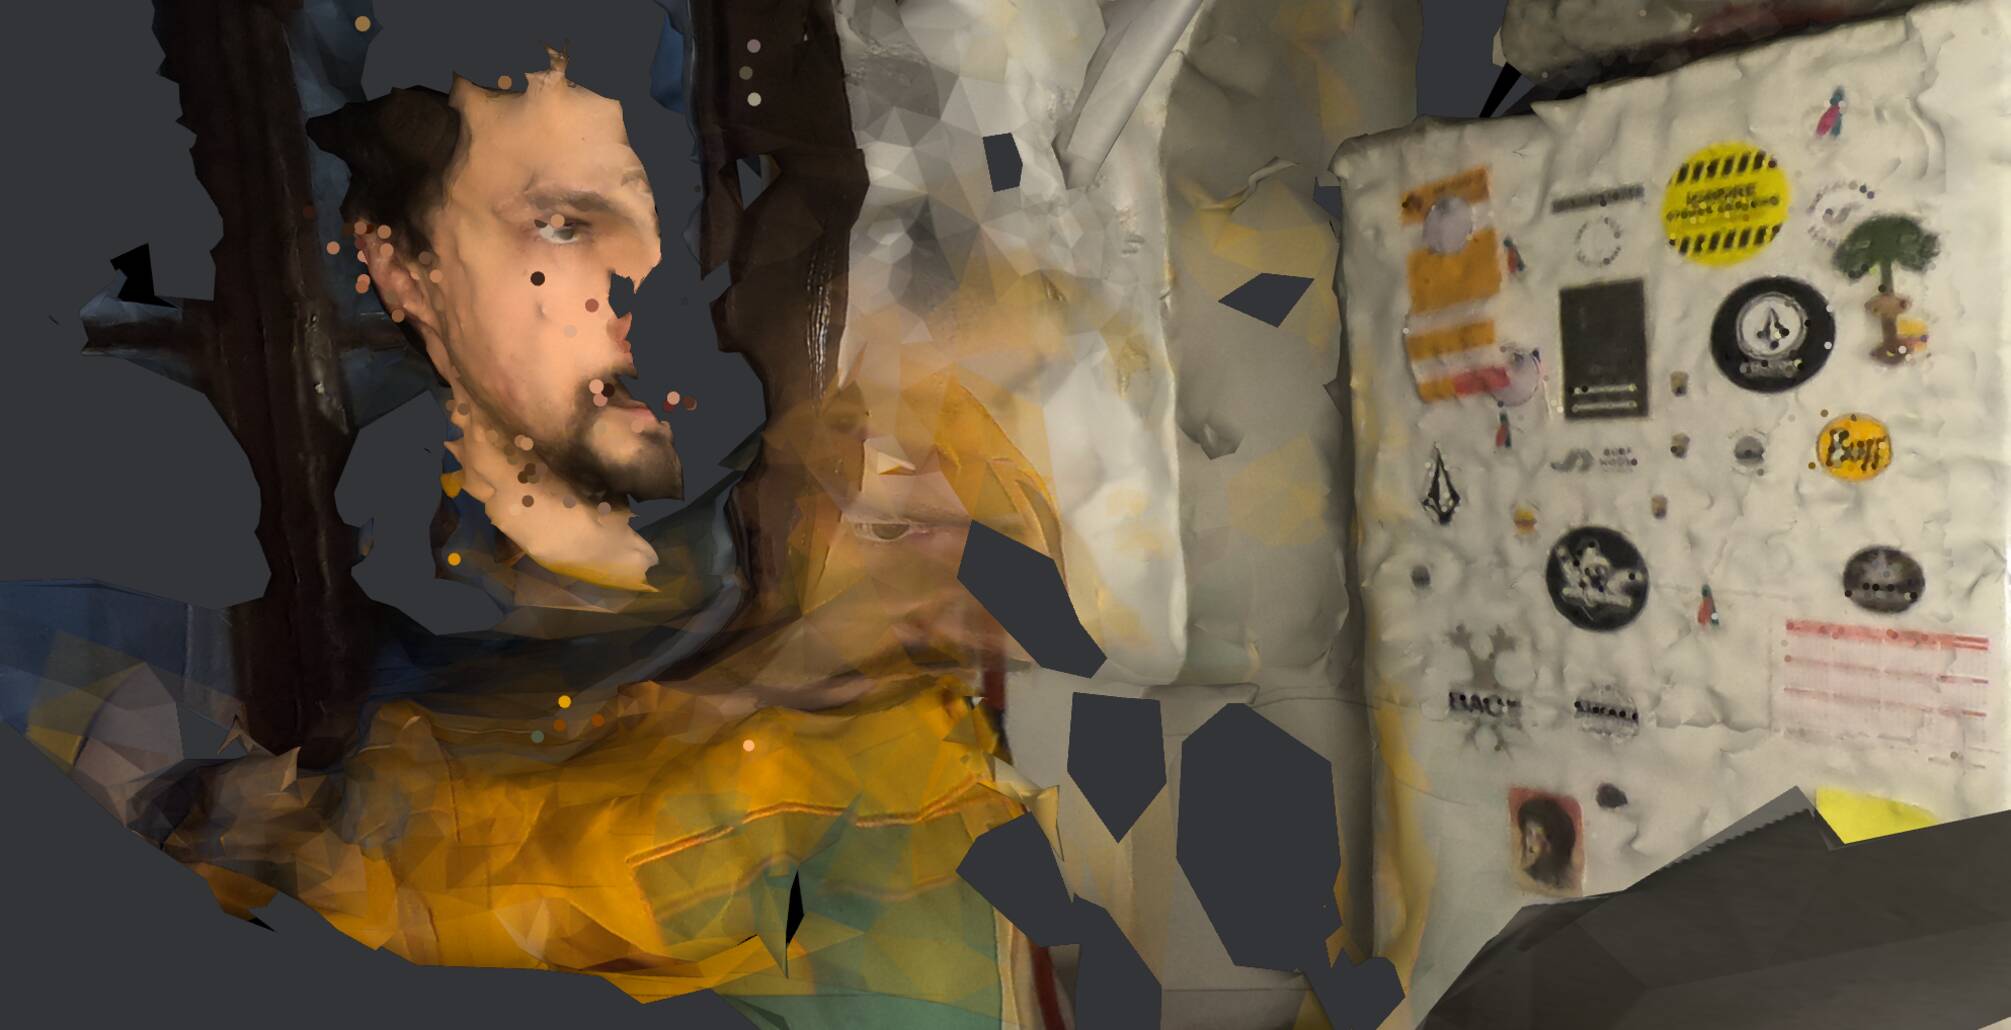 – Nth test: meshing subject half lost –