week_12
Interface and Application Programming
Quickly comparing some software, IDEs, languages and platforms that we already used before we could discuss about which one is more oriented for which case.
Python is a cross-platform computer programming language. Is a high-level scripting language that combines interpretation, compilation, interactivity, and object-oriented programming. Originally designed for writing automation scripts (shells), more and more are used for independent, large-scale projects as versions are updated and new language features are added.
Processing handles inputs and outputs very well and can work with Arduino, graphics, sounds and interactive content. It has its own language but it works with Java language as well. You can usually run it on any computer, including Raspberry Pi.
Matlab is a high-level matrix/array language that includes control statements, functions, data structures, inputs and outputs, and object-oriented programming features. Users can synchronize input statements with execution commands in a command window, or they can write a large, complex application (M file) before running it together.
Unity 3D is more graphic and more toward AR and VR, as the other ones, like Processing and Python, depends more on codes and works better with inputs and outputs. It can deal with 3D graphics better than the other ones with real time physics simulations and other features. The final program is usually a mobile application or a computer software.
Although they’re all really powerful tools we feel like they are different software for different tasks.
First, I used the program of Arduino to call the serial port in MATLAB to read the data, and I needed to use serial object in MATLAB.
The code as follows.
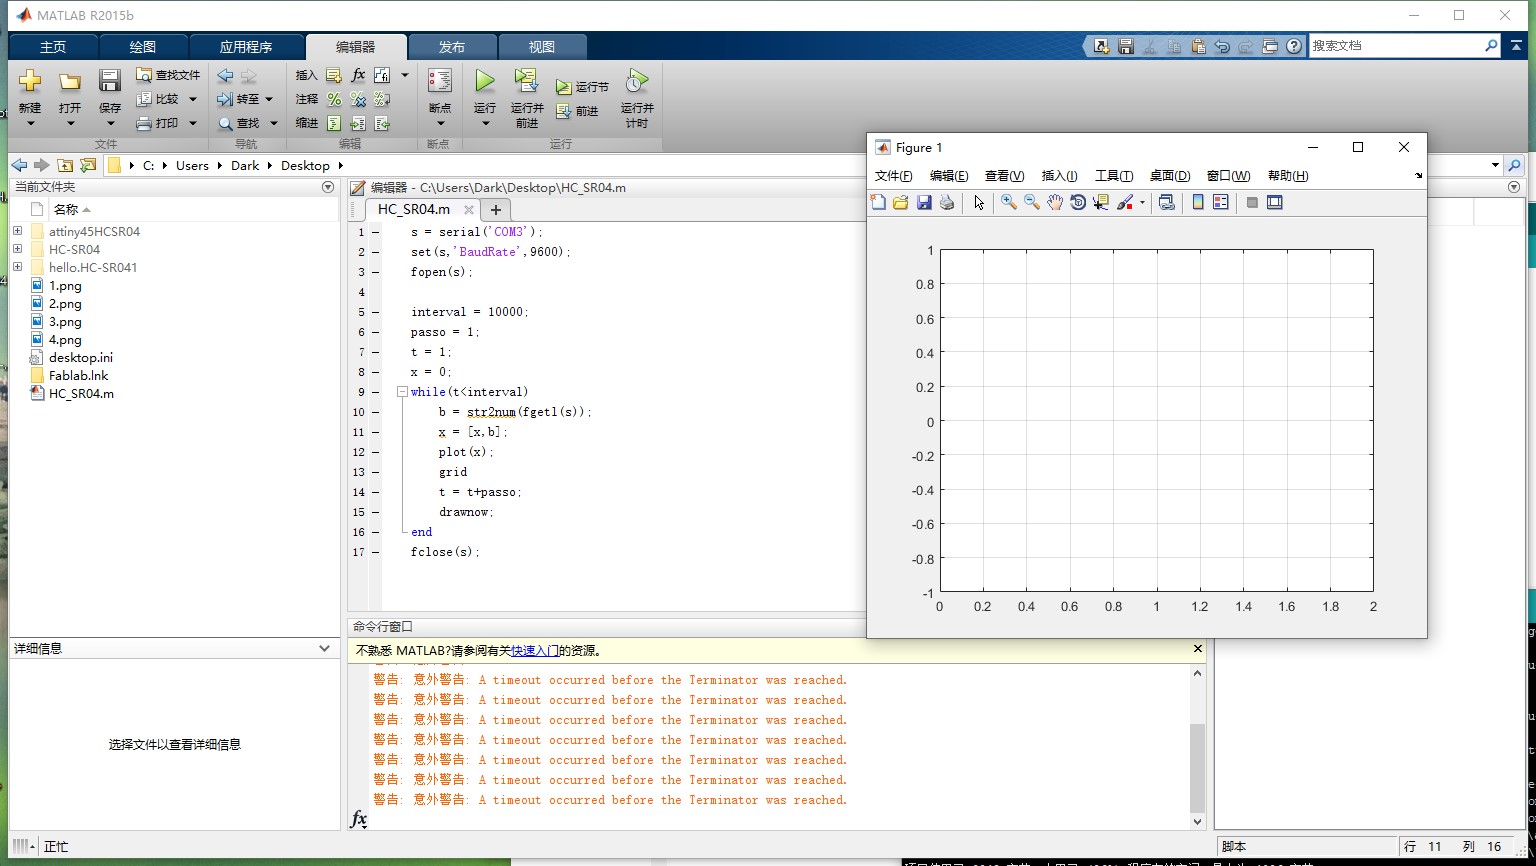
s = serial('COM3');
To establish a serial communication between MATLAB and the board the following commands were used:
set(s,'BaudRate',9600);
fopen(s);
interval = 10000;
passo = 1;
t = 1;
x = 0;
while(t
x = [x,b];
plot(x);
grid
t = t+passo;
drawnow;
end
fclose(s);
s = serial('COM3');
This is a very basic code consisting of three lines of code, the first and the second are to create a serial port object and the third is to connect the created serial interface object with the Hello.HC-SR04 board. This code confirms that the serial communication is working correctly. From there, further experimentations were made using various commands to verify receiving and sending data in various formats.
set(s,'BaudRate',9600);
fopen(s);
But there is a problem which is "A timeout occurred before the Terminator was reached".

Later, I found that the data I output in the serial port has English letters, which cannot be used for picture drawing. So I got rid of the code"So I got rid of the code",But it didn't work. So i serach in the interner. I found that i cannot write the code" Serial.print(cm);". I need to write the code "Serial.println(cm)". Then it worked.

Then I write a code in matlab to read the distance from the sensor. First of all, I connected it with the board that I made in week11 for the input devices it required to install the package for Arduino. Finally, I plotted the readings from the sensor with real time.There are two steps in this stage. First, I installed a package for Arduino to enables me to make a connection between the HC-SR04 and software as shown in the figure below.


Next, is connecting the board before sending the codes by writing the following:
a = arduino('COM3', 'Uno', 'Libraries', 'JRodrigoTech/HCSR04')

Then I connected the board I made in week_9 and found that MATLAB could not recognize it, so I connected the HC-SR04 sensor to Arduino UNO.


After connecting the board of Arduino UNO with MATLAB. I reviewed the code that I made in week_09 with Arduino and started converting the formulas to MATLAB forms. The figure below present the code I used to find the valus.
                         a = arduino('COM5', 'Uno', 'Libraries', 'Ultrasonic');

                         sensor = ultrasonic(a, 'D2', 'D3');

                         dist = readDistance(sensor);

I found that there is a big gap between the measured distance and the actual value. I suspect that there is a relationship between Arduino and MATLAB about the magnification between the values. Later, I found that the distance returned by Matlab is meters.
I reviewed the code that I made in week_09 with Arduino and started converting the formulas to MATLAB forms. The figure below presents the code I used to find the values.
clear all;
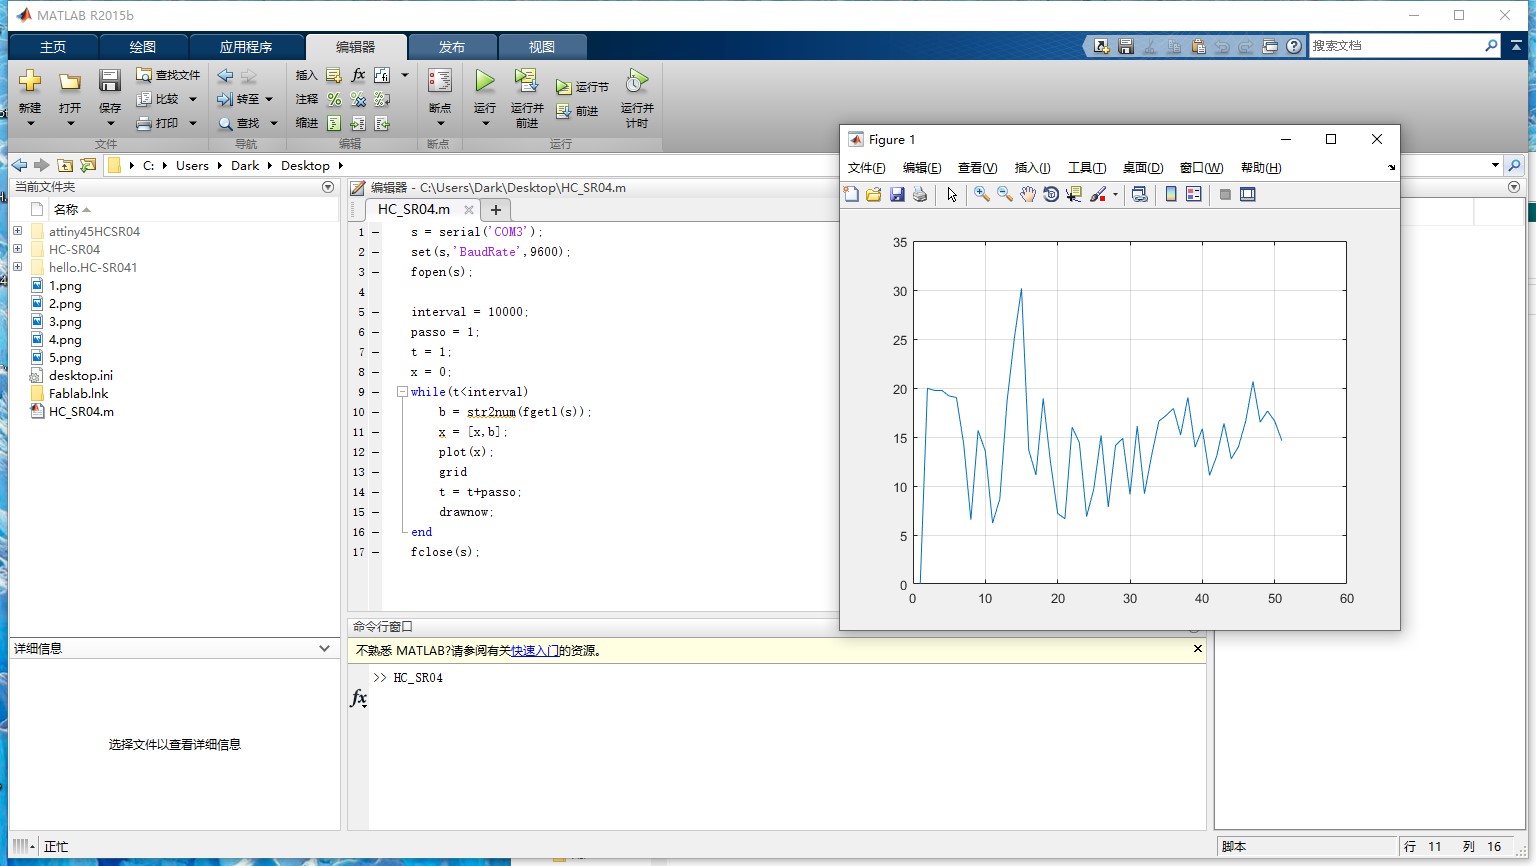
Finally, I finalized the code to plot distance sensor readings varied with time as presented below. The video below shows the overall connections and simulation.
close all;
a = arduino('COM5', 'Uno', 'Libraries', 'Ultrasonic');
sensor = ultrasonic(a, 'D12', 'D13');
interval = 10000;
passo = 1;
t = 1;
x=0;
while(t
x = [x,b];
plot(x);
grid
t = t+passo;
drawnow;
end

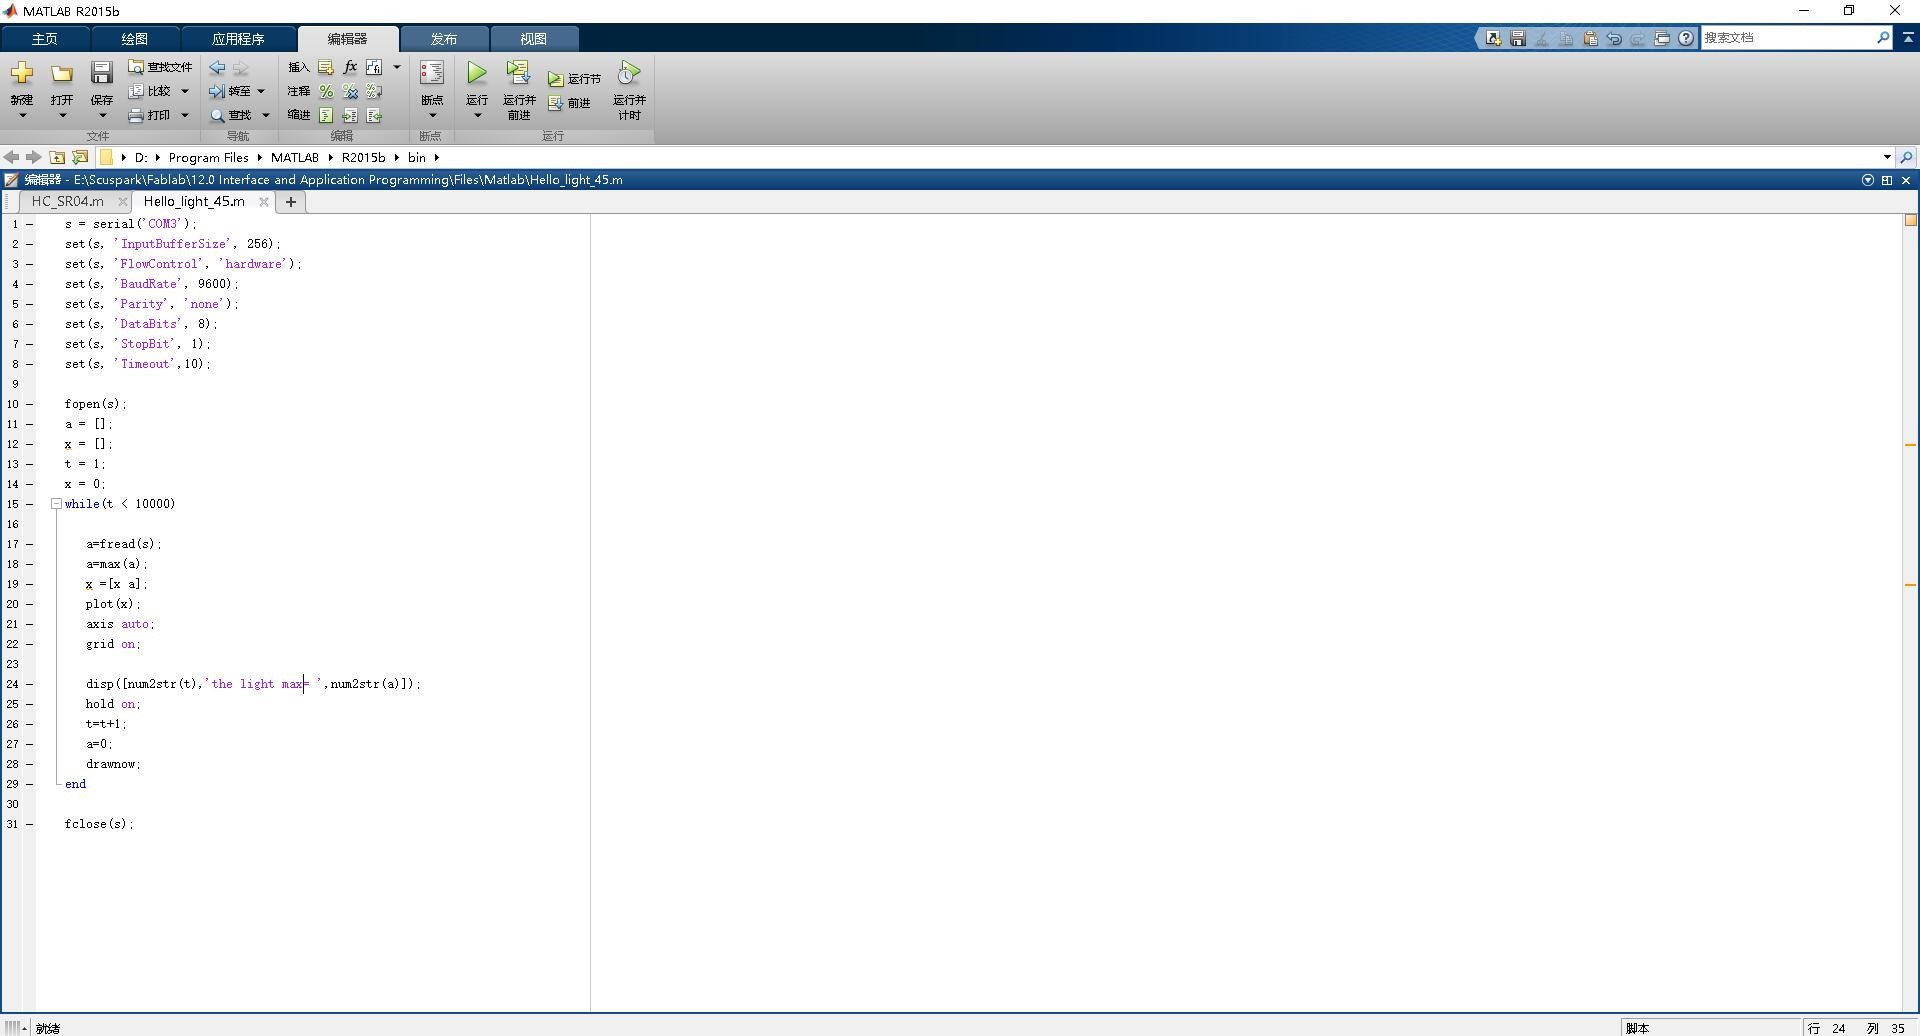
Interfacing serial port with MATLAB is also quite simple: If your device is connected to port COM3, this is the code that reads the port into 256byte buffer and selects the maximum value. Then the script starts to update the plot figure by adding a new value every time new value is ready. This is a way to collect longer period of history data from a sensor.
                      s = serial('COM3');

                      set(s, 'InputBufferSize', 256);

                      set(s, 'FlowControl', 'hardware');

                      set(s, 'BaudRate', 9600);

                      set(s, 'Parity', 'none');

                      set(s, 'DataBits', 8);

                      set(s, 'StopBit', 1);

                      set(s, 'Timeout',10);


                      fopen(s);

                      a = [];

                      x = [];

                      t = 1;

                      x = 0;

                      while(t < 10000)


                         a=fread(s);

                         a=max(a);

                         x =[x a];

                         plot(x);

                         axis auto;

                         grid on;


                         disp([num2str(t),'the light max= ',num2str(a)]);

                         hold on;

                         t=t+1;

                         a=0;

                         drawnow;

                      end


                      fclose(s);

Then I run the program, here is the movie:
I visit the processing.org website download and installed it. I read and watched different tutorials for understanding how to do my assignment. I got a lot of information at www.processing.org website.
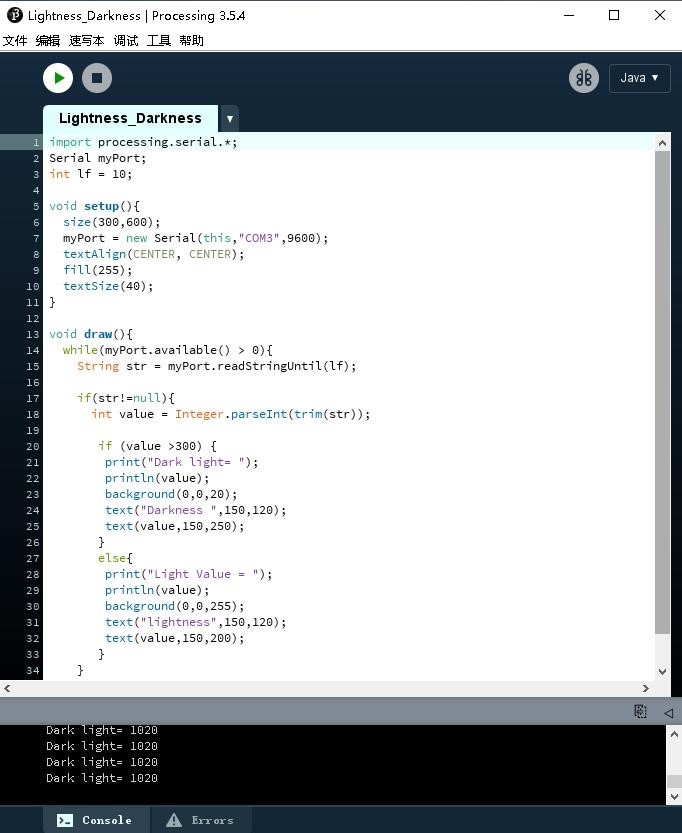
I started doing my weekly assignment, I took hall sensor board from week_09, hello.light.45 board. The resulting code looks like this.
                      import processing.serial.*;

                      Serial myPort;

                      int lf = 10;


                      void setup(){

                        size(300,600);

                        myPort = new Serial(this,"COM3",9600);

                        textAlign(CENTER, CENTER);

                        fill(255);

                        textSize(40);

                      }


                      void draw(){

                        while(myPort.available() > 0){

                          String str = myPort.readStringUntil(lf);


                          if(str!=null){

                            int value = Integer.parseInt(trim(str));


                             if (value >300) {

                              print("Dark light= ");

                              println(value);

                              background(0,0,20);

                              text("Darkness ",150,120);

                              text(value,150,250);

                             }

                             else{

                              print("Light Value = ");

                              println(value);

                              background(0,0,255);

                              text("lightness",150,120);

                              text(value,150,200);

                             }

                          }

                        }

                      }

Here is the Movie, you can see how it worked.