Week 1: principles and practices
Week one's assignment was to create website, going through Git tutorial and scetch final project.
ssh-key, setting user and cloning repository
I started by making ssh-keys for both of my computers. Ssh-keys are used to create a secure connection between local and global repository. My site (like all of the students) is located in GitLab. A good way to update the site is by using local repository and Git. Git is free and open-source distributed version control system. More about Git workflow later on this page.

Ssh-key combination (private and public) can be done by typing ssh-keygen -t rsa -C "my@email" -b 4096 in Git Bash. Save the files under C/users/username/.ssh which is the default location.

Keys were created in .ssh folder under my users-folder.

Next I had to link the public key (id_rsa.pub) to my GitLab profile. First copied text from the file with notepad and opened my repository in Gitlab.
- Open the Settings
- Choose SSH Keys from the navigation
- Paste the text from the public key -file
- Press Add key
Now the connection is created. Created keys can be seen below of the Add key-button when there is at least one.
There were few more steps to be done with Git before I could start making my website. Next I set up configuration for Git. This can be done by typing following in Git Bash: git config --global user.name "my username" and git config --global user.email "my@email". Config file can be found from the C:\users\username\.gitconfig if using default settings and Windows. The file should contain the previously set up information.

After setting up my user name and email it was time to clone my online repository to my computer finally. To clone repository, first I had to go to my GitLab page and copy the link under Clone -> Clone with SSH. Next I opened Git Bash to type and paste following: git clone copiedUrl. After this I had to confirm cloning by typing yes.
Mkdocs -> custom html site
One last thing I had to change before starting with my custom website was to change .gitlab-ci.yml -file. First I deleted the previous .gitlab-ci.yml.

Next I started by adding a new file to my repository.

Select Template type .gitlab-ci.yml and Apply template HTML.

This should automatically add some code to it and name it as .gitlab-ci.yml. Press Commit changes to save it. After this will search for index.html file instead of a one for mkdocs. Index.html should be a page where you want people to land when coming to your site through fab academy site.
Website
I took base code for the site from my earlier work and made some adjustments in both html and css to simplify it for this purpose. I had never uploaded it to online, but kept working with it time to time to keep a touch with html and to learn new things with html5. Main driving force to use site I have coded myself instead of using the mkdocs or one copied from web was that I will know how it works and it is faster to make modification if something breaks.
I have also taken some ideas from Jari Uusitalo's Fab academy site which has graphical choices which I like. For example Jari used a nice effect on the navigation which shows the current page. My choice for editor is currently Visual Studio Code. This far I have used Paint.net because my admin-rights are not working on my work PC and can't install ImageMagick without them. In the future it will be my main image compression tool.
Structure of the code
Here shortly the code which every page is based on.

This part is Head. It contains title and meta-data. I have left out head-tags from here since most of the browsers understand this without them and I don't need to to visually to understand where it ends.

This part is the bread and butter of the page, Body. Body includes all the html content on the page.
- This is the header. It can be found above of navigation on the site
- This is the navigation. Mine has only on one level
- Here is the content of each page. All of my pages are done inside one section and divided with use of h2, h3 and h4
- At the end there is footer. This is same on every page
The structure is done by using very basic html5 to avoid time spent when doing the documentation and it has served well this far.
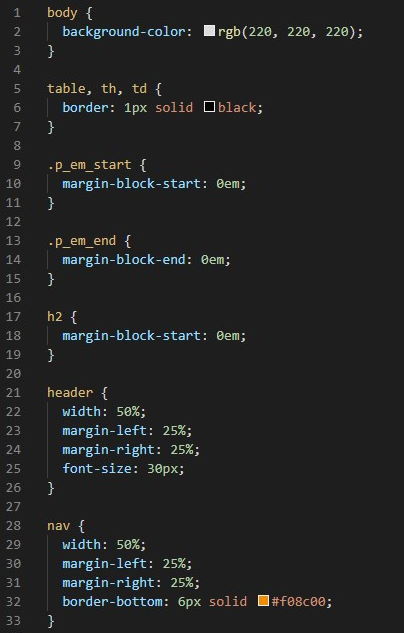
Here is the last piece of my site, CSS-file. CSS-file is external stylesheet for the html. This helps to keep same style on each page and also makes things much faster. I have done few style changes inside of html in few of the pages with either span-tag or adding style="" inside of tag.

And here what it looks like in action. Header is up there first and then the navigation. When one of the pages is active it's background is changed to orange.
Folder structure
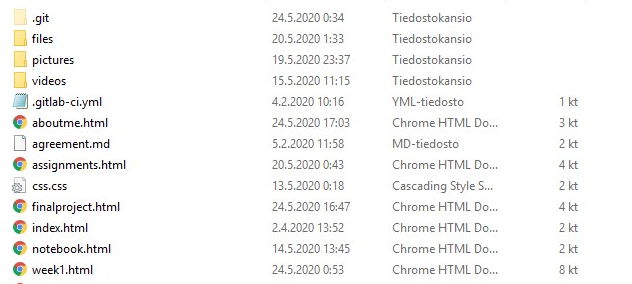
I have done repository in a way that's easy for me to go through and logical. I find it easiest to keep every html-file in the root of the repository. Images, videos and files (design-files etc) are placed within their own folders. Each of these folders have own sub-folders for each of the weeks. All of the pictures are also named in the order they are placed on the page instead of what it contains e.g. week1_1.jpg. In most of cases this has worked as planned, but there have been few exceptions where order had to be changed. In these cases I have not changed names afterwards though.
Git
I've been looking for information about Git from various sources. My main source of information have been docks.gitlab and Git Docs reference-page. Also Corey Schafer's video Git Tutorial for beginners: Command-Line Fundamentals was informative.
git status - shows current status of the repository.
git pull - pull is used to update your local repository up to date with online one.
git add - this adds files to next commit. You can use this multiple times before commiting. git add --all will add whole repository.
git commit - this is used to to save changes to local repository and will only affect files which have been added first. Commit is required before pushing them. git commit -m "insert updates" will make comment on the files in repository. This helps to track updates.
git push origin master - push will update your local repository in to online.
Workflow with Git is following: Pull -> modify files -> Add -> Commit -> Push and repeat.
Challenges and thoughts of the week
This week went pretty good, a lot of things to learn. I had a few problems when uploading my custom html-site in to repository. First page was not updating in the web even though files were updated in online repository. I talked about the issue with Jari when we met at the office and after a while we got an idea to check if I was missing some config file since index.html worked while in local. We noticed that I didn't have .gitlab-ci.yml so we created it with New file option in GitLab. After this all of my pages except index.html started to work. This one we solved faster, because the issue seemed to be that index.html was spelled with capital I. First I tried to just update file name in local repository and push it, but for some reason this did not work. Issue was solved by deleting file from repository, renaming it and pushing it back.