Project Management & Version Control
Federico, 29 January 2020
The assignments of this first week were:
- work through a git tutorial.
- Build a personal site in the class archive describing you and your final project.
Link to the lesson: Principle and practices Link to the videolesson: Principle and practices
Link to the lesson: Project Management Link to the videolesson: Project Management
I was curios about using git and running Jekyll on WSL (Windows Subsystem for Linux) so I’ve decided to install the system on my Windows 10.
Windows Subsystem for Linux
I know that this is not the better way to use linux but it has many advantages (It’s confortable to use a UNIX bash bash console instead of struggle everytime with Windows), with a UNIX BASH command you can do a lot of things with few commands without moving your mouse. And it was a good opportunity to have a revise of some essential bash command without leaving the easy-to-use feature of Windows.
Unfortunately, Linux is very easy to broken for me. Everytime I used command that I didn’t know well was good opportunity to destroy everything.
In fact the feature I like most of WSL it was that it’s quick and easy to reinstall , without partitioning and the installation was very quick. So I think is very useful for Linux n00bs like me.
WSL installation
In order to install the WSL you have to:
- Activate the developer mode in Windows settings.
- activate the Linux functionality in control panel from here:
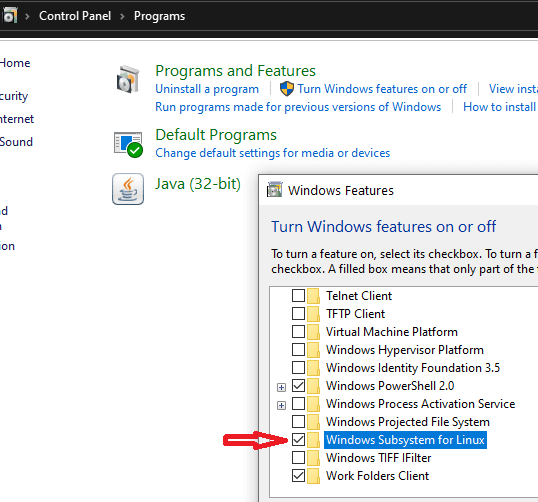
There are several ways to download the WSL, I prefered the most easy way: I downloaded it and installed it from the Microsoft store, in particular I downloaded the Ubuntu 18.04 LTS distribution of Linux.
The alternative way is to execute from the Windows Powershell the following command:
Enable-WindowsOptionalFeature -Online -FeatureName Microsoft-Windows-Subsystem-Linux
Anyway, you can find official complete WSL installing instruction here.
Git Learning
I always wanted to learn git because I think it’s necessary to colalborate with other people.
I start searching for a guided tutorial as a program that corrects you if you miss commands or if you make some mistake in the repository and I found Git-It.
Learning git that way was funny and very effortless.
Most used Git / Bash commands :
- Check the git version of you repository:
git --version - Configure your username and your mail:
git config --global user.name "Your Name" git config --global user.email “youremail@example.com” - Making a repository:
mkdir <NewFolderName> - Print working directory: It specifies WHERE you are:
pwd - List all folders and files in you pwd:
ls - Exit a step back from you directory
cd .. - Move your pwd to a listed directory
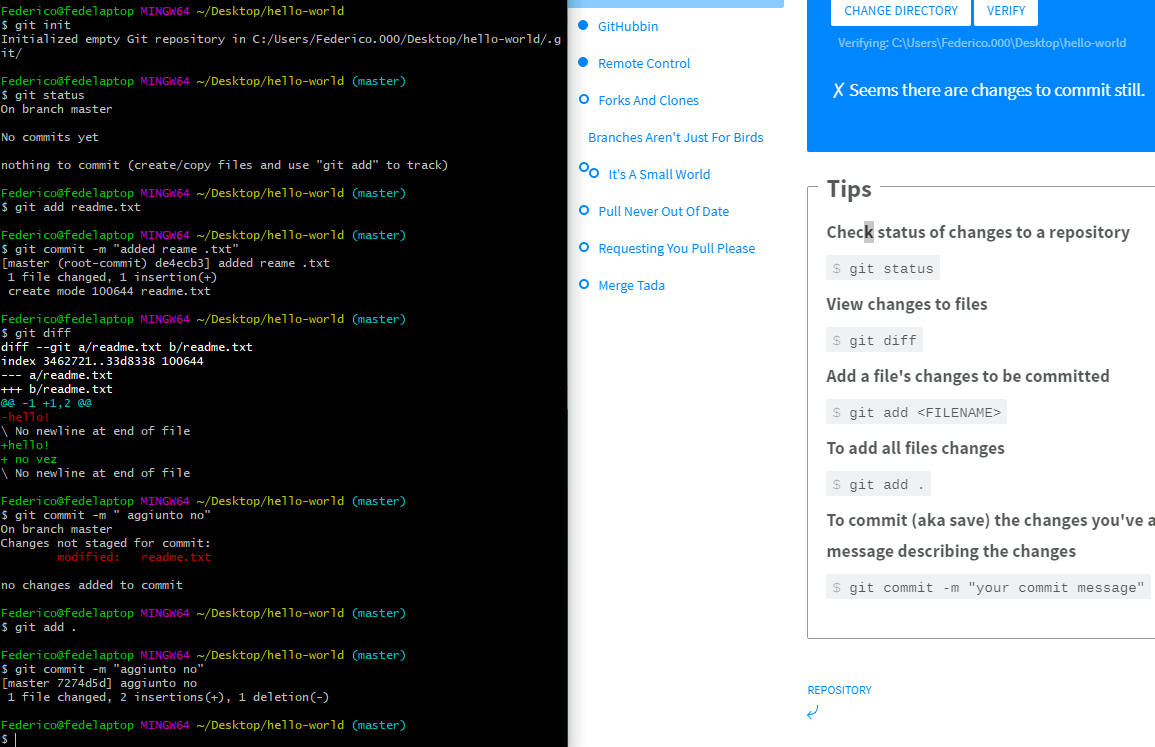
cd <DestinationDirectoryName> - Initialize git tracking of a folder:(this directory has to be you pwd)
git init - See the file differences between unsaved changes and the last commit
git diff - Add all changes in your files
git add . - Commit: Save the changes of your last file with a message of what did you do:
git commit -m "Describing What I Modified" - Cloning a repo from url:
git clone <URL> - Configuring git online:
after you created a online repo, copy the address(HTML of SSH) of the repo and stick it as argument of this command( in this case
git remote add origin <URLFROMGITHUB>  ; for HTTPS address
git remote set-url <REMOTENAME> <URL>  ; for SSH address

git remote -v                          ; for fetch and push repositories address  viewing
- Pushing changes to the server:
git push - Pushing changes to the server: (to the master branch)
git push origin master
Then I finally finish the Git It tutorial 😍
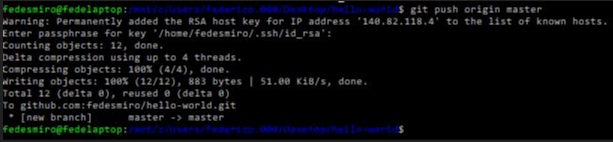
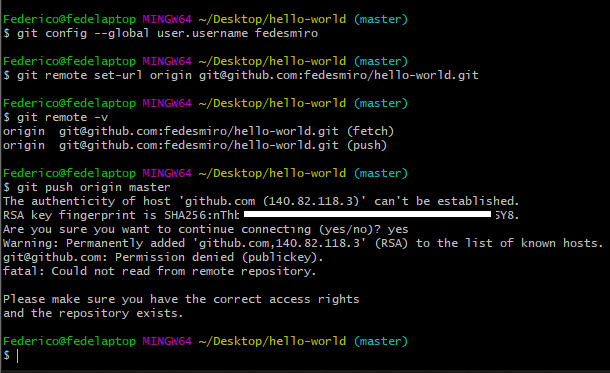
! ! ! git encountered problems ! ! !
With this last command “ git push origin master” I encountered an issue about authentication.
In fact git doesn’t know WHICH account is uploading the changes to the server. Here’s a guide of how to configure authentication on Github (it’s the same as Gitlab).
So i run the command
ls - al ~/.sshto see if there was some keys in my git:
we can se that these files are missing:
- id_rsa.pub
- id_ecdsa.pub
- id_ed25519.pub

so I ended up thinking server access keys are missng and I have to configure and generate my own keys.
GENERATING SSH KEYS
Working thourgh this tutorial (also this tutorial is very good)I figured out the command for key generation, so I typed in my WSL bash but it’s the same for git bash on Windows:
$ ssh-keygen -t rsa -b 4096 -C “your_email@example.com”
This command generates a SSH key using my mail as label.
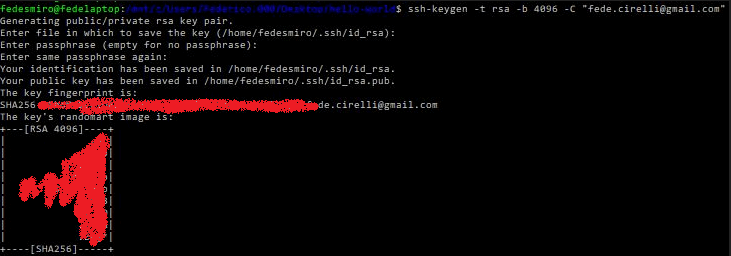
the generate key is located in the WSL path:
/home/linuxusername/.ssh/id_rsa //keys location in WSL subsystem
Instead of the location of keys in Windows:
C:\Users\username\.ssh\is_rsa //keys location in Windows
A passphare is also used for re-entering ssh key more easily. This Passphrase is managed by the ssh-agent that store this association that is located in the WSL.
In order to copy the SSH KEY to configure gitlab I search for the WSL folder inside windows, I found the answer here, the keys and the “home” linux directory are located in the following directory:
C:\Users\WINDOWSUSERNAME\AppData\Local\Packages\CanonicalGroupLimited.Ubuntu18.04onWindows_79rhkp1fndgsc\LocalState\rootfs\home\linuxusername\.ssh
If you want to test if you keys are working then type in your shell :
//testing github

$ ssh -T git@github.com
> Hi fedesmiro! You've successfully authenticated, but GitHub does not provide shell access.


$ ssh -T git@ssh.github.com
> Hi fedesmiro! You've successfully authenticated, but GitHub does not provide shell access.


//testing gitlab Fabcloud

$ ssh -T git@gitlabfabcloud.org
> Welcome to GitLab, @federico.cirelli!
If you still have many issues try adding host config in the ~/.ssh/config file reading this github guide.
BUILDING A BLOG WITH JEKYLL AND UPLOADING IT ON GITLAB
First of all a template is needed. My goal is not to build a site from scratch but uploading it already build without to many efforts.
I was curios about the main differences about static and dynamic site generator so I find that information [here]( if you’re courios on the difference between static and dynamic site generatore check here.
Then I found a good and well documented static site generator), Jekill , based on Ruby language, that does the html programming work for you.
After choosing the cool Jekyll Prologue Theme, I started experimented with the Jekyll’s step by step tutorial, playing and tweaking stuff with some easy Liquid filters.
After realizing that building very simple good looking is very time-consuming I started building the Prologue theme template in localhost:4000 local server. This host is used for quick testing sites without uploading them on the web.
I’ve got a lot of Issues on WLS about local building , mainly because I can’t properly set the gems file configuration(Gemfile, that is basically the list of gems needed), that rules all the dependencies that Jekyll uses to correctly build the site, this is how gems and gemfiles work in Jekyll/Ruby. So the main problem was that my current version of Jekyll is 4.0 and the required Jekyll version for the right building of the site is Jekyll 3.3, but I still can’t figure it out how to get it working properly in localhost.
After spent too much time on this last issue, My istructor Antonio suggested me of directly uploading on the gitlab server, with the aid of a YAML file that basically talks to the server and tells him what to do. Antonio also give me a suggestion: if I want to build the site faster, I can bypass the “test” phase
This is the content of the GITLAB YAML file, if you need it , the template is already in the gitlab list when you’re creating a new file from the web gitlab interface on the “CI/CD configuration” category, so it’s quicker creating it there. This file is describing all the steps the servers is going to do with our repository every time we git push our repo to it :
# This file is a template, and might need editing before it works on your project.
# Template project: https://gitlab.com/pages/jekyll
# Docs: https://docs.gitlab.com/ce/pages/
image: ruby:2.3

variables:
  JEKYLL_ENV: production
  LC_ALL: C.UTF-8

before_script:          // this job install bundler, a necessary tool for gems assembly and building
  - bundle install

test:                   // this is the test job, that is optional if I want to save build time
  stage: test
  script:
    - bundle exec jekyll build -d test
  artifacts:
    paths:
      - test
  except:
    - master

pages:                   //this is the real uploading job, the very necessary part
  stage: deploy
  script:
    - bundle exec jekyll build -d public
  artifacts:
    paths:
      - public
  only:
    - master
Since I didn’t have any time pressure and my site is very light for now, I just leave it as is. When the site will gets heavier this will come in handy.
First of all I wanted to keep the git remote adress the same, without causing any troubles in directory linking ( the folder was already uploaded with a preincluded MKdocs template blog from fibasile.
The effortless way to do that was to cloning from the remote repository with the ssh address
git clone git@gitlab.fabcloud.org:academany/fabacademy/2020/labs/opendot/students/federico-cirelli.git
then I cancelled all directories of it except “.gitignore”. That folder contains all git data so if I broke something it’s easy undo my wrong commits.
the next Thing I had to do was to configure the “_config.yml” file. This is the easy way to tell jekyll HOW to build the site, without struggling too much with Liquid, html, css…. things.
I so I tried configuring that way:
***WRONG CONFIGURATION:
...
title: Federico's Fabacademy Blog
subtitle: A tall nerd
description: Hi everyone! I'm finishing studying electronics engineering in Modena, Italy. I love build audio circuits, playing eletric guitar and playing basketball.

author: Federico Cirelli
email: fede.cirelli@gmail.com
avatar: "/assets/images/avatar.jpg"

# You'll want to customize url and baseurl for your own site:
baseurl: "" # the subpath of your site, e.g. /blog
url: "http://fabacademy.org/2020/labs/opendot/students/federico-cirelli" # the base hostname & protocol for your site
...
After uploading the site on git with git push (and, of course,waiting for CI/CD jobs to build the site) the wrong configuration files the css were working with the Antonio aid:
He tried to change the link of the head file _include/head.html:
<link rel="stylesheet" href="/2020/labs/opendot/students/federico-cirelli/assets/css/main.css" />
into:
<link rel="stylesheet" href="http://fabacademy.org/2020/labs/opendot/students/federico-cirelli/2020/01/29/project-management-&-version-control.html/assets/css/main.css" />
Apparently the css were working but, in the same way , analyzing the Google Chrome Debug Console located in Developer Utilies -> Ctrl+ Maiusc + I I noticed that a lot of things weren’t working:
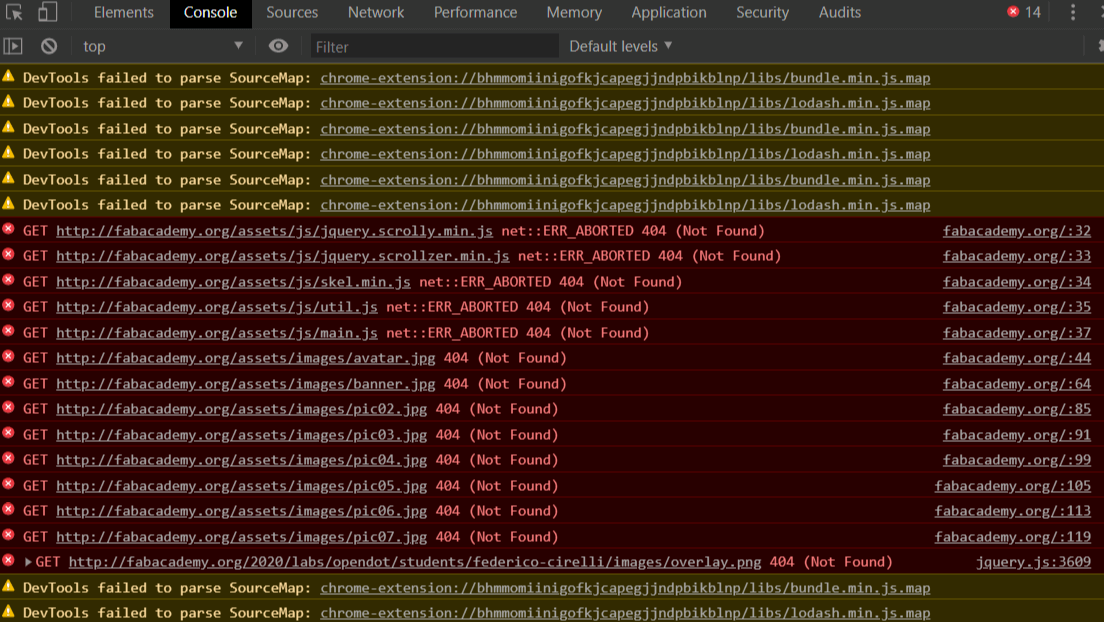
as we can see the link to all images isn’t correct because a part of the url is missing:
CORRECT ONE

 http://fabacademy.org/2020/labs/opendot/students/federico-cirelli/assets/images/avatar.jpg
it is:
WRONG ONE (as you can see in the image)

http://fabacademy.org/assets/images/avatar.jpg
and the same for javascript apps:
CORRECT ONE

 http://fabacademy.org/2020/labs/opendot/students/federico-cirelli/assets/js/jquery.scrolly.min.js
WRONG ONE (as you can see in the image)

 http://fabacademy.org/2020/labs/opendot/students/federico-cirelli/assets/js/jquery.scrolly.min.js
After a lot of commits and changes , I figure out that if I try to fix the javascript apps appending the link with page.url | absolute_url | append: "/assets/css/main.css in the Liquid Brackets
{{-" contents "-}} the css weren’t working.
I also realized that {{- page.url | absolute_url | append: "/assets/css/main.css -}} is formed by:
{{- *complete url* -}}-> The liquid Brackets, These are useful for composing url stringspage.url / site.url-> the url of the page corrisponding to theurl:....in the_config.yml|-> the operator that you need for composing multiple parts of the stringrelative_url-> it’s the relative path, equivalent to ehbaseurl:...in the_config.ymlabsolute_url-> it’s the absolute path , that it ispage.url / site.url + relative_urlappend:...-> it’s used to add additional path to your url that is not one of the above.
At this point I tried a different way, I restarted from zero taking the original theme repository and modifying the _config.yml file:
 # You'll want to customize url and baseurl for your own site:
baseurl: "/2020/labs/opendot/students/federico-cirelli" # the subpath of your site, e.g. /blog
url: "http://fabacademy.org" # the base hostname & protocol for your site
after it the css weren’t working but the images were loading up correctly.
My guess were to feed the complete adress to the Styles html template in the _include/head.html file:
 ...
<link rel="stylesheet" href="http://fabacademy.org/2020/labs/opendot/students/federico-cirelli/assets/css/main.css" />      //stylesheet reference at line 35
...
and so I also changed the javascript links:
  ...
  <!-- Scripts -->
  <script src="https://ajax.googleapis.com/ajax/libs/jquery/1.11.3/jquery.min.js" defer></script>
  <script src="{{-   append:'/assets/js/jquery.scrolly.min.js' | relative_url-}}" defer></script>
  <script src="{{-   append:'/assets/js/jquery.scrollzer.min.js' | relative_url -}}" defer></script>
  <script src="{{-   append:'/assets/js/skel.min.js' | relative_url -}}" defer></script>
  <script src="{{-   append:'/assets/js/util.js' | relative_url -}}" defer></script>
  <script src="{{-   append:'/assets/js/main.js' | relative_url -}}" defer></script>
</head>
...
and it worked! 😍
Another common mistake I made is that I added too many "/", creating incorrect links:
Example:

baseurl: "/2020/labs/opendot/students/federico-cirelli" # the subpath of your site, e.g. /blog
url: "http://fabacademy.org/"

the output url string "url+baseurl" will be:

http://fabacademy.org//2020/labs/opendot/students/federico-cirelli

THIS IS ABSOLUTELY NOT VALID URL ADDRESS!!
Another thing I noticed when I uploaded markdown file to the repo is that running job error on gitlab:
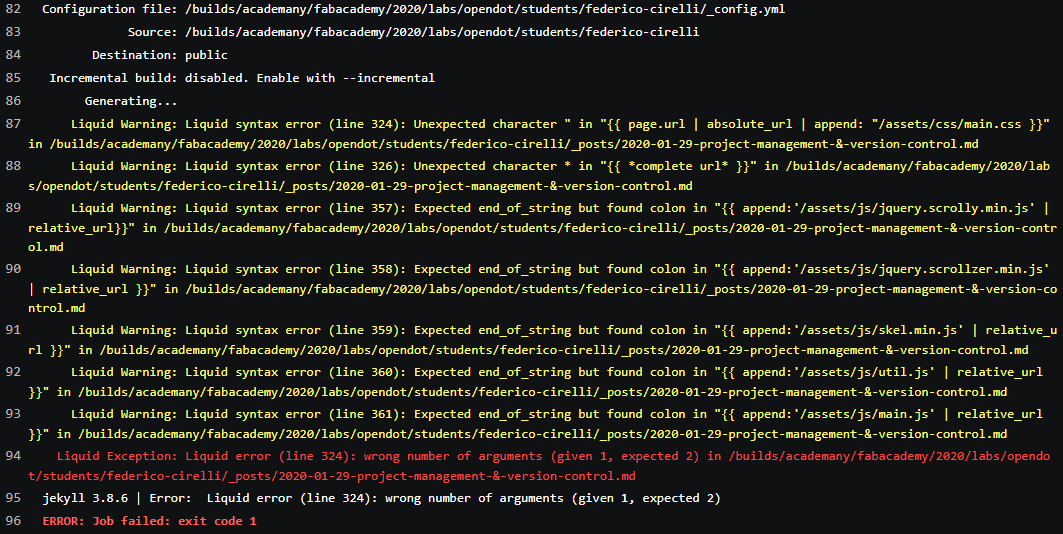
that is caused by the use of the liquid language in the markdown file. To use Liquid language in your .md file you have to include it in special raw tags likes is used here:(you can’t actually see it here)
...

USE OF LIQUID LANGUAGE

...
Also, if you’re linking to the main site, sometimes you can mistake linking the page.url instead of site.url and viceversa.
Now it’s the time for adding some posts!
Final Project
I’m very undecided of which project I wanted to realize, I’ve got two ideas:
Vu-Troubles
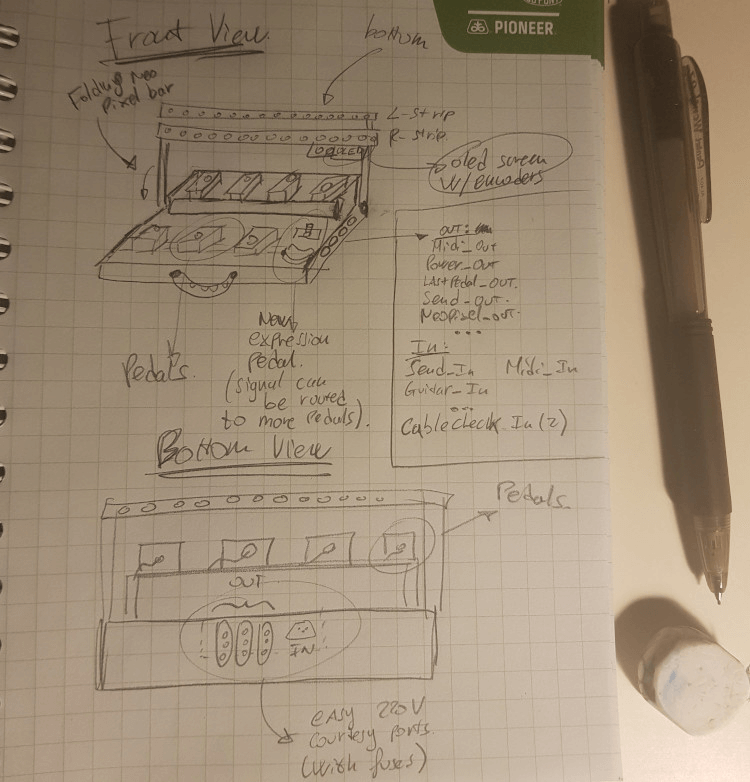
Since I love playing the electric guitar, I’m also in love with my pedals even if I’ve got a crappy pedalboard. I wanted to build a pedalboard with a Neopixel vu-meter strip (maybe with two rows, one for the Left channel, the other for the Right channel) that follows the envelope of the guitar signal. I think it can create such a incredible visuals!
So the things I’m gonna do is to create a compact size pedalboard, that is handy to carry anywhere I go and that allows a good looking cable management inside it.
The optional/features I want to build around it:
-
Cable Debugger:
this is very useful when you’re starting disassemble working cables and you can’t realize where is the problem! By the way some cable can’t be disassembled so we can’t see if they are actually working or not with visual check. It can also measure the resistance and the capacitance of the cables!
-
Pedal Current&Voltage sensing:
Sometimes is very useful to see if a pedal is bad supplyed or it’s drawing too much current. Do you know also that germanium pedals sound different if undervolted?
-
Courtesy neopixel out
If you want to drive bigger Neopixel Strips (I have to define the max Output Current)
-
Courtesy 220V out
if you just want to plug something else, you know… synths. 😂
-
Modular Design
If you want to compose a bigger pedalboard for addional pedal hosting.
-
Oled Screen with control
For display all information/measure and simple gui interface.
-
Built-in-expression pedal
I always wanted to create a potentiometer-free expression pedal! I was thinking of using an Ultrasonic sensor.
-
Built-in-power head
For external cabinet power driving.
-
Sturdy Shell
To avoid any damage!
and if it’s not enough…………………….
-
Hidden GPS logging with GSM
To find out the thief who has stole your pedalboard. 😎
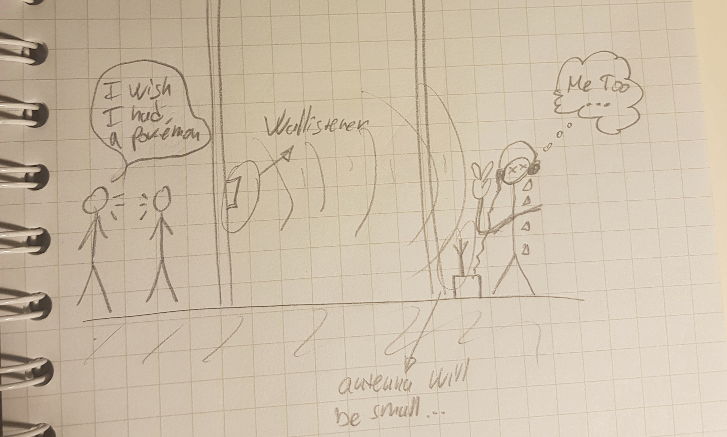
Wallistener
I wanted to create a little device that can be attached to the outside part of the wall, this can amplify the sound of people that are talking in a room and send it thru BLE/Wifi to the far listener’s device.
I think the main challange of this project is to develop a device that does draw few current and that is not recognizable as a bug!