Networking & Communication 📋
🕘 Date / Time:
Hello there mates, here you are reading my networking task week 14 of fab academy that was actually done one week before the final project presentation. :D And here I am documenting it almost a month and a half after.
Special thaks to my fab academy colleague and old friend "Abdelrahman Elshaqanqery" from whome I received a considerable amount of help to get my head wrapped around this topic (A bunsh of thanks).
Having said that, let me get my documentation work done.
A) Individual Assignment:
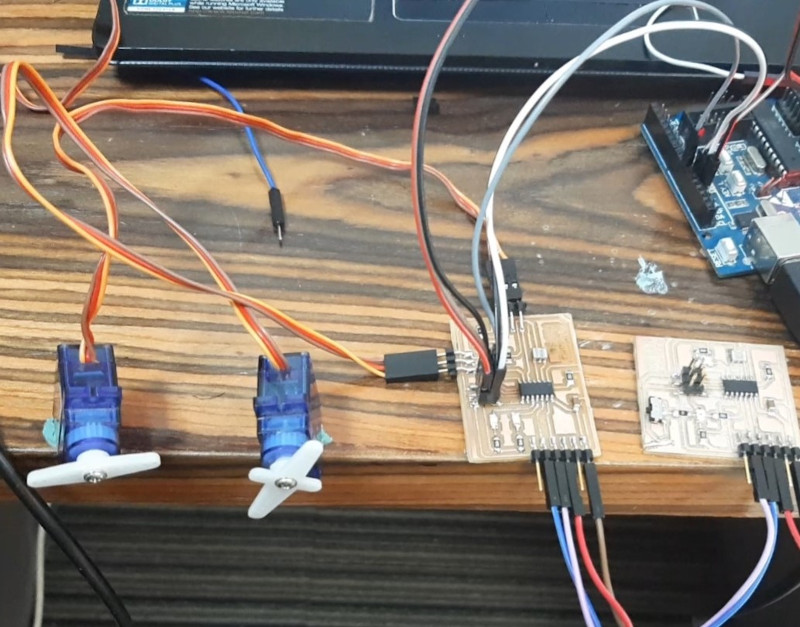
Part I: Wiring
For wiring this network all I had to give power the circuits with 5V and ground and just connect RX1 to TX2 and TX1 to RX2.
Yuuupp, wiring the network of two circuits is that simple!
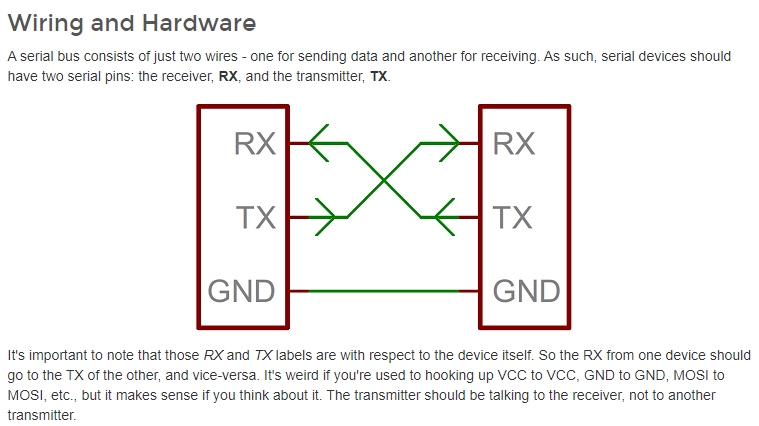
🚫 Caution:
Only after you had programmed each circuit individually, are you allowed to connect RX to TX.
If the two circuits' RX and TX were connected while you're programming one the circuit the code will transfer to the other circuit automatically and it's own code won't be there / work any more.
Part II: Programming
This was the code to my input circuit that had a phototransistor which is the trigger of the network.
      #include < SoftwareSerial.h >

      const int LED = 7;
      const int PhR = 3;

      float lightLevel;
      int trigger = 0;

      #define TX 0
      #define RX 1
      SoftwareSerial data(RX,TX);

      void setup()
        {
          data.begin(9600);
          pinMode(PhR, INPUT);
          pinMode(LED, OUTPUT);
         }

      void loop()
        {
           digitalWrite(LED, HIGH);
           delay(1000);
           digitalWrite(LED, LOW);
           delay(1000);
           lightLevel = analogRead(PhR);

            if (lightLevel >= 950)
            {
              trigger = 0;
              digitalWrite(LED, HIGH);
              delay(300);
              digitalWrite(LED, LOW);
              delay(300);

            }

             else if (lightLevel <= 950)
            {
              digitalWrite(LED, HIGH);
              trigger =1;
             data.println(trigger);
             for (;;);

            }
        }
Part II: Programming
Output Circuit Code:
      #include < SoftwareSerial.h>

      int servoPin1 = 8;
      int LED1= 3;
      int servoPin2 =7 ;
      int LED2= 2;

      int myAngle;
      int pulseWidth;


      #define TX 0
      #define RX 1
      #define lightTrigger 1

      SoftwareSerial data (RX,TX);


      void servoPulse(int servoPin, int myAngle)
      {
        pulseWidth = (myAngle * 10) + 600;
        digitalWrite(servoPin1, HIGH);
        digitalWrite(servoPin2, HIGH);
        digitalWrite(LED1, HIGH);
        digitalWrite(LED2, HIGH);
        delayMicroseconds(pulseWidth);
        digitalWrite(servoPin1, LOW);
        digitalWrite(servoPin2, LOW);
      }

      void setup ()
      {
        pinMode(LED1, OUTPUT);
        pinMode(servoPin1, OUTPUT);
        pinMode(LED2, OUTPUT);
        pinMode(servoPin2, OUTPUT);
        data.begin(9600);
      }

      void loop()
      {
          String sensorValue;

        if (data.available()){
        for (myAngle=0; myAngle<=90; myAngle= myAngle+5)
              {
                servoPulse(servoPin1, myAngle);
                delay(20);
              }
        for (myAngle=90; myAngle>=0; myAngle= myAngle-5)
              {
                servoPulse(servoPin1, myAngle);
                delay(20);
              }

          for (myAngle=0; myAngle<=180; myAngle= myAngle+5)

              {
                servoPulse(servoPin1, myAngle);
                delay(20);
              }
              for (myAngle=180; myAngle>=0; myAngle= myAngle-5)                                                                                           {
                servoPulse(servoPin1, myAngle);
                delay(20);
              }


              for (myAngle=0; myAngle<=180; myAngle= myAngle+10)
              {
                servoPulse(servoPin2, myAngle);
                delay(20);
              }
              for (myAngle=180; myAngle>=0; myAngle= myAngle-10)
              {
                servoPulse(servoPin2, myAngle);
                delay(20);
              }


              for (myAngle=0; myAngle<=180; myAngle= myAngle+5)
              {
                delay(20);
              }
              for (myAngle=180; myAngle>=0; myAngle= myAngle-5)

              {
                servoPulse(servoPin2, myAngle);
                delay(20);
              }

        }
        }
Problems & solutions:
Problem 1:
I started by Sending all the phototransistor readings to the servo circuit in order for it to turn motors on when the values are in certain ranges. But doing this the circuit did not work.
Solution:
I made all the processing happen in the first circuit and the only thing to be sent to the other circuit was the trigger value "1". Then I stopped the circuits from repeating that loop in order not to confuse the servo circuit with further data.
Problem 2:
My second (servo) code states that have you received anything from the input circuit, start to move. Yet I had no means to stop the (servo) code even if I turned the light off.
Solution:
I have no solution uptill now except having to unplug the whole thing. I know it can be done in coding but that would be available in version II of this project after getting done with the academy (Inshaa' Allah).
B) Group Assignment:
"Send a message between two projects" that is the group task for this week.
It means that I need to send a message between any combination of boards, computers and/or mobile devices.
So I uploaded the code below to my "output devices" week circuit in order to turn on and off the LED using serial monitor.
      #include < SoftwareSerial.h>
      #define RX    0
      #define TX    1
      SoftwareSerial MySerial(RX, TX);

      char serialData;
      int pin = 8;

      void setup()
      {
      pinMode(pin, OUTPUT);
      MySerial.begin(9600);
      }

      void loop()
      {
        if (MySerial.available() > 0)
        {
          serialData = MySerial.read();
          MySerial.print(serialData);

          if (serialData == '1')
          {digitalWrite(pin, HIGH);}

          else if (serialData == '0')
          {digitalWrite( pin, LOW);}
        }
      }
Downloadables: 💾
- Input Circuit Arduino File.inoHere
- Output Circuit Arduino File.inoHere
___________________________________________
©️ Row'a M. M. Othman - Fab Academy 2020