Week 2 - Computer-Aided Design
Experiments with 2D Drawing, 3D Modeling, Animating, and Simulations.
Drawings
Before I could model anything, I needed to understand what pieces parrots are composed of:
- body
- head (beak, eyes, rotation)
- wings (should open up!)
- feet
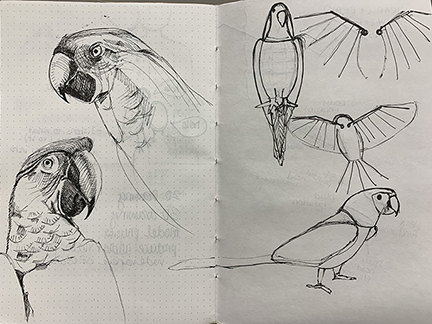
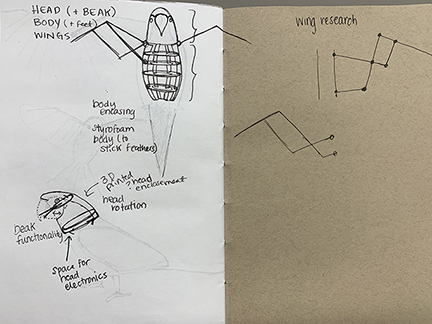
The wings would be more complicated, and required research into how other people made them.
2D Rendering
Since I have previous experience with Adobe products (Photoshop, Illustrator), I decided to use these for the 2D rendering.
Bitmaps are cool - in Photoshop, you can turn them into “comic-style” halftone screens, and then bring them into Illustrator, and change the colors.  Here’s how I made it:
- Bring image into Photoshop
- Using the magic wand tool, select the black lines of the drawing. Your lines will have to be quite dark. This will leave the entire selection, and you’ll have to select the inside and delete the white-space.
- Make sure your layer is not locked as ‘Background’ (this lets you have transparancy).
- Once you have the line drawing (I ended up using the brush tool to make it more detailed and defined), turn the file into Grayscale color mode (Image -> Mode -> Grayscale)
- When ready, turn the image into a bitmap, and save as a tif.
- Bring the tif image into Illustrator, change the colors, etc. and voila!
Due to space contraints, not all images will be shown, and are downloaded at the end of this page. Some images will be hosted on my personal website.
3D Rendering
In college, I worked with Maya to 3D Model and Animate things, but it’s too expensive and I no longer have student access. Last year I was introduced to Fusion 360, and this week I dug deeper into learning how to use it.
However, I was focusing too much on 3D modeling a beautiful parrot (as I would have done in Maya), but I think I’m losing sight of what Fusion360’s purpose is…
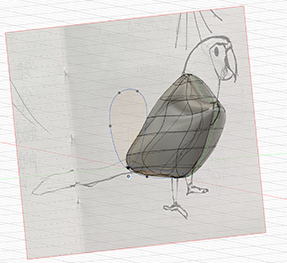
This week I learned how to create more organic forms using a lofting technique. By creating sketched on different planes (they must be on the same axis), you can create an interesting shape. To have more control over the shape, you can create “rails” (on a different axis) - a sketch/line with control points which intersect with the first sketches.
Creating organic shapes is quite difficult in Fusion 360, but they provide another way of making solids with the Forms tool. It is great for curves, without needing control points. I used this tutorial to
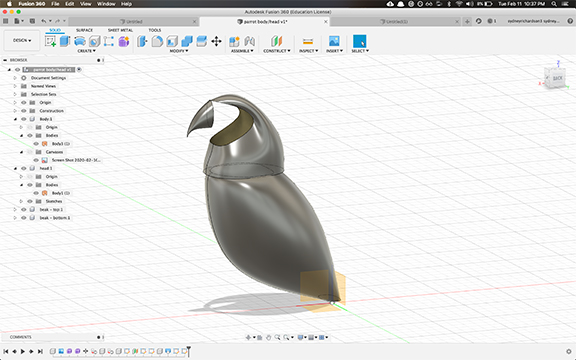
I really like the shape of what I was able to create, but it’s not surving the purpose. I am not able to close the head/eyes/brain area, and I’m invisioning it being a creepy open-skull animatronic. I might have to re-do the head component to achieve what I’m looking for.
Right now I’m suffering a bit from the “I kNoW hOw To Do ThIs” tendency, when in fact, I am still a novice. Lars Christensen on YouTube has some amazing tutorials that explain everything from the basics.
3D Animation
I wanted to figure out how the wings would work as a model, so I decided to learn how to animate these.
I created a sketch for the wings, and added holes where they would be joined. I did this by creating a sketch of 4mm circles, and duplicating them everywhere, then using the Extrude functionality. There’s an important step I learned from Lars for this: instead of setting the distance of the extrude, you can extrude to an object. This way, if you change the width of the object that has the extrude, it will stay consistent.
Creating joints was fairly straightforward, but some distinctions need to be made. First, there needs to be a way for the joints to be grounded. For this, I attatched the base of the wings to a dummy body placeholder, and used an As Built Joint.
For the joints coming out of the wings, at first I was using a rotational joint, but it was breaking the animation. After looking through what is available, I noticed a Planetary Joint. A Planetary Joint lets the model rotate and translate in different directions, basically giving it three degrees of translation. Once I used that in the model, the simulation worked as intended.
Neil provided some ways to format this video, but they are not working for me on my computer.
Video Link for Techincal Issues