14. Networking and Communications
For the machine design week, we created a project with student from FabLab Kannai to send messages among Raspberry Pi and ESP32s using MQTT.
One ESP32 and Raspberry Pi were used to publish a json file with numbers representing rythm and melody.
The set-up of MQTT configurations, and the program for MQTT pubsub is documented in this page .
Here is how we programmed the client side code so we can play our own instrument machine according to the json file published.
This is the code for the publisher, and how messages are published when the code is executed:
Kimura
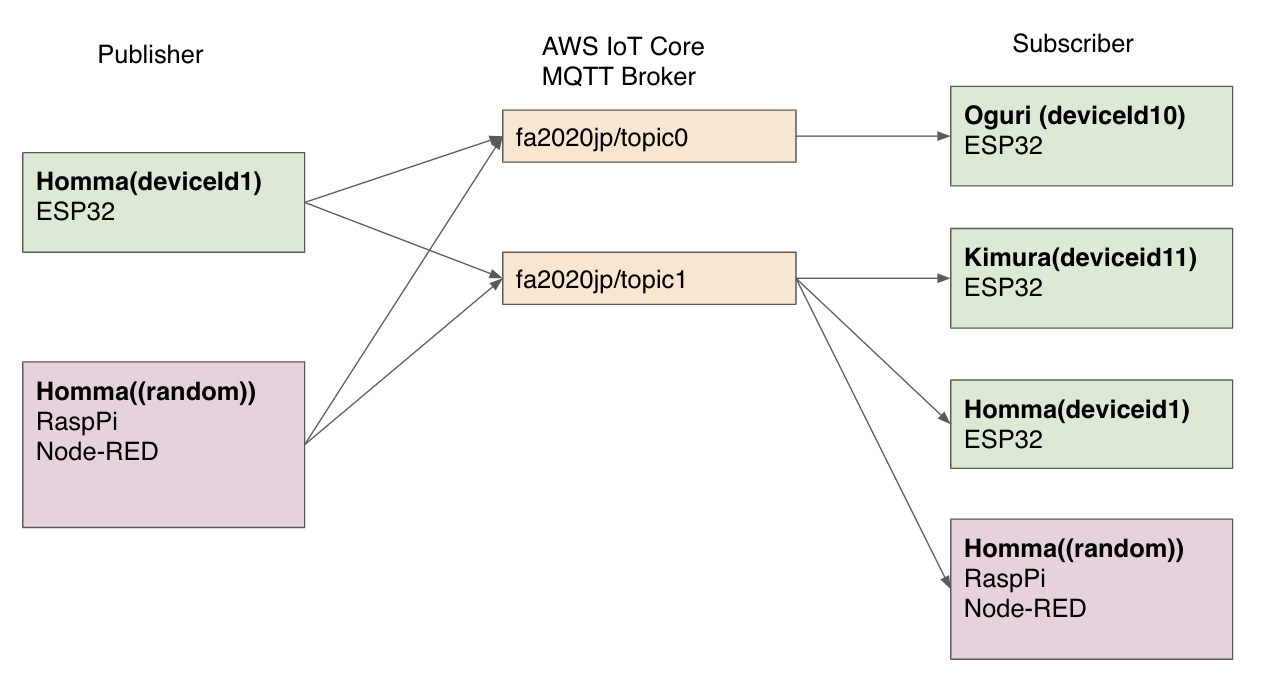
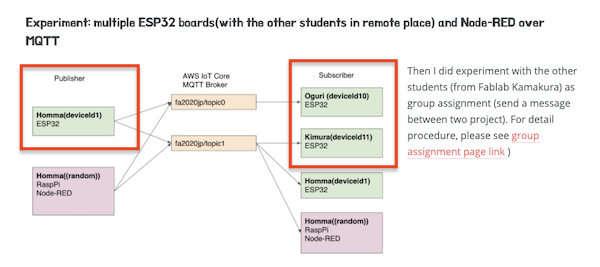
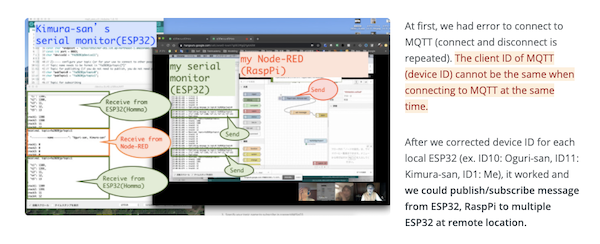
I experimented with Mr. Homma (Fablab kannai) and Mr. Oguri as a group assignment for a network using multiple ESP32 boards via MQTT.
Details are on Mr. Homma’s page.
Tsuchiyama
For the machine design week, I created a project to send messages between Raspberry Pi and ESP32 using MQTT with the FabLab Kannai students and FabLab Kamakura students.
Programm code
  1
  2
  3
  4
  5
  6
  7
  8
  9
 10
 11
 12
 13
 14
 15
 16
 17
 18
 19
 20
 21
 22
 23
 24
 25
 26
 27
 28
 29
 30
 31
 32
 33
 34
 35
 36
 37
 38
 39
 40
 41
 42
 43
 44
 45
 46
 47
 48
 49
 50
 51
 52
 53
 54
 55
 56
 57
 58
 59
 60
 61
 62
 63
 64
 65
 66
 67
 68
 69
 70
 71
 72
 73
 74
 75
 76
 77
 78
 79
 80
 81
 82
 83
 84
 85
 86
 87
 88
 89
 90
 91
 92
 93
 94
 95
 96
 97
 98
 99
100
101
102
103
104
105
106
107
108
109
110
111
112
113
114
115
116
117
118
119
120
121
122
123
124
125
126
127
128
129
130
131
132
133
134
135
136
137
138
139
140
141
142
143
144
145
146
147
148
149
150
151
152
153
154
155
156
157
158
159
160
161
162
163
164
165
166
167
168
169
170
171
172
173
174
175
176
177
178
179
180
181
182
183
184
185
186
187
188
189
190
191
192
193
194
195
196
197
198
199
200
201
202
203
204
205
206
207
208
209
210
211
212
213
214
215
216
217
218
219
220
221
222
223
224
225
226
227
228
229
230
231
232
233
234
235
#include <Servo_ESP32.h>
/*
* Description:
* Example for setting the minimal and maximal angle .
*/
static const int servo1Pin = 12 ;//printed G14 on the board
Servo_ESP32 servo1 ;
/*
This is a sample template program for ESP32 connecting to
AWS IoT over MQTT to make distributed machine device for group
project of Machine design and mechanial design in
FabAcademy 2020 (students at Fablab Kamakura and Kannai ).
As this code contains certification information , PLEASE
DO NOT UPLOAD THIS SOURCE CODE to ANY SHARABLE PLACE
DIRECTLY (including FabAcademy page ). If you need to upload
this to sharable place , PLEASE MAKE SURE YOU DELETE
VALUES OF rootCA , certificate and privateKey CHARACTORS .
For preparation , please find PubSubClient .h in youf local
library and chhange #define MQTT_MAX_PACKET_SIZE 128 to 512.
For using this , please update as follows .
1 ) Set your ssid and password
2 ) Configure your topic (or for your use to publish / receive message )
3 ) Specify your topic name to subscribe in connectAWSIoT ()
4 ) Write your logic on receiving message in mqttCallback ()
5 ) Write your logic for publishing message in mqttLoop () // <-optional
*/
#include <WiFiClientSecure.h>
#include <PubSubClient.h>
#include <ArduinoJson.h>
#include <ESPmDNS.h>
// pin assignment for LED blink
//const int S1 = 4 ;
//const int S2 = 16 ;
//const int S3 = 17 ;
// 1 ) set your ssid and password ----------
char *ssid = "Buffalo-G-B378" ;
char *password = "5h4drrvjjmift" ;
// 1 ) end ---------------------------------
// AWS_IOT endpoint setting (fixed )
const char *endpoint = "a2toz7cb5zl4er-ats.iot.ap-northeast-1.amazonaws.com" ;
const int port = 8883 ;
//char deviceId [4 ]; // random device ID in 4 digit hexadecimal (max : ffff )
byte mac_addr [6 ];
char deviceId [20 ];
// 2 ) configure your topic (or for your use to connect to other people ) -----
// Topic name needs to be format in "fa2020jp/topic[*]"
// Topic for publishing (if you do not need to publish , you do not need pubTopic .
char *pubTopic0 = "fa2020jp/topic0" ;
// Topic for subscribing
char *subTopic0 = "fa2020jp/topic0" ;
// 2 ) end -----------------------------------------------------------
const char * rootCA = "-----BEGIN CERTIFICATE-----\n" \
***
"-----END CERTIFICATE-----\n" ;
const char * certificate = "-----BEGIN CERTIFICATE-----\n" \
***
"-----END CERTIFICATE-----\n" ;
const char * privateKey = "-----BEGIN RSA PRIVATE KEY-----\n" \
***
"-----END RSA PRIVATE KEY-----\n" ;
WiFiClientSecure httpsClient ;
PubSubClient mqttClient (httpsClient );
void setup () {
Serial .begin (115200 );
pinMode (12 , OUTPUT );
// Start WiFi connection
Serial .println ("Connecting to " );
Serial .print (ssid );
WiFi .begin (ssid , password );
// wait until WiFi connected
while (WiFi .status () != WL_CONNECTED ) {
delay (500 );
Serial .print ("." );
}
Serial .println ("\nWifi Connected." );
// Configure certification and MQTT Client
httpsClient .setCACert (rootCA );
httpsClient .setCertificate (certificate );
httpsClient .setPrivateKey (privateKey );
mqttClient .setServer (endpoint , port );
mqttClient .setCallback (mqttCallback );
// Set device Id from Mac Address
WiFi .macAddress (mac_addr );
sprintf (deviceId , "%02X:%02X:%02X:%02X:%02X:%02X" , mac_addr [0 ], mac_addr [1 ], mac_addr [2 ], mac_addr [3 ], mac_addr [4 ], mac_addr [5 ]);
connectAWSIoT ();
servo1 .attach (servo1Pin );
}
void connectAWSIoT () {
while (!mqttClient .connected ()) {
if (mqttClient .connect (deviceId )) {
Serial .print ("mqtt Connected - deviceId: " );
Serial .println (deviceId );
// QoS 0 is sending message only 1 time (the fastest )
// QoS 1 is returning puback to publisher after send message successfully
// QoS 2 is sending message only 1 time with validation (the slowest )
// AWS IoT only allows QoS 0 or 1 .
int qos = 0 ;
// 3 ) Specify your topic name to subscribe -----------
mqttClient .subscribe (subTopic0 , qos );
// 3 ) end --------------------------------------------
Serial .println ("Subscribed." );
} else {
Serial .print ("mqttClient.connect() Failed - deviceId:" );
Serial .println (deviceId );
Serial .print ("Error state=" );
Serial .println (mqttClient .state ());
// Wait every 5 seconds until connect to MQTT broker
delay (5000 );
}
}
}
int t4 ;
int t5 ;
int t6 ;
void mqttCallback (char * topic , byte * payload , unsigned int length ) {
DynamicJsonDocument doc (256 );
// Write serial monitor
Serial .print ("Received. topic=" );
Serial .println (topic );
// deserialize
DeserializationError error = deserializeJson (doc , payload );
if (error ) {
Serial .print ("deserializeJson() failed with code " );
Serial .println (error .c_str ());
return ;
}
// 4 ) Write your logic on received message -----------------
// dump Json in readable format
serializeJsonPretty (doc , Serial );
Serial .println ();
// parse Json (retrieve int value from for each track )
int seq = doc ["seq" ].as <int> ();
int interval = doc ["interval" ].as <int> ();
int overhead ; // overhead for each beat (returned by pushSolenoids ())
// int t1 = doc ["t1" ].as <int> ();
// int t2 = doc ["t2" ].as <int> ();
// int t3 = doc ["t3" ].as <int> ();
// int t4 = doc ["t4" ].as <int> ();
// int t5 = doc ["t5" ].as <int> ();
// int t6 = doc ["t6" ].as <int> ();
// switch (t4 ) {
// case 0 :
delay (400 );
servo1 .write (20 );
delay (100 );
servo1 .write (70 );
delay (100 );
servo1 .write (20 );
delay (100 );
servo1 .write (70 );
delay (100 );
// break ;
// case 1 :
// break ;
// }
// 4 ) end -------------------------------------------------
}
void mqttLoop () {
if (!mqttClient .connected ()) {
connectAWSIoT ();
}
mqttClient .loop ();
// 5 ) ----- Write your logic for publishing message from here -----
// (If you are not pubishing anything , you can delete following code )
// Publisher publishes folowing element
// seq: sequence status (start from 1 when start sound )
// count: count (start from 1 when start publisher process (on Node-RED in RaspPi )
// t1: melody1 (in MIDI note name )
// t2: melody2 (ex . harmony , in MIDI note name )
// t3: code , (in MIDI note name )
// t4: rhythm1 (8 beat , front ) 1 , 0 , 1 , 0 , 1 , 0 , 1 , 0
// t5: rhythm2 (8 beat , back ) 0 , 1 , 0 , 1 , 0 , 1 , 0 , 1
// t6: rhythm3 (8 beat , variation ) 1 , 1 , 0 , 1 , 0 , 1 , 1 , 0
// interval: interval in delay
// mqttClient .disconnect ();
// 5 ) end---------------------------------------------------
}
void loop () {
// server .handleClient ();
mqttLoop ();
}
↓
VIDEO
Oguri
Yume
I followed t5, and had 2 servo motors moving up and down every time I received 1 and 0.
(Wifi info and authorization keys are substituted with ***.)
  1
  2
  3
  4
  5
  6
  7
  8
  9
 10
 11
 12
 13
 14
 15
 16
 17
 18
 19
 20
 21
 22
 23
 24
 25
 26
 27
 28
 29
 30
 31
 32
 33
 34
 35
 36
 37
 38
 39
 40
 41
 42
 43
 44
 45
 46
 47
 48
 49
 50
 51
 52
 53
 54
 55
 56
 57
 58
 59
 60
 61
 62
 63
 64
 65
 66
 67
 68
 69
 70
 71
 72
 73
 74
 75
 76
 77
 78
 79
 80
 81
 82
 83
 84
 85
 86
 87
 88
 89
 90
 91
 92
 93
 94
 95
 96
 97
 98
 99
100
101
102
103
104
105
106
107
108
109
110
111
112
113
114
115
116
117
118
119
120
121
122
123
124
125
126
127
128
129
130
131
132
133
134
135
136
137
138
139
140
141
142
143
144
145
146
147
148
149
150
151
152
153
154
155
156
157
158
159
160
161
162
163
164
165
166
167
168
169
170
171
172
173
174
175
176
177
178
179
180
181
182
183
184
185
186
187
188
189
190
191
192
193
194
195
196
197
198
199
200
201
202
203
204
205
206
207
208
209
210
211
212
213
214
215
216
217
218
219
220
221
222
223
224
225
226
227
228
229
230
231
232
233
234
235
236
237
238
239
240
241
#include <Servo_ESP32.h>
/*
* Description:
* Example for setting the minimal and maximal angle .
*/
static const int servo1Pin = 13 ;
static const int servo2Pin = 12 ;
Servo_ESP32 servo1 ;
Servo_ESP32 servo2 ;
/*
This is a sample template program for ESP32 connecting to
AWS IoT over MQTT to make distributed machine device for group
project of Machine design and mechanial design in
FabAcademy 2020 (students at Fablab Kamakura and Kannai ).
As this code contains certification information , PLEASE
DO NOT UPLOAD THIS SOURCE CODE to ANY SHARABLE PLACE
DIRECTLY (including FabAcademy page ). If you need to upload
this to sharable place , PLEASE MAKE SURE YOU DELETE
VALUES OF rootCA , certificate and privateKey CHARACTORS .
For preparation , please find PubSubClient .h in youf local
library and chhange #define MQTT_MAX_PACKET_SIZE 128 to 512.
For using this , please update as follows .
1 ) Set your ssid and password
2 ) Configure your topic (or for your use to publish / receive message )
3 ) Specify your topic name to subscribe in connectAWSIoT ()
4 ) Write your logic on receiving message in mqttCallback ()
5 ) Write your logic for publishing message in mqttLoop () // <-optional
*/
#include <WiFiClientSecure.h>
#include <PubSubClient.h>
#include <ArduinoJson.h>
#include <ESPmDNS.h>
// 1 ) set your ssid and password ----------
char *ssid = "***" ;
char *password = "***" ;
// 1 ) end ---------------------------------
// AWS_IOT endpoint setting (fixed )
const char *endpoint = "a2toz7cb5zl4er-ats.iot.ap-northeast-1.amazonaws.com" ;
const int port = 8883 ;
//char deviceId [4 ]; // random device ID in 4 digit hexadecimal (max : ffff )
byte mac_addr [6 ];
char deviceId [20 ];
// 2 ) configure your topic (or for your use to connect to other people ) -----
// Topic name needs to be format in "fa2020jp/topic[*]"
// Topic for publishing (if you do not need to publish , you do not need pubTopic .
char *pubTopic0 = "fa2020jp/topic0" ;
// Topic for subscribing
char *subTopic0 = "fa2020jp/topic0" ;
// 2 ) end -----------------------------------------------------------
const char * rootCA = "-----BEGIN CERTIFICATE-----\n" \
***
"-----END CERTIFICATE-----\n" ;
const char * certificate = "-----BEGIN CERTIFICATE-----\n" \
***
"-----END CERTIFICATE-----\n" ;
const char * privateKey = "-----BEGIN RSA PRIVATE KEY-----\n" \
***
"-----END RSA PRIVATE KEY-----\n" ;
WiFiClientSecure httpsClient ;
PubSubClient mqttClient (httpsClient );
void setup () {
Serial .begin (115200 );
// Start WiFi connection
Serial .println ("Connecting to " );
Serial .print (ssid );
WiFi .begin (ssid , password );
// wait until WiFi connected
while (WiFi .status () != WL_CONNECTED ) {
delay (500 );
Serial .print ("." );
}
Serial .println ("\nWifi Connected." );
// Configure certification and MQTT Client
httpsClient .setCACert (rootCA );
httpsClient .setCertificate (certificate );
httpsClient .setPrivateKey (privateKey );
mqttClient .setServer (endpoint , port );
mqttClient .setCallback (mqttCallback );
// Set device Id from Mac Address
WiFi .macAddress (mac_addr );
sprintf (deviceId , "%02X:%02X:%02X:%02X:%02X:%02X" , mac_addr [0 ], mac_addr [1 ], mac_addr [2 ], mac_addr [3 ], mac_addr [4 ], mac_addr [5 ]);
connectAWSIoT ();
servo1 .attach (servo1Pin );
servo2 .attach (servo2Pin );
servo1 .write (10 );
servo2 .write (10 );
}
void connectAWSIoT () {
while (!mqttClient .connected ()) {
if (mqttClient .connect (deviceId )) {
Serial .print ("mqtt Connected - deviceId: " );
Serial .println (deviceId );
// QoS 0 is sending message only 1 time (the fastest )
// QoS 1 is returning puback to publisher after send message successfully
// QoS 2 is sending message only 1 time with validation (the slowest )
// AWS IoT only allows QoS 0 or 1 .
int qos = 0 ;
// 3 ) Specify your topic name to subscribe -----------
mqttClient .subscribe (subTopic0 , qos );
// 3 ) end --------------------------------------------
Serial .println ("Subscribed." );
} else {
Serial .print ("mqttClient.connect() Failed - deviceId:" );
Serial .println (deviceId );
Serial .print ("Error state=" );
Serial .println (mqttClient .state ());
// Wait every 5 seconds until connect to MQTT broker
delay (5000 );
}
}
}
int t4 ;
int t5 ;
int t6 ;
void mqttCallback (char * topic , byte * payload , unsigned int length ) {
DynamicJsonDocument doc (256 );
// Write serial monitor
Serial .print ("Received. topic=" );
Serial .println (topic );
// deserialize
DeserializationError error = deserializeJson (doc , payload );
if (error ) {
Serial .print ("deserializeJson() failed with code " );
Serial .println (error .c_str ());
return ;
}
// 4 ) Write your logic on received message -----------------
// dump Json in readable format
serializeJsonPretty (doc , Serial );
Serial .println ();
// parse Json (retrieve int value from for each track )
int seq = doc ["seq" ].as <int> ();
int interval = doc ["interval" ].as <int> ();
int overhead ; // overhead for each beat (returned by pushSolenoids ())
// int t1 = doc ["t1" ].as <int> ();
// int t2 = doc ["t2" ].as <int> ();
// int t3 = doc ["t3" ].as <int> ();
// int t4 = doc ["t4" ].as <int> ();
int t5 = doc ["t5" ].as <int> ();
// int t6 = doc ["t6" ].as <int> ();
switch (t5 ) {
case 0 :
servo1 .write (10 );
servo2 .write (10 );
delay (500 );
servo1 .write (120 );
servo2 .write (120 );
delay (500 );
// }
break ;
//for (int posDegrees = 180 ; posDegrees >= 0 ; posDegrees-- ) {
case 1 :
servo1 .write (10 );
servo2 .write (10 );
delay (500 );
servo1 .write (120 );
servo2 .write (120 );
delay (500 );
break ;
}
// 4 ) end -------------------------------------------------
}
void mqttLoop () {
if (!mqttClient .connected ()) {
connectAWSIoT ();
}
mqttClient .loop ();
// 5 ) ----- Write your logic for publishing message from here -----
// (If you are not pubishing anything , you can delete following code )
// Publisher publishes folowing element
// seq: sequence status (start from 1 when start sound )
// count: count (start from 1 when start publisher process (on Node-RED in RaspPi )
// t1: melody1 (in MIDI note name )
// t2: melody2 (ex . harmony , in MIDI note name )
// t3: code , (in MIDI note name )
// t4: rhythm1 (8 beat , front ) 1 , 0 , 1 , 0 , 1 , 0 , 1 , 0
// t5: rhythm2 (8 beat , back ) 0 , 1 , 0 , 1 , 0 , 1 , 0 , 1
// t6: rhythm3 (8 beat , variation ) 1 , 1 , 0 , 1 , 0 , 1 , 1 , 0
// interval: interval in delay
// mqttClient .disconnect ();
// 5 ) end---------------------------------------------------
}
void loop () {
// server .handleClient ();
mqttLoop ();
}
I was able to receive message like this:
And Elmo that is attached to the 2 motors moved like this:
Kimura
Yanome
I created Saba-kan Machine for Machine Design week.
Using MQTT platform, publisher sent messages among Raspberry Pi and ESP32s and the subscriber, me, received them.
Here is the code that I used.
  1
  2
  3
  4
  5
  6
  7
  8
  9
 10
 11
 12
 13
 14
 15
 16
 17
 18
 19
 20
 21
 22
 23
 24
 25
 26
 27
 28
 29
 30
 31
 32
 33
 34
 35
 36
 37
 38
 39
 40
 41
 42
 43
 44
 45
 46
 47
 48
 49
 50
 51
 52
 53
 54
 55
 56
 57
 58
 59
 60
 61
 62
 63
 64
 65
 66
 67
 68
 69
 70
 71
 72
 73
 74
 75
 76
 77
 78
 79
 80
 81
 82
 83
 84
 85
 86
 87
 88
 89
 90
 91
 92
 93
 94
 95
 96
 97
 98
 99
100
101
102
103
104
105
106
107
108
109
110
111
112
113
114
115
116
117
118
119
120
121
122
123
124
125
126
127
128
129
130
131
132
133
134
135
136
137
138
139
140
141
142
143
144
145
146
147
148
149
150
151
152
153
154
155
156
157
158
159
160
161
162
163
164
165
166
167
168
169
170
171
172
173
174
175
176
177
178
179
180
181
182
183
184
185
186
187
188
189
190
191
192
193
194
195
196
197
198
199
200
201
202
203
204
205
206
207
208
209
210
211
212
213
214
215
216
217
218
219
220
221
222
223
224
225
226
227
228
229
230
231
232
233
234
235
#include <Servo_ESP32.h>
/*
* Description:
* Example for setting the minimal and maximal angle .
*/
static const int servo1Pin = 12 ;//printed G14 on the board
Servo_ESP32 servo1 ;
/*
This is a sample template program for ESP32 connecting to
AWS IoT over MQTT to make distributed machine device for group
project of Machine design and mechanial design in
FabAcademy 2020 (students at Fablab Kamakura and Kannai ).
As this code contains certification information , PLEASE
DO NOT UPLOAD THIS SOURCE CODE to ANY SHARABLE PLACE
DIRECTLY (including FabAcademy page ). If you need to upload
this to sharable place , PLEASE MAKE SURE YOU DELETE
VALUES OF rootCA , certificate and privateKey CHARACTORS .
For preparation , please find PubSubClient .h in youf local
library and chhange #define MQTT_MAX_PACKET_SIZE 128 to 512.
For using this , please update as follows .
1 ) Set your ssid and password
2 ) Configure your topic (or for your use to publish / receive message )
3 ) Specify your topic name to subscribe in connectAWSIoT ()
4 ) Write your logic on receiving message in mqttCallback ()
5 ) Write your logic for publishing message in mqttLoop () // <-optional
*/
#include <WiFiClientSecure.h>
#include <PubSubClient.h>
#include <ArduinoJson.h>
#include <ESPmDNS.h>
// pin assignment for LED blink
//const int S1 = 4 ;
//const int S2 = 16 ;
//const int S3 = 17 ;
// 1 ) set your ssid and password ----------
char *ssid = "***" ;
char *password = "***" ;
// 1 ) end ---------------------------------
// AWS_IOT endpoint setting (fixed )
const char *endpoint = "a2toz7cb5zl4er-ats.iot.ap-northeast-1.amazonaws.com" ;
const int port = 8883 ;
//char deviceId [4 ]; // random device ID in 4 digit hexadecimal (max : ffff )
byte mac_addr [6 ];
char deviceId [20 ];
// 2 ) configure your topic (or for your use to connect to other people ) -----
// Topic name needs to be format in "fa2020jp/topic[*]"
// Topic for publishing (if you do not need to publish , you do not need pubTopic .
char *pubTopic0 = "fa2020jp/topic0" ;
// Topic for subscribing
char *subTopic0 = "fa2020jp/topic0" ;
// 2 ) end -----------------------------------------------------------
const char * rootCA = "-----BEGIN CERTIFICATE-----\n" \
***
"-----END CERTIFICATE-----\n" ;
const char * certificate = "-----BEGIN CERTIFICATE-----\n" \
***
"-----END CERTIFICATE-----\n" ;
const char * privateKey = "-----BEGIN RSA PRIVATE KEY-----\n" \
***
"-----END RSA PRIVATE KEY-----\n" ;
WiFiClientSecure httpsClient ;
PubSubClient mqttClient (httpsClient );
void setup () {
Serial .begin (115200 );
pinMode (12 , OUTPUT );
// Start WiFi connection
Serial .println ("Connecting to " );
Serial .print (ssid );
WiFi .begin (ssid , password );
// wait until WiFi connected
while (WiFi .status () != WL_CONNECTED ) {
delay (500 );
Serial .print ("." );
}
Serial .println ("\nWifi Connected." );
// Configure certification and MQTT Client
httpsClient .setCACert (rootCA );
httpsClient .setCertificate (certificate );
httpsClient .setPrivateKey (privateKey );
mqttClient .setServer (endpoint , port );
mqttClient .setCallback (mqttCallback );
// Set device Id from Mac Address
WiFi .macAddress (mac_addr );
sprintf (deviceId , "%02X:%02X:%02X:%02X:%02X:%02X" , mac_addr [0 ], mac_addr [1 ], mac_addr [2 ], mac_addr [3 ], mac_addr [4 ], mac_addr [5 ]);
connectAWSIoT ();
servo1 .attach (servo1Pin );
}
void connectAWSIoT () {
while (!mqttClient .connected ()) {
if (mqttClient .connect (deviceId )) {
Serial .print ("mqtt Connected - deviceId: " );
Serial .println (deviceId );
// QoS 0 is sending message only 1 time (the fastest )
// QoS 1 is returning puback to publisher after send message successfully
// QoS 2 is sending message only 1 time with validation (the slowest )
// AWS IoT only allows QoS 0 or 1 .
int qos = 0 ;
// 3 ) Specify your topic name to subscribe -----------
mqttClient .subscribe (subTopic0 , qos );
// 3 ) end --------------------------------------------
Serial .println ("Subscribed." );
} else {
Serial .print ("mqttClient.connect() Failed - deviceId:" );
Serial .println (deviceId );
Serial .print ("Error state=" );
Serial .println (mqttClient .state ());
// Wait every 5 seconds until connect to MQTT broker
delay (5000 );
}
}
}
int t4 ;
int t5 ;
int t6 ;
void mqttCallback (char * topic , byte * payload , unsigned int length ) {
DynamicJsonDocument doc (256 );
// Write serial monitor
Serial .print ("Received. topic=" );
Serial .println (topic );
// deserialize
DeserializationError error = deserializeJson (doc , payload );
if (error ) {
Serial .print ("deserializeJson() failed with code " );
Serial .println (error .c_str ());
return ;
}
// 4 ) Write your logic on received message -----------------
// dump Json in readable format
serializeJsonPretty (doc , Serial );
Serial .println ();
// parse Json (retrieve int value from for each track )
int seq = doc ["seq" ].as <int> ();
int interval = doc ["interval" ].as <int> ();
int overhead ; // overhead for each beat (returned by pushSolenoids ())
// int t1 = doc ["t1" ].as <int> ();
// int t2 = doc ["t2" ].as <int> ();
// int t3 = doc ["t3" ].as <int> ();
// int t4 = doc ["t4" ].as <int> ();
// int t5 = doc ["t5" ].as <int> ();
// int t6 = doc ["t6" ].as <int> ();
// switch (t4 ) {
// case 0 :
delay (400 );
servo1 .write (20 );
delay (100 );
servo1 .write (80 );
delay (100 );
servo1 .write (30 );
delay (100 );
servo1 .write (80 );
delay (100 );
// break ;
// case 1 :
// break ;
// }
// 4 ) end -------------------------------------------------
}
void mqttLoop () {
if (!mqttClient .connected ()) {
connectAWSIoT ();
}
mqttClient .loop ();
// 5 ) ----- Write your logic for publishing message from here -----
// (If you are not pubishing anything , you can delete following code )
// Publisher publishes folowing element
// seq: sequence status (start from 1 when start sound )
// count: count (start from 1 when start publisher process (on Node-RED in RaspPi )
// t1: melody1 (in MIDI note name )
// t2: melody2 (ex . harmony , in MIDI note name )
// t3: code , (in MIDI note name )
// t4: rhythm1 (8 beat , front ) 1 , 0 , 1 , 0 , 1 , 0 , 1 , 0
// t5: rhythm2 (8 beat , back ) 0 , 1 , 0 , 1 , 0 , 1 , 0 , 1
// t6: rhythm3 (8 beat , variation ) 1 , 1 , 0 , 1 , 0 , 1 , 1 , 0
// interval: interval in delay
// mqttClient .disconnect ();
// 5 ) end---------------------------------------------------
}
void loop () {
// server .handleClient ();
mqttLoop ();
}
And…I”ve finally controlled my machine like this;
VIDEO