A13 - Networking and Communications
Group assignment
We´re just allowed to enter to the Fab Lab with restricted time and access. That´s because i haven´t been able to program my board. I hope that I have the time to test networks on my own PCB Board
Networking with the esp8266
The ESP 8266 was the first low cost Wi-Fi microchip with a full TCP/IP stack and a micro controller capability that was available to makers in August 2014. It uses simple TCP/IP connections using Hayes-style commands. It´s produced by the Chinese company Espressif Systems.
ESP 8266 Pin Out

Features:
- Processor: L106 32-bit RISC microprocessor core based on the Tensilica Xtensa Diamond Standard 106Micro running at 80 MHz[5]
- Memory: 32 KiB instruction RAM 32 KiB instruction cache RAM 80 KiB user-data RAM 16 KiB ETS system-data RAM External QSPI flash: up to 16 MiB is supported (512 KiB to 4 MiB typically included)
- IEEE 802.11 b/g/n Wi-Fi Integrated TR switch, balun, LNA, power amplifier and matching network WEP or WPA/WPA2 authentication, or open networks
- 17 GPIO pins[6]
- SPI
- I²C (software implementation)
- I²S interfaces with DMA (sharing pins with GPIO
- UART on dedicated pins, plus a transmit-only UART can be enabled on GPIO2
- 10-bit ADC (successive approximation ADC)
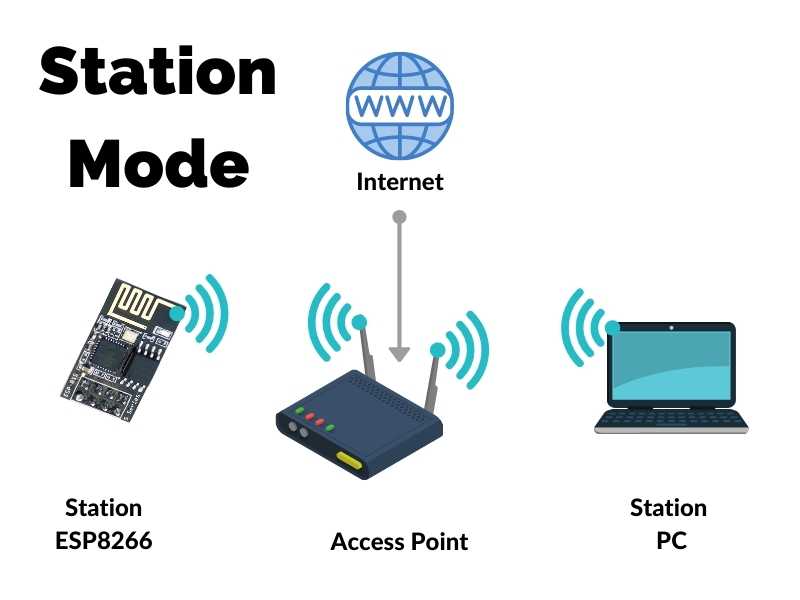
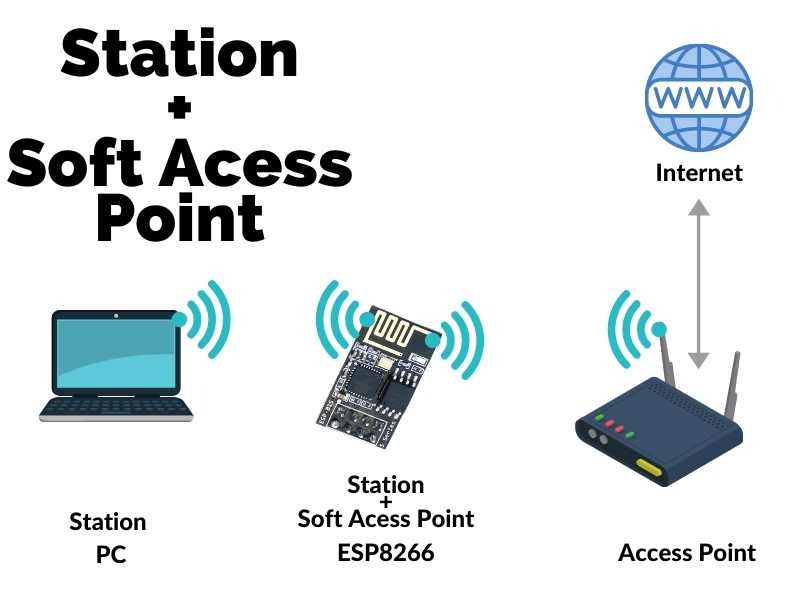
The ESP8266 can be connected in different modes: Station Mode, Soft Access Mode, Client Mode and Station and Client Mode.
Station Mode
It connects to a Wi- Fi network provided by a Router.
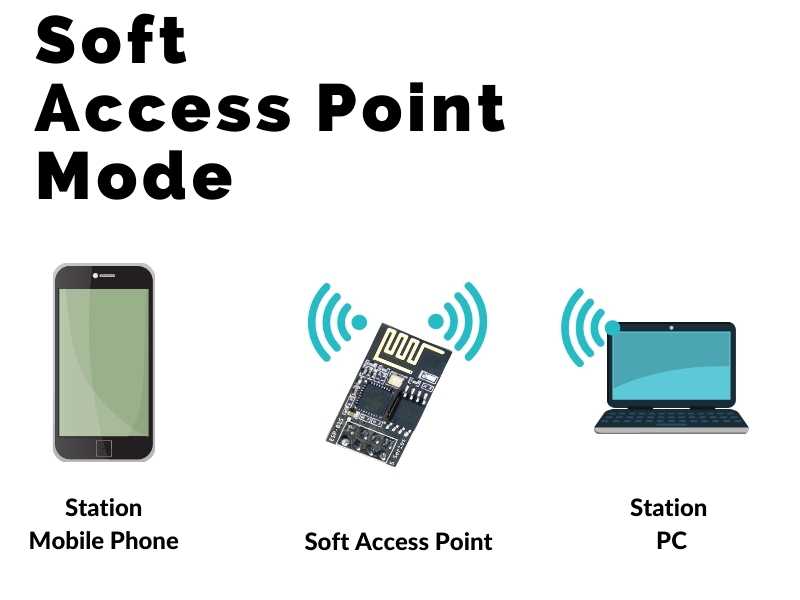
Soft Access Point
It generates a Wi-Fi access to another devises. It´s called Soft Access because it doesn't´t have an interface to log in or to program the network.
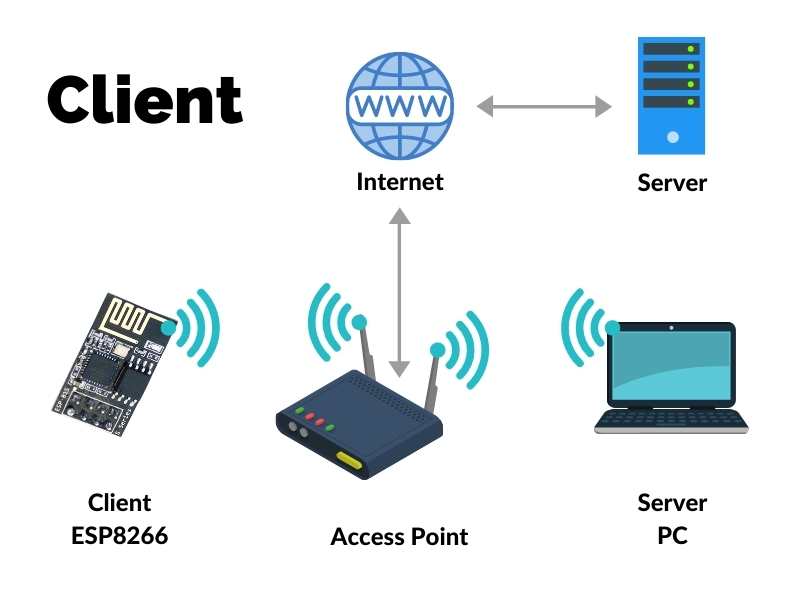
Client
It can access private services trough servers to send, receive or process data.
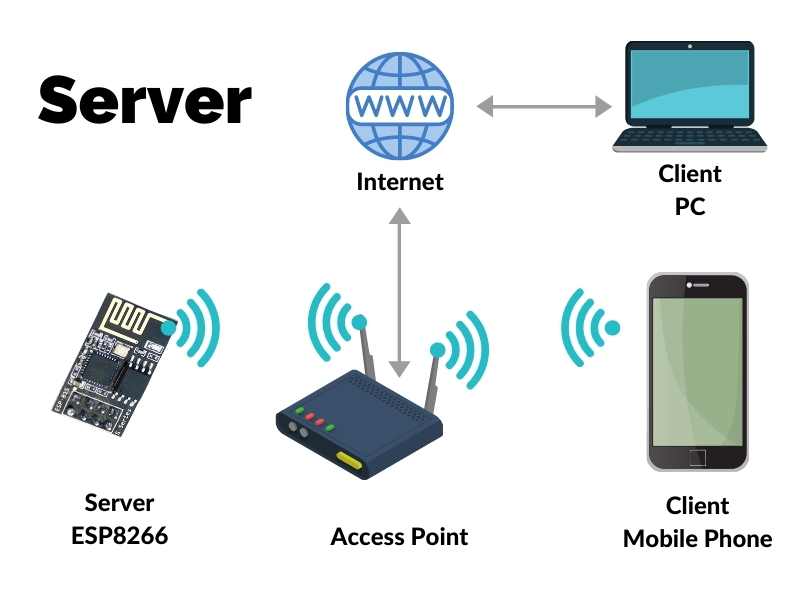
Server
Provides services and functions to another clients.
Station + Soft Access Point Mode
Thing Speak
At the end I connected my sensor to the internet trough Thing Speak that is an IoT analytics platform service that allows you to aggregate, visualize, and analyze live data streams in the cloud. You can send data to Thing Speak from your devices, create instant visualization of live data, and send alerts.
The process is easy but you have to put attention whit the numbers and the connections. I use a ESP8832 Wifi sensor to connect to the internet.
\#include
String apiKey = "H38TEGNC0XKW43BB";
//Enter your Write API key  from ThingSpeak const char *ssid =  "how2electronics";
// replace with your wifi  ssid and wpa2 key const char *pass =  "alhabibi";

const char* server = "api.thingspeak.com";
#define DHTPIN 0 //pin where the dht11 is connected

DHT dht(DHTPIN, DHT11);
WiFiClient client;

void setup()
{
Serial.begin(115200);
delay(10);
dht.begin();

Serial.println("Connecting to ");
Serial.println(ssid);

WiFi.begin(ssid, pass);

while (WiFi.status() != WL_CONNECTED)
{
delay(500);
Serial.print(".");
}
Serial.println("");
Serial.println("WiFi connected");

}
void loop()
{
float h = dht.readHumidity();
float t = dht.readTemperature();
if (isnan(h) || isnan(t))
{
Serial.println("Failed to read from DHT sensor!");
return;
}
if (client.connect(server,80))  //"184.106.153.149" or api.thingspeak.com
{
String postStr = apiKey;                                                                   postStr +="&field1=";                                                                       postStr += String(t);                                                                       postStr +="&field2=";                                                                       postStr += String(h);                                                                       postStr += "\r\n\r\n";                                                                      client.print("POST /update HTTP/1.1\n");                                                   client.print("Host: api.thingspeak.com\n");                                                 client.print("Connection: close\n");                                                       client.print("X-THINGSPEAKAPIKEY:  "+apiKey+"\n");
client.print("Content-Type:  application/x-www-form-urlencoded\n");                         client.print("Content-Length: ");                                                           client.print(postStr.length());                                                             client.print("\n\n");
client.print(postStr);
Serial.print("Temperature: ");                                                             Serial.print(t);
Serial.print(" degrees Celcius, Humidity:  ");
Serial.print(h);
Serial.println("%. Send to Thingspeak.");
}
client.stop();
Serial.println("Waiting...");
// thingspeak needs minimum 15 sec delay between updates
delay(1000);
}
Blue Tooth Connection
I was able to connect the HC-=05 Blue Tooth Sensor with an application I downloaded from the internet that allows you to connect your Android Device with an Arduino board to turn on a led with it´s own App.
Program the ESP8266 with Arduino
I still don´t have full access to the FabLab, so I haven´t been able to program my own board. That´s because I´m using the Arduino Uno board.
The first thing is to find the Arduino Core ESP8266 Wi - Fi library from in this page on github
I had to install the library by entering this web address https://arduino.esp8266.com/stable/package_esp8266com_index.json into the File>Preferences>Additional Boards Manager URLs field of the Arduino IDE.

In the board Manager you have to download the libraries.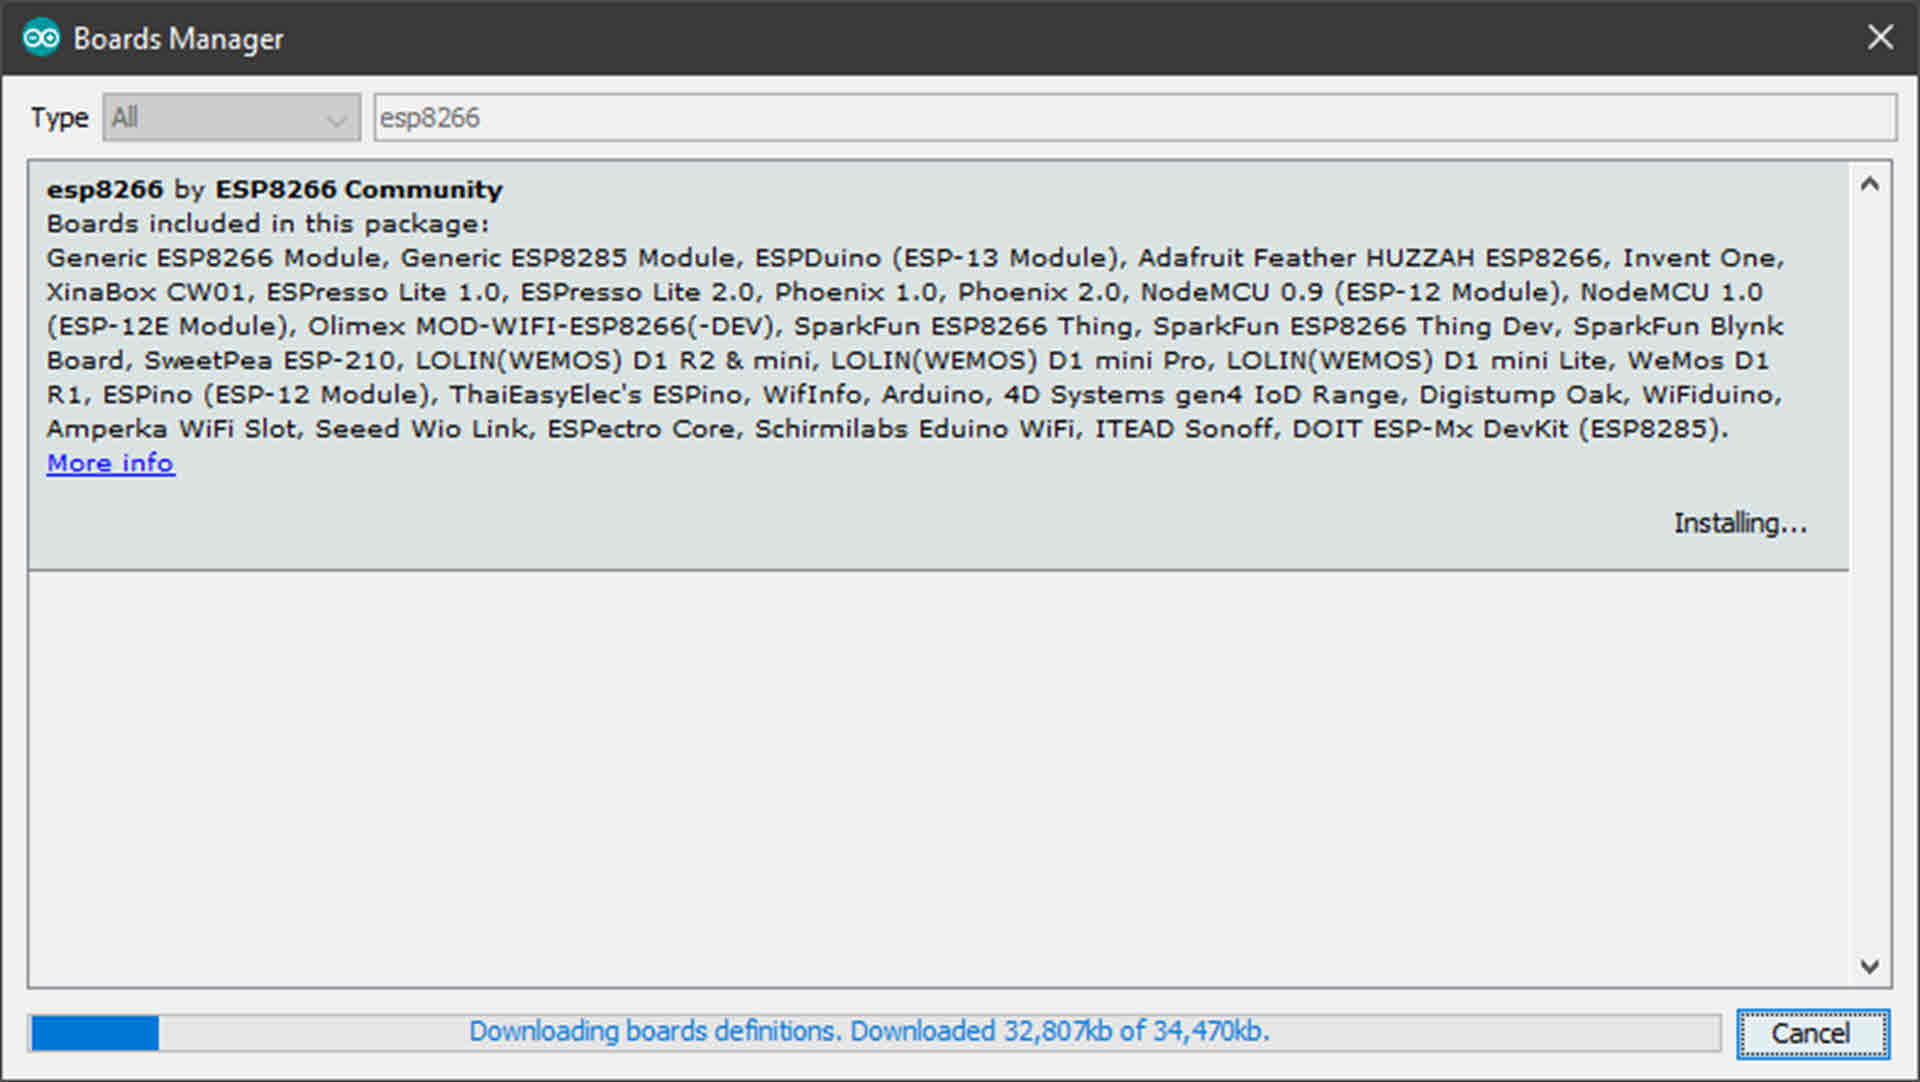
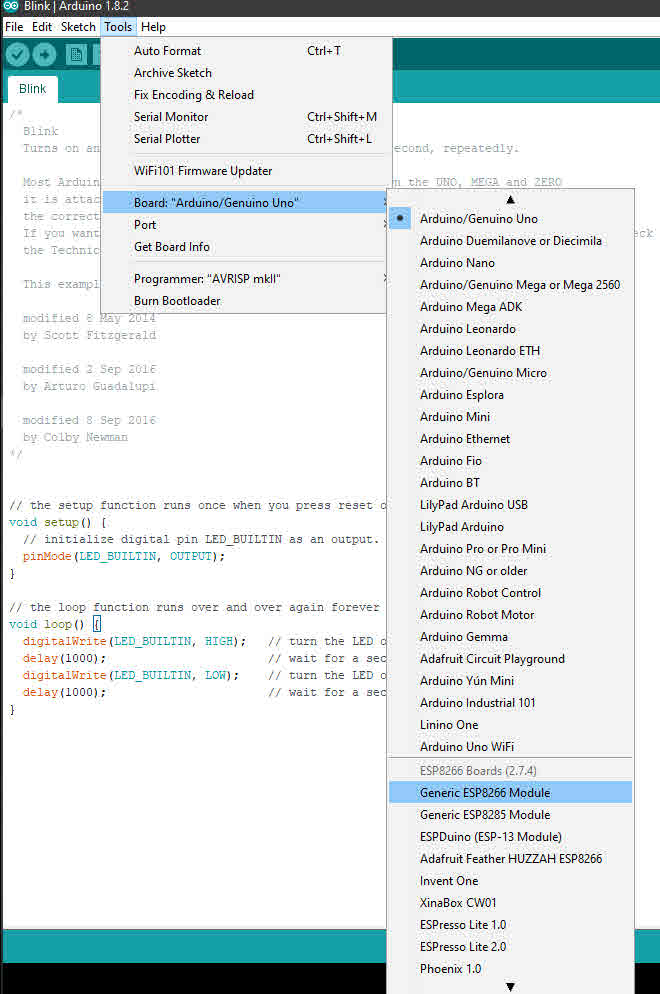
After installing i have to choose the Generic ESP8266 Board in the board Manager
To flash the ESP8266 I used an Arduino UNO DIP.
I have to remove the Processor from the Arduino Board
This is the diagram of the breadboard connection.

Missing Photo of real Connection
Load Example of "WIFI Scan"

I encounter the first problem the ESP 8266 didn't´t flash properly and after it doesn't´t recognize the Arduino Port any more.
[Source] (https://www.youtube.com/c/jadsatv/playlists)
Instructions:
Send a message between two projects (assignments made by different students) Individual assignment:
design, build, and connect wired or wireless node(s) with network or bus addresses Learning outcomes
- [ ] Demonstrate workflows used in network design
- [ ] Implement and interpret networking protocols
Have you? * [ ] Described your project using words/images/diagrams/schematic screenshots. * [ ] Explained the programming process/es you used. * [ ] Outlined problems and how you fixed them * [ ] Included design files (or linked to where they are located) and original code
FAQ Can we use arduino/commercial boards for networking? Answer: You can not use Arduino or similar commercial microcontroller boards. You can use a commercial wireless module in your own PCB. For this week, you can use the original satcha-kit/fab-kit/fabduino.
Must each board have a unique identity? Answer: It does not have to be hard-coded but you must use some form of addressing.