Project Management


How to use Git for version control step by step
Step 1: Get Git Install

Step 2. Configure Git’s settings, Command's lines

For Windows users, the application used is Git Bash. Add your Git username and set your email
git config –-global user.name “silvialugo24”
git config -–global user.email “silvialugo24@mail.com”
Step 3:Generate SSH key

After installing Git, you need to generate SSH key and save it on your GitLab account,it provides security and allows you to authenticate to the GitLab remote server without supplying your username or password each time.
ssh-keygen -t rsa -C "your.email@example.com" -b 4096cat ~/.ssh/id_rsa.pub | clip

Step 4:Clone Repository
To work on a git project from your computer, you will need to clone it.So,follow this commands . Copy your Repository SSH URl address "git@gitlab.fabcloud.org......." > Enter the code below in Git Bash.
$ git clone git@gitlab.fabcloud.org.......
Most commonly used commands in Git Bash.
git push -tags origin- Push all tags to remote repository
git add-Add files to staging (index)
git staus-List the files you've changed and those you still need to add or commit
git pull-Fetch and merge changes on the remote server to your working directory
git merge "branchname"-To merge a different branch into your active branch
git checkout "branchname"-List the files you've changed and those you still need to add or commit

Well, as a designer, I got experience on web design and programming by making sites for clients, homeworks of college and recently working on my own page (#coming soon). But what exactly is a website?
Website
A collection of publicly accessible, interlinked Web pages that share a single domain name, like a group of files that you could find in your computer, like a code. Through web browsers each individual site is identified by a distinct URL, enabling browsers to display them on the user's device.

Behind all the beauty of websites, you'll find a programming language, a common one is HTML or Hypertext Markup Language, is the standard markup language for creating web pages.
With Cascading Style Sheets (CSS) and JavaScript it forms a triad of cornerstone technologies for the World Wide Web.It's preferable to have basic notions about HTML and CSS before jump into it.Here I'll leave some tutorials.
Building this Website step by step
- Step 1: Download a Text Editor
For building a site or changing the code of a template is necessary a text editor.Usually I use Sublime Text, it’s friendly, even for beginners, and it allows you to work on many program languages like Javascript, Markdown, etc.

Here's the link to install Sublime Text
Just download and execute the file
Once you have the text Editor, you can start practicing from zero (follow the tutorials above) with basic commands (down below)

- Step 2: Download a Template
For building a site or changing the code of a template is necessary a text editor.Usually I use Sublime Text, it’s friendly, even for beginners, and it allows you to work on many program languages like Javascript, Markdown, etc. I picked this template named Massively from bootstrap.
At this point on just have fun exploring, changing fonts, sizes, combining color, ctrl c, ctrl v, and things like that. And that's how I made the page you’re now watching.

Basically, I use CorelDRAW to export the images. Corel lets you export the following web-compatible file formats: GIF, PNG, and JPEG.
Open Corel > New Document > Import image > File > Export for Web.
In this example, the picture size is 578 KB(it's not giant but this is only an example), changing color to rgb and the quality you'll see the size going from 500 to 72.3, pretty much lighter than the original. You can export web-compatible files using preset settings. This allows you to optimize the file, without the need to modify individual settings. You can also customize the settings to produce a specific result. For example, you can adjust its color, display quality, and file size.
Here's a full tutorial about exporting images for web using CorelDRAW.
How to manage the size of my images
Introduction: Basic things about websites

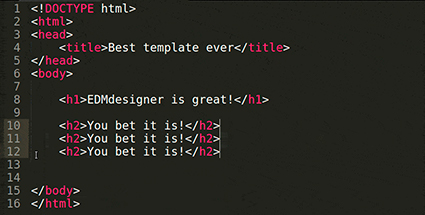
Most commonly used commands in HTML.
< p> < /p > new paragraph .
< a href="link > < /a> linking the word .
< span class="image main" > < img src="link alt= /> < /span> insert image .
< hn > example < /hn> font size adjusting by number n .
< br> next line .
< pre> < code>your code example < /code> < /pre> changes to the code style .
< div class="box" > content < /div> puts your contnent in to the box .


