_stage 1
List of features
Cat entrance-door system
The device I would like to develop ideally I would like it to cover the following features:
1_Smart collar: A cat's collar (possibly done in silicone, I still need to think about the best material to use) that has an integrated system, like a proximity sensor that enables the exit or entrance of the cat through a special door.
2_Sensor to detect entrance or exit: The door needs to have a sensor of movement, maybe on each side of the door, to detect whether the cat went out or came in.
3_Necklace water-proof: The necklace that my cat will be wearing should be water-proof. I'll need to find a way to use a water proof material, that is soft, safe, easy to clean and that my cat won't loose easily =P
4_Smart door: This door will allow the entrance or exit of my
cat, so it should have a sensor that reads the tag on my cat's collar. I would like to integrate other
functions such as, a temperature reader that can sense humidity, so in case it is raining outside the
sensor will detect it and will send me a warning (I guess I can develop a software for this?), this way
I can decide if I lock the door so the cat can't go out when it's raining.
Another cool function would be a sensor to detect the pollution, so if there is high pollution I receive
a warning as well so I can lock the door so she can't go out.
5_Adjustable door: I would like that the door height is easy
to adjust, this way if I move home or I change the place where the door is, it is easy to re-adjust the
height.
For this I was thinking on using a material that is flexible to fold but gets hard when extended.
6_Software: The idea of having an app or program that gives
us a weather/pollution warning is so that we can decide if we lock the door that day not letting our cat
to go out. So whenever we receive the weather warning we can decide if she goes out or not.
This app ideally would also send us a message when she comes in or goes out.
I would love it to be an app, this way is easier to control from the phone and remotely.
7_Alarm activation: This is an extra feature I would like to add, and it's that when the cat goes out a sensor is triggered and an alarm announce us she has left Miau leaving!, and when she comes in the alarm announces she is in Miau'm back!, which is also sincronized to the app that sends us weather warning messages.
8_Timer: Although her necklace tag will open/close the door there should be a timer that won't let the door open anymore until certain time. For instance once she comes in during the night, the timer locks the door and will only open the next morning after 09.30am.
Existing products
This will be a list of my research of existing similar products, then would be great to highlight their features and use them as inspiration.
There are a number of existing door flaps for cats and dogs out there on the market. Before start working on the final project and defining what makes different my design to the products out there, I will enlist several similar products but also interesting products that are not related but could serve as inspiration.
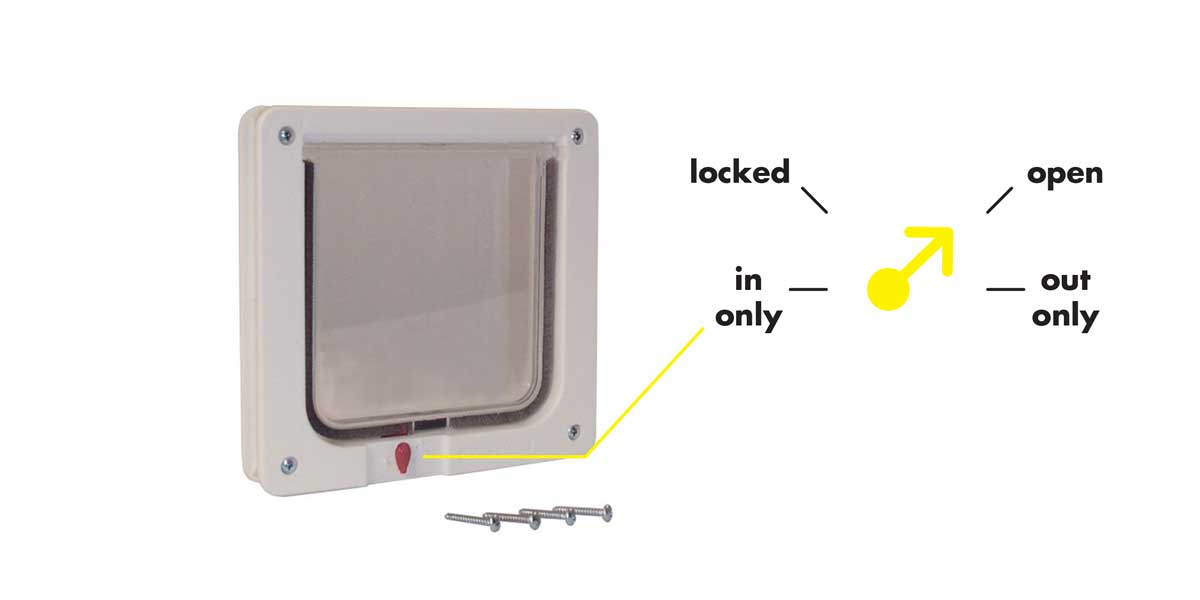
_Ideal Pet Products Lockable Cat Flap Pet Door
This is a very simple model but it has a feature (which is the main feature of the product) that I find
useful and that is the opening/closing/locking mechanism. Basically the locking mechanism has 4
positions in only, out only, open and closed/locked.
It also has a magnet on the flap to keep it well locked when it's closed.
SPECIFICATIONS:
_cost:135.93RMB/20.24USD
_size: 158.75*158.75mm
_online purchase: AMAZON,CHEWY
_material: The main frame is made of lexan, it is a polycarbonate mainly used in electronics
applications, as it is a good electrical insulator and has heating and flame resistant properties its
widely used in telecommunications hardware. *source
wikipedia
I read this material can be drilled without cracking easily so
it could be interesting to find it and use for the main frame of the door.
Some examples of products
that uses polycarbonate are molds, phones and computers cases, some reusable drinking bottles...
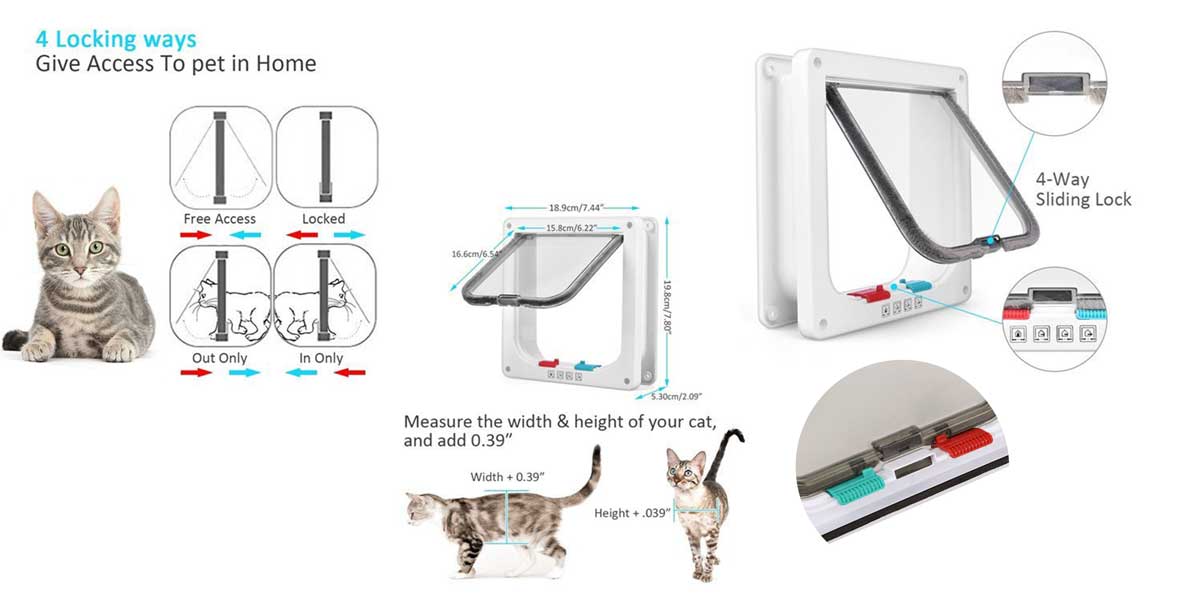
_MOOST Cat Door
This door works pretty much the same as the previous model it has 4 positions it uses the same mechanism:
SPECIFICATIONS:
_cost:187.75RMB/27.95USD
_size: 189*198*53mm
_online purchase: AMAZON
_material: Made of Lexan as well
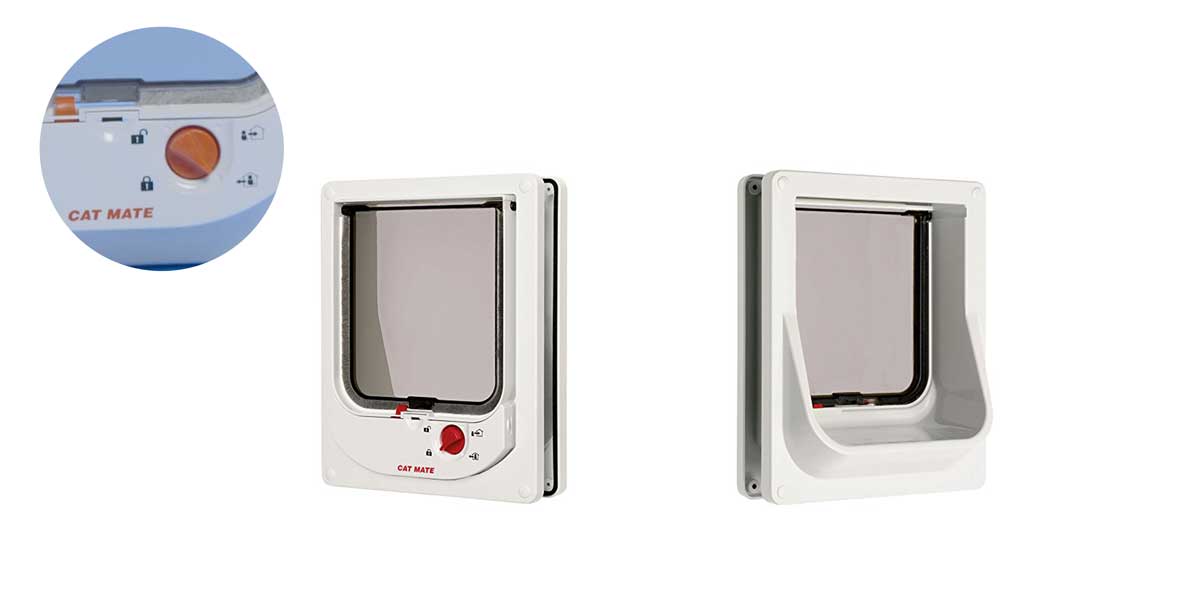
_Cat Mate
They have a cat flap that works using electromagnetic field.
A magnet is attached to the collar of the cat and when it is near to the door the system unlocks the
entrance.
As the previous models the locking mechanism has 4 positions in only, out only, open and
closed/locked.
SPECIFICATIONS:
_cost:315RMB/47USD
_size: 195*242mm
_online purchase: AMAZON, CHEWY
_material: ___
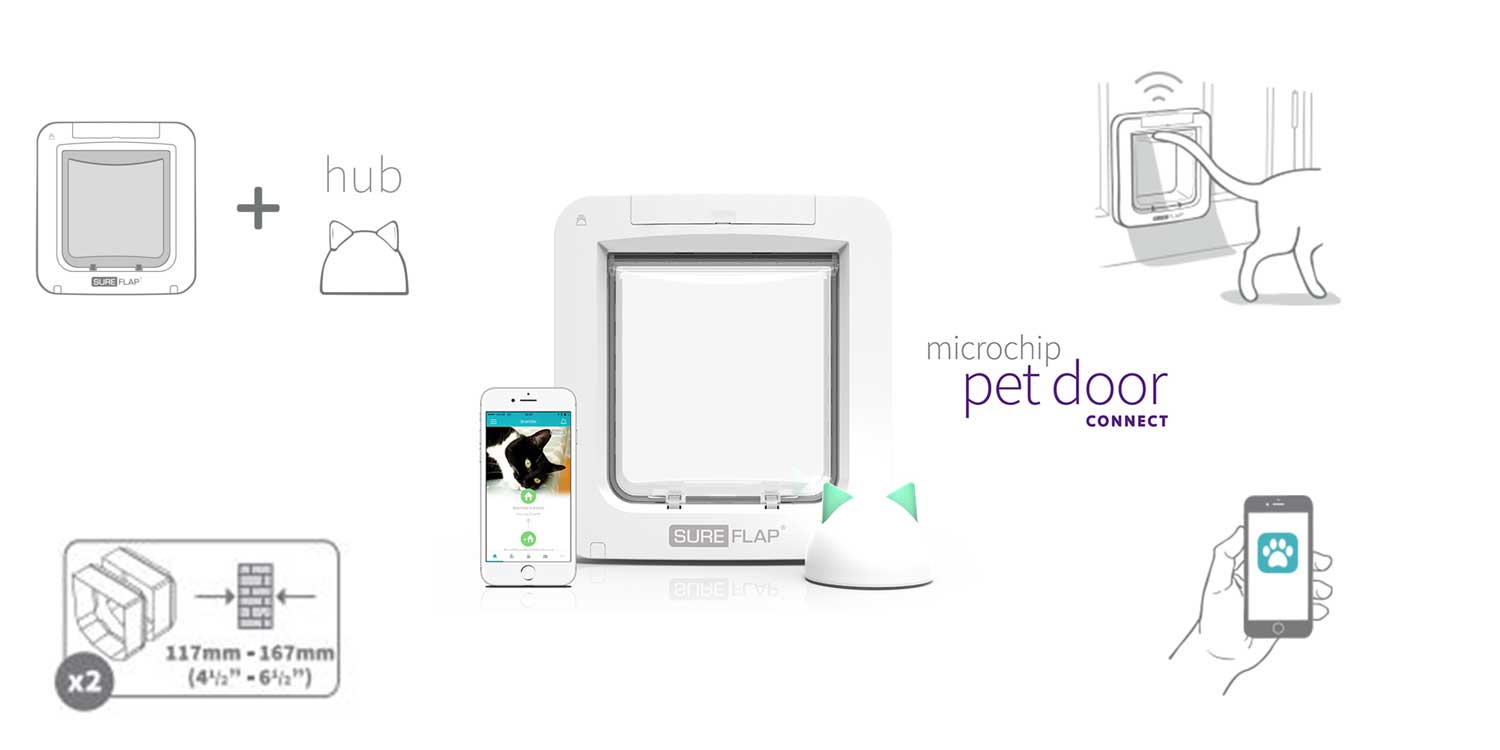
_Sure Pet Care
This company has a wide range of tech products for dogs and cats. Among them they have a more advanced
cat flap that works by reading/scanning your pet's microchip (the ID registration chip that is inserted
through their skin), the system only recognizes the microchips that are registered enabling the opening
of the door.
Another cool feature they have which is similar to what I want to do, is an App that helps to monitor
when the cat comes in or goes out, this device they call hub monitors as well the cat's
activity.
Their products are well and clearly explained on their website, the Microchip pet door connect is the most
complete option they have and the one that interests me the most an overall product. The product,
accessories, website, and communication is well done. And they have some well thought accessories, for
instance the Pet Door Tunnel Extender is a good idea, it is a tunnel extension specially
designed for thicker walls.
SPECIFICATIONS:
_cost:(door+hub app system) 1406RMB/160£
_size: 262*281mm (thickness can be adapted)
_online purchase: AMAZON, CHEWY, or directly on
their website sure pet care
_material: ___
_users manual: useful as a reference check out here
_other brands and styles
_Electronic SmartDoor This door works similarly to the previous examples, it uses an identification tag that unlocks the door and allows your pet in. It costs 99USD/662RMB.
Similar or inspiring products
There a number of smart doors locking system out there. Here are a few of them and I think these could be a starting point for me to develop the opening and closing system first and from there start grwoing the project.
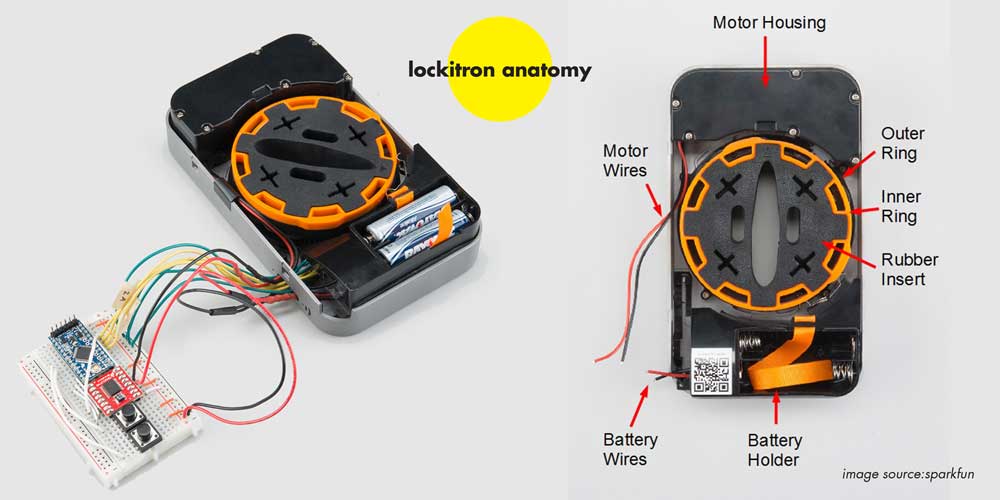
_LOCKITRON Is a system to unlock your front door and uses NFC communication. It let's you unlock your door by waving the phone in front of the door but it also lets you remotely unlock it.
SPECIFICATIONS:
_cost:665-1200RMB/99-179USD
_size:__
_online purchase: lockitron store
_material: __
Materials, components & production
I did a breakdown for each component to understand what materials, components and manufacturing
production I will be needing to develop the final project.
Probably things might change during the process but this is the main reference for me to follow:
_1 adjustable height: For the adjustable height, I need to use something flexible maybe if I do the frame in wood I could use kerf bending technique. (--THIS COMPONENT RESEARCH IS IN PROGRESS--). I was planning to make the adjustable height component using CNC machine, and maybe a plastic like HDPE as the material.
_2 frame: The main frame of the door could be made in plastic (HDPE) using CNC milling if I can't source the material on time I could use wood.
_3 flap: Needs to be transparent, I will probably use acrylic and laser cut it. But I will need some hardware to fix it like hinges, which I will buy and not produce myself.
_4 sensors+electronics: To control the opening/closure of the door from our cats collar, I will need an NFC or RFID card reader, which I plan to buy. It needs as well a main PCB (which I will fabricate) where I will connect all the other sensors such as, the tag reader, the temperature or pollution sensor, timer to control the closing/opening times, a speaker if I want the alarm.
_5 locking system: I will build a locking system using solenoids (I will buy), magnets, distance sensor. Here I would cover the electronics part of the course
_6 hub: If I have time to develop the other parts of the project that track the opening and closure of the other, the weather warning, I would integrate this into a hub that the shape itself could be 3D printed. Now I would just need to find the way to integrate molding and casting into this component.
_1 necklace body: The material has to be frlexible and also waterproof. As inside it will have the reading tag, I was thinking of using silicone, this way I could make a mold and then cast the silicone. Otherwise I could use a fabric I can laser cut and then sew together.
_2 identification tag: There are a few ways I could do this, usinf an NFC or RFID tag, but I need
to find onw with a long reading range. Below I have the information on both technologies and how do they
work.
Another way would be not using any necklace or tag, and reading the microchip my cat has beneath her
skin.
_3 adjustable size: Needs a easy way to adjust but hard for the cat to rmeove it.
Main feature components
The main feature of my final project is a door that opens and closes through a reading tag that my cat
will be wearing.
And this door needs to have sensors as well to read whether the cat goes in or out.
These are the main things I want to do, after that I would like to add the extra features written above.
I started this week by reading about two possible technologies I could implement for the tag reading.
I also did some tests using them to understand how they work and what is their reading range.
During this week I started a research about what technologies I may be needing to develop this project.
Adviced by my instructor I checked out what NFC and RFID technologies are for and how they will be useful for my project.
_Near-field communication (NFC) is a set of communication protocols that enable two electronic devices, one of which is usually a portable device such as a smartphone, to establish communication by bringing them within 4 cm (1.6 in) of each other. (source:wikipedia)
_Radio-frequency identification (RFID) uses electromagnetic fields to automatically identify and track tags attached to objects. The tags contain electronically-stored information. Passive tags collect energy from a nearby RFID reader's interrogating radio waves. Active tags have a local power source (such as a battery) and may operate hundreds of meters from the RFID reader. Unlike a barcode, the tag need not be within the line of sight of the reader, so it may be embedded in the tracked object. RFID is one method of automatic identification and data capture(AIDC).(source:wikipedia)
This system needs a transmiter and receiver, the receiver is the reader, which in this case
is the RFID module, and then the tag is the transmiter.
But both the reader and the tag need to work under the same frequency otherwise one can't read the other
one.
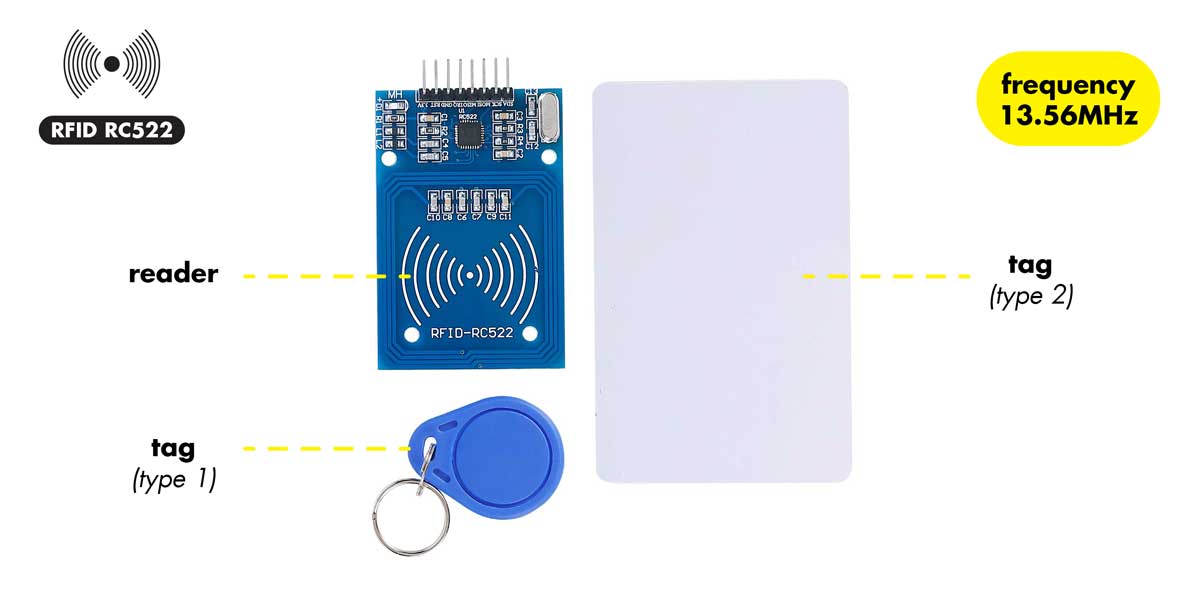
There are several DIY projects online to make a door opening system using NFC or RFID tags, I found a few
where they use the model RFID RC522, which works under a frequency of 13.56MHz, and has
eight pins:
_SDA
_SCK
_MOSI
_MISO
_IRQ (not needed for the tests I will be doing)
_GND
_RST
_3.3V (it is very important that you use 3.3V for this module not with a higher voltage like 5V)
_RFID tests
To begin to understand the main system of my door, I did a research on existing systems using RFID or
NFC for locking/unlocking doors.
I found several interesting and useful tutorials, among them I decided to begin by understanding and
trying out this one: DIY Smart Lock with Arduino and
RFID, that uses as its main components an RFID-RC522 and a solenoid
as the element that is triggered to lock/unlock the door.
There were a couple of things in this tutorial that I modified, and that was the code, as it is a bit
too complex for what I needed, as I only need a code where the reader detects a tag (that has been
recongnized and saved in the EEPROM memory) and the solenoid was going up instead of down when
reading the tag.
So, I researched for other codes that could be more simplyfied and focused on the tasks abd
variables I needed. And I found a very good one on viral science website.
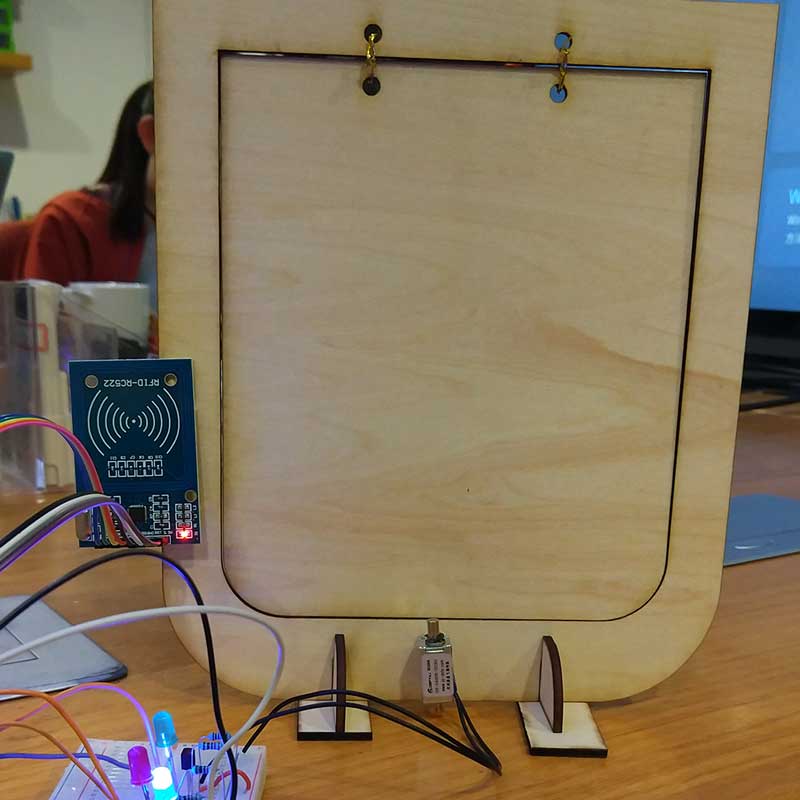
I first build a prototype of the frame, it's not the final shape, but this helps me a lot to visual
the sensor, how it works and start thinking how I will assemble the hole door.
I realized that if I go for this RFID tag, I will be needing two of them on each side, to read when
she comes in and when she goes out, and I will need to integrate a sensor that when the flap reaches
a certain position the sensor detects it and that would mean that either the door is open or closed,
as it would have two sensors on each side of the flap.
This is a diagram of how I connected the solenoid, the LEDs are only to show green when the tag readed is recognized and triggers the solenoid, and red when is not read the card.
src="images/final_project/1_stage/resized_photos/rfid_specs.jpg">_RFID tests
To begin to understand the main system of my door, I did a research on existing systems using
RFID or
NFC for locking/unlocking doors.
I found several interesting and useful tutorials, among them I decided to begin by understanding
and
trying out this one: DIY Smart Lock with Arduino
and
RFID, that uses as its main components an RFID-RC522 and a
solenoid
as the element that is triggered to lock/unlock the door.
There were a couple of things in this tutorial that I modified, and that was the code, as it is a
bit
too complex for what I needed, as I only need a code where the reader detects a tag (that has
been
recongnized and saved in the EEPROM memory) and the solenoid was going up instead of down when
reading the tag.
So, I researched for other codes that could be more simplyfied and focused on the tasks abd
variables I needed. And I found a very good one on
viral science website
.
I first build a prototype of the frame, it's not the final shape, but this helps me a lot to
visual
the sensor, how it works and start thinking how I will assemble the hole door.
I realized that if I go for this RFID tag, I will be needing two of them on each side, to read
when
she comes in and when she goes out, and I will need to integrate a sensor that when the flap
reaches
a certain position the sensor detects it and that would mean that either the door is open or
closed,
as it would have two sensors on each side of the flap.
This is a diagram of how I connected the solenoid, the LEDs are only to show green when the tag readed is recognized and triggers the solenoid, and red when is not read the card.

My instructor pointed me out that there are ways to increase the range of lecture on the RFID
readers, in fact the code from the first tutorial had an interesting variable to set the max
range of the antenna reader.
This variable enables the antenna to read at its max range, just by activating the variable
below:
mfrc522.PCD_SetAntennaGain(mfrc522.RxGain_max)
So I integrated this variable into this new code from viral science to see if I could increase
the reading distance range.
This are differences I found when activating it.
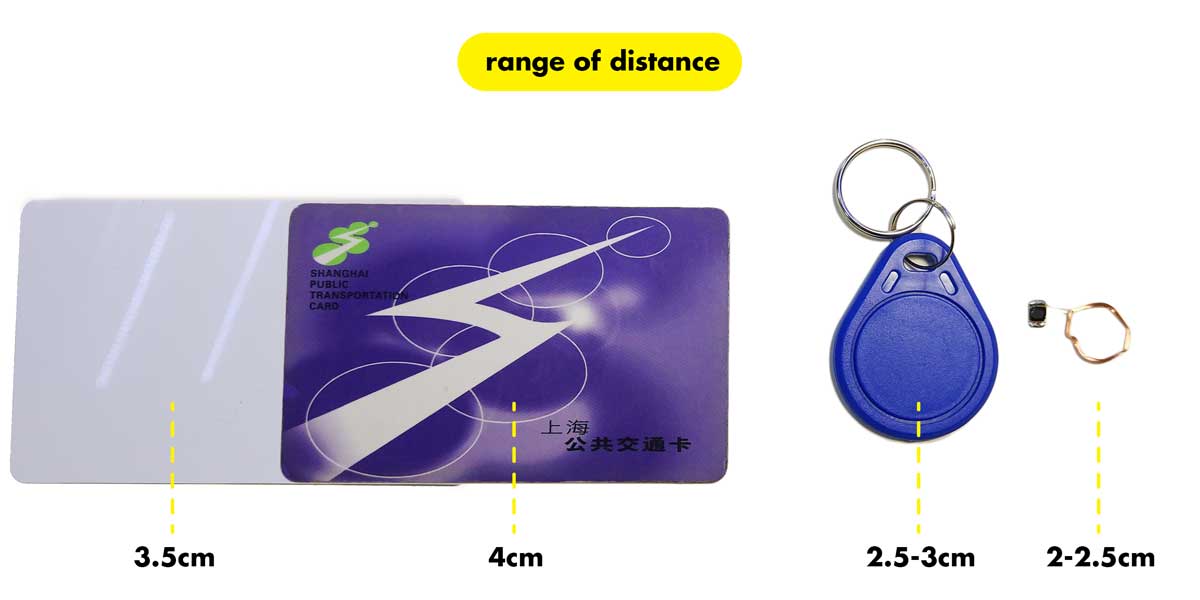
So I did some tests using the tag and activating and deactivating this variable to see how much
the distance changed. If the antenna is not set to its maximum the reading range is very small,
you have to be almost touching the reader to activate the sensor (1cm).
Whereas if I activate the antenna to its max the reading value can be up to 4cm far from the
reader.
_CODE
Solenoid 5V and RFID-RC522
//Viral Science www.youtube.com/c/viralscience
//RFID Solenoid Lock
//modified by Pamela Martello
//19 April 2019
#include
#include
#define SS_PIN 10
#define RST_PIN 9
#define LED_G 2 //define green LED pin
#define LED_R 4 //define red LED
#define RELAY 5 //relay pin
#define ACCESS_DELAY 3000
#define DENIED_DELAY 1000
MFRC522 mfrc522(SS_PIN, RST_PIN); // Create MFRC522 instance.
void setup()
{
Serial.begin(9600); // Initiate a serial communication
SPI.begin(); // Initiate SPI bus
mfrc522.PCD_Init(); // Initiate MFRC522
pinMode(LED_G, OUTPUT);
pinMode(LED_R, OUTPUT);
pinMode(RELAY, OUTPUT);
digitalWrite(RELAY, HIGH);
Serial.println("Put your card to the reader...");
Serial.println();
//If you set Antenna Gain to Max it will increase reading distance it increases
about
1-2cm
mfrc522.PCD_SetAntennaGain(mfrc522.RxGain_max);
}
void loop()
{
// Look for new cards
if ( ! mfrc522.PICC_IsNewCardPresent())
{
return;
}
// Select one of the cards
if ( ! mfrc522.PICC_ReadCardSerial())
{
return;
}
//Show UID on serial monitor
Serial.print("UID tag :");
String content= "";
byte letter;
for (byte i = 0; i < mfrc522.uid.size; i++) { Serial.print(mfrc522.uid.uidByte[i] <
0x10
? " 0" : " " ); Serial.print(mfrc522.uid.uidByte[i], HEX);
content.concat(String(mfrc522.uid.uidByte[i] < 0x10 ? " 0" : " " ));
content.concat(String(mfrc522.uid.uidByte[i], HEX)); } Serial.println();
Serial.print("Message : ");
content.toUpperCase();
if (content.substring(1) == " 50 FC 89 1E") //change here the UID of the
card/cards that
you want to give access { Serial.println("Authorized access");
Serial.println();
delay(200); digitalWrite(RELAY, LOW); digitalWrite(LED_G, HIGH);
delay(ACCESS_DELAY); //delay to keep the lock open and let the cat go in
digitalWrite(RELAY, LOW); digitalWrite(LED_G, LOW); delay(500);//delay to keep
the
lock open and let the cat go in } else { Serial.println(" Access denied");
digitalWrite(LED_R, HIGH); delay(DENIED_DELAY); digitalWrite(LED_R, LOW); } }