Molding and casting
Week 10
Like every week I started the week planning the assignment.
Group assignment. Reviewing the safety data sheets for molding and casting materials.
I am a remote student and none of my colleagues are in the fab academy, so I did this part of the assigment individualy.
The first thing that I did for this assignment was to read the datasheet of the products that I decided to used to make the mold and the casting pieces. So I went to the webpage of Feroca, the shop where I bought the silicone and resins, and I looked for the information:
> Polyurethane resin: Feropur PR55+E55
> Pigments for polyurethane: SO-Strong®
> Silicone: PlatSil FS-20
> Polyester transparent resin: Ferpol 1973
> Pigments for resin: Color Tube
In all of them, they recommend you to work in a ventilated workspace, to protect your hands with gloves and wear a mask. So that is what I did.
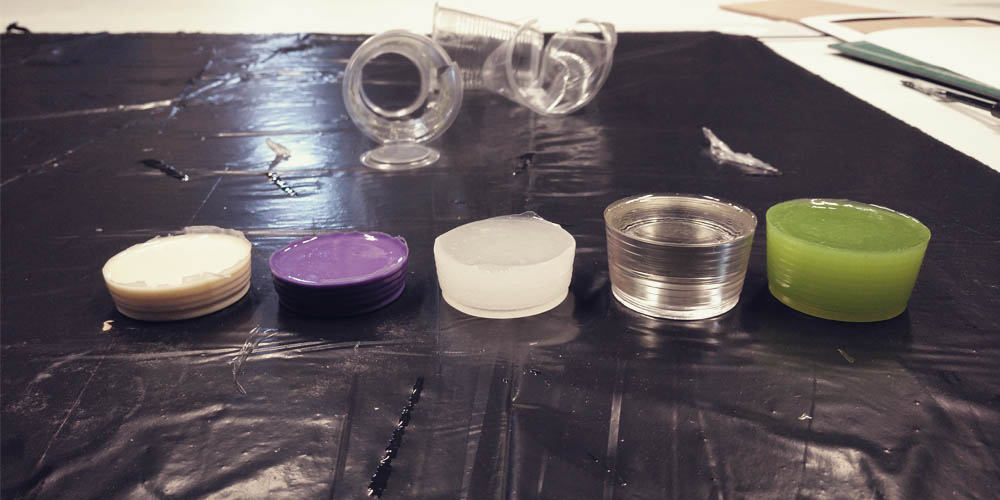
Then I made some test to check the behavior of the materials. I also did a couple of tests adding special pigments to the mixture.
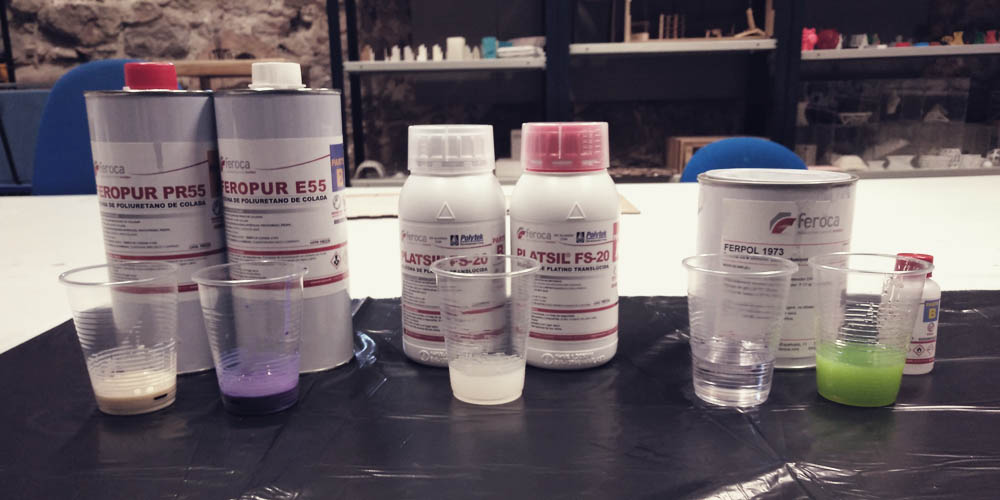
> Polyurethane resin: Work time: 80sg.; curing time: 8 min. It is a very liquid material so is very easy to mix the two parts and also I think that during the pouring process that will help to get all the corners. Both tests came out without bubbles.
> Silicone: Work time: 8 min.; curing time: 25 min. It was a bit hard to mix properly the two components because both parts have the same color. I also had a lot of tiny bubbles, however, the exterior surface was completely smooth.
> Polyester transparent resin: Work time: 35 min.; curing time: 100 min. In this case, I had to use a digital scale, since the catalyst needs to be mixed with the base at 2%. The mixture is a bit thicker than the polyurethane resin, it is like a gel, but it is easy to mix. I had some bubbles but they disappeared a few minutes later after pouring so both tests came out without bubbles.
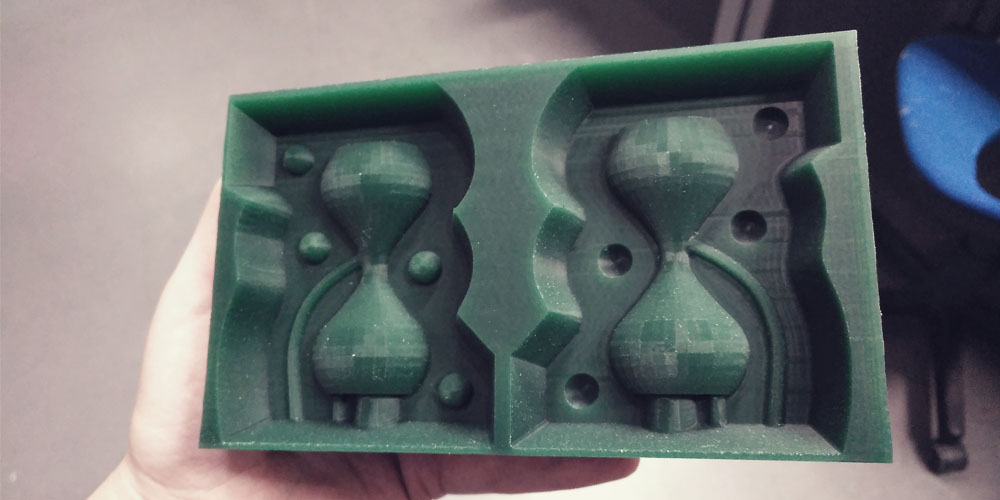
Designing the mold
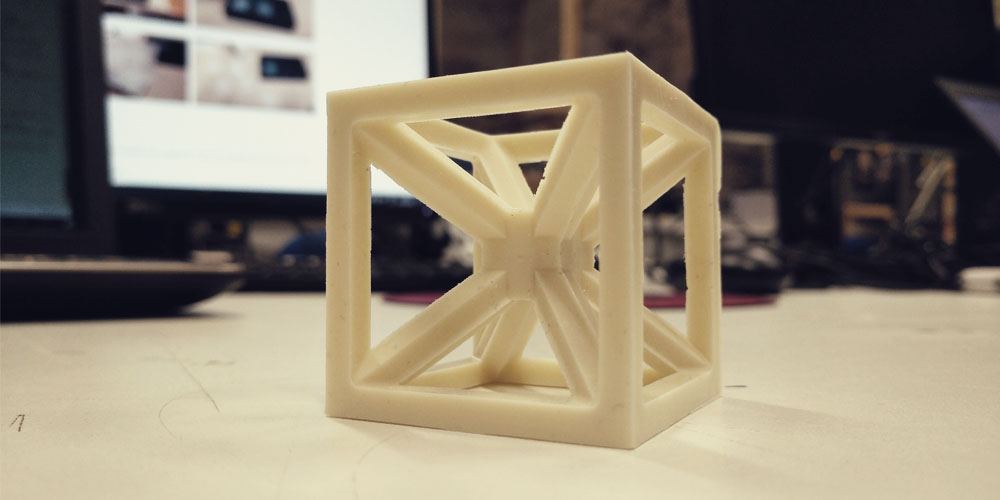
At the begging, I wanted to use as a masterpiece the file that I got from the 3d scanning assignment in week 06. I liked that idea of completing the circle somehow and joining both techniques. So I prepared the file keeping in mind that I would use a long end-mill of 3mm.
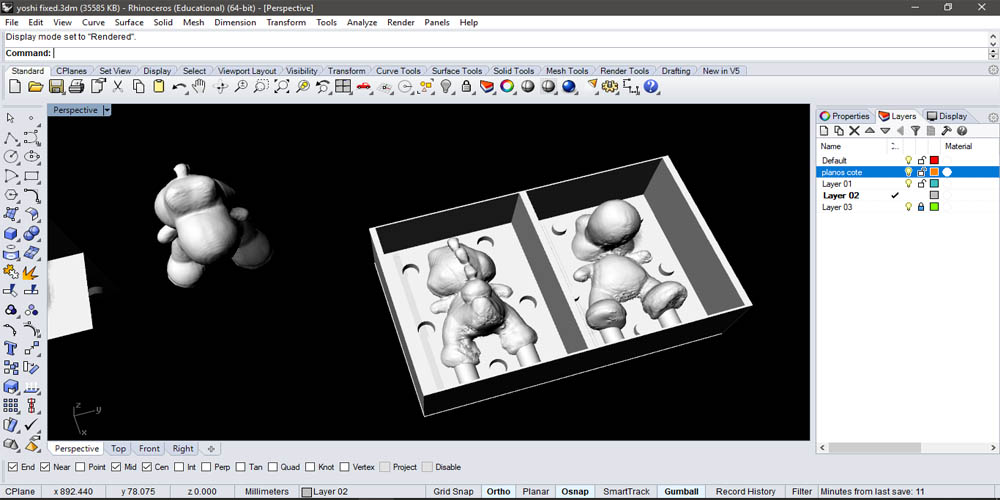
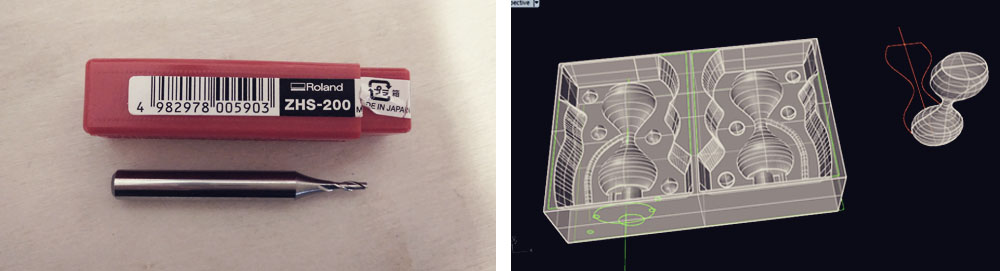
However, when I got to the Fab Lab I realized that the 3mm. end-mill had disappeared and it was the only long one that I had, so I had to design a new file since the rest of the end-mills had a much smaller cut length. I already had lost a lot of time due to this and I needed to mill the wax as soon as possible because it was Friday and my Fab Lab is closed during the weekends, so I decided to do a very simple design (I tried to simulate a sand clock).
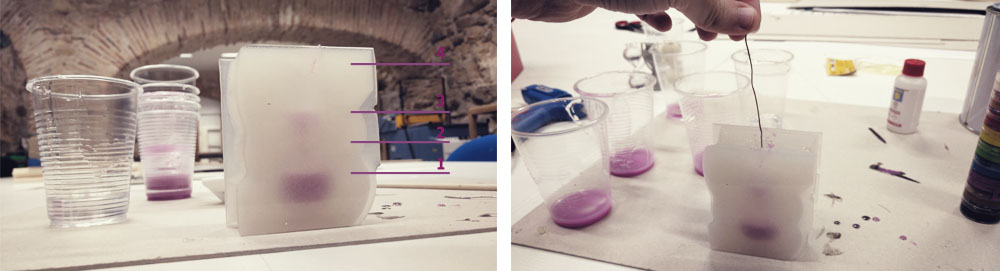
Keeping in mind the end-mill that I would use (Ø2mm., cut length 15mm.) I did the edges of the mold inclined, so the upper part of the end-mill doesn't touch the wax. I also added the mouth and a couple of vents to allow the air to come out while pouring the resin avoiding to have bubbles in the final piece.
Then I saved the file into a .stl format in mm.
3D Milling
To generate de .rml file for milling the wax mold I went to Fab Modules.
Here I selected input format > mesh (.stl) and I looked for the file in my computer. Then I calculated the height map in the right menu. Once this was done I seleccted output format > roland mill (.rml) and then process > wax rough cut (1/8). Finally I chose my machine and I configurate all the settings base on the end-mill that would use.
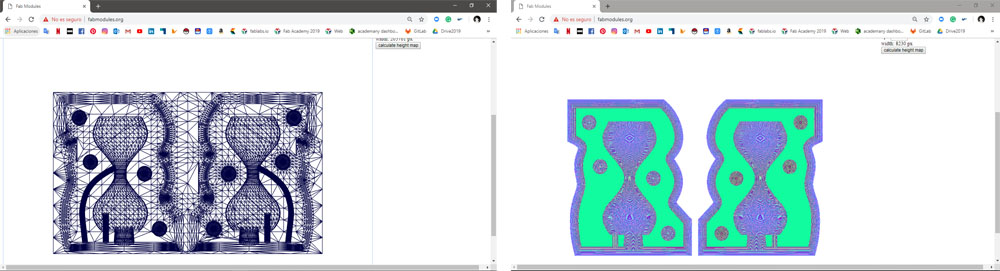
However, when I tried to calculate the process the software generated the traces very slowly (It took like 30 minutes to calculate just the first layer), so I closed the window and I decided to use the software SRP Player.
I opened the file and I configured all the settings: the size and orientation of the model, the type of milling and the different toolpaths. I used the following setting for the roughing and finishing processes:

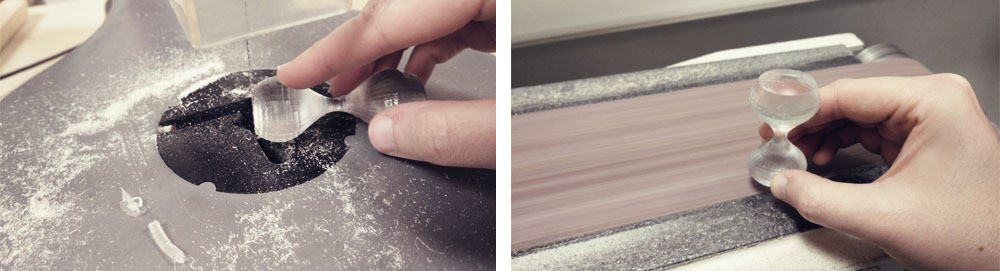
Then, I fastened the block of wax with adhesive tape to the bed of the Roland MDX-40A and in Vpanel I set the xy-zero and the z-zero using the sensor.
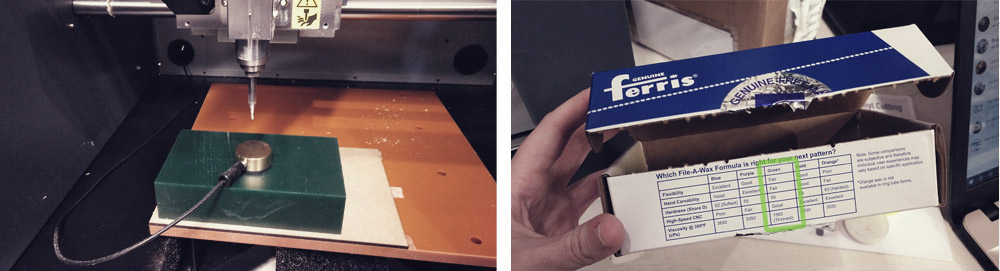
When everything was ready I started the process. First I tried with a piece of FOAM to see that the orientation was correct and then I send the file on the block of wax.
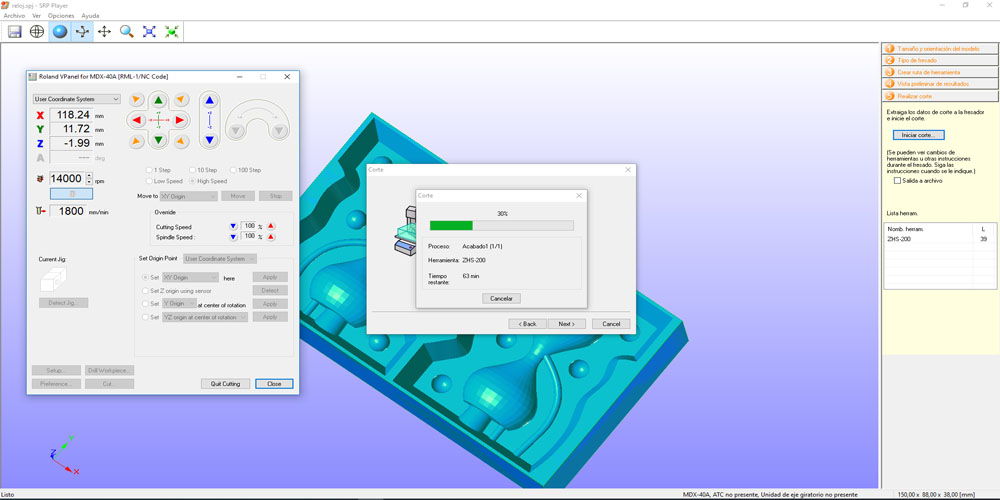

The software gives you an estimation of time, that in this case, for both roughing and finishing processes, was 2,2h. but that is totally imprecise because at the end the whole process took almost 4 hours.
Here you can find the .stl file and the .spj file (SRF Player) that I made for this assignment.
Silicone mold
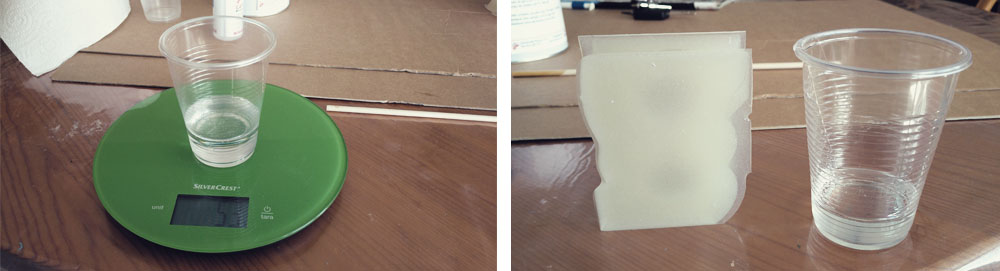
The first thing that I did to make the silicone mold was to calculate how much material I needed. For that I used rice. So I filled the wax mold with rice, and then I divided the total amount of rice into two plastic cups, trying to have the same amount in each one.
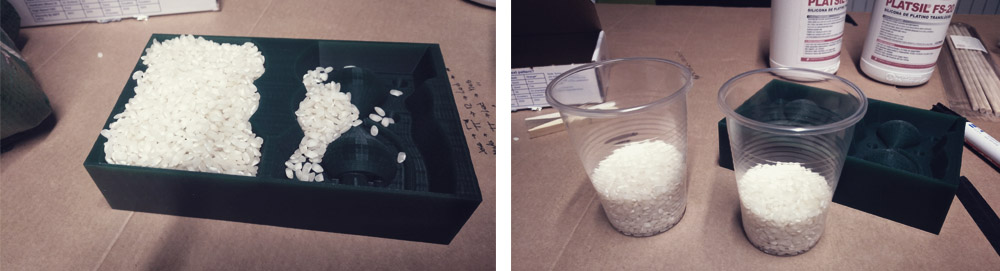
Then, with a black marker, I drew a line on the cups where the level of rice was (well, always adding a bit more, just in case, but just a bit). Then I emptied the plastic cups and I filled each cup with one of the components of the silicone.
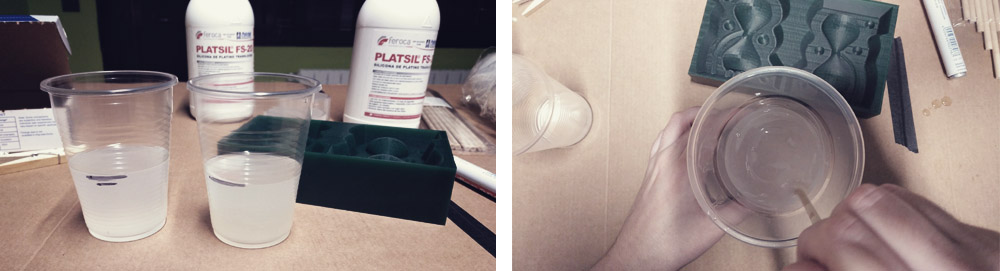
Then I mixed well both in a bigger plastic cup and I poured the silicone into the wax mold.
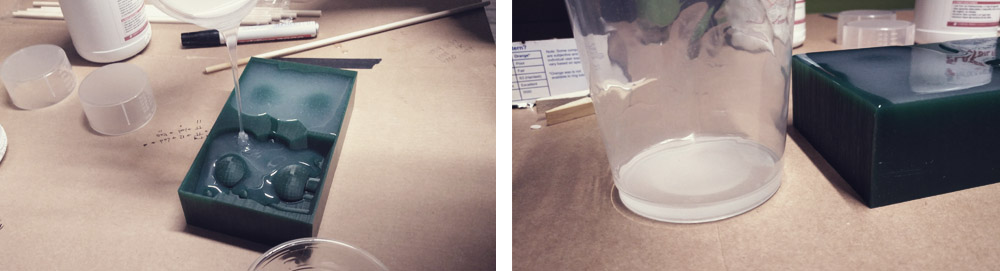
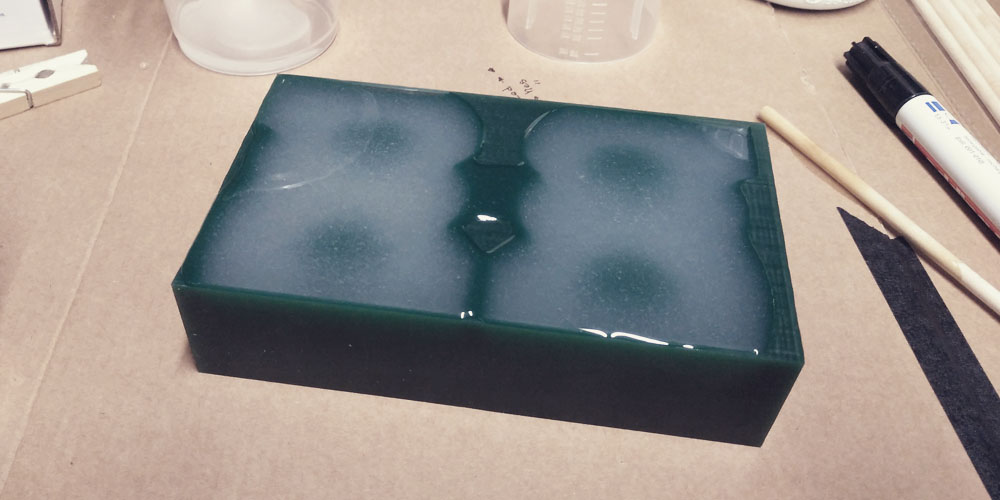
It only took 30 minutes to cure. It was super easy to take off the silicone from the wax. The silicone replicated perfectly the shape so both faces of the mold fit super accurate.

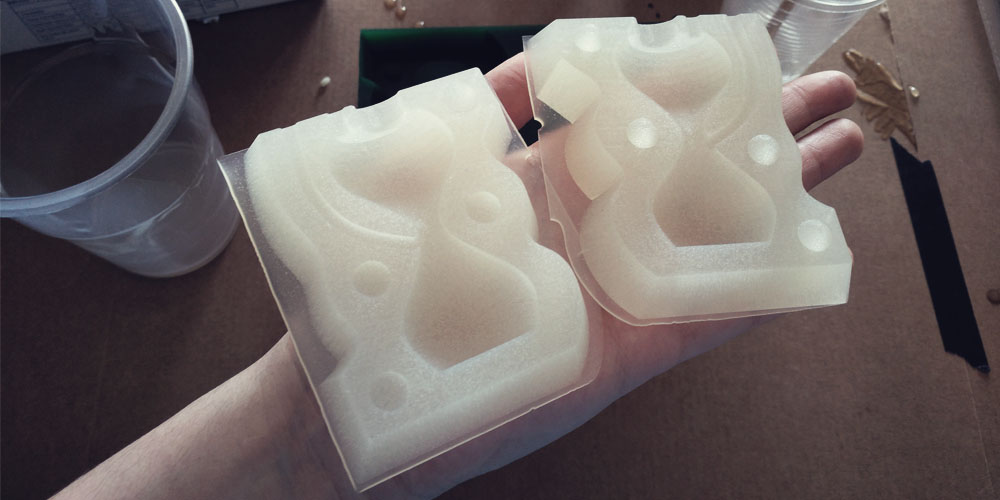
The use of rice is the easiest and most comfortable way to calculate the volume of the product that you need. And without doing it by maths. You can measure it with water and it would be more precise but if you don't dry well the mold the water can react with the silicone and mess up the mixture. However, the rice method is very precise too. You can see in the images that I only waste a little bit of silicone.
On the other hand, the silicone that I used is really good, fast to cure, very flexible and I didn't need to add mold release to take it off.
Casting
Polyurethane resin
After measuring with rice the volume of resin that I needed I sealed the two pieces of the mold with hot glue (it doesn't damage the silicone mold and after is very easy to take off). Then I mixed the two components and I filled the mold.
I waited until the resin was completely cured (just 8 minutes!), I removed the hot glue and I opened the mold. The result was very nice!!
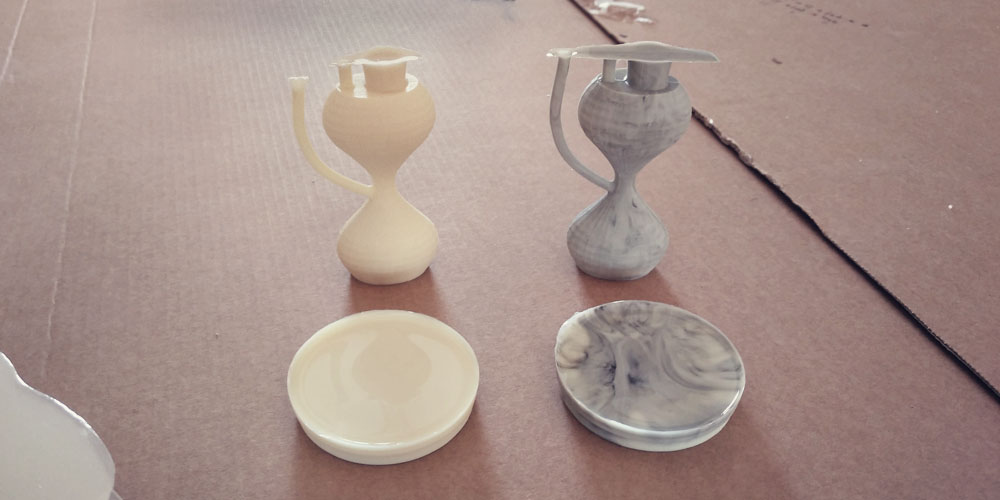
Then I tried to replicate marble or something similar, adding some black pigment but without mixing it completely, leaving "lines of ink". It worked good in the test, I got the effect that I was looking for, but I didn't get the same result in my piece, I think due to the geometric texture.
As the silicone is translucent, you can see through it and perceive how the mold goes filling!! It is very cool!!
I really love this product. It is extremely easy to use and mix and it only takes 8 minutes to cure!! So you can do a lot of copies in a few time. And almost no smell!! Also, it is very liquid, it is like water, so it can reach even the most tiny corner. And with zero bubbles.
Casting
Polyester transparent resin
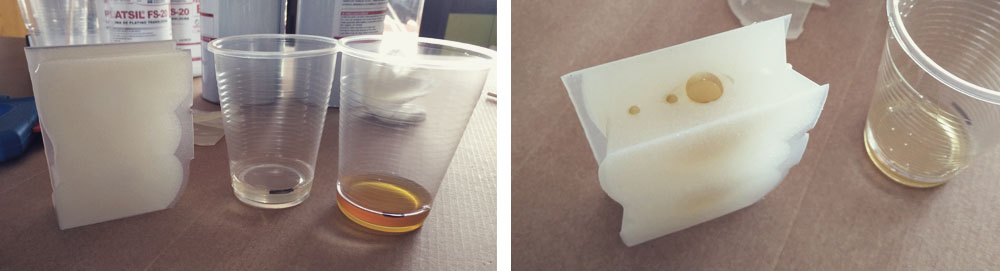
This type of resin was a bit trickier to use. This product is not bi-component 1:1, here we have a base and a catalyzer that in this case we have to mix at 2%. That means that you need a digital scaled and to do the maths. Be careful here because if you add more catalyzer than necessary, the mixture will react very fast and due to the overheating it can damage the silicone mold; and if you add less than necessary the mixture will never react and you will mess-up the mold and then it is really hard to clean.
It also means that if you are working with a small object that is our case, you waste a lot of product just to be able to read the amount of catalyzer. For example, in my case, I used 50gr. of base + 1gr. of catalyzer when I only need around 20gr. of the mixture...).
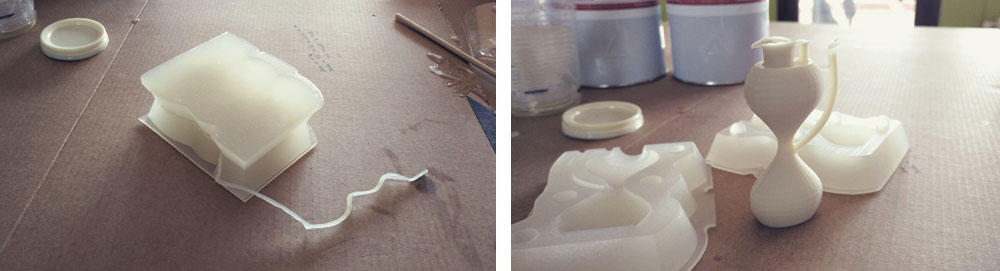
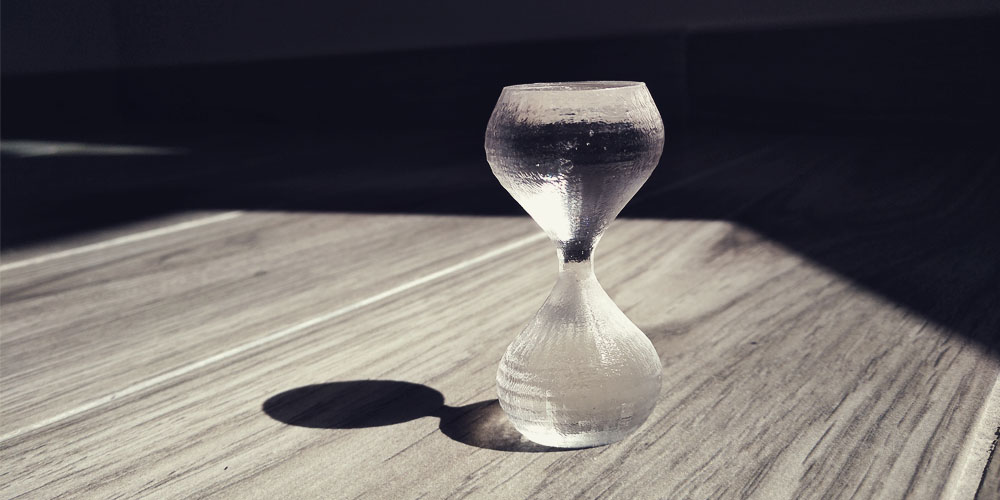
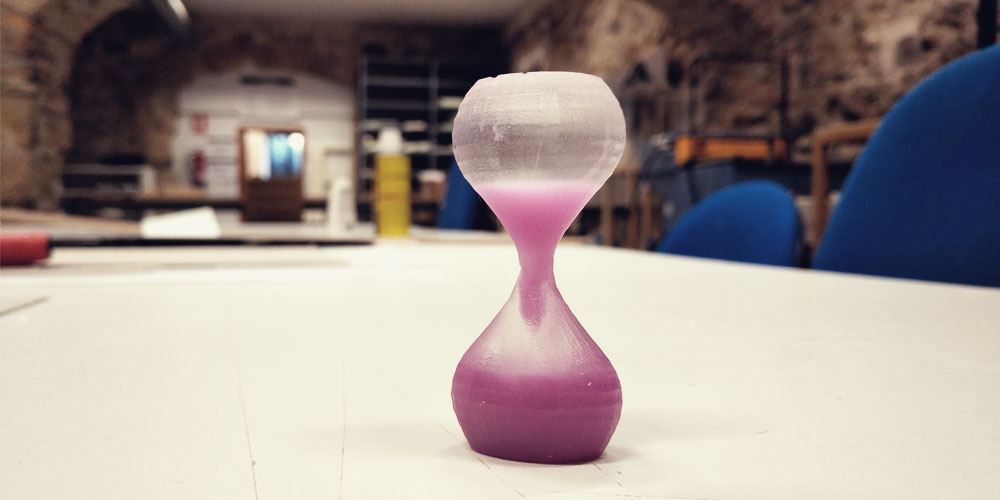
Despite all that, everything went good and the result was very nice. It looks like real glass!! I finished the job just cutting the mouth and the vents and sanding those surfaces a little bit.
Then I wanted to go a bit further and to make a piece by layers of resin of different colors simulating the sand and glass of a "sand clock". To do that I needed four layers and I had to wait between pourings around 30 minutes. To make the "line of sand" I used a thin wire to push down some purple resin while the second transparent layer wasn't completely cured.
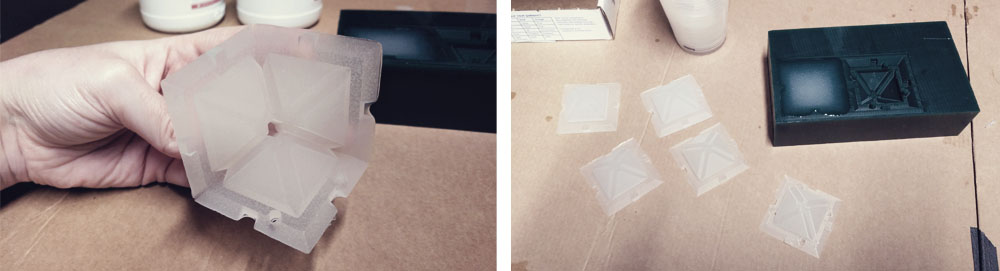
Extra. Six faces mold
Since I saw the Matt's assignment I wanted to try to do a six faces mold. So I did my own file based on Matt's images and I made the design for the mold.
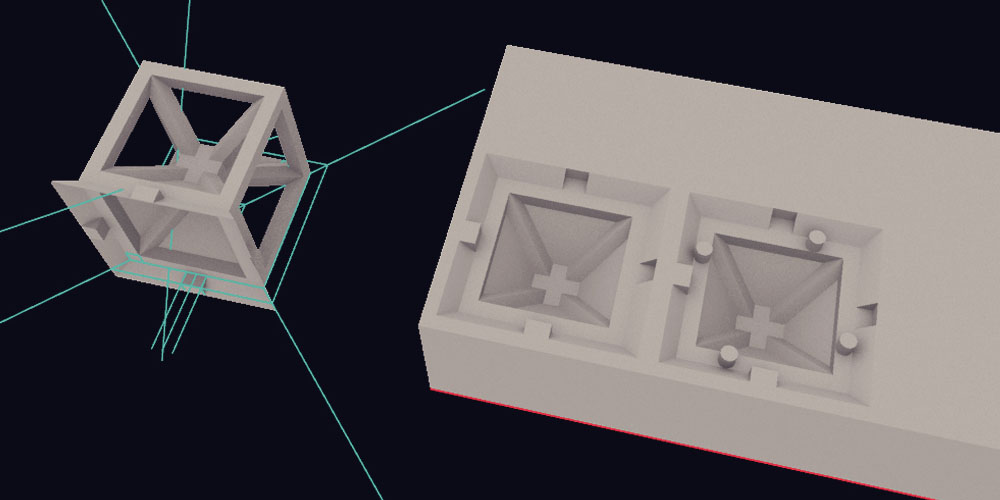
Here you can find the .stl file and the .spj file (SRF Player) that I made for this extra part of the assignment.
Then I mechanized the wax and after more than 3 hours of pouring silicone (thank's Good that my silicone cures in 25 minutes), I got the six parts of the mold.
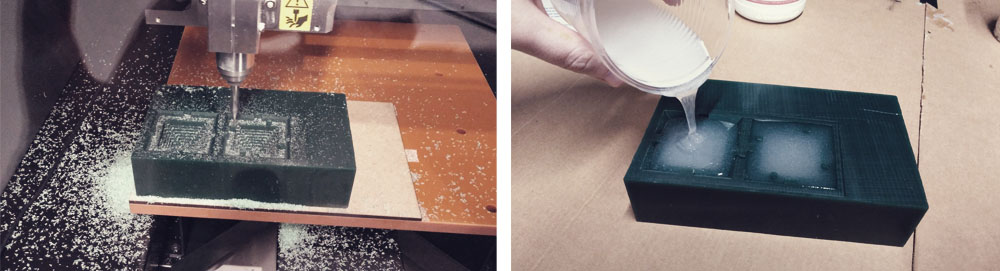
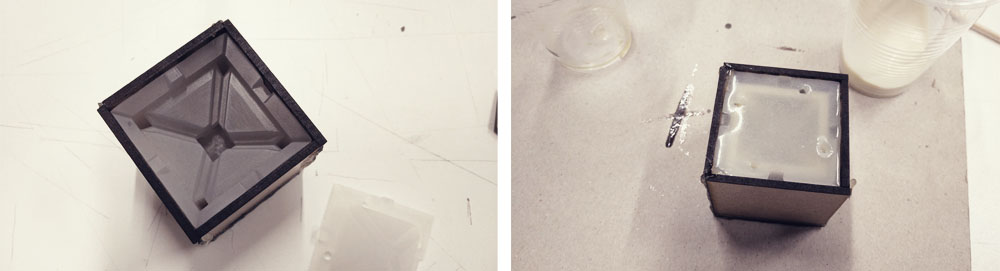
Following Matt's recommendation, I made a box to hold the six parts off the mold together, I sealed it with hot glue (I put also a bit on the corners of the upper face) and then I poured the polyurethane resin.
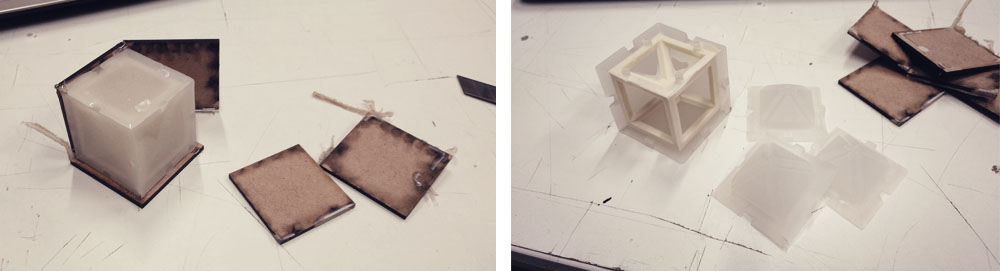
When the resin was cured, I broke down the box and then I took off each silicone face. I had some bubbles in the upper part, around the mouths/vents, but I think it was due to that I didn't add enough material. Then I removed the extra material and I sand it a bit. And voilá!
I had some experience with molding and casting (basically what I had done before was just one face molds from 3D Printing pieces) but I really enjoyed this method, you know, mechanize the wax and get the silicone mold from there. Sometimes it is a bit hard to understand what you need because you are designing a "positive piece" but the goal of that design is to get the "negative piece". It can be a bit confused. But following this method it is really easy to do molds with several faces, something that if you do by hand is extremely hard and time demanding. I really liked it.
Files
Find below the files that I made for this assignment. Please do not hesitate to download it!! I hope you enjoy it!!
Sand clock wax mold - .stl
Cube wax mold - .stl