WEEK 1: PRINCIPLES & PRACTICES, PROJECT MANAGEMENT
Objectives
Plan and sketch a potential final project
To explain this first task deeply, I created a page dedicated to the final project. In these I will try to explain what can be achieved at the end of this path. Link
Build a personal site describing you and your final project
Well, it's what you're in! This site was created to document everything we did and what we will do during Fab Academy. And in this part I will explain how I built it, so that everyone can carry out a similar project.
Text Editor program
First of all, I downloaded and installed a text editor program. Basically it is a program that allows to open and edit HTML, CSS and other files by editing the code inside them. I studied HTML and CSS some years ago at university, but I have only basics knowledges about them.
You don't know what is HTML5 and CSS3? Well, I am not a great expert but I find very helpful w3school. If you have a doubt or can't do something, know that you can find the solution to any dilemma you have.
The one I choosed is Brackets. I've decided to use this one because:

Template
Once I opened Bracket, I started to work to the HTML and the CSS code. For the basic structure of this website I decided to use the MIT-licensed template. If you want to use it for your own Fab Academy personal page, you can download from Here. The template is based on Bootstrap's classes.
Do you know what Bootstrap is? Bootstrap is an open-source toolkit that allows you to build responsive and mobile-first websites easily. In this library you can find HTML and CSS models to create menus, buttons and other usefull stuffs to build your own website.I suggest you to start modifying this one if you are not very practical in HTML and CSS, because it:
For the third point in particular, I refer to the
<div class="col-lg-n"> also contained in the index.html file. Elements connected to this class are set by default as <div class="col-lg-4">. You have to know that in this grid template you can add infinite lines, but you have at most 12 columns. You can decide the number of columns that a particular element can occupy simply changing the number next to col-lg-. For example you can decide to put an element of 8 spaces close together and one that occupies 4 spaces, using col-lg-8 near the first div and col-lg-4 for the second one. I use this method to create pages that required an organized subdivision of the elements, such as the Weekly projects list.
Using GIT and make it accessible to all users
When I finished creating all pages (or those that I needed initially) it was time to upload (to be specific, to push) the work done on GIT and make it so public and accessible to the whole community. Git is a free and open source DVCS (Distributed Version Control System). In Fab Academy we use GITLab.
Do you know what Version Control is? Well, it's a very cool stuff! According with Fiore Basile's recitation, best things about VC are:The first thing I did was instal GIT on my computer. I use MacOS so I used these commands on the Terminal app:Backup and restore: obviusly you can save every changes you made at your files. But you have to imagine that you had done something wrong a few days ago and you noticed it only today. No problem: you can have access to the whole history of changes and do not throw away work days! At every changes, GIT create an ID (commit), important for verify changes. Collaboration: if you want, you can work with other people who have accessed your files. As I said before, it's available the history of changes also in that situation. Remote control: you can interact with GITLab through its web interface. Cool. But you can also make same thinks through local interfaces such as the Terminal of you computer. You have to remember the right commands (thing of which I am still not very practical) but in this way you can speed up work times. You can also copy (clone) the entire repository to your PC.
git
I never used GIT, so MacOS asked me to install also XCode Developers tool. Obviusly I said "yes". After that I generate an SSH Key to create a secure connection with the command:
sudo ssh-keygen -t rsa -C "email_used_for_GITLab" -b 4096
Than I copied it to MacOS clipboard using the command:
pbcopy < ~/.ssh/id_rsa.pub
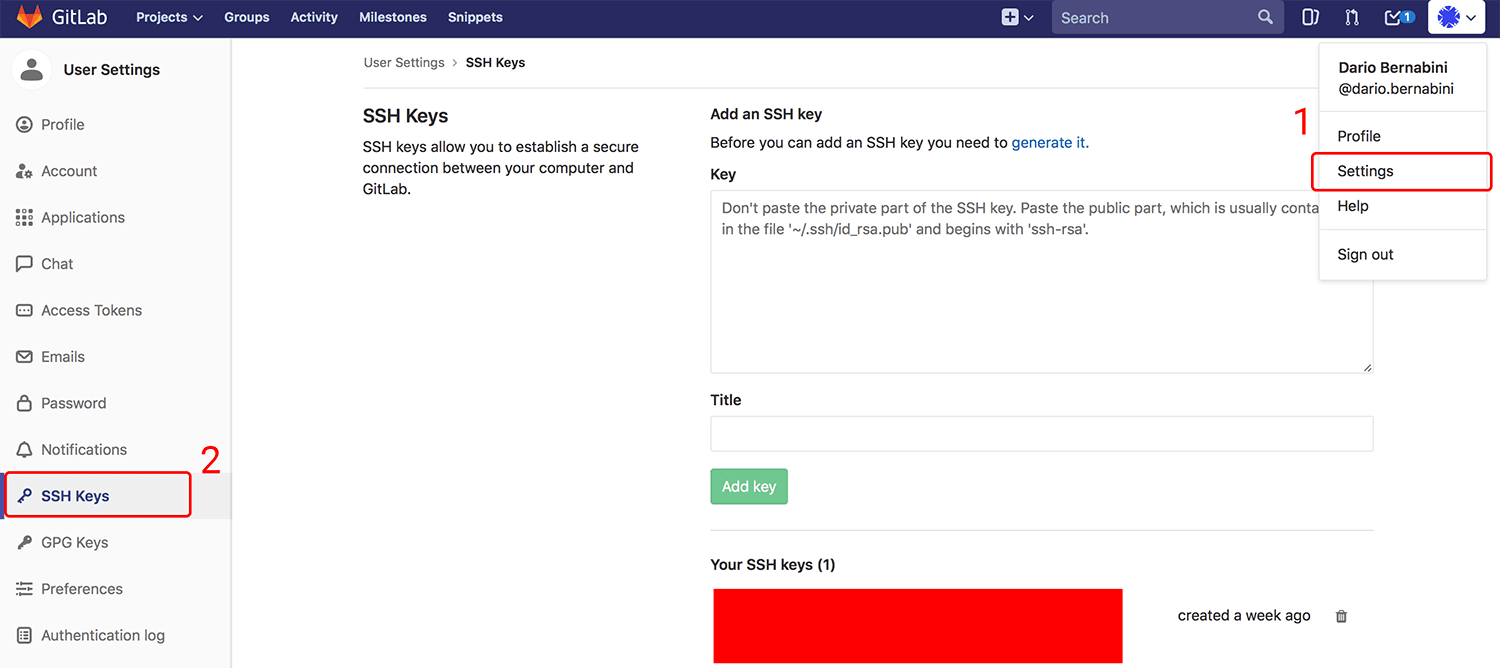
Secure SHell (SSH) is a cryptographic network protocol for operating network services securely over an unsecured network. The best known example application is for remote login to computer systems by users. SSH provides a secure channel over an unsecured network in a client-server architecture, connecting an SSH client application with an SSH server. Common applications include remote command-line login and remote command execution, but any network service can be secured with SSH. Via WikipediaAfter that I uploaded the file of my SSH Key to my GITLab profile. If you want to do the same, you can do going to your profile and press
Settings - SSH Keys
Than I pasted into the box, named it and upload it.
At the end, I came back to my GITLab page and I pushed via web interface all of my website's files, creating the same directories I have on my PC. I could have done it much faster through terminal commands, but as I said, I'm not very practical and I need to learn better.
After few second I went to Santa Chiara Fab Lab's page to check if everything was correctly viewed. Fortunately I did not find any problems at this stage.
UPDATE 30/01/2018 - UPDATE FILES VIA GIT COMMANDS
As I said a few lines above, I'm not good in command lines and terminal commands. So I tried to understand them and starting from today I will use only this method to update files in my directory. I'll explain better what I did.
Till now I used web interface to upload files. This morning I noticed that I created some directories in a wrong position (I created folders named "js" and "fonts" in the root directory intead into "bootstrap" one). From web interface I can't delete them, so I caught this opportunity to made it by terminal commands and learn better how to use it. The first thing I did was clone my GIT archive locally in my PC. For this I opened the Terminal app and i wrote:
git clone git@gitlab.fabcloud.org:academany/fabacademy/2018/labs/fablabsiena/students/dario-bernabini.git
In this way I create the same folder in the root of my computer. At this point I deleted unnecessary folders simply selecting them and drag to trash bin as a normal files.
Than I had to upload the GIT folder with these changes. First I went to my local folder in the terminal using:
cd dario-bernabini
Then I started using:
git add .
to propose my changes of all files contained in my folder. Than I validate these changes with:
git commit -m 'deleted folders'
For being all of them real, I sent all to remote repository:
git push. Alternatively you can use git push origin master
Here a screenshot as example of the whole process:

---UPDATE 01/02/2018 - USING W3SCHOOL CSS TEMPLATE
Starting from 1st february 2018 I decided to migrate and use a CSS free template named Start Page Template, but I modified some part of the original code. For example I swapped from red colour to grey. This template uses a .css file made by W3School that I decided to download locally for any future changes. If you want to use it in your Fab Academy personal page too you can proceed to download from HERE
---UPDATE 20/02/2018 - JQUERY - ISSUES WITH TAG <button> ON FIREFOX AND LITY LIGHTBOXES
Starting from today and from Week 4 - Electronics Production I integrate in this website Lity.
Lity is a ultra-lightweight, accessible and responsive lightbox plugin which supports images, iframes and inline content out of the box.Once download it, I copied
lity.js, jquery.js and lity.css in my website's folders.
I then called them up in every HTML page by inserting in the header the following strings:
<link href="style/css/lity.css" rel="stylesheet">
<script src="style/js/jquery.js"></script>
<script src="style/js/lity.js"></script>
I instert also a class for images called
img-rounded and, in CSS, I give to it:
.img-rounded {border-radius: 10px;}.
So I modified all HTML string for my images. Here is an example with the result:
<a href="media/week01/valdorcia.jpg" data-lity data-lity-target="media/week01/valdorcia.jpg"><img src="media/week01/valdorcia.jpg" width="50%" height="50%" class="img-rounded"></a>

At the same time, I noticed that my button on classes.html have a problem on Mozilla Firefox: basically they didn't open their relative link. After some research I discovered that this browser does not agree well with
<a href=""></a> tag inside <button></button> tag.
So I made some changes and now my buttons have the code:
<div class="personal_button"><button onClick="javascript: window.location='week01.html'">SEE WEEK 01</button></div>
And the result is: