This is the eighth week assignment for the Fab Academy 2018.
Embedded programming
Last week I also milled my own Arduino board, I called it the Q Board. To make sure my board is working, I programmed it using Arduino cause it's the easy and quick way.

I chose the board to be Arduino and uploaded the Arduino ISP program to the arduino before I connected my Q board to it.

Then I burnt the bootloader to it.

Next, I edited the blink example to have the LED on my board blink. The LED is connected to Pin 2 so I defined that pin and made it blink.
The video above shows my Q board blinking.
Intoduction
Before starting to program I had to read the datasheet of the microcontroller again in order to understand better the usage of the pins so that I can program the board. From reading the datasheet, I learnt that there are three different kinds of ports. There are DDRx for the Data Direction Register, PINx for the Pin Input Register, and PORTx for Pin Output Register. Also, every port works differently.


This week assignment was to program the board we worked on in 2 weeks ago using low level programming. To do that we have to read the datasheet for the microcontroller we used which is Attiny44.
Programming Using Arduino ISP
I decided to take advantge of the FabISP. I built weeks ago and use it to give life to my Echo Hello board. To do that, I connected the following pins to each other.


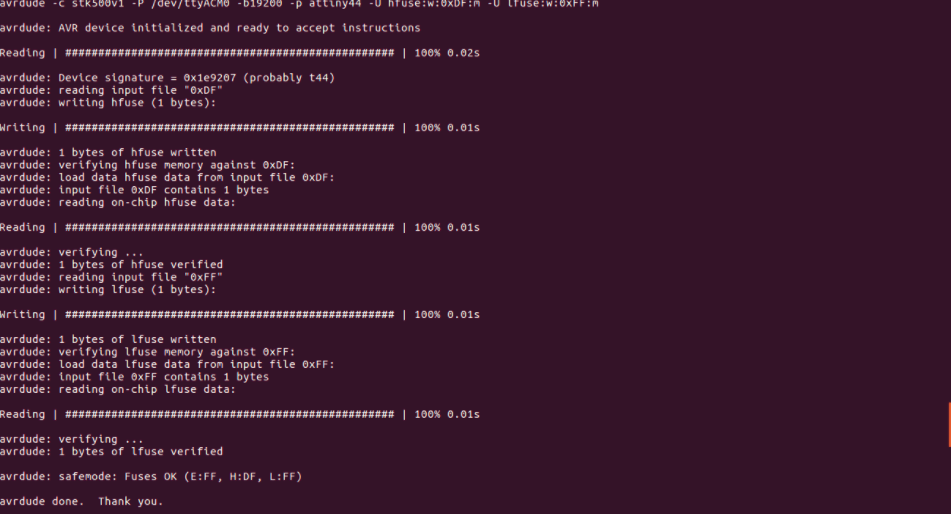
In order to do that' i have to understand how fuses work to set them. We can use a fuse calculator to get the code. What i noticed, however, was that when you choose to prgram, the calculator sets a 0 which according to sheet means “unprogram” therefore figured to do it manually in order for the code to work.To understand how to set the fuses, I went through this tutorial.
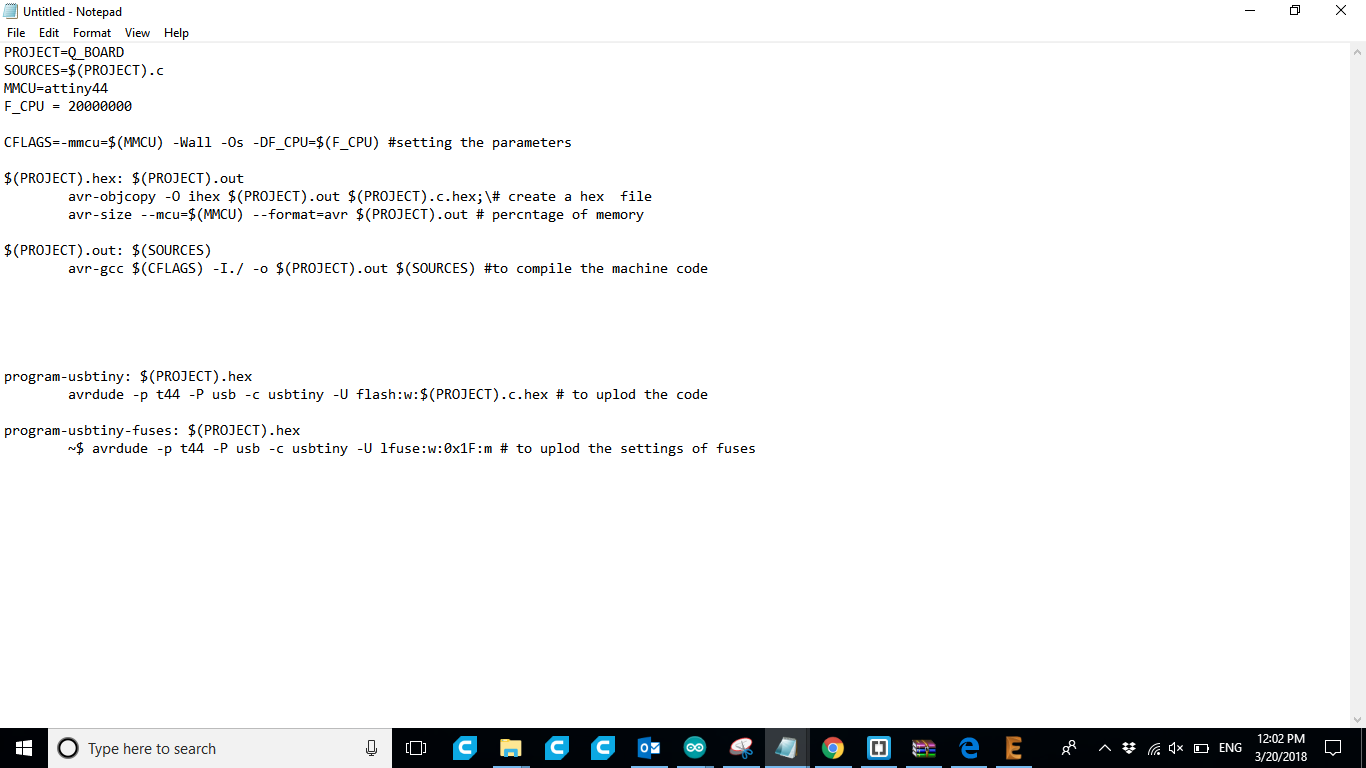
A makefile contains rules that will determine how my microcontroller will work. If I don't set everything correctly in the makefile my microcontroller can behave in a wrong manner.
I took the example makefile from Neil and I edited it but only after understanding what it does.
The most important thing about the makefile is the avr-gcc and the avrdude.
avr-gcc compiles a c code which means it converts it to a language that the microcontroller understands which is machine language.
avrdude uploads the compiled program (a hex file) to the microcontroller.
The first step is to download the drivers and packages to my computer using the below commands:
sudo apt-get install flex byacc bison gcc libusb-dev avrdude
sudo apt-get install gcc-avr
sudo apt-get install avr-libc
sudo apt-get install libc6-dev
Once all the drivers and packages are downloaded, you use:
Make to create a .hex & .out file. This means your code was successfully compiled successfully compiled.
Make Name of Program the name of the program is the same as in the makefile. If everything was correct, your board should now be running your code.
#include  <avr/io.h>
#include  <util/delay.h>

#define F_CPU20000UL
#define LED PORTA

int main (void){

  DDRA = 0xFF;  //set PORTA for output


 while(1){

      LED = 0b10000000;  //set PORTA.7 high


      _delay_ms(1000);

      LED = 0b00000000;  //set PORTA.7 high
      _delay_ms(1000);
  }
}
My c code is above, as you can see I defined port A as output and then I made it blink by giving it high and after 1 second giving it low. I used a library for the delay.
ubuntu@ubuntu:~$ cd desktop
bash: cd: desktop: No such file or directory
ubuntu@ubuntu:~$ ls
Desktop  Documents  Downloads  Music  Pictures  Public  Templates  Videos
ubuntu@ubuntu:~$ cd Desktop
ubuntu@ubuntu:~/Desktop$ ls
examples.desktop  nadine                                   ubiquity.desktop
files             Screenshot from 2018-03-20 15-44-12.png
ubuntu@ubuntu:~/Desktop$ cd files
ubuntu@ubuntu:~/Desktop/files$ ls
Makefile  Q_BOARD.c
ubuntu@ubuntu:~/Desktop/files$ ls
Makefile  Q_BOARD.c
ubuntu@ubuntu:~/Desktop/files$ make
avr-gcc -mmcu=attiny44 -Wall -Os -DF_CPU=20000000 -I./ -o Q_BOARD.out Q_BOARD.c
avr-objcopy -O ihex Q_BOARD.out Q_BOARD.c.hex;\
avr-size --mcu=attiny44 --format=avr Q_BOARD.out
AVR Memory Usage
----------------
Device: attiny44

Program:     104 bytes (2.5% Full)
(.text + .data + .bootloader)

Data:          0 bytes (0.0% Full)
(.data + .bss + .noinit)


ubuntu@ubuntu:~/Desktop/files$ make program-fabISP
avr-objcopy -O ihex Q_BOARD.out Q_BOARD.c.hex;\
avr-size --mcu=attiny44 --format=avr Q_BOARD.out
AVR Memory Usage
----------------
Device: attiny44

Program:     104 bytes (2.5% Full)
(.text + .data + .bootloader)

Data:          0 bytes (0.0% Full)
(.data + .bss + .noinit)


avrdude -p t44 -P usb -c usbtiny -U flash:w:Q_BOARD.c.hex

avrdude: AVR device initialized and ready to accept instructions

Reading | ################################################## | 100% 0.00s

avrdude: Device signature = 0x1e9207 (probably t44)
avrdude: NOTE: "flash" memory has been specified, an erase cycle will be performed
         To disable this feature, specify the -D option.
avrdude: erasing chip
avrdude: reading input file "Q_BOARD.c.hex"
avrdude: input file Q_BOARD.c.hex auto detected as Intel Hex
avrdude: writing flash (104 bytes):

Writing | ################################################## | 100% 0.13s

avrdude: 104 bytes of flash written
avrdude: verifying flash memory against Q_BOARD.c.hex:
avrdude: load data flash data from input file Q_BOARD.c.hex:
avrdude: input file Q_BOARD.c.hex auto detected as Intel Hex
avrdude: input file Q_BOARD.c.hex contains 104 bytes
avrdude: reading on-chip flash data:

Reading | ################################################## | 100% 0.15s

avrdude: verifying ...
avrdude: 104 bytes of flash verified

avrdude: safemode: Fuses OK (E:FF, H:DF, L:FE)

avrdude done.  Thank you.
My terminal log is seen above.
As you can see I uesd the command make to create the hex file then I called the program in my makefile to upload it to the microcontroller.
The above video is my microcontroller programmed to blink. And the reset button resets the program another LED is connected to the reset and it lights when you press it.
/*
  Blink

  Turns an LED on for one second, then off for one second, repeatedly.

  Most Arduinos have an on-board LED you can control. On the UNO, MEGA and ZERO
  it is attached to digital pin 13, on MKR1000 on pin 6. LED_BUILTIN is set to
  the correct LED pin independent of which board is used.
  If you want to know what pin the on-board LED is connected to on your Arduino
  model, check the Technical Specs of your board at:
  https://www.arduino.cc/en/Main/Products


  This example code is in the public domain.

  http://www.arduino.cc/en/Tutorial/Blink
*/
#define LED1 7
// the setup function runs once when you press reset or power the board
void setup() {

  // initialize digital pin LED_BUILTIN as an output.
  pinMode(LED1, OUTPUT);
}

// the loop function runs over and over again forever
void loop() {
int del=0;
int times=1;
 for (int step1=0;step1<5;step1++){// helloooooooooooooo


     for (int step2=1;step2<=times;step2++){

      digitalWrite(LED1,LOW);

      del=del+250;
      delay(del);

      digitalWrite(LED1,HIGH);
      delay(del);

      }
    times=times+1;

  }
  }
The above code is another code I wrote in Arduino C language during the break week.
I wanted the LED to blink once then twice then three times and so on but each time I increased the delay between them. To do that I used 2 for loops and I was editing the value of the delay inside the inner loop by adding 250 millie seconds to it.
This week was hard, I have never programmed anything in low level before. I'd like to learn more about that and possibly try different low level programming languages like assembly when I have the time in the future.
Download
MakefileC Code
(C language )
I wrote another more complex code in C. The code uses a button and an LED. If the button is pressed on a long press the led will blink fast if it is a one click the led will blink slow. The code is seen below.
#include  <avr/io.h >
#include   <util/delay.h>
#define F_CPU20000UL
#define LED_PORT PORTA
#define Button PA7

int main (void){

  DDRA = 0x7F;  //set Pin 7 of PORT A as input (button) and set pin 2 of PORT A as output (LED)
  int stat=0; //define a variable that will check if the button is pressed or not, zero means the button
  //is not pressed, 1 means it was pressed

  int delaying=50; //we should add a small delay to make sure we debounce the button's status


  while (1){

   if (bit_is_set(PINA, PA7)) {
        _delay_ms(500); //delay for 1000 milie second to see if it is still high then it is a long press
        if (bit_is_set(PINA, PA7)){
          fast();
        }
        else{
          stat=1;  //set PA2 high
        }


    }
    else {
      slow();
      stat=0;
  }


 }}}}

 void fast(){  // blink led fast, the speed depends on the delay
     LED_PORT = 0x04;
     _delay_ms(100);
     LED_PORT = 0x00;
     _delay_ms(100);
     LED_PORT = 0x04;
     _delay_ms(100);
     LED_PORT = 0x00;
     _delay_ms(100);
     LED_PORT = 0x04;
      _delay_ms(100);
     LED_PORT = 0x00;
  }


void slow(){        //blink led slow.
      LED_PORT = 0x04;
     _delay_ms(1500);
     LED_PORT = 0x00;
     _delay_ms(1500);
     LED_PORT = 0x04;
     _delay_ms(1500);
     LED_PORT = 0x00;
      _delay_ms(1500);
     LED_PORT = 0x04;
     _delay_ms(1500);
     LED_PORT = 0x00;
      }
Screenshot
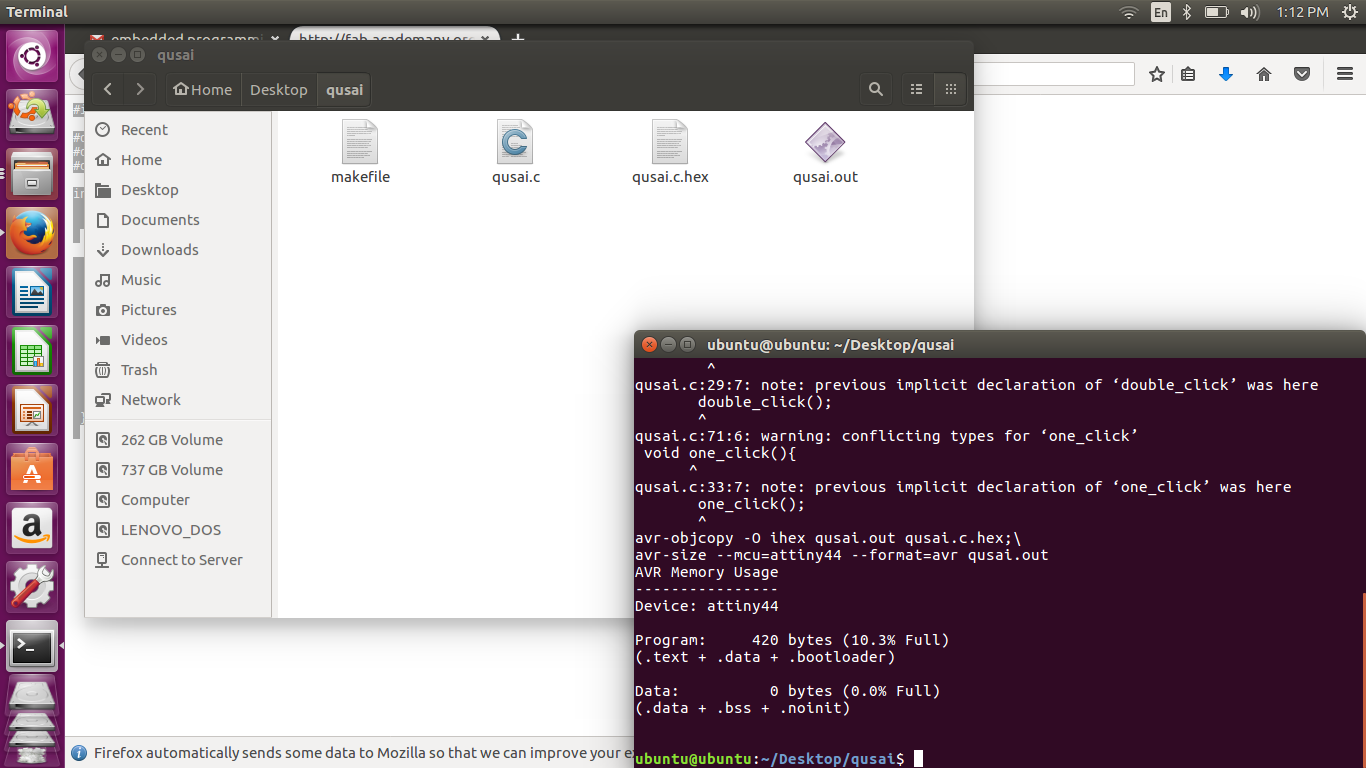

My terminal log:
    ubuntu@ubuntu:~$ cd Desktop
ubuntu@ubuntu:~/Desktop$ cd qusai
ubuntu@ubuntu:~/Desktop/qusai$ la
makefile  qusai.c
ubuntu@ubuntu:~/Desktop/qusai$ make
avr-gcc -mmcu=attiny44 -Wall -Os -DF_CPU=20000000 -I./ -o qusai.out qusai.c
qusai.c: In function ‘main’:
qusai.c:21:11: warning: implicit declaration of function ‘long_press’ [-Wimplicit-function-declaration]
           long_press();
           ^
qusai.c:29:7: warning: implicit declaration of function ‘double_click’ [-Wimplicit-function-declaration]
       double_click();
       ^
qusai.c:33:7: warning: implicit declaration of function ‘one_click’ [-Wimplicit-function-declaration]
       one_click();
       ^
qusai.c:13:7: warning: unused variable ‘delaying’ [-Wunused-variable]
   int delaying=50; //we should add a small delay to make sure we debounce the button's status
       ^
qusai.c: At top level:
qusai.c:42:7: warning: conflicting types for ‘long_press’
  void long_press(){
       ^
qusai.c:21:11: note: previous implicit declaration of ‘long_press’ was here
           long_press();
           ^
qusai.c:57:8: warning: conflicting types for ‘double_click’
   void double_click(){
        ^
qusai.c:29:7: note: previous implicit declaration of ‘double_click’ was here
       double_click();
       ^
qusai.c:71:6: warning: conflicting types for ‘one_click’
 void one_click(){
      ^
qusai.c:33:7: note: previous implicit declaration of ‘one_click’ was here
       one_click();
       ^
avr-objcopy -O ihex qusai.out qusai.c.hex;\
avr-size --mcu=attiny44 --format=avr qusai.out
AVR Memory Usage
----------------
Device: attiny44

Program:     420 bytes (10.3% Full)
(.text + .data + .bootloader)

Data:          0 bytes (0.0% Full)
(.data + .bss + .noinit)


ubuntu@ubuntu:~/Desktop/qusai$ make program-qusai
avr-objcopy -O ihex qusai.out qusai.c.hex;\
avr-size --mcu=attiny44 --format=avr qusai.out
AVR Memory Usage
----------------
Device: attiny44

Program:     420 bytes (10.3% Full)
(.text + .data + .bootloader)

Data:          0 bytes (0.0% Full)
(.data + .bss + .noinit)


avrdude -p t44 -P usb -c usbtiny -U flash:w:qusai.c.hex

avrdude: AVR device initialized and ready to accept instructions

Reading | ################################################## | 100% 0.00s

avrdude: Device signature = 0x1e9207 (probably t44)
avrdude: NOTE: "flash" memory has been specified, an erase cycle will be performed
         To disable this feature, specify the -D option.
avrdude: erasing chip
avrdude: reading input file "qusai.c.hex"
avrdude: input file qusai.c.hex auto detected as Intel Hex
avrdude: writing flash (420 bytes):

Writing | ################################################## | 100% 0.44s

avrdude: 420 bytes of flash written
avrdude: verifying flash memory against qusai.c.hex:
avrdude: load data flash data from input file qusai.c.hex:
avrdude: input file qusai.c.hex auto detected as Intel Hex
avrdude: input file qusai.c.hex contains 420 bytes
avrdude: reading on-chip flash data:

Reading | ################################################## | 100% 0.51s

avrdude: verifying ...
avrdude: 420 bytes of flash verified

avrdude: safemode: Fuses OK (E:FF, H:DF, L:FE)

avrdude done.  Thank you.

ubuntu@ubuntu:~/Desktop/qusai$
problem
I faced some problem Makefile as I set the extension for it as .txt but after investigating I figured out that there should be no extension for it and at the end it worked well.
You can download my C code here. Download
