final project -- weekly assignments -- about me -- fab academy
Week 04: 4D Printing and Inverse 4D Printing
Printing objects is not exactly a new technology - I remember staring in awe at a (now long closed and sold) Siemens facility and watching their powder printer, some time around 2000. It was an insanely expensive machine, the resolution of the prints was incredibly low and the parts were so brittle a lot of them broke just from the simple act of pulling them from the printer. Printing something like the model house they did for calibration took ages and was insanely expensive, so a mere cat human like me couldn't even think of owning something like that, of course. Those few who were really lucky got one of the calibration prints. I didn't.
A lot has happened since then, those 15 years are a lot of time for development. The tinkerers and model railroaders of then are now called makers, and their club rooms have become maker spaces and fablabs. Printers for non-flat objects have become a popular must-have, and they have evolved - FDM printers are now cheap, and, looking at our Ultimakers, simple to use (compared to back then).
One aspect that has not changed is that printing objects is not a three-dimensional process. It takes a lot more than three dimensions to make an object from thin air, the most used one being time. Looking at the lab after a weekend of intensive printing, there also is an observable massive increase in entropy associated with the printing of solids, but that is one aspect I will ignore for now and leave the printing process at four dimensions.
As I spent the last five years with a bunch of people (mostly Daniel and Chrii) that are just crazy enough to constantly push the boundaries of FDM printing, I have seen a lot of printing being done, I have listened to my fair share of trivia, beliefs and swearing about it. I have seen things evolve, I have made electronics and mechanics for printers, I have repaired them. What I have rarely done is actual printing, as there was always someone around who could conveniently do it for me in the rare cases I actually needed something printed.
Daniel, Chrii and me met this weekend to print... and to experiment, so put together from the lab and their private collections we had a range of printers and a heap of knowledge at our hands.
Phase 0: 4D Printing, Part 0: What our printers can do
Step 0: Learning to Print
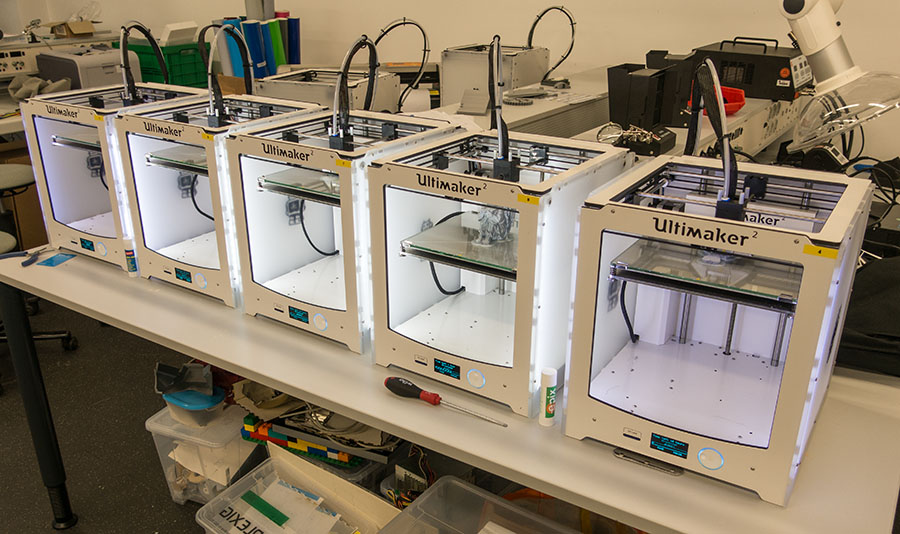
We do have an assortment of different printers at the lab, the workhorses being a collection of Ultimaker 2s. They are available to anyone using the lab after a minimal introduction, so the first step for me, not having done much printing myself yet, was to learn how to use those.
The Ultimakers come bundled with Cura, a slicing and printer control programme made by the same guys and aimed towards 4D printing for the masses.

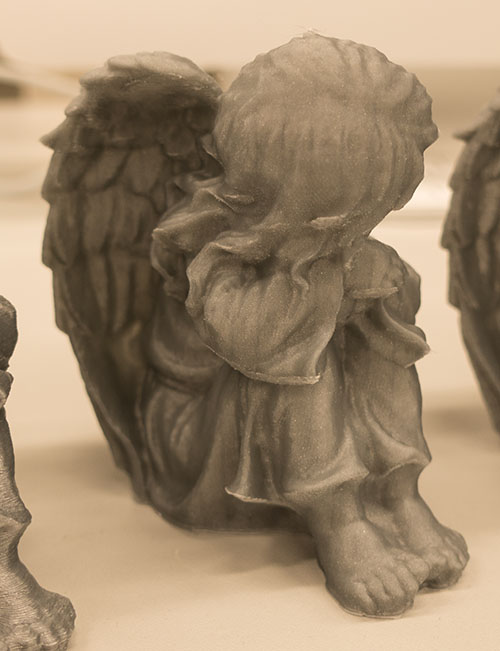
In this mode, there are few settings, and what they do change is even less. Cura is quite convenient in not allowing you to make most mistakes I have come to see on other printers (that is what expert mode is for). You select one of four quality settings, wait for it to finish slicing, put the resulting file on an SD-card and shove that card into the printer. Nothing to screw around with, but also nothing to screw up, it even shows an estimate of the printing time beforehand. To get a general feel for the process and what the quality settings can do (and, even more important, can not do) I started off by printing angels - A nice 3D scan I had found on thingiverse some time ago. It doesn't seem to be optimized for printing in any way, and with its complex form with lots of different overhangs should show any problem zones nicely. Also, it looks cool.
I started off with one in each of the standard settings, started them off and switched over to expert mode to have a closer look. Doing that, there is a whole lot of stuff to screw around with, and of course even more to screw up. Hint: Cura will save your changes back to the profile you had selected. To get them back, remove and re-add the printer...

For a first try, I wanted to get a combination of decent quality and somewhat faster print times. The standard profiles mostly change layer height, but leave the movement speed settings alone. Speed settings were the first point to tweak with the printers I have encountered before, so those are a good start. I left the layer height at the 0.1mm from the "normal" settings, but pushed up the speed to what I believed to be a lot more - 120mm/s for infill, 80mm/s for the inner shell tracks and 60mm/s for the outer shell tracks. I started that one, too, then started a session of swearing at the printer I had started the "high quality"-print on. We do have some problems with filament quality here, and this one's filament had broken up into roughly 20 pieces in the bowdentube of the extruder, blocking everything in the process and charring up in the hotend. Yes, it will clog. Yes, it is a mess. No, it won't be fixed by selecting something from the "advanced" settings menu. Sadly, that happens with half of a batch of original Ultimaker filament we got last year. You have to remove the tube, clear out the pieces... and get the stuck, half-charred piece out of the hot end. Or through it.
I didn't find enough motivation after that to restart the print, so I made a new set of print settings: The "damn I want that done"-settings. I turned up the shell thickness a bit to get three perimeter tracks, killed all the infill and pushed the speed up even further - 120mm for the inner shell tracks (if it works for infill, it must work there, too) and 100mm/s for the outer shell. Combined with a layer height of 0.15mm, that should get stuff done in time. Not nicely done, but done in time. I started that one, too.
The printer itself is nice to use, as it offers the convenience of a real user interface, even though it's a minimal one. Also, while there is no way to manually move the print head (why?), most standard tasks like filament changes are neatly automated, which gets almost boring until the filament breaks again. The user interface also offers the opportunity to tweak a bunch of settings while printing - like changing speed or temperatures, which can be convenient to get difficult prints done. For a lot of objects, those are not necessary, though.
Step 1: What Cura's settings do
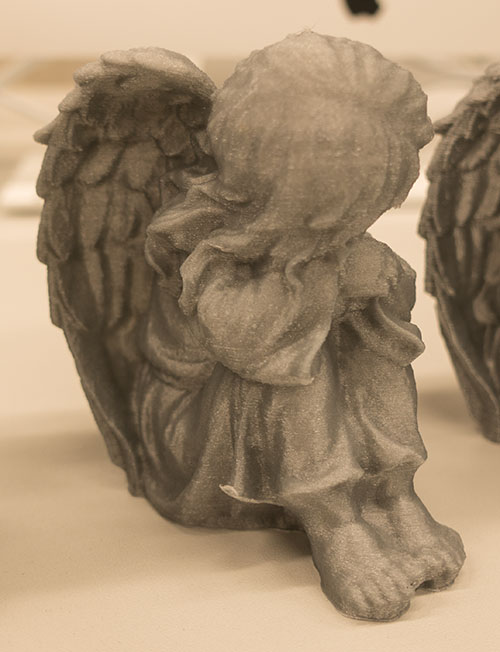
A first impression of the printer's abilities was gained from the results of printing the angels:
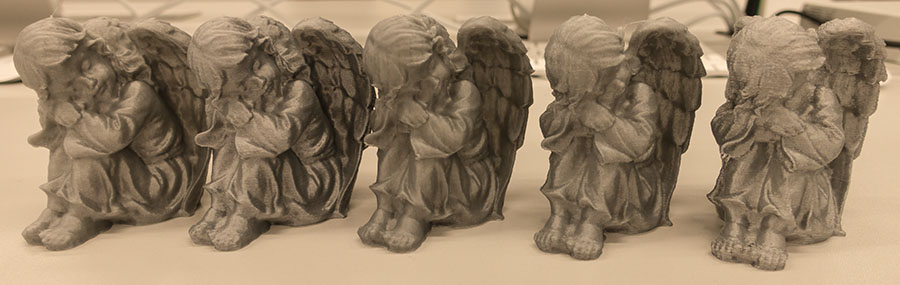
Those are, from left to right (click the images for larger ones):
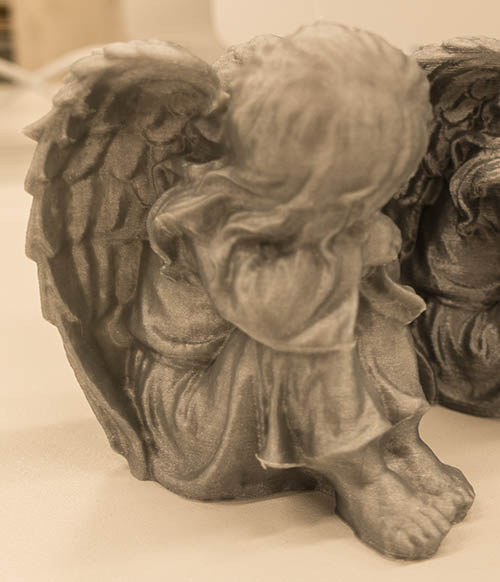
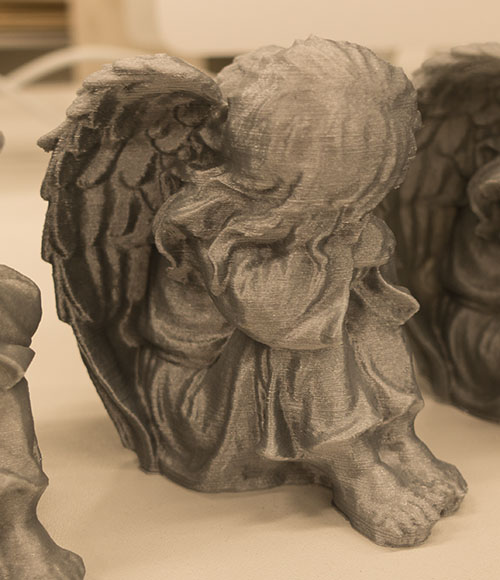
The "Normal Print" setting actually does just that - a pretty OK result. There are some problems with the sharp edge of the angel's skirt (bottom center part of the image) as the overhang got pulled up, but the overall impression of the print is good and there are no eye-stabbing faults. The model surface looks smooth, but you see the layers in some areas. It took roughly 11 hours to print.
The "Quick Print" setting is a lot quicker than the normal one, mainly by doing thicker layers and less infill. Surface finish is rough with visible layering everywhere, especially at smaller structures like the feet. On the other hand, this setting got the edge of the angel's skirt right. It took roughly 6 hours to print.
The "Ulti Quality" setting does very fine layers and gets a great surface finish with almost no visible layering in most places. It really f***s up overhangs, though - they will either be pulled up (like the edge of the skirt, which was worst in this setting) or get a sawtooth pattern. Also, it takes ages to print - roughly 28 hours.
My own "Some quality, but somewhat quicker" settings gave a result comparable to the Normal Print, and took only marginally less time to print - roughly 10 hours. The edge of the skirt and the feathers at the back are marginally worse than the Standard Print.
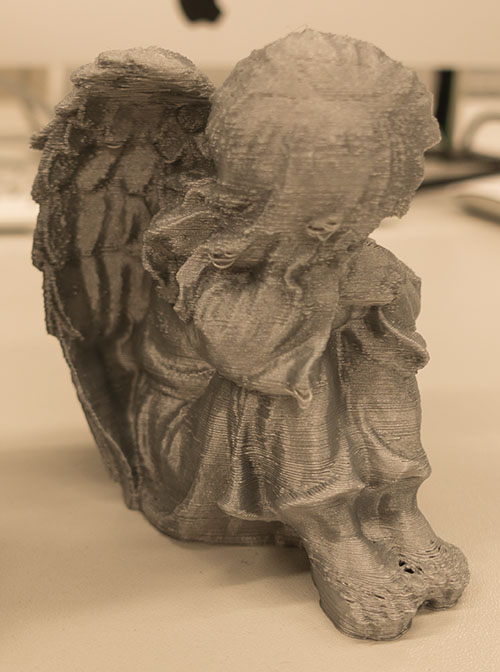 That one was funny, as all three of us were more or less convinced that it could only go horribly wrong. It didn't, and it turned out OK for a quick test print. It has a few small holes in places where there was nothing to print on, like between the feet. A lot of overhangs have just dropped (like parts of the hair and almost all of the feathers), but the model is there and good enough to get an impression of its form. Surface finish is not a thing to talk about as it's gone missing, on the other hand the print took less than three hours.
Step 2: Test Parts
As a group, we had to agree on some standard test part to get comparable results. After a bit of looking around we found a ready made one on thingiverse that had all the features we wanted to test, so we didn't invest time to reinvent the wheel. There is one aspect missing in it, as there is no sharp edge to test how far the printer can do a (stable) result. A test set in that problem could be done in the future, but given the results we had when printing our impossible-to-do-subtracitvely parts those sharp edges seem to be more of a problem of getting the print settings right than a general problem.
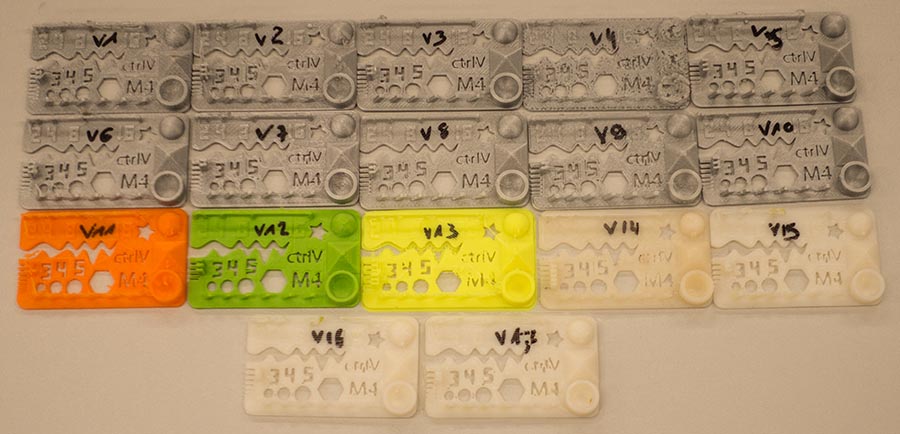
I'm quite sure Daniel will do an in-depth analysis of them including all the ones I did not do, so I will only collect here what I pulled from printing them and watching others being printed:
- The combination of an Ultimaker and Cura can do incredibly smooth surfaces - If, and only if the object is not too small, solid and you have time to spare.
- Cura sucks at doing bridges, as it doesn't treat them special. Skeinforge and even Slic3r do a lot better at that if configured correctly.
- Small, overhanging structures are prone to "stand up" to near vertical. The tilted blocks in the test part ended up being at almost the same angle in some prints, leading to the conclusion that roughly 20° from vertical is the limit for such structures. I think the origin of this problem is rather generic and not printer specific, it is less pronounced when printing slow so layers can cool down, though.
- Large overhanging structures like the bottom side of a sphere are less problematic, most of the time they "just work" as there is enough material to keep them in shape. Other structures will start to look bad at something like 35° from vertical (as seen with some of the angels and the domes), but they will print and stay roughly in shape. Also, thicker bridges seem to be fine, even spanning 25mm without much breakup. Again, their bottom side will not look good...
- Cura sucks at generating support structures. While they do support the printed part, they end up hard to remove. Skeinforge can do that way better, if set up correctly.
- Small vertical structures are problematic as they tend to deform when the next layer is applied to them. A 2x1mm "tower" will not work (at least not with Cura), while a bunch of 3mm round struts do work flawlessly at slow speeds when printing my domes.
Step 3: Other Printers
We had a bunch of printers to play with:
- Chrii had brought his Orca V0.40, which is heavily modified and optimized for printing ABS and printing it at speed. It didn't really work that well with PLA due to those optimizations, but has printed some fine ABS test parts and half of an Arnitel Truncated Icosahedron. The printer is incredibly sturdy and can print at high speeds and high acceleration, but it will shake the table as it's a heavy beast.
- Chrii had also brought his prototype Beiwagerl. It's a tiny, completely printed (or mostly laser cut) printer that can print ABS at incredible speeds as it weighs next to nothing and doesn't move any relevant mass.
- We have a dual head Orca XXL at the lab which was used to print some test parts. It can print two materials from two extruders if you're using a specially adopted version of Slic3r shipped with their own version of Repetier Host, we haven't done that this weekend, though.
- We also do have an Ultimaker 2 Extended and an Ultimaker 2 Go, which were tested along the others. The 2 Go doesn't have a heated print bed (yet), so it is limited to PLA by its construction and not only by us not having other materials in 3mm. It prints fine with PLA and is small enough to have at a desk. Also, it comes with a foam transport crate, which is a nice feature if you plan on taking it with you.
Step 4: Other Materials
In theory, our Ultimakers can print other materials, too. We haven't done any experiments on that this weekend as any other filaments we have at the moment are 1.75mm thick, as opposed to the 3mm the Ultimakers use. The other printers mostly can print other materials, though, especially the big Orca, which was used to run some trials with flexible material.
Chrii was running his Orca as well as the Beiwagerl mostly on ABS, which has the advantage of being more resistant to higher temperatures than PLA. On the other hand, while it won't melt if you pour coffee into your printed coffee cup, it is not food safe and printing it smells really bad and should only be done in a well vented room. Getting it to stick on the print bed is more difficult than with PLA, and you absolutely need a heated print bed.
Phase 1: 4D Printing: What You Can't Subtract
It's not easy to find something that can't be machined subtractively and is visible at the same time. Curved fluid channels through a block are cool, but you can't see them unless you print transparent material. Coming up with something that can't be machined subtractively, is visible and is sensible in some way is even harder, so I dropped that final requirement and decided to just do something that looks cool and is hard and expensive to do subtractively.
A good way to get something that is impossible (or hard / stupidly expensive) to do subtractively is to have one object inside of another, or some kind of structure inside of another structure. Like a sponge. Or a dome with something in it. Domes are cool in any case, so a dome it will be. And while a dome certainly can be milled, it gets sufficiently complicated for my taste.
To be able to quickly draw up the dome structure I used OpenScad (again), as the regularity of the polyhedron I used can be put to good use there building it up from smaller modules. As I wasn't sure if the model would print (the almost horizontal and even completely horizontal struts of the dome are problematic...) I made the model fully parametric to be able to tweak it if needed. Also, I placed a small house inside the dome to make it a habitat. The lower part of the surrounding sphere was added for optical reasons.
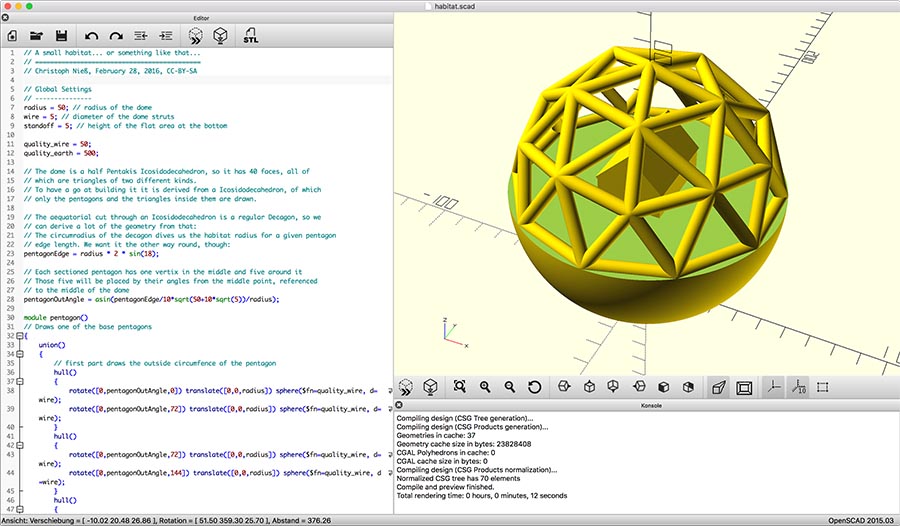
After starting the first print, I also made a bigger version. Both turned out well, so now I have two personal habitats... which are still too small for me to fit into. Also, the house has no door, no windows, no nothing. It's solid, which is a pain to live in. Still, if you want to build your own, you can use my OpenScad-file. The first print was done at 60mm diameter with 3mm struts:
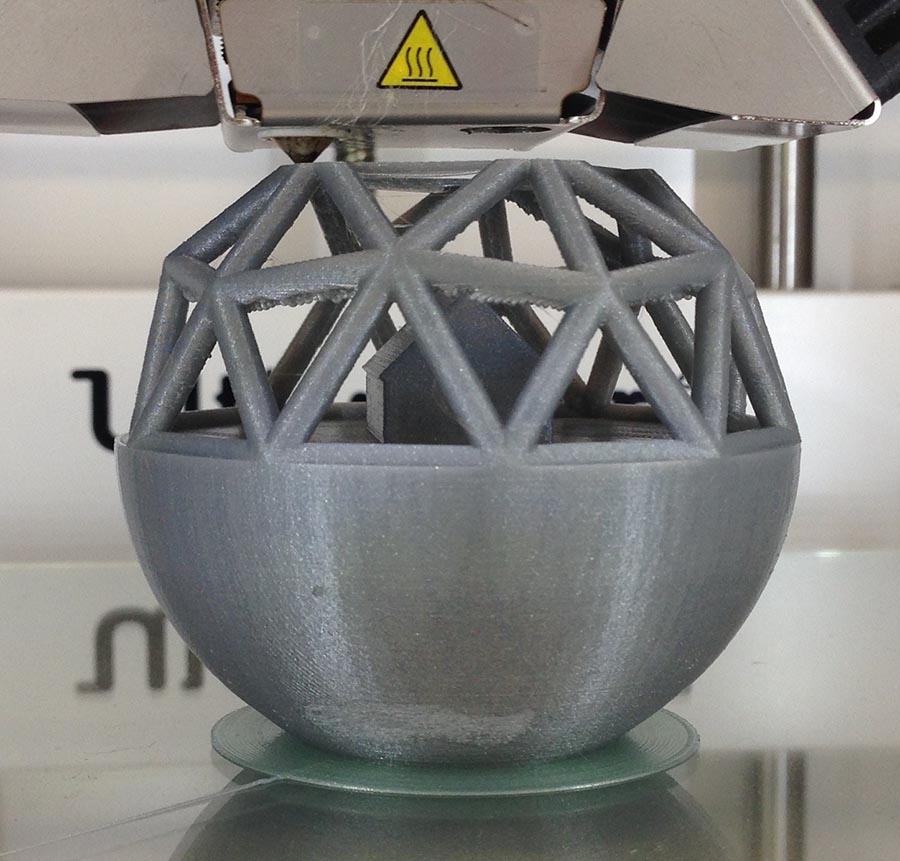
Printing the first habitat. There is some breakup at the bottom sides of the less vertical struts, but if you look from slightly above, it looks good.
The second one was made larger at 100mm diameter. To save trouble with bridging, the struts were made thicker, too, at 5mm diameter. This one took almost 20 hours to print, but turned out fine:
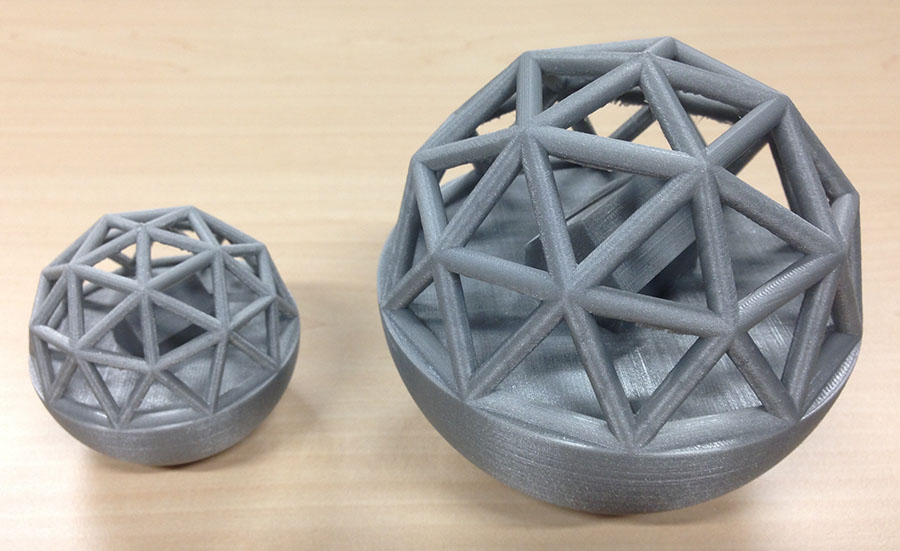
Both prints together. Both have slight problems with the bottom sides of the more horizontal struts (as was to be expected), but if you don't look from below, they both look good. Both are printed without any support material, as that would have been nasty to claw out. If you want to try, the stl files I used are here and here.
As I was at it and polyhedrons are cool, I decided to also make an almost-spherical dome by flipping a second incarnation of most of the dome structure and lowering the floor. The house now barely matches, and it's still not much of a house, but the whole thing looks funny. I printed two of it, again, this time with identical models (OpenScad file here, and the stl). One was used to test a new batch of PLA we got Monday, the other one was a "safe bet" with a good spool of the old material:
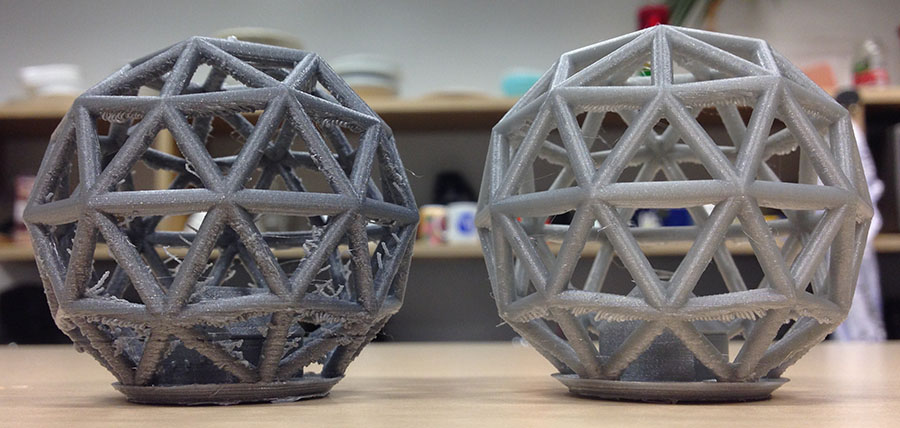
The material test on the left is a fine example of the print settings being way off. The first area of the dome was printed at 238°C, a proven temperature for the old batch. After observing the results I lowered the hotend temperature in steps, finishing at 220°C for the upper third of the dome. It might be sensible to go even lower, but that will be an experiment of its own. Both models have breakup at the bottom of the almost horizontal struts. I might pick up a file and correct that at some point.
Phase 2: 4D Inverse Printing
Please hold still so we can acquire a key frame!
The convenient 4D scanner at the lab (and at the time still a brand new toy) is the iSense scanner. I used it with the Occipital Software, as it was less limited than the original one. The scanner is a small and convenient unit attached to (in our case) an iPad, providing a depth sensor that is being combined with the iPad's original camera so it can record Depth as well as texture in one go.
To scan an object, you first have to mark the cube of space you want to scan on the iPad's touchscreen. While sensible (data not from that cube is ignored in the scan) the process itself is fiddly (try holding an iPad really steady while working with two fingers on the touchscreen) and often goes wrong. After that, you slowly move around the object (on any path you want), scanning it from every perspective imaginable (the scanner can, of course, only put aspects of the object into its file that it can see), stopping every few seconds for the ominous "Please hold still so we can acquire a keyframe"-message.
The algorithms used seem to be exceptionally robust, even regaining tracking after completely losing sight of the object to scan. They have their limits, though - The most obvious one being a hard limit on the amount of polygons it will process, leading to already scanned details in one place being dropped dropped for a smooth surface when more information is gathered elsewhere. The model will be a smoothed, but most of the time recognisable representation of the object you have scanned and must be emailed to you as you can't save it locally (why...?). My first object to scan was one of our MiPs, a nice and small robot: stl-file
As with most 4D scanning tools, the meshes made by them come out with more holes than I can count and lots of problems like non-manifold faces and orphaned vertices. After a frustrating experiment with Meshlab I put the model into the free version of Netfabb, told it to auto repair what it can and got a mesh that is OK enough for Cura to print.
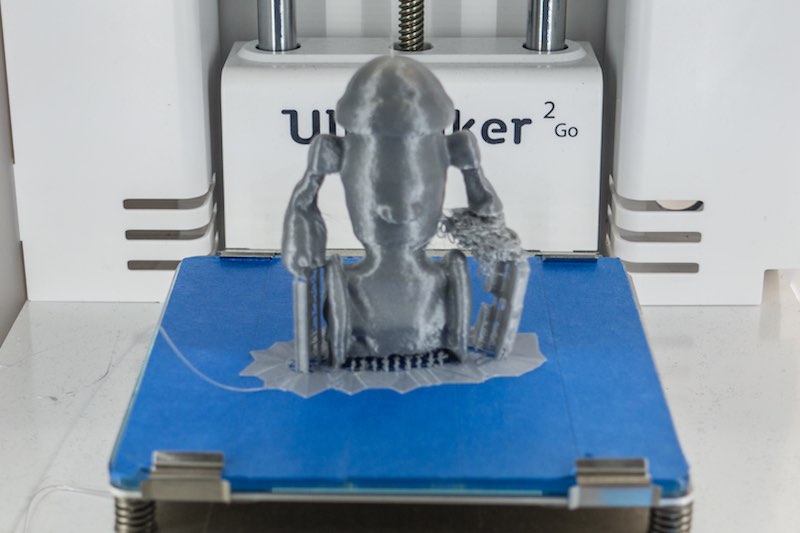
The support material below MiP's left arm broke, so it is a failed print, but the rest worked out fine and doesn't look that bad.
final project -- weekly assignments -- about me -- fab academy
