final project -- about me -- weekly assignments -- fab academy
A grabby machine!
More thoughts on my placer concept, just theory at this point, though. Also, I ordered some more stuff to play with, which might (or might not) be fun. Not much time to do anything, though, as I am off to an electrical safety course this week and have a conference to prepare stuff for.
Grabbing theories
Most parts of a placer are fairly straight forward and can be adapted from other machines - Getting from point A to point B can be done by almost any CNC machine, either by manual input or by programming. We're not moving large weights and need almost no lateral force, so mechanics and drives from 3D printers should be a good match. Turning stuff so it is oriented right on the PCB is no problem either, a lot of robots have axis like that that could be adapted. What is hard to do is actually grabbing components to take them with you.
Vacuum
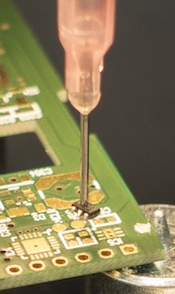
A lot of commercial placers use vacuum and a variety of metal or rubber nozzles to pick up components. It's so common manufacturers even include clip-on pieces to get that horizontal top surface with stuff like receptacles. One problem, though, is that it's quite hard to build - vacuum tends to leave at the first opportunity, and even small leakages will immediately lead to dropped components. Dropped components are the path to the dark side. Dropped components lead to anger, anger leads to hate, hate... leads to smashed placers.
Also, vacuum pumps are loud, most of them rattle, vacuum valves are tricky to build (or expensive to buy) and getting a good vacuum connection to a head that can turn 360° is not a nice thing to do in the limited time frame of a final project. Not to mention Neil told me in no uncertain terms that the idea might be stupid. Which would be all the reason needed to do it anyway, if only I had the time. So, other ideas will have to be tested. I'll try (and fail) to do the vacuum way at a later point in time, as others already have done. I bought a small membrane pump to play around with, though... it was cheap.
The components shotgun
If you cannot suck up parts to lift them, why not just push them around, maybe along a tube or chute, and drop them in place? The idea of just dropping a component down a chute looks nice and easy, and I haven't given up on it as it just sounds too nice to not do. I don't see a way to get stuff into place precisely enough, though. For larger stuff it might work, but I'm trying to do the opposite here - A placer for stuff that is too small for the placer we have. So, this one is out, at least until I get that one great idea to make it work.
Give me a hand!
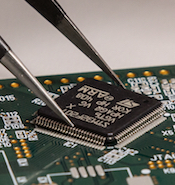
Another idea I had almost ruled out was to use tweezers. When placing components by hand, that's just what I'm doing most of the time - pick up a pair of tweezers (matching the size of the components... or not, if we don't have matching ones at the lab), use them to grab the component and drop it in place. For some components, a little additional shoving to press them into the solder paste can be good, for others, a little shoving to adjust them onto their pads can help. It's a straight forward process, but even with a microscope, it's neither good for your nerves nor for your back.
Tweezers can be motorized, though - so while still flexible (we want to neither crush nor drop components) they could grab stuff at the press of a button. And, with a few more mechanical pieces, they could support a really large range of components. Or just be changeable with a tool changer. Getting them to grab at a predefined force shouldn't be too hard by just using flexibility - a springy pair of tweezers should end up at a rather precise grabbing force when closed a certain amount too far somewhere at the upper end.
So, one of the next steps will be to build a set of "digital tweezers", which should be rather straight forward in itself. A cheap pair of tweezers, a small geared motor and a screw to linearise the movement should be enough. I'll order motors over the next few days, anyway (for playing around with servo stuff), so as soon as those are here, I'll hack together a prototype.
To fix, or not to fix...
Another difference from "normal" fablab machinery is that a placer needs to handle PCBs, so they need to be fixed to it. I want my components to stay in place after I put them there, so double-sided tape is out of the question (that might be good for some great youtube moments, though). Also, I want to do double sided boards, so just putting them on a piece of wood is out, as is a vacuum table or other fancy stuff.
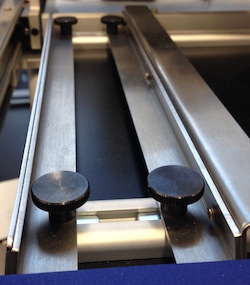
Our lab placer uses a metal clamp to fix boards in place, and it works reasonably well. So, building one is a good backup plan, but I don't really like it that much. First, horizontal clamping will only work on multiple board if they are the same size. I'm building a placer for prototype boards, so while I may do two or three of a type, I will most probably also have more than one type of board to do at the same time. Also, I don't really like the idea of clamping boards that might be made from soft stuff, very thin or otherwise fragile.
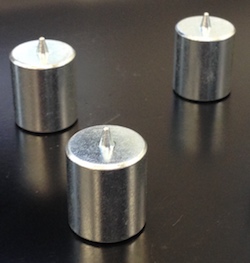
Those little stands that came with our lab placer do look intriguing, though. They're meant to support larger boards, putting them below the board with the board ending up on the tips. Placing a board with mounting holes over those tips and trying to stuff it won't work, as the placer can't go that low... Nothing keeping me from doing that differently, though. I really like the idea of having a bunch of those little things, placing them appropriately on a piece of sheet metal (they have magnets in their bottoms) and just putting boards on top of them. For boards without mounting holes, just using more than four of them to "cage" the board should work, too. And they're not hard to make.
Dimensions...
For any machine, some physical facts have to be established first before thinking about automation. In my case, this plan will remain rather soft for now, with a lot of values subject to spontaneous change. Those are a starting point, though:
- I want to have an area for PCBs of roughly 150x200mm (This one is rather soft...)
- I want the placer to move at up to 150mm/s (not by hand, but when travelling to set coordinates, to shorten waiting times) (This one is rather soft, too - If I can't make that, it doesn't really matter)
- The placer head (or a possible dispenser unit) are rather light, I estimate them to be below 250g
- Movement has to be precise: A 0402 housing is 1.0x0.6mm small, and I want, in the long run, to place even smaller parts than that (0201 at 0.6x0.3mm?). I want to have a "movement step" of less than 0.02mm to be able to still place those not only in the right area, but onto their pads.
User interface
At this point, the user interface doesn't have that many features to define, but it has to allow for:
- Sending the placer to a set of coordinates, ideally by clicking into an image of the working area, to quickly move it to the right area
- Precisely placing a part by manual input
It will need two modes of operation to do all of that, and the mode change should be automatic.
final project -- about me -- weekly assignments -- fab academy
